SQL Databases
In the 4th week, we will leverage the capabilities of Structured Query Language, a powerful tool for working with databases. The sophisticated system will function as the repository for user profiles, seamlessly integrating their platform activities which encompass Create, Read, Update, and Delete operations.
Through this exploration, we aspire to deepen our understanding of how databases intricately manage user interactions, thereby augmenting our practical skill set in a significant manner.
Week Four Main Tasks
- Pathways to Success In Databases
- Opting for PostgreSQL
- Amazon Relational Database Service
- PSQL for Everyone
- Bash Scripts for Database Operations —
5 Steps - Simplify Connecting To PSQL
- Connecting to AWS RDS Instance in Gitpod —
7 Steps - Implement PostgreSQL Flask Client —
6 Steps - A Database of Experiences
- Additional PSQL Reference
Pathways to Success in Database
I am surpassing my initial expectations with this section, and I am creating a clear path for you, driven by my affection towards you.
DBAs are more concerned with the technical aspects of database management and maintenance, while Data Analysts focus on extracting meaningful insights from the data for decision-making purposes.
Create a Diagram Like This One. (opens in a new tab)
journey
  title Database Management Office Hours
  section Designing Tables
    Define schema: 5: DBA
    Create indexes: 3: DBA
    Optimize queries: 1: DBA, Analyst
  section Data Manipulation
    Insert records: 5: DBA
    Update entries: 3: DBA
    Analyze data: 1: Analyst
  section Maintenance
    Backup data: 5: DBA
    Monitor performance: 3: DBA
    Fine-tune system: 2: DBA
If you possess a keen interest in the realm of data, I recommend embarking on a trajectory that starts with assuming the role of a Data Analyst and subsequently progressing through the ranks to eventually become a Data Administrator, Engineer, and ultimately an Architect.
| Role | Responsibilities |
|---|---|
| Data Analyst | Data Manipulation Analyze Data: Extract insights and patterns using SQL and analysis tools. |
| Database Administrator | Designing Tables Define Schema: Design efficient database schema with tables and relationships. Data Manipulation Insert Records: Ensure data integrity during record insertion. Update Entries: Enforce data constraints during updates. Optimizing Queries Optimize Queries: Enhance query performance using indexes and analysis. Maintenance Backup Data: Perform data backups for recovery. Monitor Performance: Identify and resolve performance issues. Fine-Tune System: Optimize system resources. |
| Data Engineer | Data Management ETL Processes: Develop and manage Extract, Transform, Load (ETL) processes. Data Integration: Integrate data from various sources into cohesive pipelines. Infrastructure Data Storage: Design and manage data storage solutions. Data Transformation: Develop data transformation logic for analysis and reporting. Data Quality Data Cleansing: Ensure data quality and consistency. Data Pipeline Monitoring: Monitor data flows for accuracy and reliability. |
| Data Architect | System Design Architect Data Solutions: Design scalable and efficient data architecture. Data Modeling: Create advanced data models for complex business needs. Leadership Team Collaboration: Lead data teams, aligning efforts with business objectives. Technology Selection: Evaluate and select appropriate data technologies |
You can follow the path I outlined, founded on trust and practical expertise. Drawing from my firsthand experience in working with data and effectively leveraging Google Cloud, Azure, and AWS services for substantial big data and machine learning projects, you can have full confidence in the credibility of this roadmap.
Each role builds upon the previous, culminating in an enriching journey marked by both personal growth and impactful contributions to the world of data management and analysis.
| 💡 | I can direct you towards a range of tech, Incl. Amazon Redshift, BigQuery, and Google Looker (opens in a new tab). |
|---|
Opting for PostgreSQL
PostgreSQL is a top database engine in the market for a reason. It offers a wide range of powerful features, it is reliable and robust, and it has a large and active community of users and developers.
- Open source and free: It is freely available to use, modify, and distribute.
- ACID compliance: PostgreSQL guarantees that all transactions are atomic, consistent, isolated, and durable.
- JSON and XML support: The engine supports the JSON and XML data types, which makes it a good choice for applications that need to store and query semi-structured data.
pie
"Advanced Features" : 40
"Robustness and Reliability" : 35
"Community Support" : 20
"Extensibility" : 25
"Standards Compliance" : 30- Full-text search: PostgreSQL has built-in full-text search capabilities, which makes it easy to find data within large datasets.
- Replication and clustering: PostgreSQL supports replication and clustering, which makes it possible to scale the database to meet the needs of growing applications.
Our initial steps will involve creating the database, establishing a connection to it, and subsequently outlining a schema that aligns with the specifications mentioned earlier.
Amazon Relational Database Service
RDS is a cutting-edge cloud-based solution that has revolutionized the way databases are managed and hosted.
RDS offers a seamless and efficient way to host, manage, and scale relational databases like PostgreSQL without the need for extensive infrastructure management. We'll integrate this database to facilitate CRUD operations, enabling us to store user posts seamlessly.
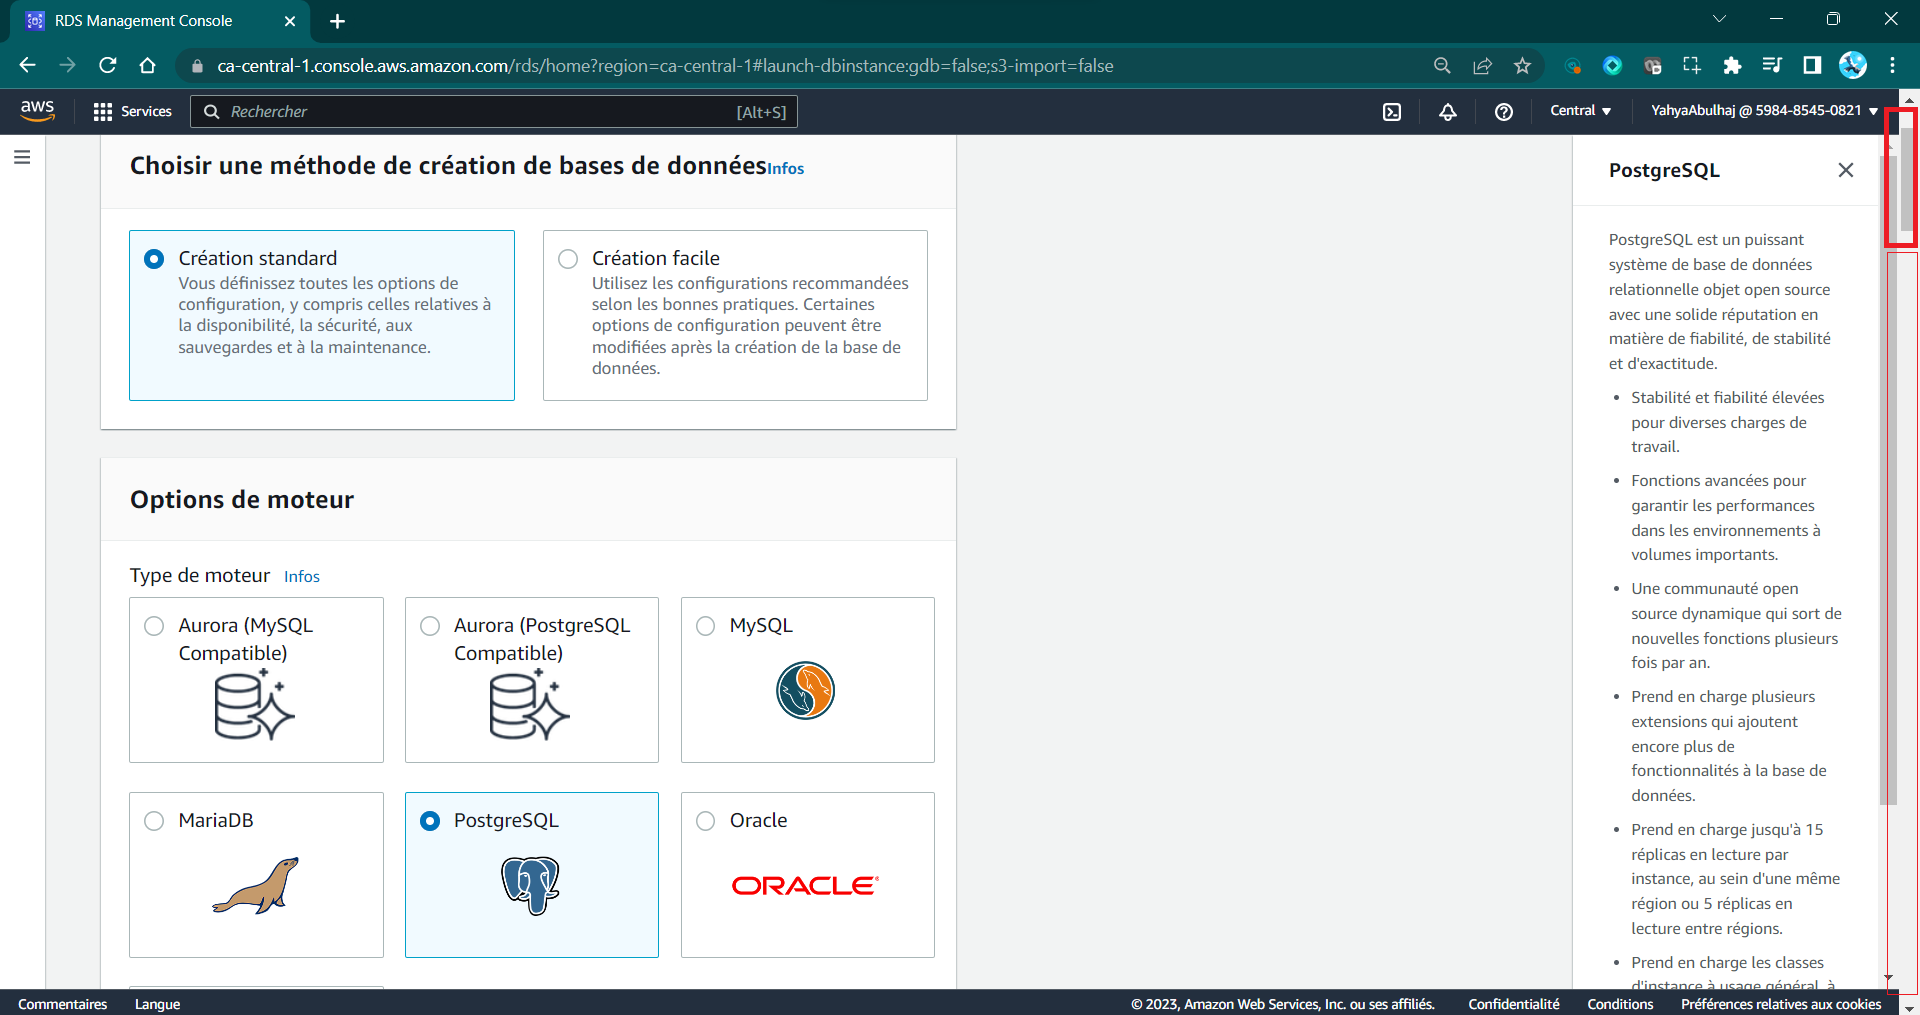
Creating an RDS Instance in AWS Console
Navigate to the console for further insights into the workings of RDS.
- Go to the RDS section in the AWS Management Console.
- Click the
"Create database"button. - Choose
"Standard Create"and select thePostgreSQLengine. - Specify a unique identifier for your DB instance.
- Configure instance details, such as class, storage, and VPC settings.
- Set a secure master username and password.
- Configure network settings and enable
"Publicly accessible". - Provide a database name and choose a port.
- Enable
Performance Insightsand set a retention period. - Set backup retention to
0and disable deletion protection. - Choose storage type and enable encryption.
- Review and create the instance.
- Monitor creation progress on the RDS Dashboard.
DB instance created:
Instance ID: `cruddur-db-instance`
Engine: `PostgreSQL`
Instance Class: `db.t3.micro`
...
Status: `Creating`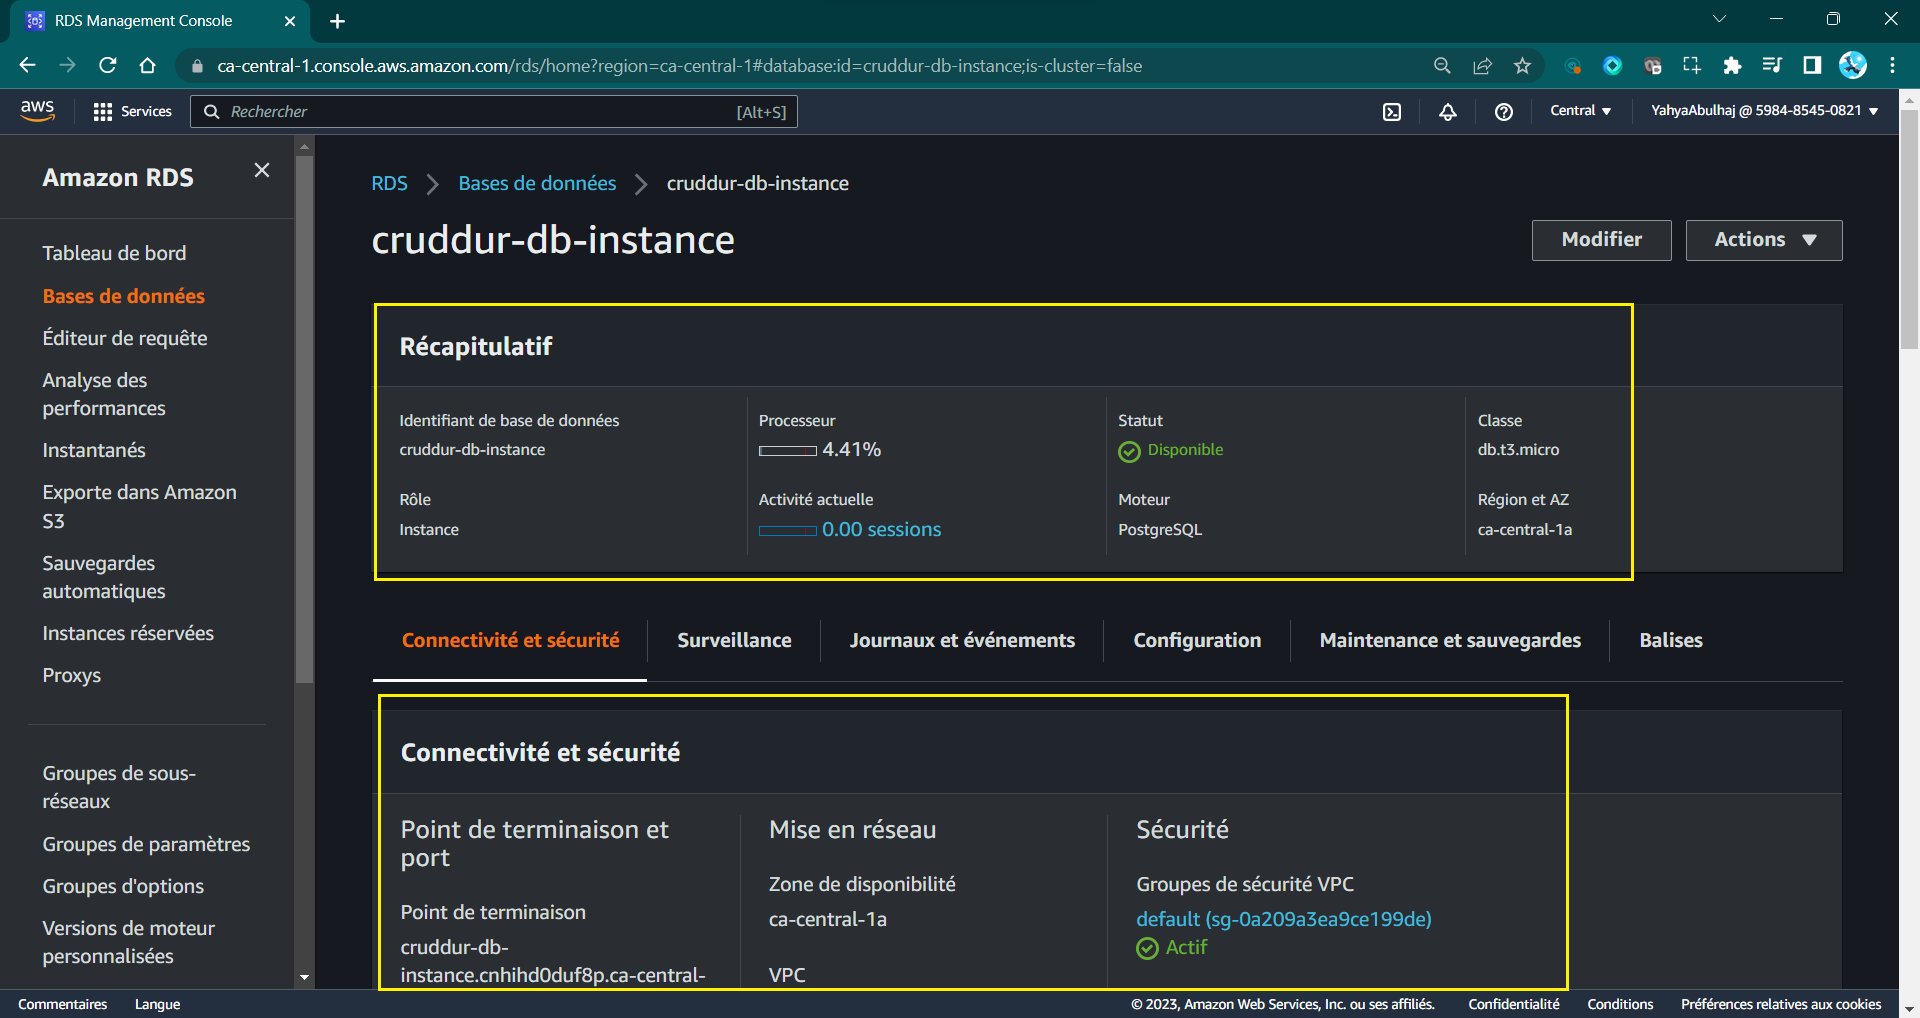
Creating an RDS Instance in AWS CLI
The preceding clicks were meticulously crafted within a solitary command-line prompt, encompassing all operations within distinct flags with this synopsis. (opens in a new tab)
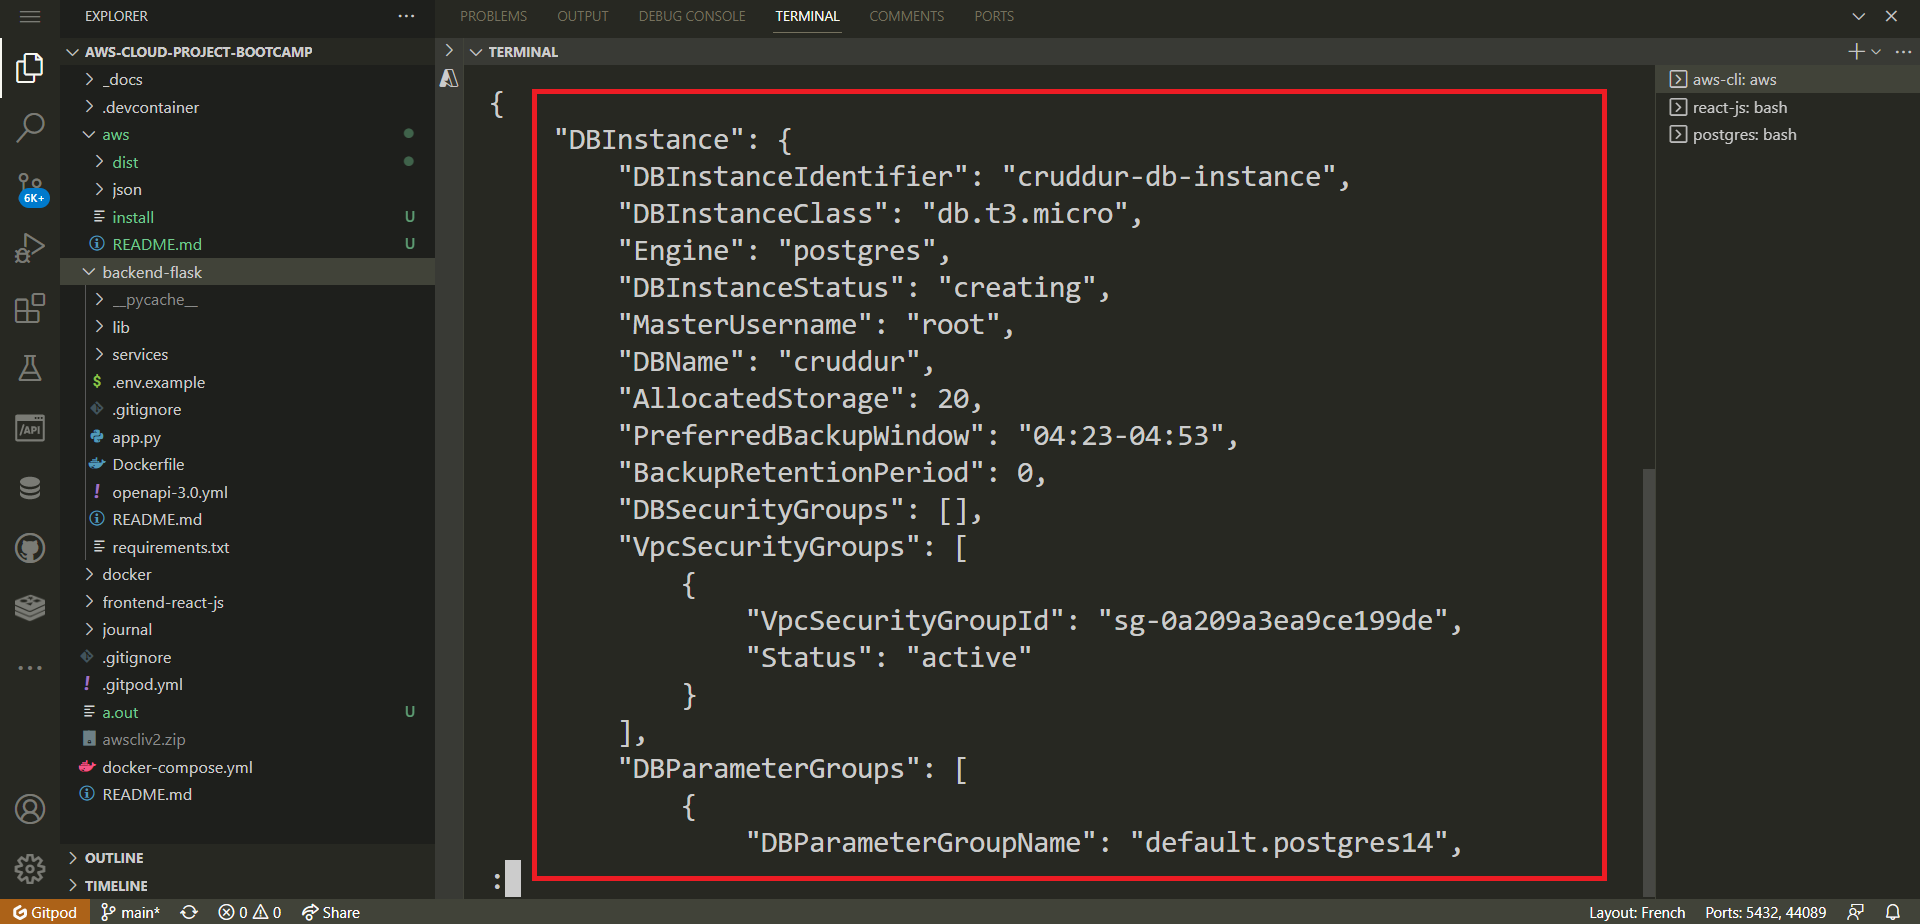
- Duplicate the provided CLI command and carefully examine the required areas.
aws rds create-db-instance \
  --db-instance-identifier cruddur-db-instance \
  --db-instance-class db.t3.micro \
  --engine postgres \
  --engine-version  14.6 \
  --master-username <required> \
  --master-user-password <required> \
  --allocated-storage 20 \
  --availability-zone <required> \
  --backup-retention-period 0 \
  --port 5432 \
  --no-multi-az \
  --db-name cruddur \
  --storage-type gp2 \
  --publicly-accessible \
  --storage-encrypted \
  --enable-performance-insights \
  --performance-insights-retention-period 7 \
  --no-deletion-protection
Required
- Choose a
master-username master-user-passwordwith a length between 8 and 30 characters.- Change
availability-zonewith yours
| ⛔ | RDS operates on EC2 and can only undergo a temporary suspension for up to seven days. Beyond this period, it will automatically resume. |
|---|---|
| 💡 | Proceed with a momentary halt of the RDS instance and remember to establish a notification for its automatic restart in seven days. |
- Access AWS RDS, navigate to the "Databases" section, and select the desired database entry.
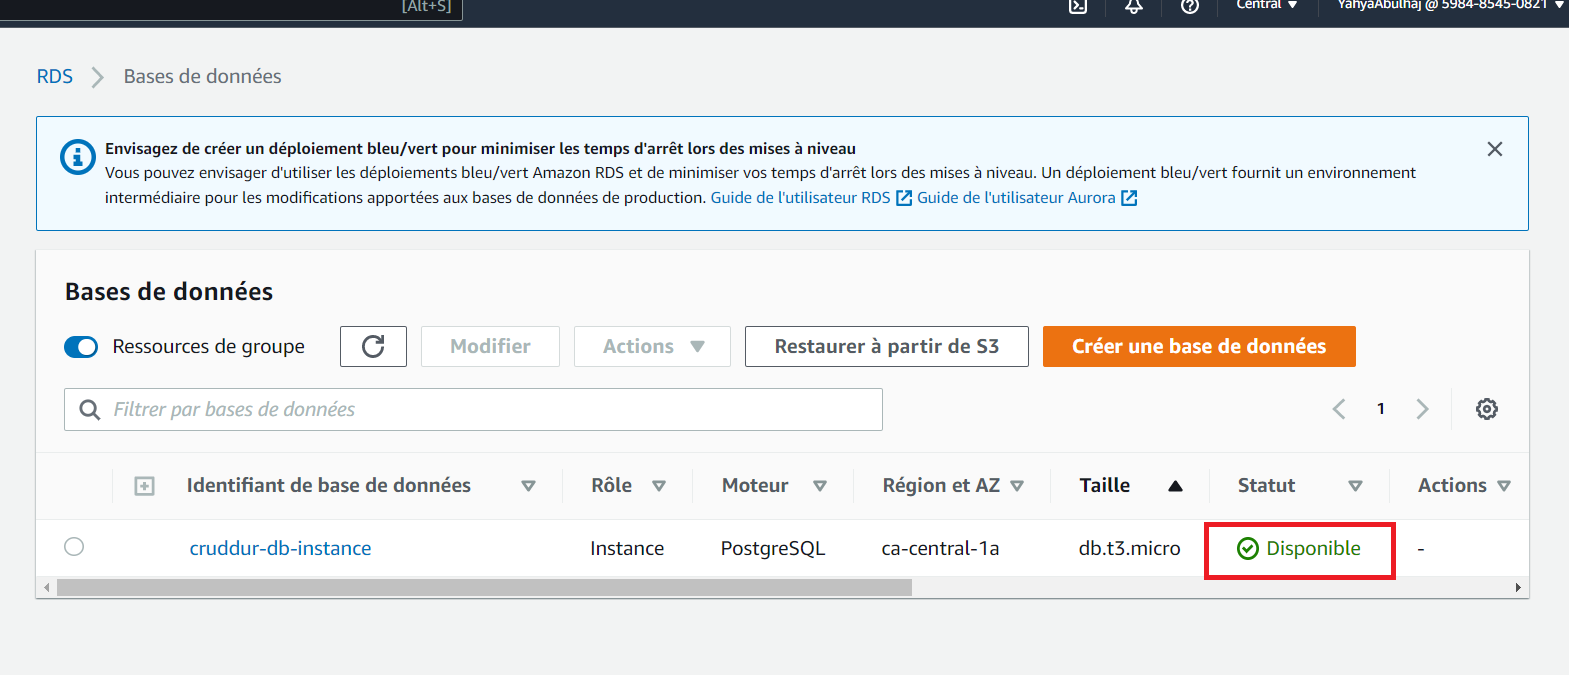
Please await the RDS status to transition to the "Available" stated by the green indicator.
Considerations
5432 is the default port used by PostgreSQL. Many attackers will scan for databases on the default port, so changing it might reduce the number of automated attacks targeting your database.
PSQL for Everyone
In this segment, I will make every effort to equip you with SQL knowledge. We are going to initiate our local PostgreSQL instance and establish a connection to it.
- Earlier (Week-1), we set up psql as a container, and I walked you through the procedure right here.
Now, we will demonstrate how to simply execute that.
- Run the following command in a terminal:
docker compose up- Connect with the password
password.
gitpod /workspace/aws-cloud-project-bootcamp (main) $ psql -Upostgres -h localhost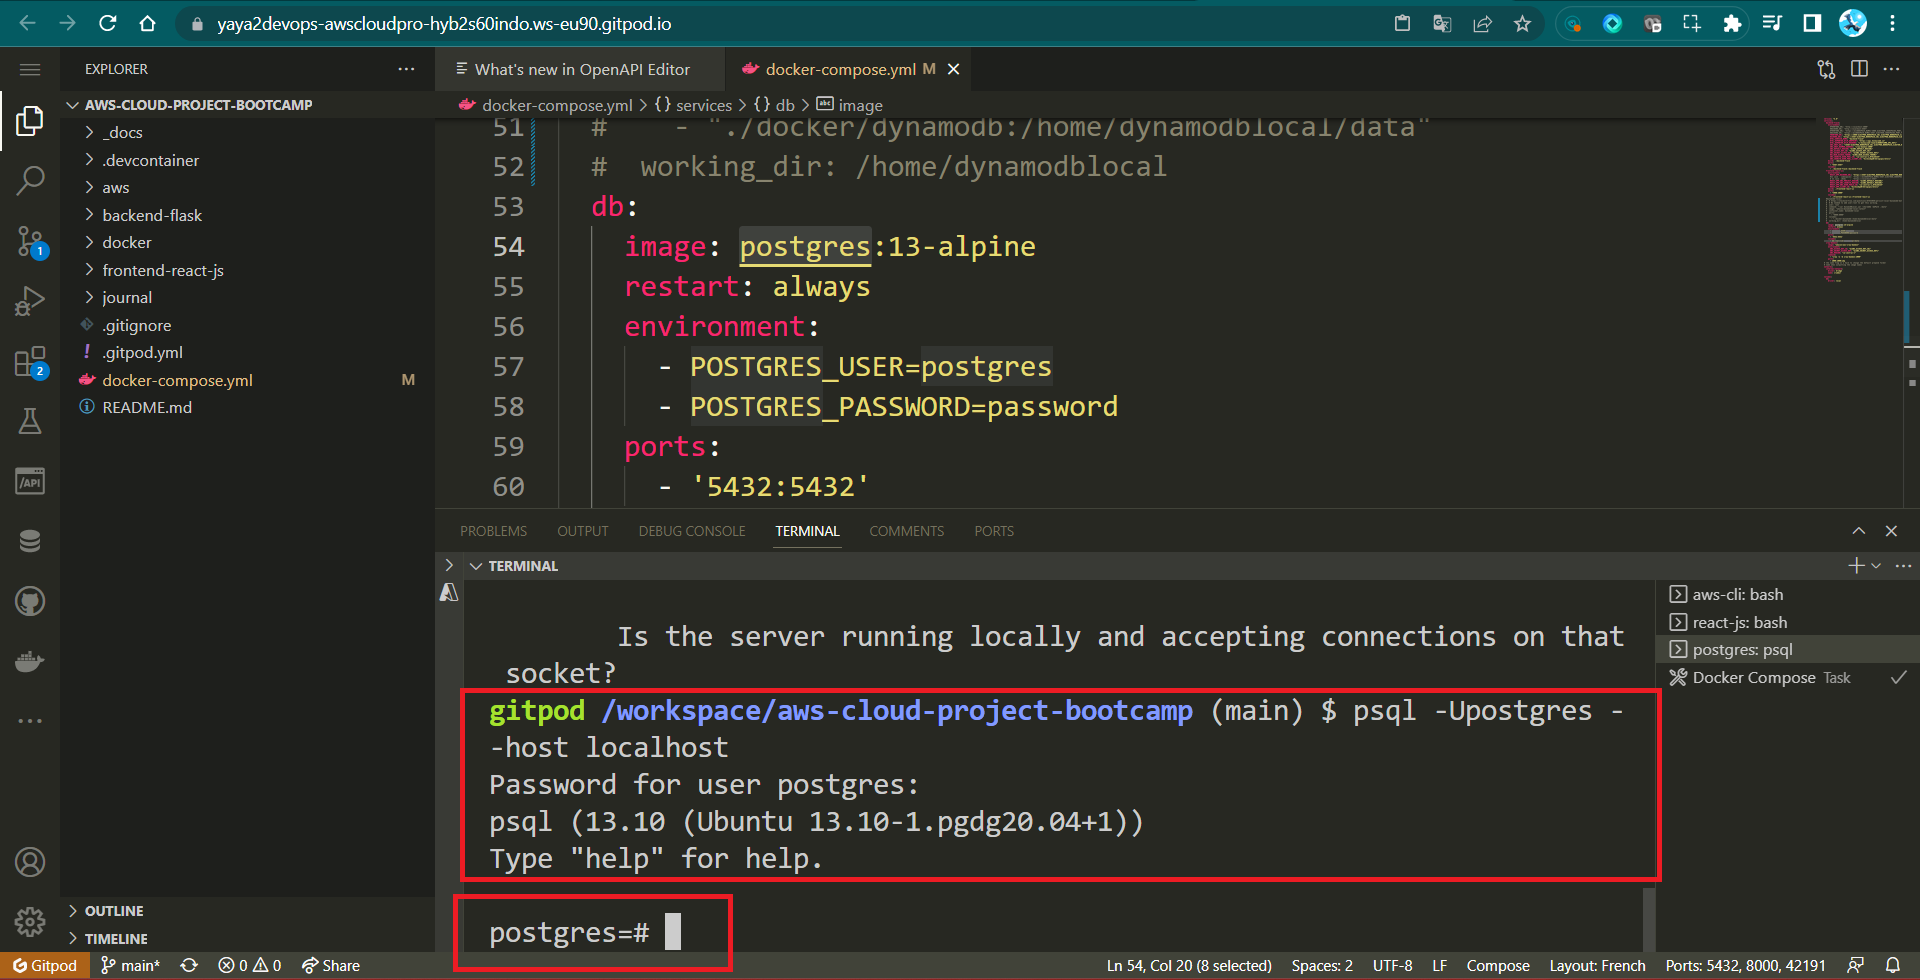
SQL Maestro Pro
The array of tasks and activities that can be accomplished within the realm of database management is remarkably extensive.
- To start off, initiate the process by creating your own database, for instance;
CREATE DATABASE database_name; - Discard the database if it's no longer required.
DROP DATABASE database_name;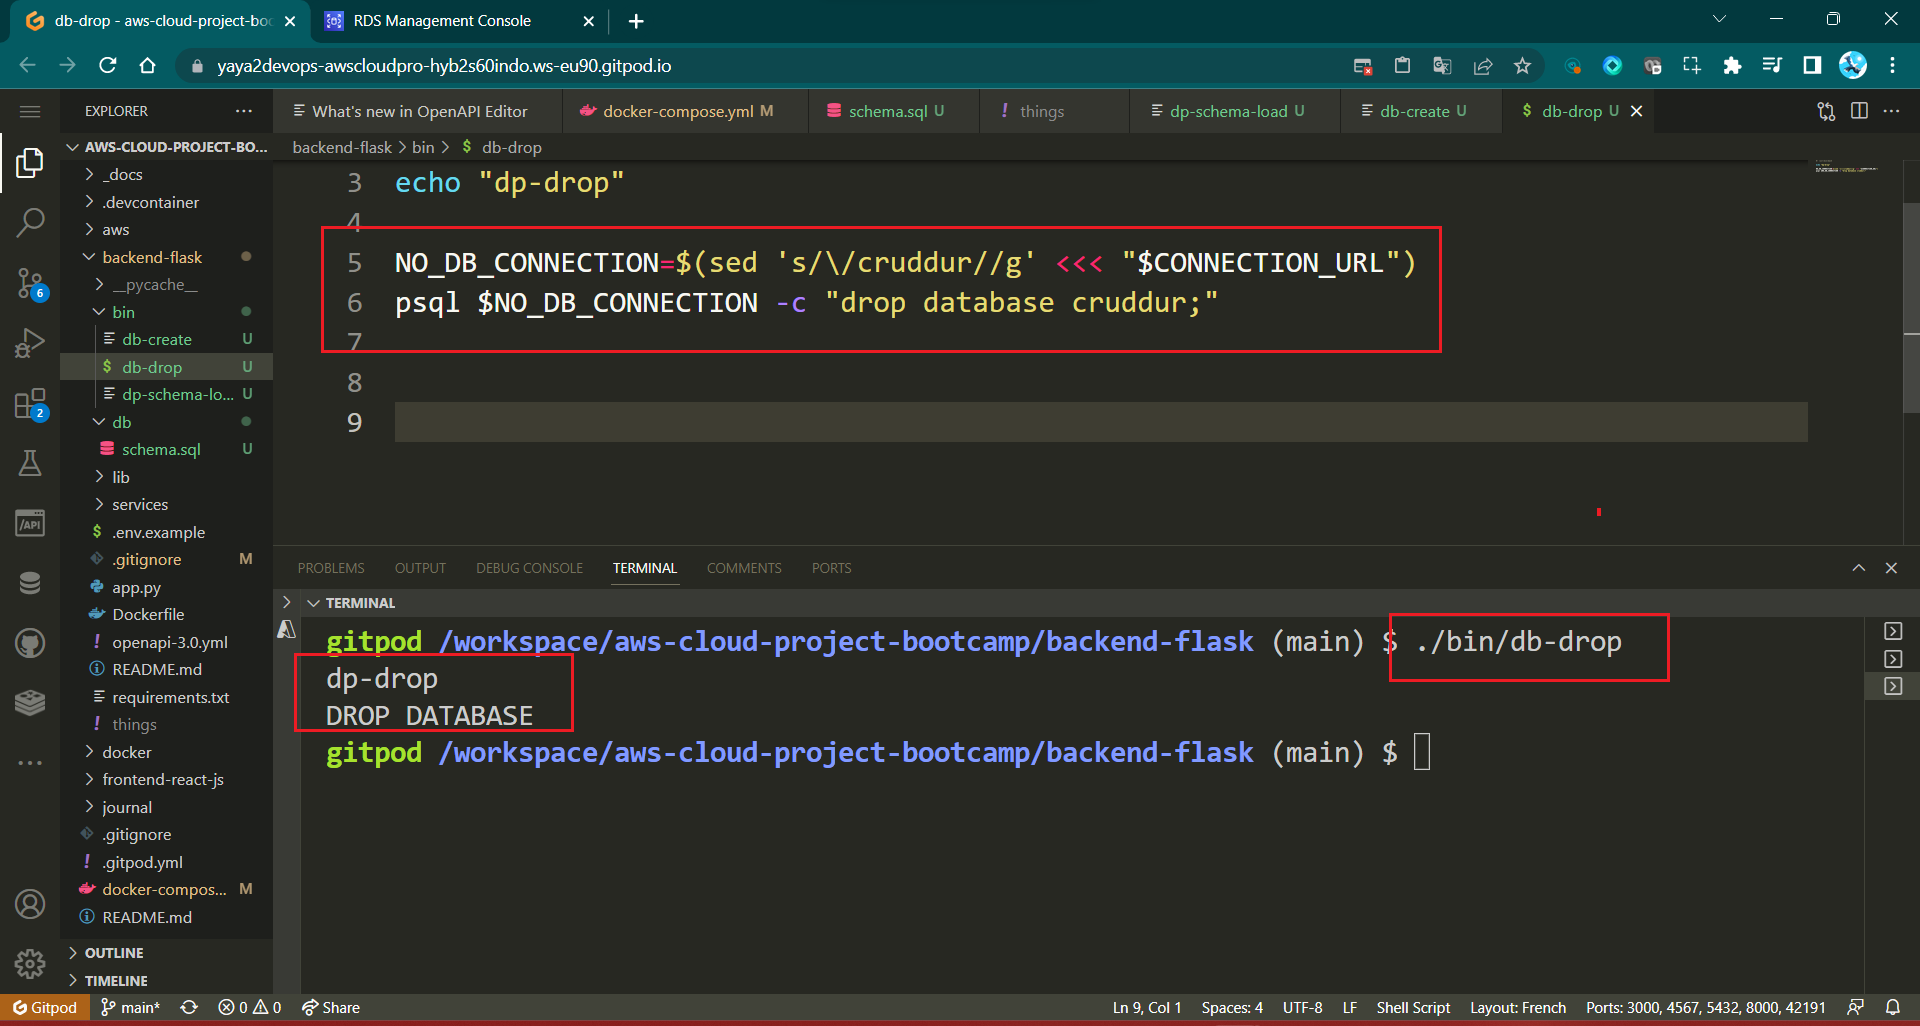
- Additionally, you can execute straightforward tasks such as;
| Command | Description | Example |
|---|---|---|
\x | Enable expanded display when viewing data. | \x on |
\q | Quit the PSQL command-line interface. | \q |
\l | List all available databases. | \l |
\c database_name | Connect to a specific database. | \c database_name |
\dt | List all tables in the current database. | \dt |
\d table_name | Describe a specific table's structure. | \d table_name |
\du | List all users and their roles. | \du |
\dn | List all schemas in the current database. | \dn |
- Moreover, you can delve into more sophisticated operations inside.
| Command | Description | Example SQL |
|---|---|---|
| SELECT | Retrieve data from a database. | SELECT column1, column2 FROM table_name; |
| INSERT | Add new records into a table. | INSERT INTO table_name (column1, column2) VALUES (value1, value2); |
| UPDATE | Modify existing records in a table. | UPDATE table_name SET column1 = value1 WHERE condition; |
| DELETE | Remove records from a table. | DELETE FROM table_name WHERE condition; |
| CREATE TABLE | Create a new table in the database. | sql CREATE TABLE table_name ( column1 datatype, column2 datatype, ... ); |
| ALTER TABLE | Modify an existing table (add, modify, or delete columns). | sql ALTER TABLE table_name ADD column_name datatype; sql ALTER TABLE table_name MODIFY column_name datatype; sql ALTER TABLE table_name DROP COLUMN column_name; |
| DROP TABLE | Delete a table and its data. | DROP TABLE table_name; |
| CREATE INDEX | Create an index on columns to improve query performance. | CREATE INDEX index_name ON table_name (column_name); |
| ALTER INDEX | Modify an existing index. | ALTER INDEX index_name REBUILD; |
| JOIN | Combine rows from multiple tables based on related columns. | SELECT column1, column2 FROM table1 INNER JOIN table2 ON table1.column = table2.column; |
| GROUP BY | Group rows with the same values in specified columns. | SELECT column1, COUNT(*) FROM table_name GROUP BY column1; |
| HAVING | Filter results of aggregate functions in combination with GROUP BY. | SELECT column1, COUNT(*) FROM table_name GROUP BY column1 HAVING COUNT(*) > 5; |
| ORDER BY | Sort the result set by one or more columns. | SELECT column1, column2 FROM table_name ORDER BY column1 ASC, column2 DESC; |
| UNION | Combine result sets of multiple SELECT statements (removes duplicates). | SELECT column1 FROM table1 UNION SELECT column1 FROM table2; |
| UNION ALL | Similar to UNION, but includes duplicate rows. | SELECT column1 FROM table1 UNION ALL SELECT column1 FROM table2; |
I'm new Yaya! Sure, check this out. (opens in a new tab)
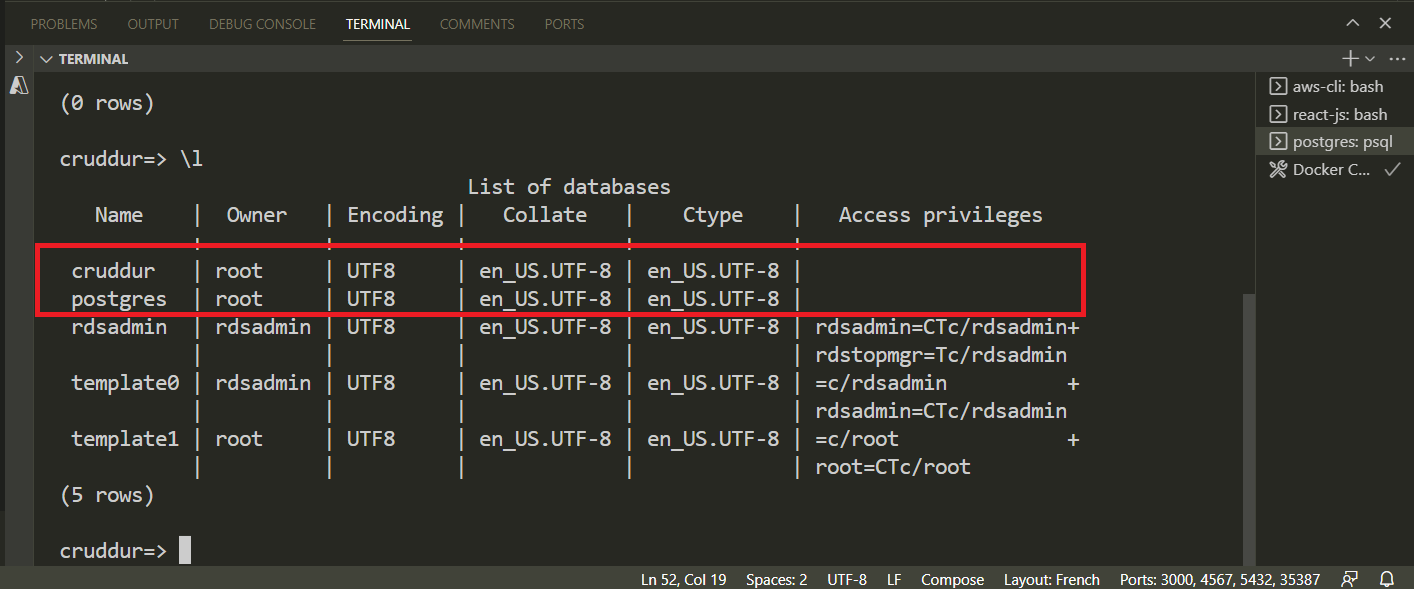
Cruddur Database Create
- To get started, simply prepare your databse by creating one.
CREATE database cruddur;- Inside the psql shell, run
\lto list DBs.
List of databases
   Name    |  Owner   | Encoding |  Collate   |   Ctype    |   Access privileges
-----------+----------+----------+------------+------------+-----------------------
 cruddur   | postgres | UTF8     | en_US.utf8 | en_US.utf8 |
 postgres  | postgres | UTF8     | en_US.utf8 | en_US.utf8 |
 template0 | postgres | UTF8     | en_US.utf8 | en_US.utf8 | =c/postgres          +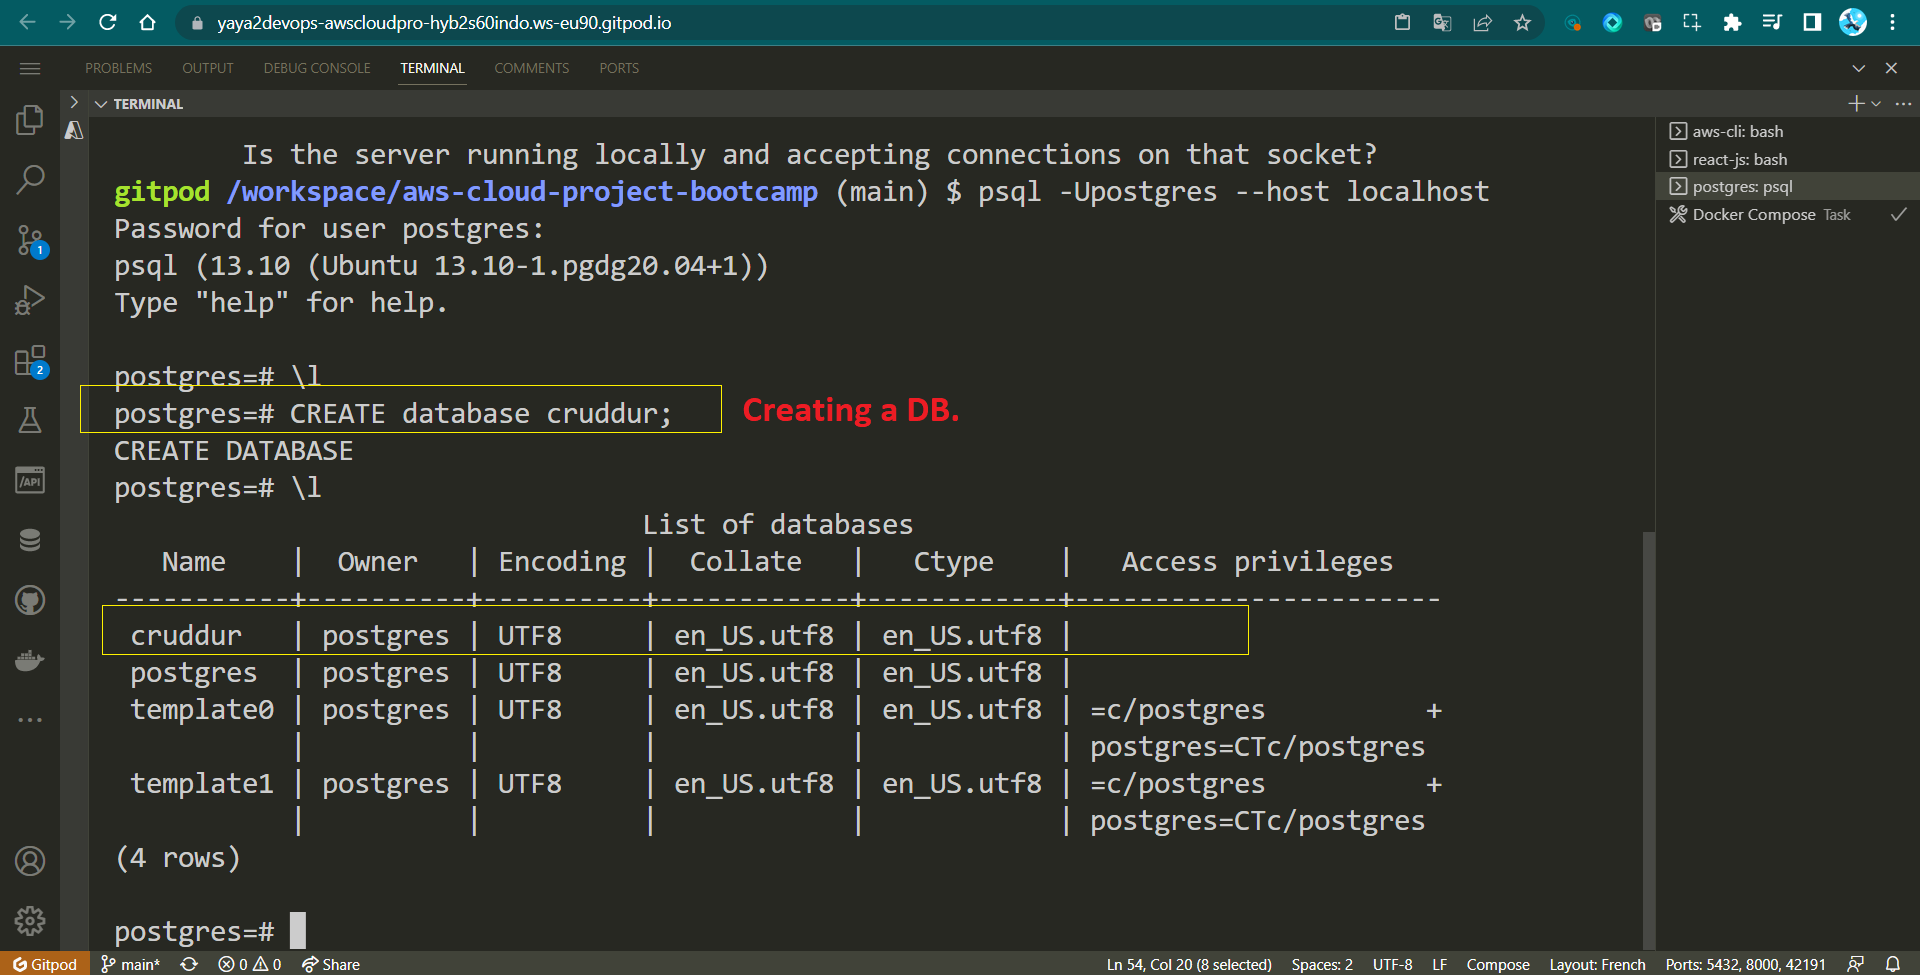
To establish the foundational SQL structure the database we require an SQL file that defines its schema.
Design PSQL Schema
While many web frameworks include a schema.sql file for the purpose of defining database tables during database creation, Flask, on the other hand, requires the manual creation of this file.
graph TD
    A[Users] -->|1| B[Activities]
    B -->|n| C[Comments]
    B -->|1| D[Tags]
    A -->|1..n| E[Profile]
A schema.sql file is a script or a set of instructions written in SQL (Structured Query Language) that outlines the structure and organization of a database. In this file, you define the tables, their columns, data types, constraints, relationships, and other relevant database elements.
Step Zero : In backend-flask/db, create a schema.sql file.
- Step 1 : PostgreSQL UUID
- Step 2 : Load Initial PSQL Schema
- Step 3 : Expand Dropping Tables
- Step 4 : Creating the
usersTable - Step 5 : Creating the
activitiesTable - Step 6 : Schema Successfully Established
- Step 7 : RELOAD SQL Schema
Step 1 : PostgreSQL UUID
Include the following line within the file to enable the UUID extension for PostgreSQL.
CREATE EXTENSION IF NOT EXISTS "uuid-ossp";We'll use uuid-ossp to enable PostgreSQL to generate UUIDs.
| 💡 | UUIDs enhances uniqueness and reduces the likelihood of ID collisions when compared to numeric IDs. |
|---|
Step 2 : Load Initial PSQL Schema
- Quit
psql: If you have a psql session open, close it by typing the command:
\qThis will exit the current psql session.
- Load schema.sql: Navigate to the
backendfolder in your project directory and run the following command:
psql cruddur < db/schema.sql -h localhost -U postgrespsql: This is the PostgreSQL command line tool used to interact with the PostgreSQL database server.cruddur: This is the name of the database you want to connect to.< db/schema.sql: This indicates that you want to input the contents of theschema.sqlfile into thepsqlcommand.-h localhost: This specifies the host (in this case, your local machine).-U postgres: This specifies the PostgreSQL username to use (in this case, "postgres").
-
Password Prompt: When you run the command, you'll be prompted to enter the password for the "postgres" user. Enter the correct password associated with the "postgres" user equals
password. -
Terminal Output: If the schema file is loaded successfully, you'll see output analogous to the one I had:
$ psql cruddur < db/schema.sql -h localhost -U postgres 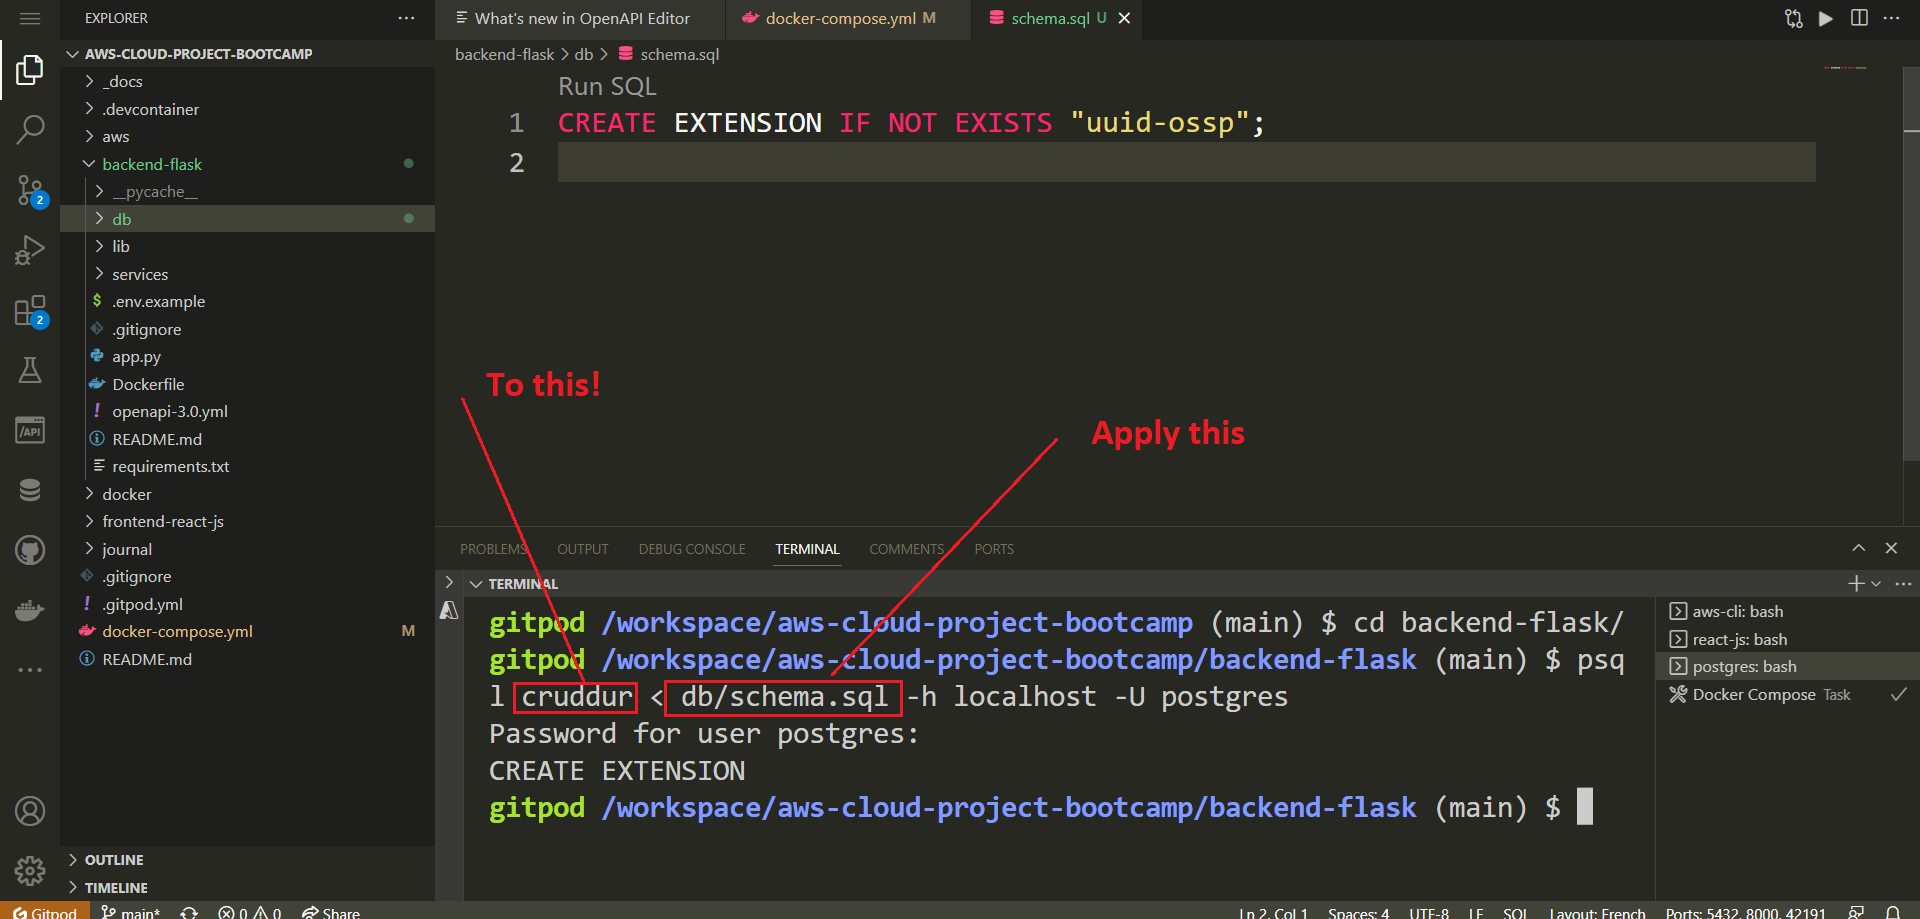
This output indicates that the commands in the schema.sql have been executed, including creating extension.
Step 3: Expand Dropping Tables
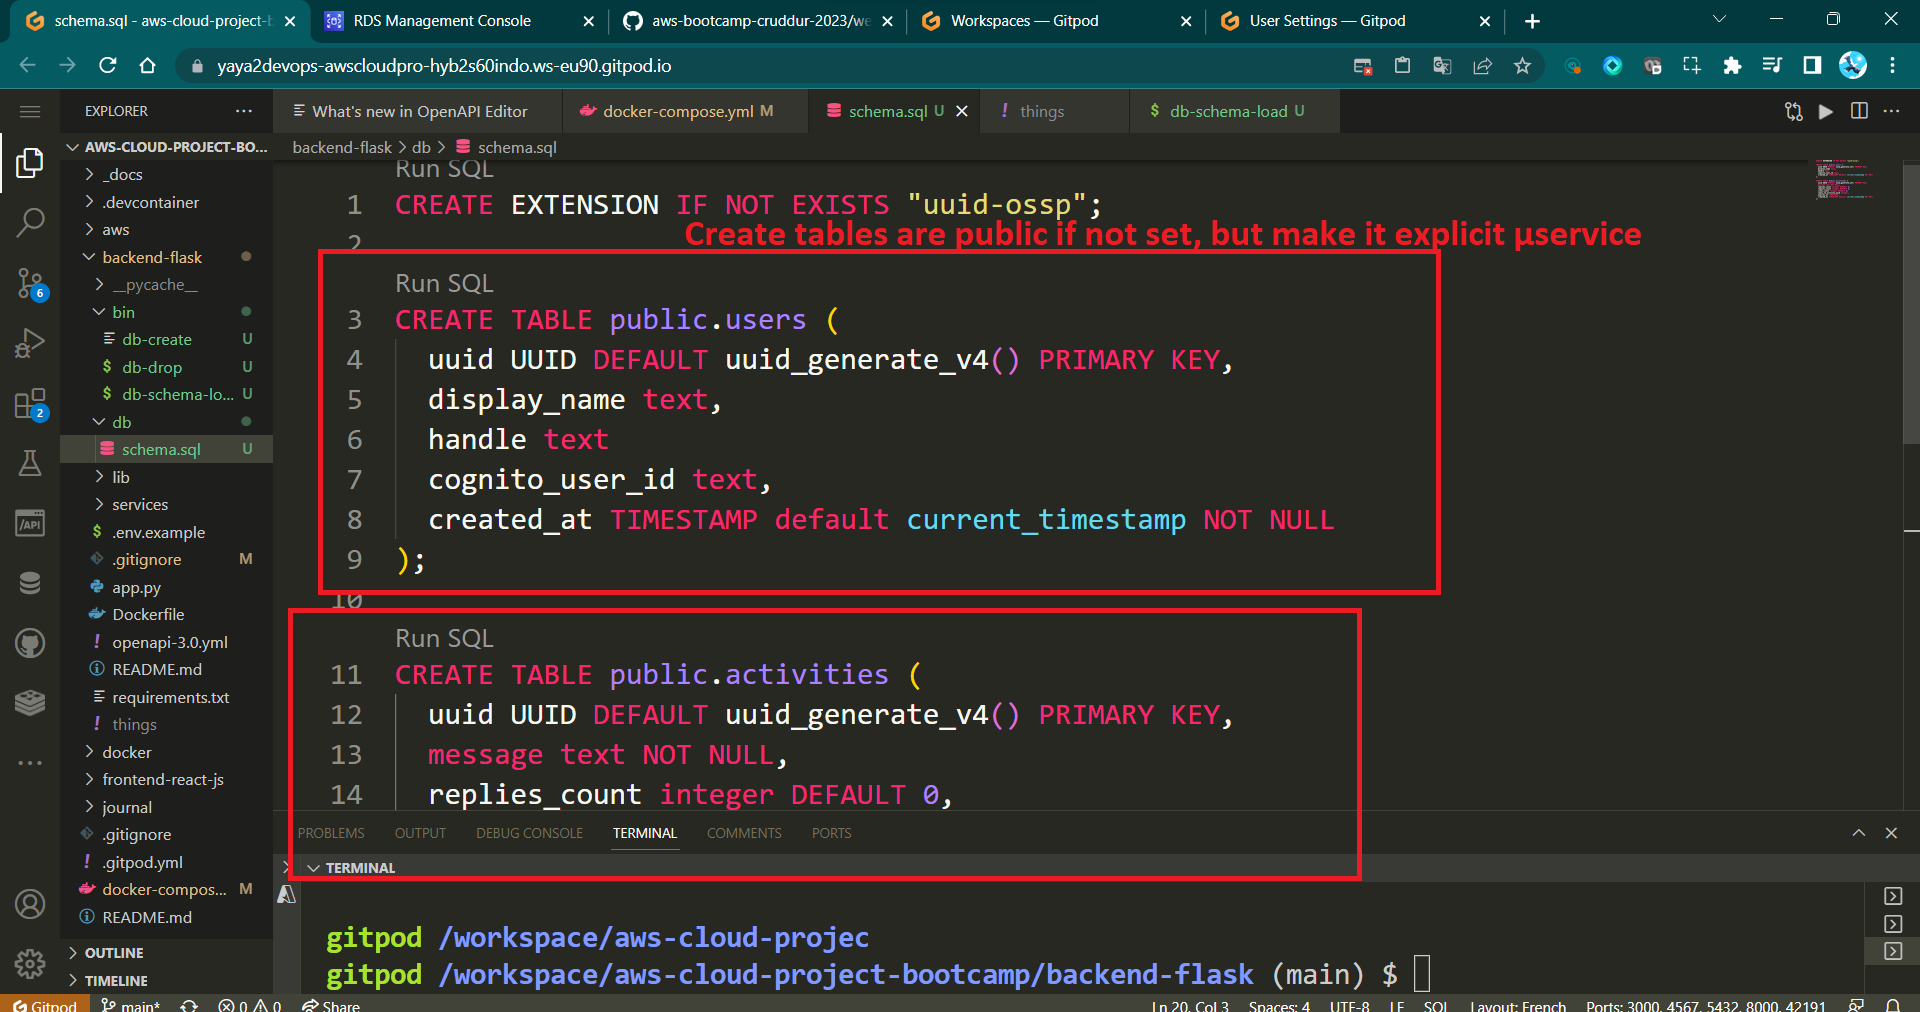
Start by dropping two tables public.users and public.activities if they already exist in the database. This ensures that any previous versions of these tables are removed before creating new ones.
DROP TABLE IF EXISTS public.users;
DROP TABLE IF EXISTS public.activities;
The DROP TABLE IF EXISTS statement is used to delete the specified table if it exists. The public in public.users and public.activities indicates the schema where the tables are located.
Step 4: Creating the users Table
Create a new table called users in the public schema. This table will store information about users.
CREATE TABLE public.users (
  uuid UUID DEFAULT uuid_generate_v4() PRIMARY KEY,
  display_name text NOT NULL,
  handle text NOT NULL,
  email text NOT NULL,
  cognito_user_id text NOT NULL,
  created_at TIMESTAMP default current_timestamp NOT NULL
);
Here's a breakdown of the columns in the users table
- uuid: A
UUID(Universally Unique Identifier) column with a default value generated usinguuid_generate_v4(). This column is set as the primary key of the table. - display_name: A
textcolumn that stores the display name of the user. It cannot beNULL(i.e., it's a required field). - handle: A
textcolumn that stores a handle or username for the user. It cannot beNULL. - email: A
textcolumn that stores the email address of the user. It cannot beNULL. - cognito_user_id: A
textcolumn that stores an identifier associated with the user in Amazon Cognito (a service for managing user identities). It cannot beNULL. - created_at: A
TIMESTAMPcolumn that stores the timestamp of when the user record was created. It has a default value of the current timestamp and cannot beNULL.
Step 5: Creating the activities Table
Create a table called activities in the public schema. This table will store information about various activities.
CREATE TABLE public.activities (
  uuid UUID DEFAULT uuid_generate_v4() PRIMARY KEY,
  user_uuid UUID NOT NULL,
  message text NOT NULL,
  replies_count integer DEFAULT 0,
  reposts_count integer DEFAULT 0,
  likes_count integer DEFAULT 0,
  reply_to_activity_uuid integer,
  expires_at TIMESTAMP,
  created_at TIMESTAMP default current_timestamp NOT NULL
);- uuid: A
UUIDcolumn with a default value generated usinguuid_generate_v4(). This column is set as the primary key of the table. - user_uuid: A
UUIDcolumn that stores the UUID of the user associated with the activity. It cannot beNULL. - message: A
textcolumn that stores the message or content of the activity. It cannot beNULL. - replies_count, reposts_count, likes_count: Integer columns that store the counts of replies, reposts, and likes for the activity, respectively. They have default values of 0.
- reply_to_activity_uuid: An
integercolumn that stores the ID of the activity to which this activity is a reply. It allows for creating a hierarchical structure of activities. - expires_at: A
TIMESTAMPcolumn that stores the expiration timestamp of the activity (if applicable). - created_at: A
TIMESTAMPcolumn that stores the timestamp of when the activity record was created. It has a default value of the current timestamp and cannot beNULL.
The SQL table provided above lacks a comma, which previously took me a while to troubleshoot and resolve.
Quite amusing, actually!
Step 6: Schema Successfully Established
Review your design, Mr. Database Architect, and ensure its alignment with the following structure and adequately meets your business requirements.
CREATE EXTENSION IF NOT EXISTS "uuid-ossp";

DROP TABLE IF EXISTS public.users;
CREATE TABLE public.users (
  uuid UUID DEFAULT uuid_generate_v4() PRIMARY KEY,
  display_name text NOT NULL,
  handle text NOT NULL,
  email text NOT NULL,
  cognito_user_id text NOT NULL,
  created_at TIMESTAMP default current_timestamp NOT NULL
);

DROP TABLE IF EXISTS public.activities;
CREATE TABLE public.activities (
  uuid UUID DEFAULT uuid_generate_v4() PRIMARY KEY,
  user_uuid UUID NOT NULL,
  message text NOT NULL,
  replies_count integer DEFAULT 0,
  reposts_count integer DEFAULT 0,
  likes_count integer DEFAULT 0,
  reply_to_activity_uuid integer,
  expires_at TIMESTAMP,
  created_at TIMESTAMP default current_timestamp NOT NULL
);
Schema is like the excel file, tables /views are like the sheets in it.
Step 7: RELOAD SQL Schema
Once we have successfully refined our schema, it's time to reload it along with the newly created tables for activities and users.
- Load
schema.sql: run the following command again
psql cruddur < db/schema.sql -h localhost -U postgresPassword for user postgres:
CREATE EXTENSION - Verify by listing the current relations in your psql using
\dt
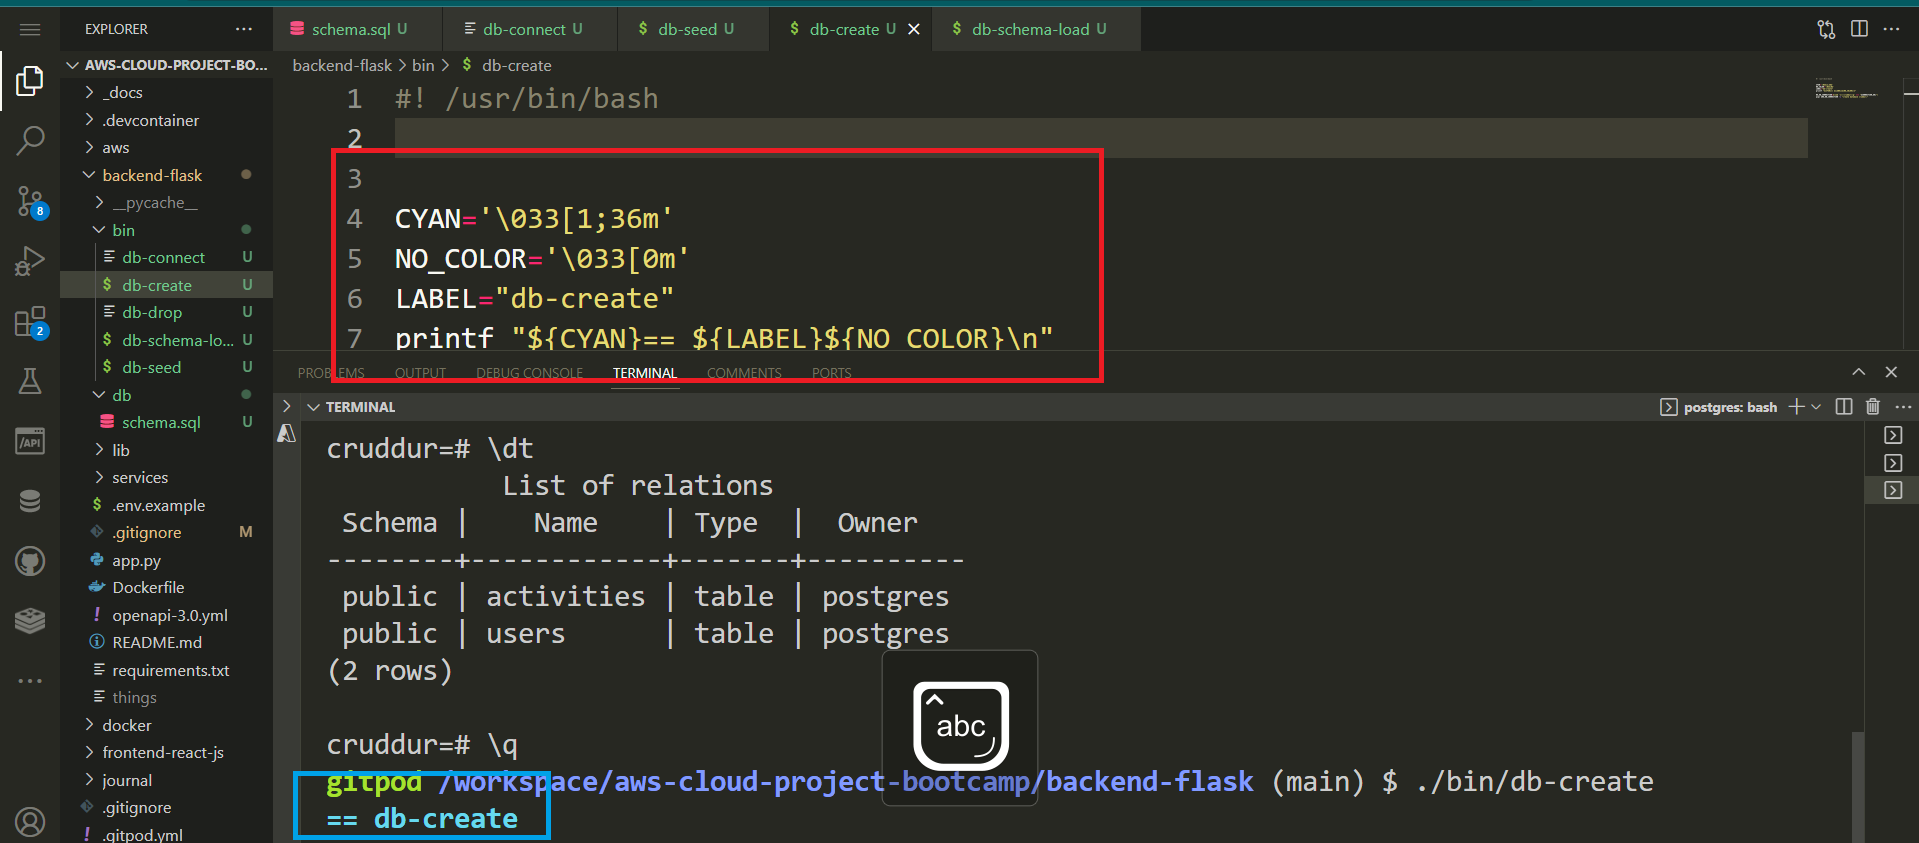
Do you like the terminal color? Me too.
Now you have the public.users and public.activities tables ready to store data for your application along the previously loaded extension.
Simplify Connecting To PSQL
In here, we will allocate PostgreSQL development and production connection URLs to environment variables, simplifying the process of connecting to the specific workspace you require in a more efficient manner.
Local PostgreSQL
- Compose the following code to establish a connection with your database:
psql "postgresql://postgres:password@localhost:5432/cruddur"- Export the PostgreSQL connection URL as an environment variable.
export CONNECTION_URL="postgresql://postgres:password@localhost:5432/cruddur"This will not only simplify the connection process through the environment variable but also enhance the convenience of utilizing it in our upcoming scripts.
- Persist the variable for future Gitpod workspaces.
gp env CONNECTION_URL="postgresql://postgres:password@localhost:5432/cruddur"- Run the following command to examine the connectivity URL
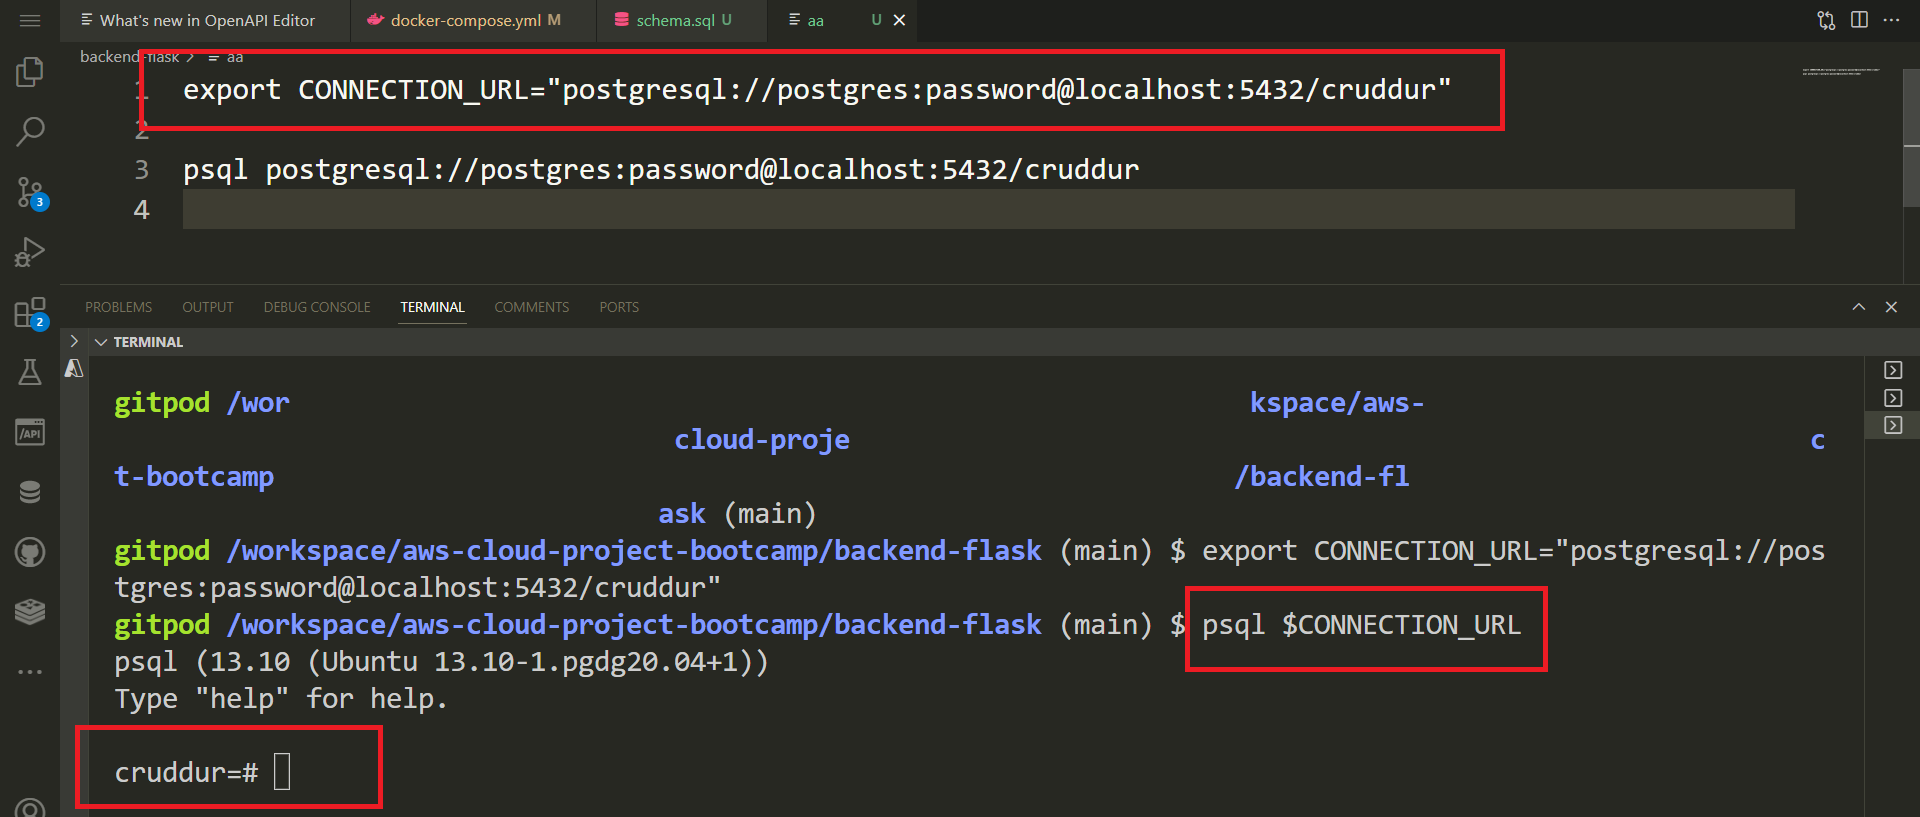
psql $CONNECTION_URL- Reflect on schema design by running the following command
\dt List of relations
Schema | Name | Type | Owner
--------+------------+-------+----------
public | activities | table | postgres
public | users | table | postgresProduction PostgreSQL
Following the approach employed earlier, we will once again incorporate the URL from the RDS instance we established at the outset.
- Set and persist the connection URL for the production RDS DB;
export PROD_CONNECTION_URL="postgresql://cruddurroot:<password>@<DB_endpoint>:5432/cruddur"

gp env PROD_CONNECTION_URL="postgresql://cruddurroot:<password>@<DB_endpoint>:5432/cruddur"
Connecting to AWS RDS Instance in Gitpod
Try running the following to connect to prod.
psql $PROD_CONNECTION_URLThe command will hang indefinitely because the default security group on our RDS instance is configured to allow inbound access exclusively from the security group itself, preventing any external connections.
Get ready for the complete solution.
- Step 1: Set Environment Variable
- Step 2: Adjust Security Group Inbound Rules
- Step 3: Test Database Connection
- Step 4: Security Group Update
- Step 5: Automate Security Group Update
- Step 6: Load Schema to RDS
- Step 7: Test Prod Connection and Schema
Step 1: Set Environment Variable
In your GitPod environment, i you haven't already, set the PROD_CONNECTION_URL environment variable in the following format:
export PROD_CONNECTION_URL="postgresql://<user>:<password>@<RDS>:5432/<master-db-name>"
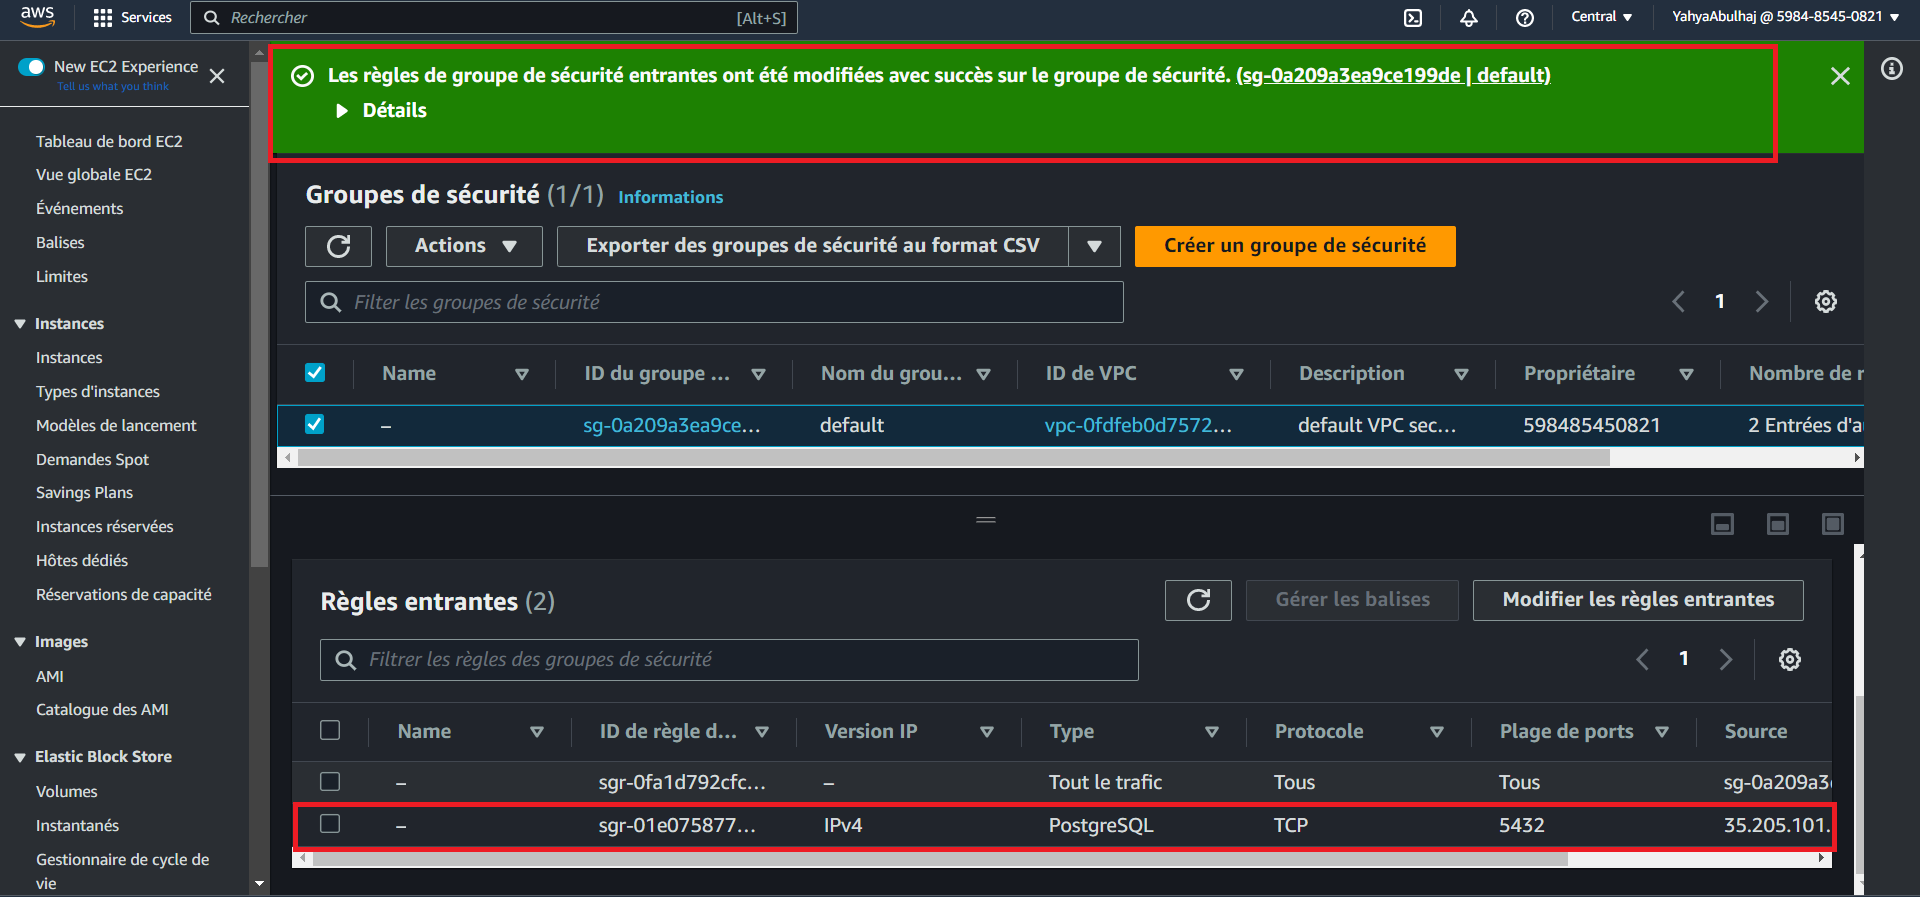
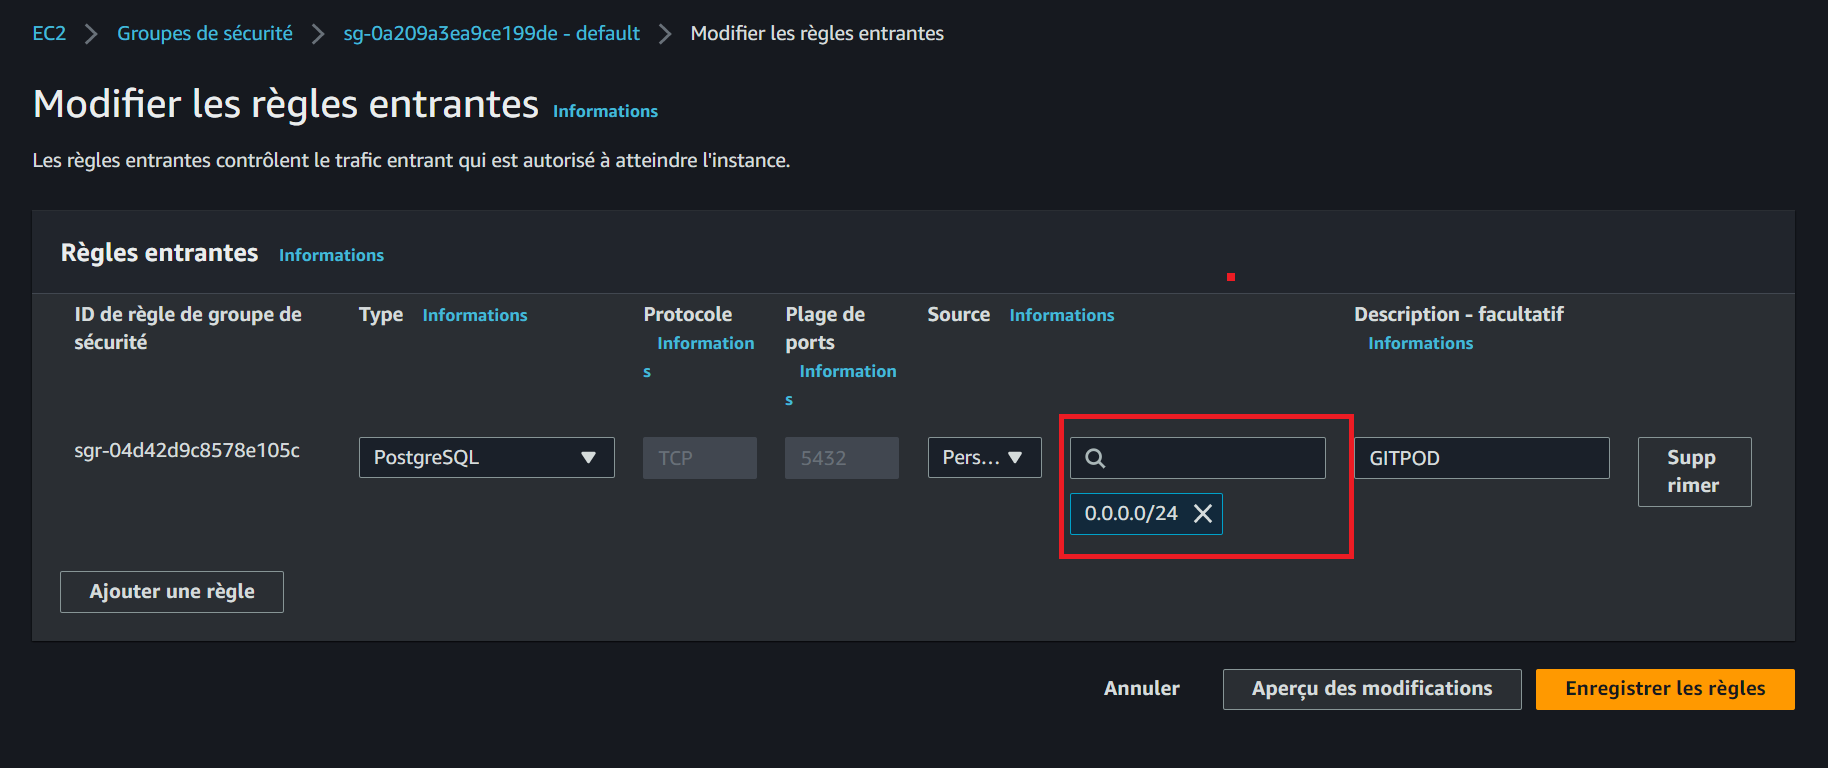
gp env PROD_CONNECTION_URL="postgresql://<user>:<password>@<RDS>:5432/<master-db-name>"Step 2: Adjust Security Group Inbound Rules
- Connect to your AWS RDS console.
- Adjust the security group inbound rules to allow Gitpod's IP address to connect to your database.
- Get the Gitpod IP address using the command:
GITPOD_IP=$(curl ifconfig.me)- Add an inbound rule to the RDS security group for the Gitpod IP address (
$GITPOD_IP).
Step 3: Test Database Connection
- Run the command:
psql $PROD_CONNECTION_URL- Run the
\lcommand to list prod databases.
The existing configuration requires us to manually update the IP address each time.
Step 4: Security Group Update
- Set environment variables for the security group and the inbound rule:
export DB_SG_ID="<security-group-id>"
export DB_SG_RULE_ID="<security-group-rule-id>"

gp env DB_SG_ID="<security-group-id>"
gp env DB_SG_RULE_ID="<security-group-rule-id>"- Use
DB_SG_IDto refer to the ID of the security group itself. - Use
DB_SG_RULE_IDfor the unique identifier of the inbound rule we've configured in the security group.
- Use the following CLI script to update the security group rule with the Gitpod IP address:
aws ec2 modify-security-group-rules \
    --group-id $DB_SG_ID \
--security-group-rules "SecurityGroupRuleId=$DB_SG_RULE_ID,SecurityGroupRule={Description=GITPOD,IpProtocol=tcp,FromPort=5432,ToPort=5432,CidrIpv4=$GITPOD_IP/32}"- Verify it returns the following
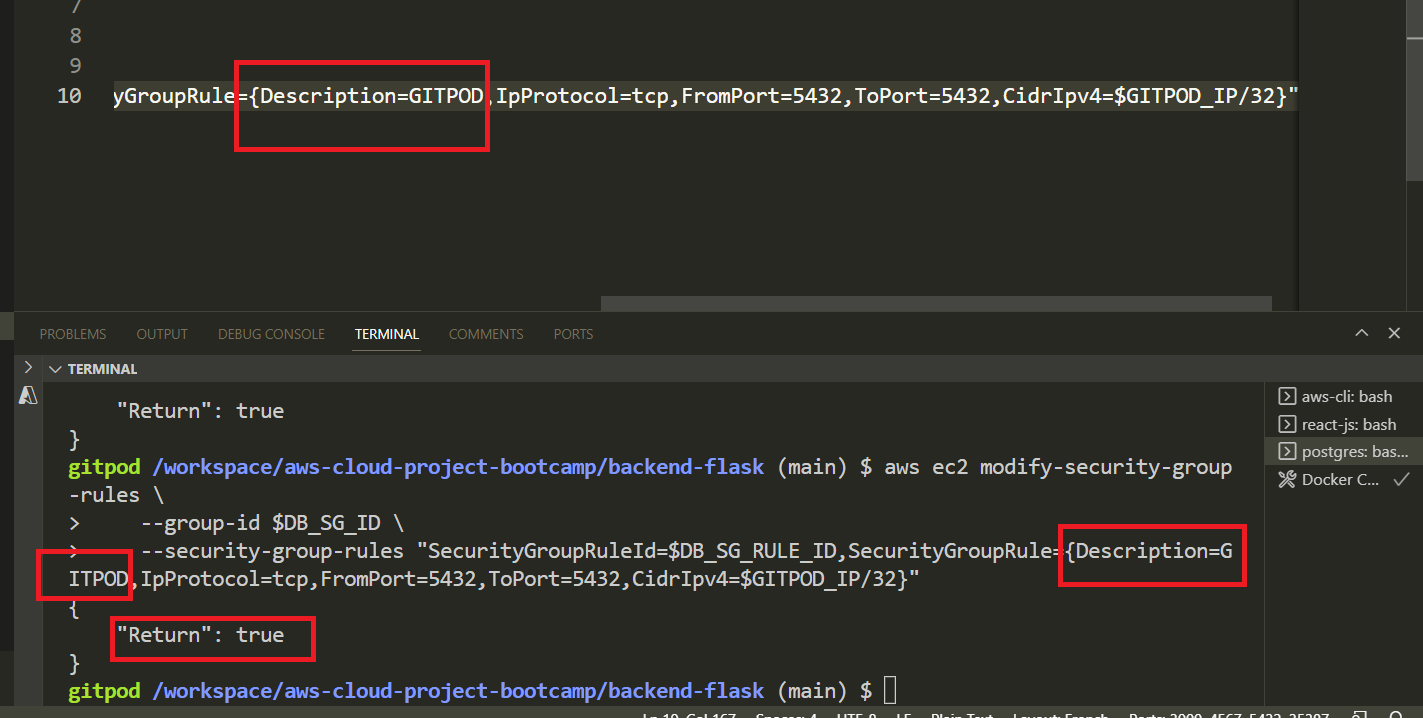
{
    "Return": true
}- Verify the ip is updated in the console
Step 5: Automate Security Group Update
- Create a file named
rds-update-sg-ruleinside the/binwith the following content:
#! /usr/bin/bash

aws ec2 modify-security-group-rules \
    --group-id $DB_SG_ID \
    --security-group-rules "SecurityGroupRuleId=$DB_SG_RULE_ID,SecurityGroupRule={Description=GITPOD,IpProtocol=tcp,FromPort=5432,ToPort=5432,CidrIpv4=$GITPOD_IP/32}"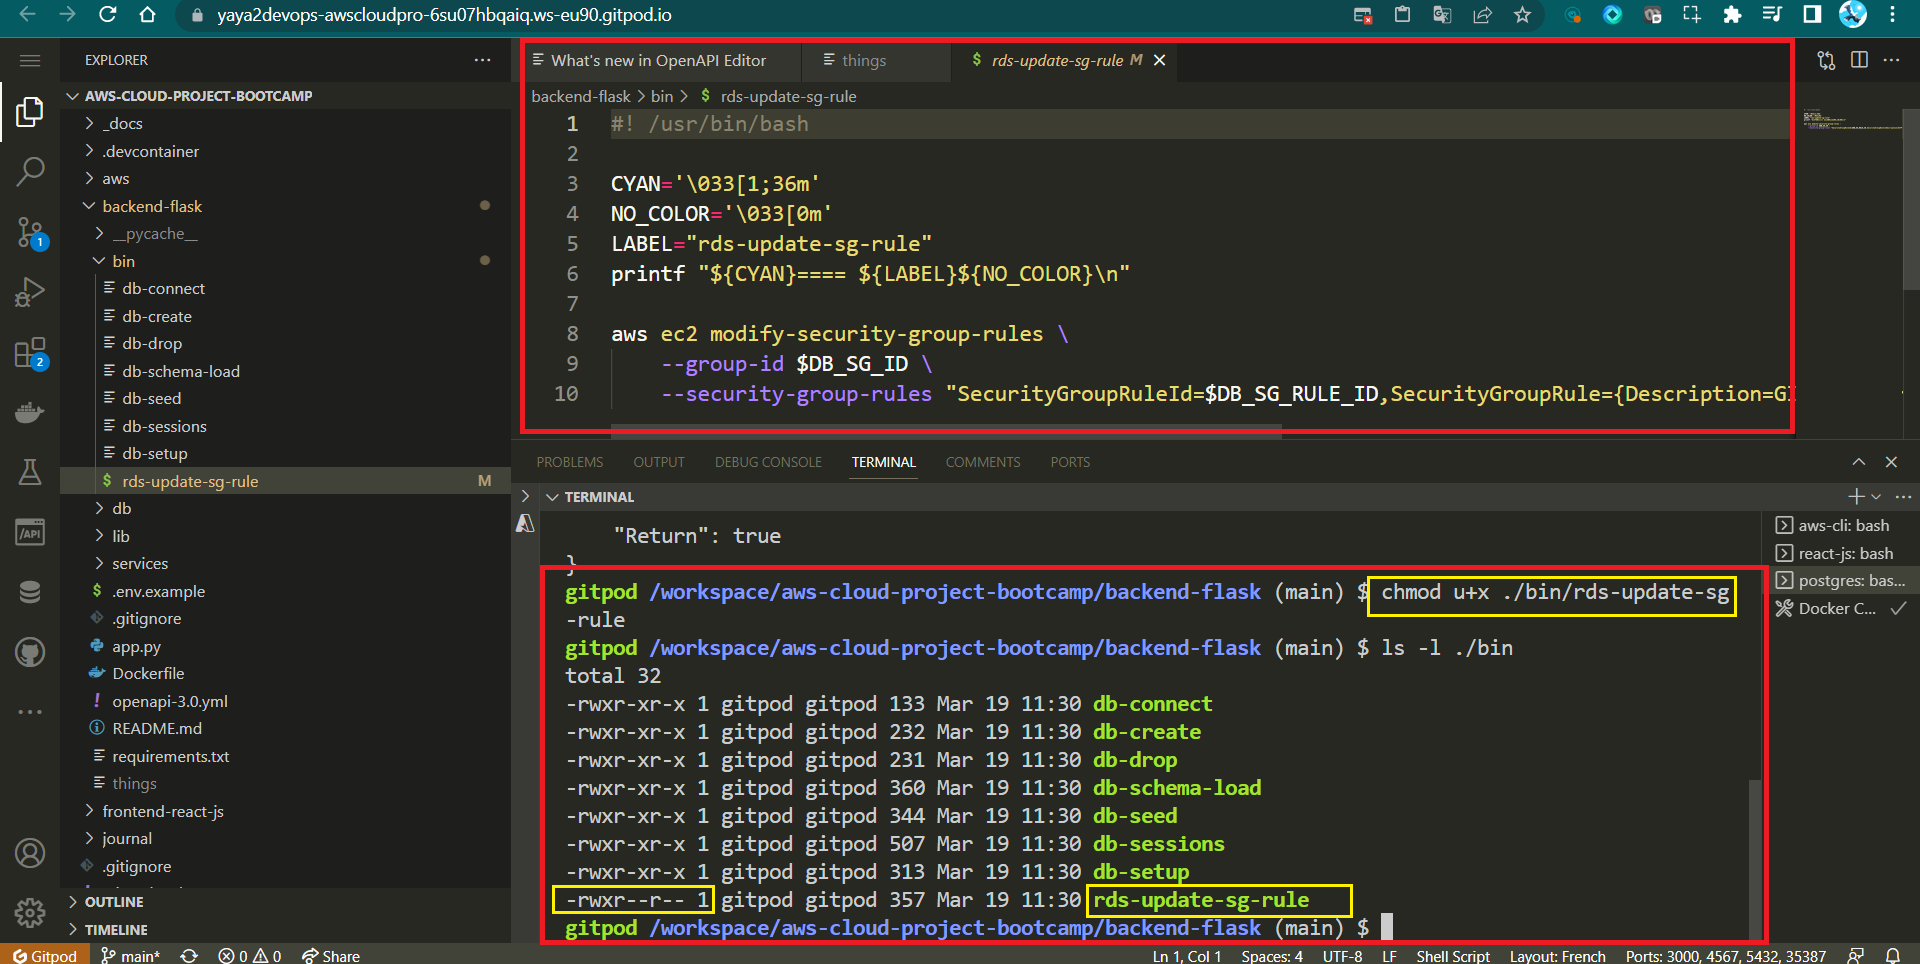
- Make the script executable:
chmod u+x rds-update-sg-rule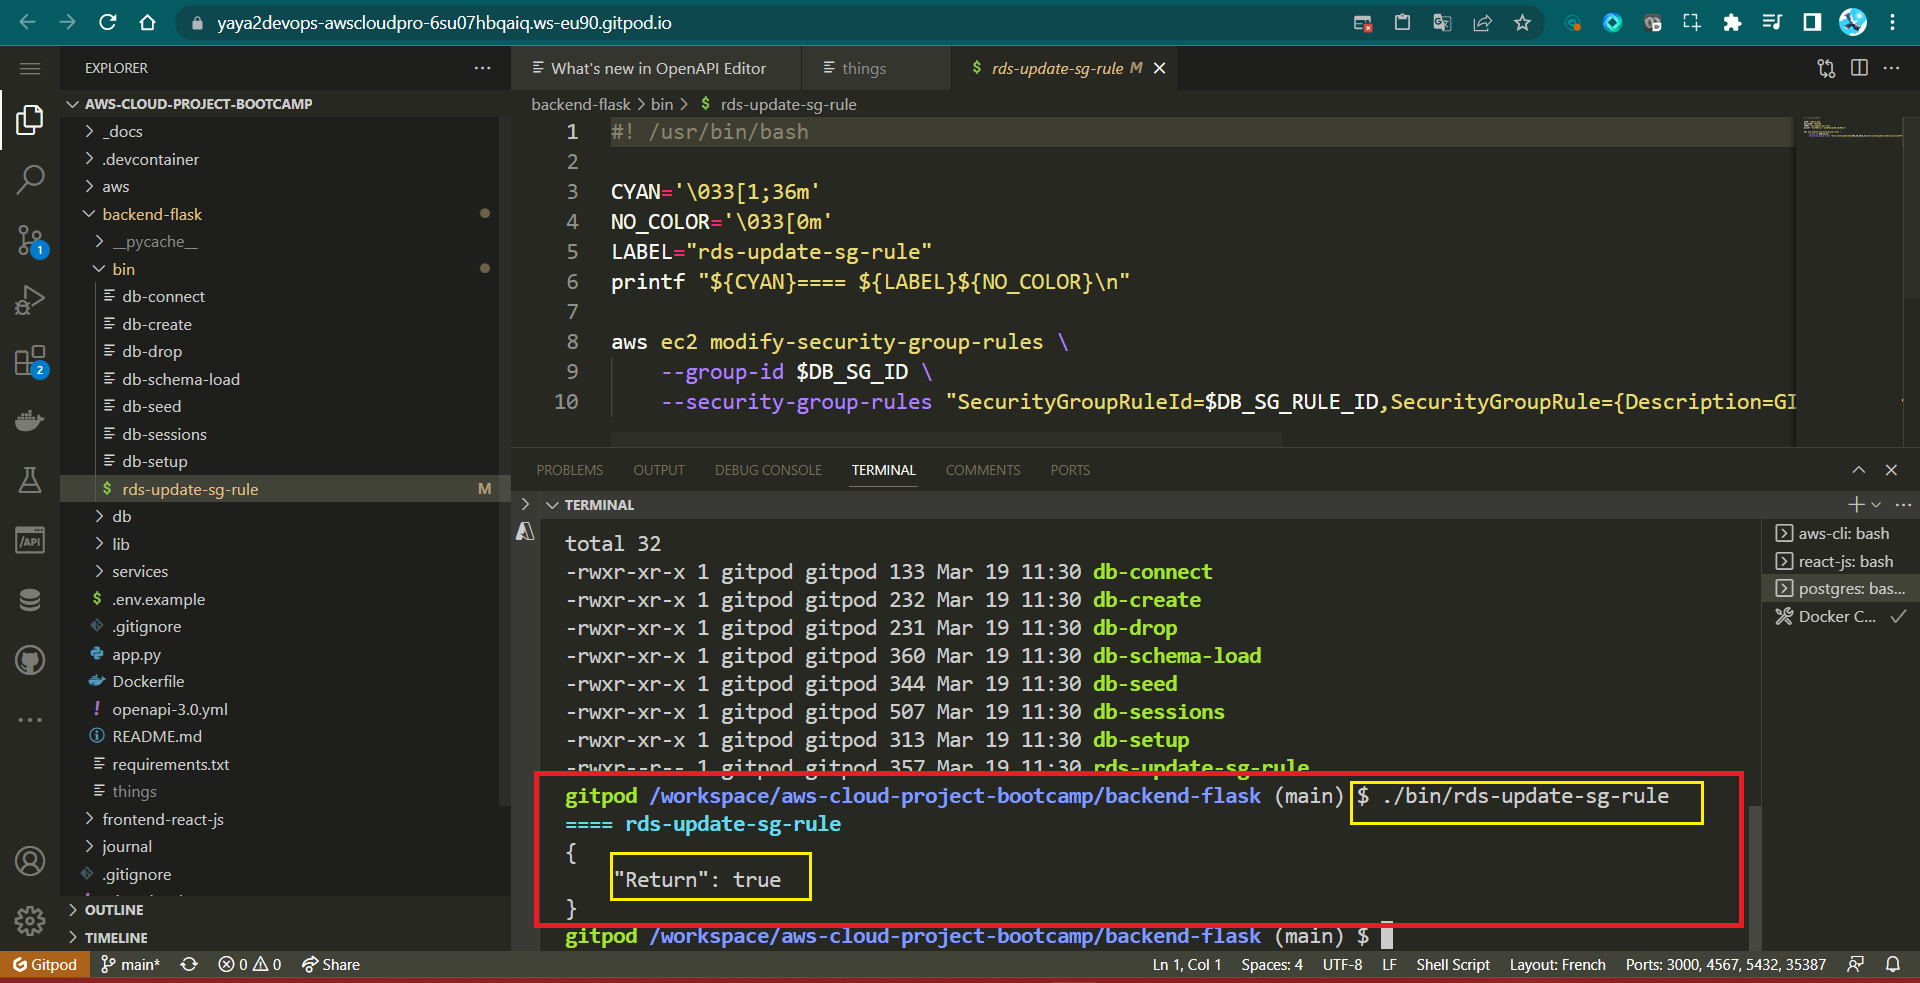
And now, each time you initiate it, updates are reflected in the console in real-time.
- Update
.gitpod.ymlto run the script on environment startup part of postgre setup:
- name: postgres
  init: |
      # check the file.
  command: |
    export GITPOD_IP=$(curl ifconfig.me)
    source "$THEIA_WORKSPACE_ROOT/backend-flask/bin/rds-update-sg-rule"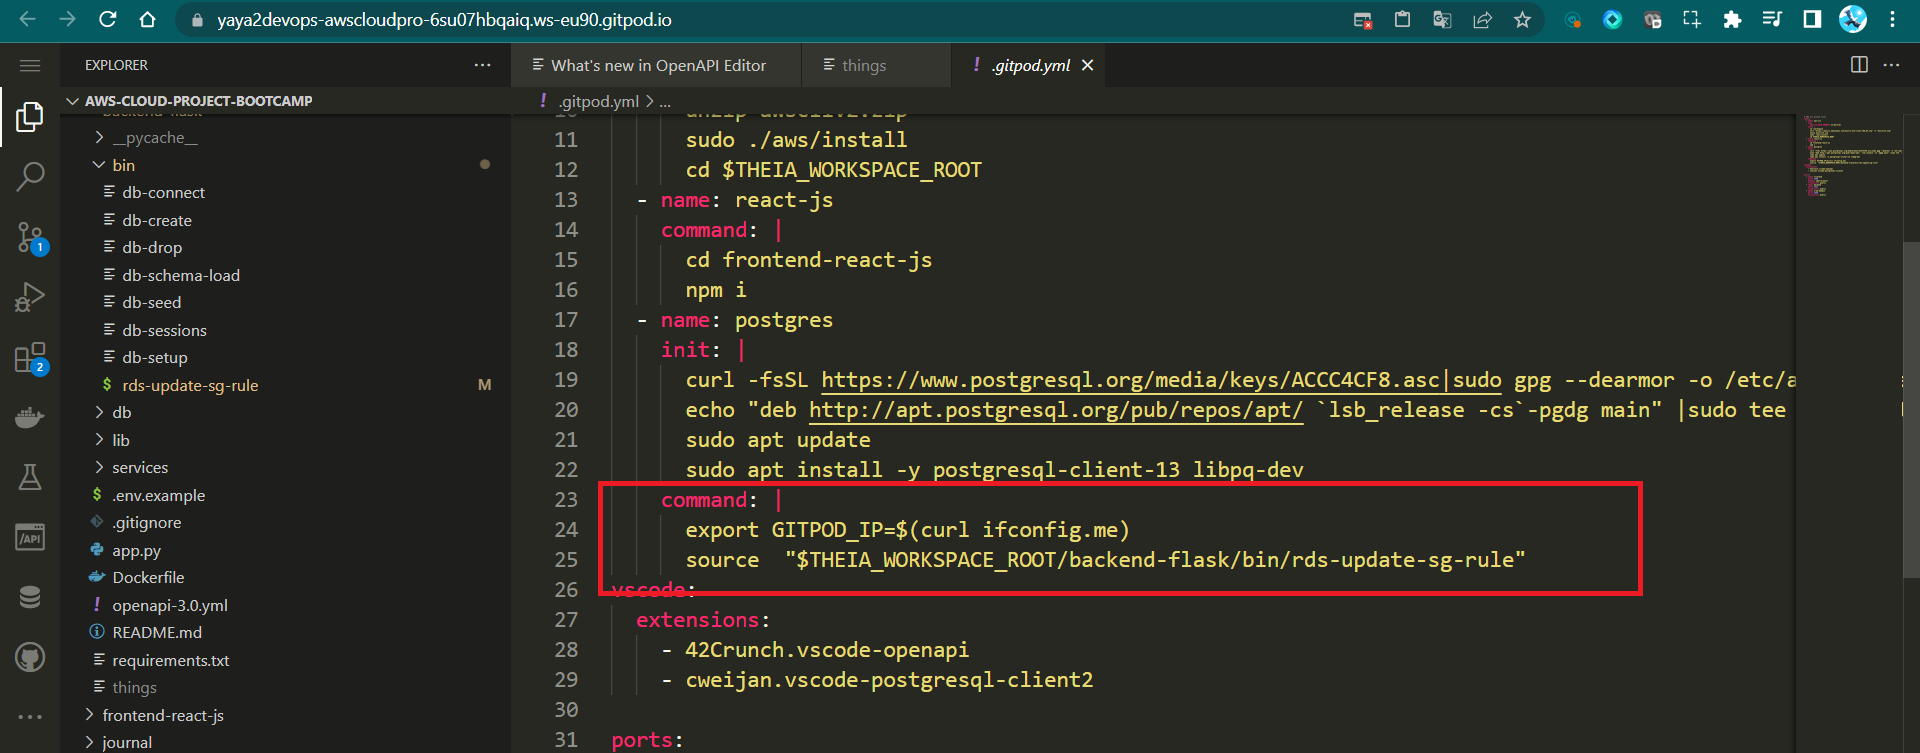
Step 6: Load Schema to RDS
- Update the Docker Compose connection URL to the production URL in
docker-compose.yml:
CONNECTION_URL: "${PROD_CONNECTION_URL}"- Run the
db-schema-loadscript in production:
./backend-flask/bin/db-schema-load prodStep 7: Test Prod Connection and Schema
- Update
./bin/db-connectto include a condition for the 'prod' parameter. - Test connectivity to the production database by running the script.
./bin/db-connect prodbin/db-connect prod
running in production
psql (13.10 (Ubuntu 13.10-1.pgdg22.04+1), server 14.6)
WARNING: psql major version 13, server major version 14.
Some psql features might not work.
SSL connection (protocol: TLSv1.2, cipher: ECDHE-RSA-AES256-GCM-SHA384, bits: 256, compression: off)
Type "help" for help.
cruddur=>Bash Scripts for Database Operations
In this comprehensive instructional guide, we will walk you through the process of setting up a series of bash scripts to manage various database operations, such as creating and dropping databases, loading schemas, and seeding data.
This week initiates the launch of the much-awaited bin directory's construction. This organized workflow will enhance your efficiency and maintainability while working with databases.
./bin
├── db-create
├── db-drop
├── db-connect
├── db-sessions
├── db-setup
├── db-seed
├── db-schema-load
└── db-rds-update-sg-rule
These scripts will be relocated to bin/db (Week Seven), attributed to the implementation of diverse technological scripts in a proactive development approach.
- Step 1: Organize Script Files
- Step 2: Add Shebang and Permissions
- Step 3: Implement Database Operation Scripts
- Step 4: Synergizing Scripts for Speed
- Step Bonus: Aesthetics in Bash Scripts
Step 1: Organize Script Files
- Begin by creating a new directory called bin within your backend project's root directory. This directory will house all your bash scripts related to database operations.
mkdir bin- Inside the bin directory, create the file structure provided.
touch bin/db-create
touch bin/db-drop
touch bin/db-connect
touch bin/db-sessions
touch bin/db-setup
touch bin/db-seed
touch bin/db-schema-load
touch bin/db-rds-update-sg-rule
Benefits of naming scripts without extensions Incl. Clear Intent, Portability, File Type Agnostic and looks nice.
Step 2: Add Shebang and Permissions
- For each script file, add the shebang line at the top to indicate that the script should be executed with Bash.
#! /usr/bin/bash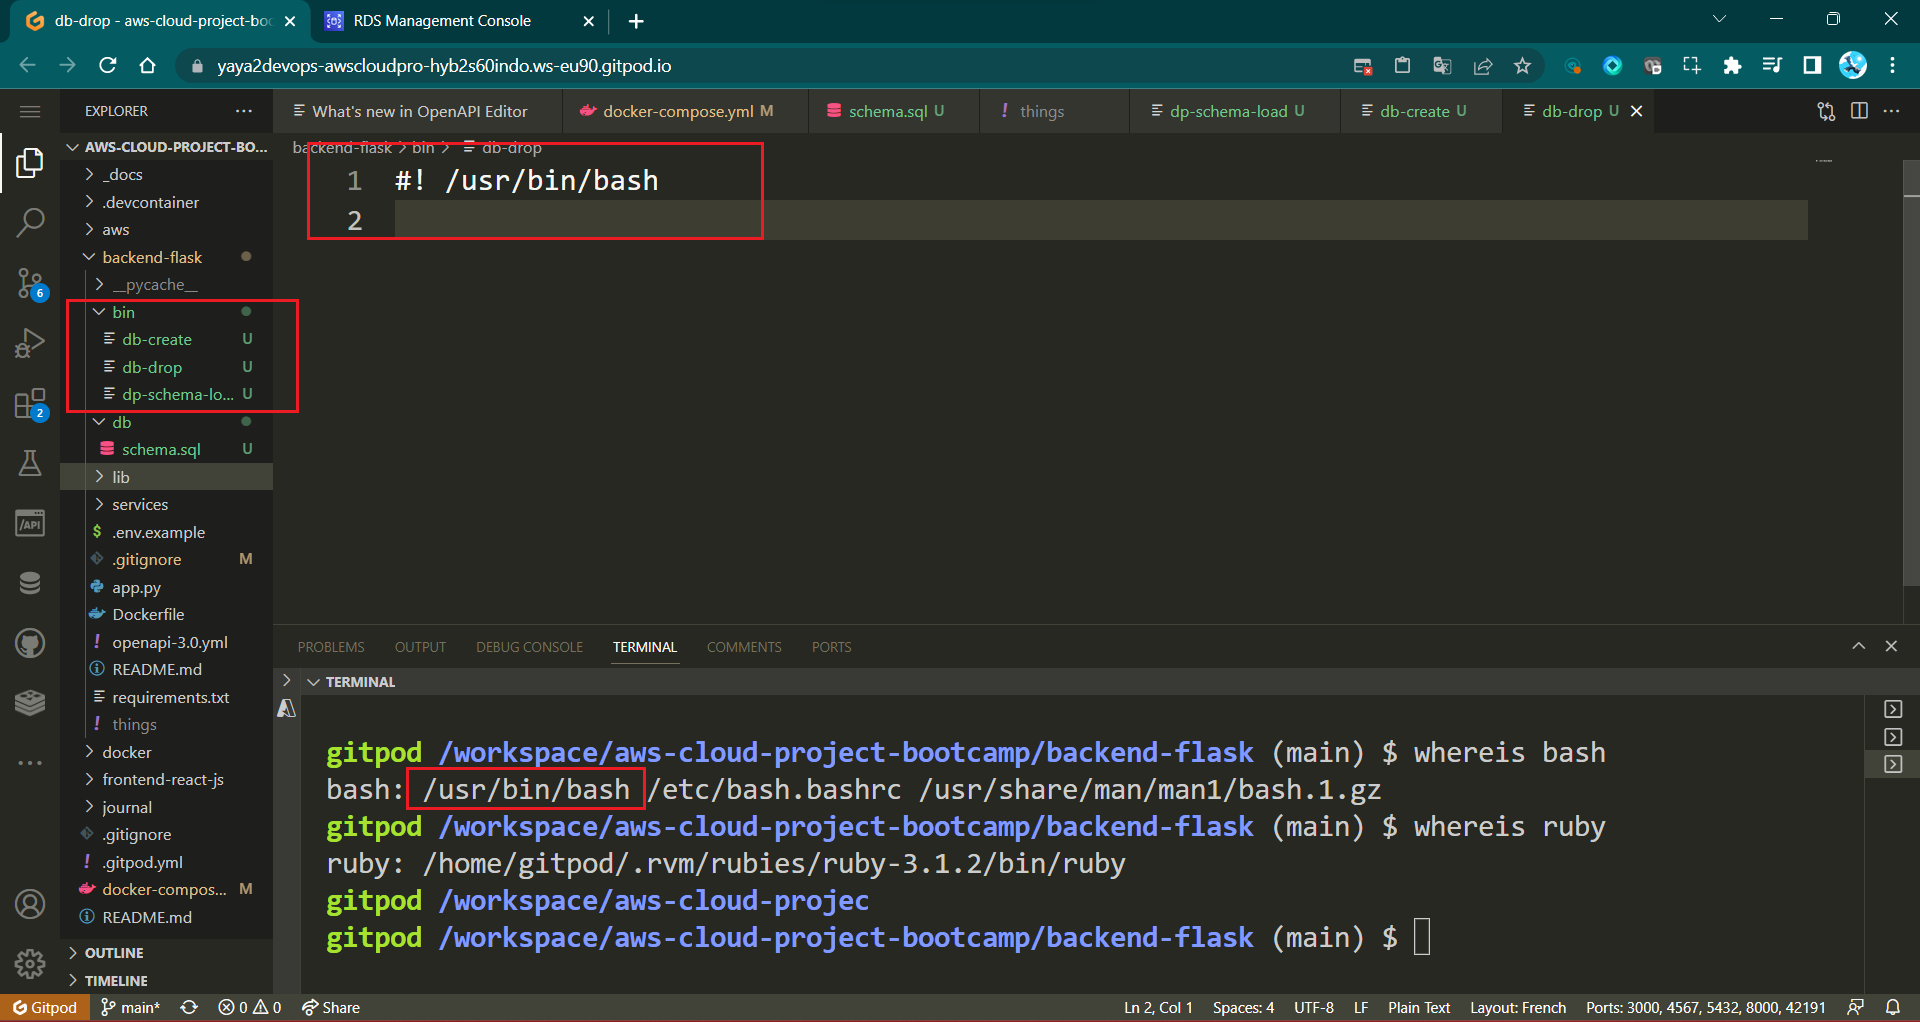
- Make all the script files executable by running the following command for each file:
chmod u+x bin/<filename>- You can apply to all the bin directory in one command to all files:
chmod -R u+x bin/
Step 3: Implement Database Operation Scripts
- Develop
db-createscript
#! /usr/bin/bash

NO_DB_CONNECTION=$(sed 's/\/cruddur//g' <<< "$CONNECTION_URL")
psql $NO_DB_CONNECTION -c "create database cruddur;"First: Uses thesedcommand to extract a modified version of theCONNECTION_URL. This modified URL removes the trailing "/cruddur" segment from the connection URL. The modified URL is stored in theNO_DB_CONNECTIONvariable.Second: Executes thepsqlcommand to create a new database named "cruddur" using the modified connection URL stored in theNO_DB_CONNECTIONvariable. The-cflag specifies a command to be executed withinpsql.
sed 's/\/cruddur//g'To get rid of / do \ infront of it
for this /cruddur// It will take it and change it with empty using //
Now let's feed it to our connection string:
sed 's/\/cruddur//g' <<< "$CONNECTION_URL"WRAPPING in dollar sign so we can assign it to our env var
NO_DB_CONNECTION=$(sed 's/\/cruddur//g' <<< "$CONNECTION_URL"For more, refer to the sed command.
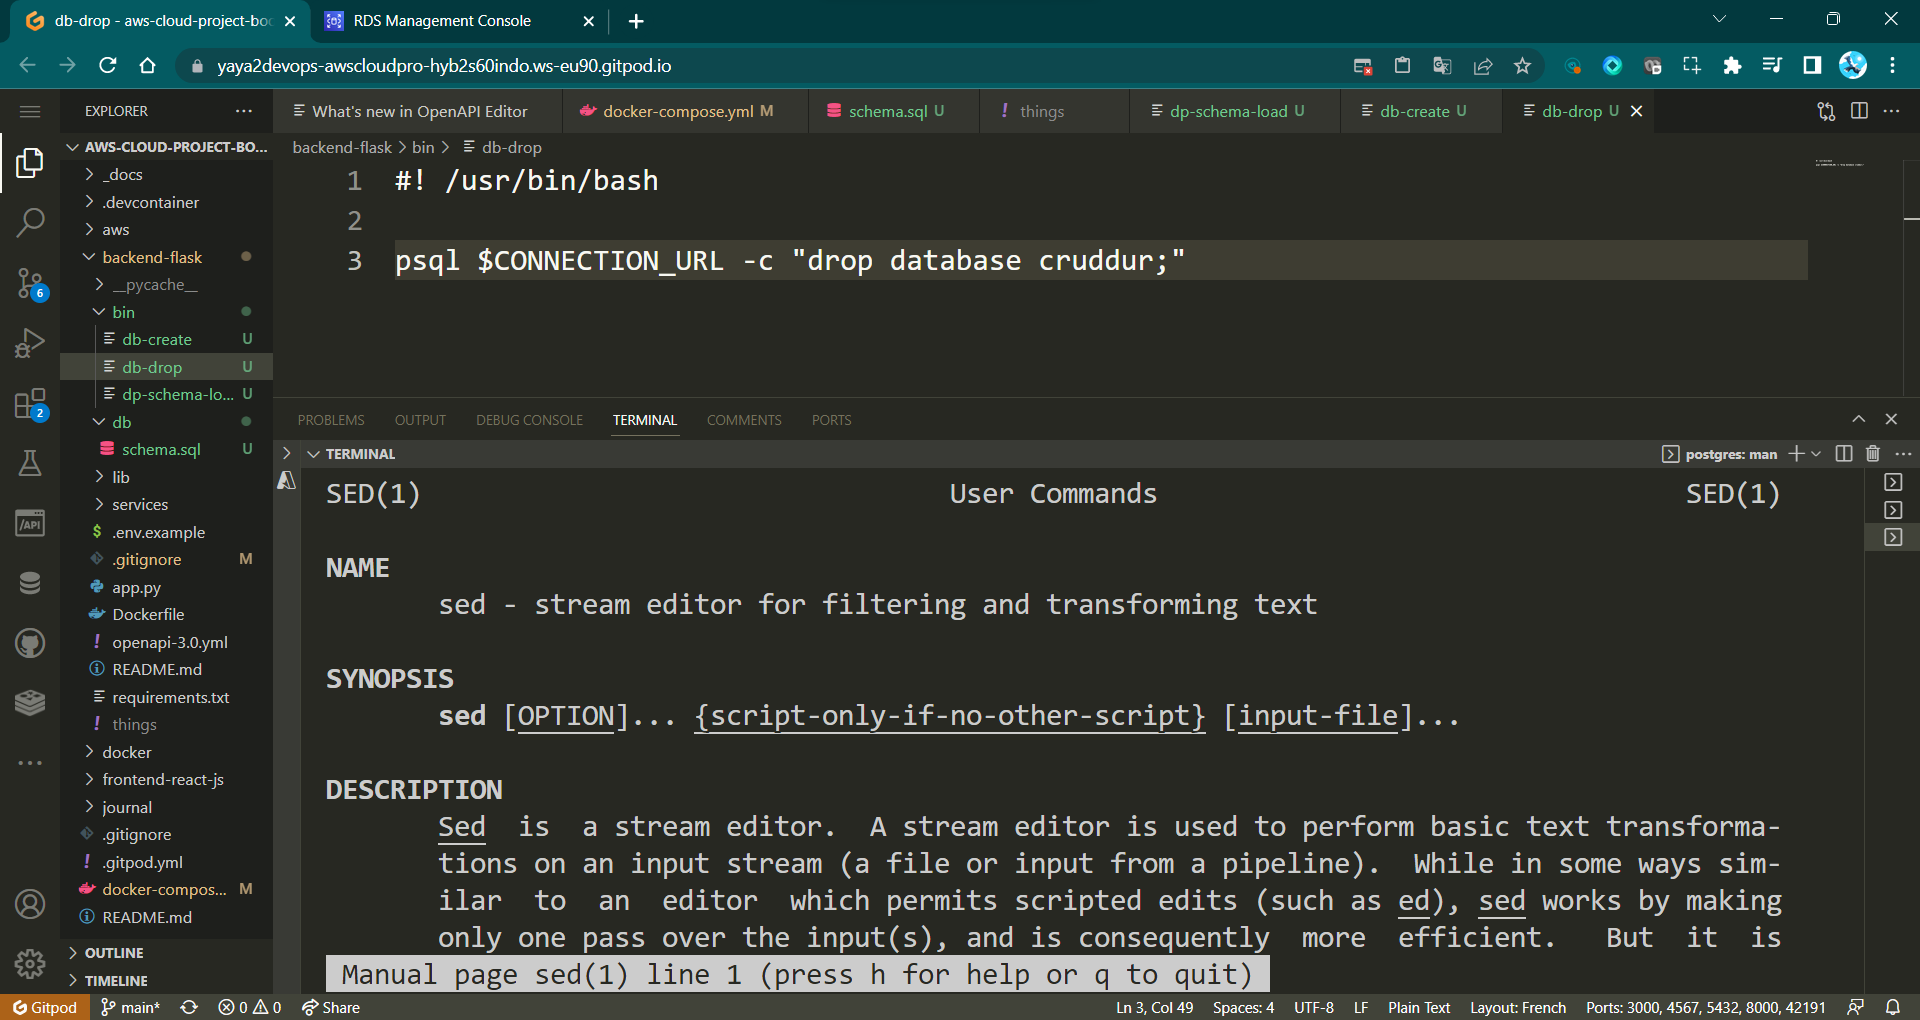
- Develop
db-dropscript
#! /usr/bin/bash

NO_DB_CONNECTION_URL=$(sed 's/\/cruddur//g' <<<"$CONNECTION_URL")
psql $NO_DB_CONNECTION_URL -c "drop database IF EXISTS cruddur;"First: ModifyCONNECTION_URLto remove "/cruddur" segment, store inNO_DB_CONNECTION_URL.Second: Drop database "cruddur" using modified URL, if exists.
- Develop
db-connectscript
#! /usr/bin/bash

if [ "$1" = "prod" ]; then
  echo "using production"
  URL=$PRODUCTION_URL
else
  URL=$CONNECTION_URL
fi

psql $URL- Determine connection URL based on argument:
- If argument is "prod," use production URL.
- Otherwise, use default connection URL.
- Use the determined URL to connect using
psql.
./bin/db-connect
psql (13.10 (Ubuntu 13.10-1.pgdg22.04+1))
Type "help" for help.


cruddur=#- Develop
db-sessionsscript
#! /usr/bin/bash


if [ "$1" = "prod" ]; then
  echo "using production"
  CONNECTION_URL=$PROD_CONNECTION_URL
else
  CONNECTION_URL=$CONNECTION_URL
fi

NO_DB_URL=$(sed 's/\/cruddur//g' <<<"$CONNECTION_URL")
psql $NO_DB_URL -c "select pid as process_id, \
       usename as user,  \
       datname as db, \
       client_addr, \
       application_name as app,\
       state \
from pg_stat_activity;"- Determine connection URL based on argument:
- If argument is "prod," use production connection URL.
- Otherwise, use default connection URL.
- Modify the determined connection URL, store in
NO_DB_URL. - Use
psqlto execute a SQL query that retrieves process information from the PostgreSQLpg_stat_activityview.
+-------------+----------+----------+--------------+------+---------+
| Process ID  |   User   |    DB    | Client Addr  | App  |  State  |
+-------------+----------+----------+--------------+------+---------+
|      A      | postgres | postgres | x.y.z.a      | psql | active  |
|      B      | postgres | cruddur  | x.y.z.a      |      | idle    |
+-------------+----------+----------+--------------+------+---------+- Develop
seed.sqlfor the testing data.
./backend-flask/
│
└── sql/
    └── seed.sql
Take me to where this worked.
-- this file was manually created

INSERT INTO
    public.users (
        display_name,
        handle,
        cognito_user_id
    )
VALUES  (
        'Yahya Abulhaj',
        'yaya2devops',
        'MOCK'
    );

INSERT INTO
    public.activities (user_uuid, message, expires_at)
VALUES ( (
            SELECT uuid
            from public.users
            WHERE
                users.handle = 'yaya2devops'
            LIMIT
                1
        ), 'This was imported as seed data!', current_timestamp + interval '10 day'
)- Develop
db-seedscript to seed the above.
#! /usr/bin/bash

ABS_PATH=$(readlink -f "$0")
DB_PATH=$(dirname $ABS_PATH)
BIN_PATH=$(dirname $DB_PATH)
PROJECT_PATH=$(dirname $BIN_PATH)
BACKEND_FLASK_PATH="$PROJECT_PATH/backend-flask"
seed_path="$BACKEND_FLASK_PATH/db/seed.sql"
echo $seed_path

if [ "$1" = "prod" ]; then
  echo "using production"
  CONNECTION_URL=$PRODUCTION_URL
else
  CONNECTION_URL=$CONNECTION_URL
fi

psql $CONNECTION_URL cruddur < $seed_path- Get script's absolute path, store in
ABS_PATH. - Derive script's directory path, store in
DB_PATH. - Derive bin directory path, store in
BIN_PATH. - Derive project directory path, store in
PROJECT_PATH. - Define Flask project path in
BACKEND_FLASK_PATH. - Define seed SQL file path in
seed_path. - Echo
seed_pathto console. - Determine connection URL based on provided argument:
- If
prod,use production connection URL. - Else, use default connection URL.
- If
- Use psql to execute seed SQL file on specified database (cruddur) using determined connection URL.
./bin/db-seed
== db-seed
db-seed
running in development
INSERT 0 2
INSERT 0 1- Develop
db-schema-loadscript
#! /usr/bin/bash

ABS_PATH=$(readlink -f "$0")
DB_PATH=$(dirname $ABS_PATH)
BIN_PATH=$(dirname $DB_PATH)
PROJECT_PATH=$(dirname $BIN_PATH)
BACKEND_FLASK_PATH="$PROJECT_PATH/backend-flask"
schema_path="$BACKEND_FLASK_PATH/db/schema.sql"
echo $schema_path

if [ "$1" = "prod" ]; then
  echo "using production"
  CONNECTION_URL=$PRODUCTION_URL
else
  CONNECTION_URL=$CONNECTION_URL
fi


psql $CONNECTION_URL cruddur < $schema_path- Get absolute path as
ABS_PATH. - Derive script's directory as
DB_PATH. - Define Flask project path as
BACKEND_FLASK_PATH. - Determine connection URL based on argument as
CONNECTION_URL. - Define schema file path as
schema_path. - Echo schema path.
- If argument is "prod," use production URL.
- Use
psqlto apply schema setup using determined URL.
Refer to the process of designing the schema for PostgreSQL.
- Observe
rds-update-sg-rule, It was used for this purpose.
Step 4: Synergizing Scripts for Speed
We'll streamline the scripts needed to set up PostgreSQL each time, simplifying the process of configuring psql for future workspaces.
- Develop
db-setupscript
#! /usr/bin/bash
set -e # stop it if it failed at any stage

ABS_PATH=$(readlink -f "$0")
DB_PATH=$(dirname $ABS_PATH)

source "$DB_PATH/drop"
source "$DB_PATH/create"
source "$DB_PATH/schema-load"
source "$DB_PATH/seed"
python "$DB_PATH/migrate"
python "$DB_PATH/update_cognito_user_ids"
This script is designed to automate the process of managing a database. It performs several essential tasks related to the database setup and maintenance.
source "$DB_PATH/drop": Executes a script to drop an existing database.source "$DB_PATH/create": Executes a script to create a new database.source "$DB_PATH/schema-load": Executes a script to load the database schema.source "$DB_PATH/seed": Executes a script to populate the database with initial data.python "$DB_PATH/migrate": Executes a Python script namedmigratefor database migrations.python "$DB_PATH/update_cognito_user_ids": Executes a Python script for updating user IDs cognito
Bonus Step: Aesthetics in Bash Scripts
Incorporating color into Bash scripts is a way to elevate their visual appeal and clarity. Instead of monotonous plain text, you can add vibrancy using colored outputs.
To achieve this effect, a combination of escape codes and variables is employed.
```bash
CYAN='\033[1;36m'
NO_COLOR='\033[0m'
LABEL="sqldb-welcome-setup"
printf "${CYAN}==== ${LABEL}${NO_COLOR}\n"
The above snippet adds color to the scripts using the echo command that uses escape sequences stored in `CYAN` and `NO_COLOR` variables to apply cyan and default colors to text.

When combined in the printf statement, it creates visually appealing output with `==` in cyan and the label in the default color.

Here's a table presenting the colors to choose from;

| Color   | Escape Code   | Example Variable   | Example Usage                    |
|:--------|:--------------|:-------------------|:----------------------------------|
| Red     | '\033[1;31m'  | RED='\033[1;31m'   | printf "\${RED}Text\${NO_COLOR}\n" |
| Green   | '\033[1;32m'  | GREEN='\033[1;32m' | printf "\${GREEN}Text\${NO_COLOR}\n" |
| Blue    | '\033[1;34m'  | BLUE='\033[1;34m'  | printf "\${BLUE}Text\${NO_COLOR}\n" |
| Yellow  | '\033[1;33m'  | YELLOW='\033[1;33m'| printf "\${YELLOW}Text\${NO_COLOR}\n" |
| Magenta | '\033[1;35m'  | MAGENTA='\033[1;35m'| printf "\${MAGENTA}Text\${NO_COLOR}\n" |
| Cyan    | '\033[1;36m'  | CYAN='\033[1;36m'  | printf "\${CYAN}Text\${NO_COLOR}\n" |
| Reset   | '\033[0m'     | NO_COLOR='\033[0m' | Reset color to default            |

1. Enhance the visual appeal of the script**s** within the setup script by applying colors that align with your preferences, such as using red for "drop" and green for "create," and so on.
2. Add this visual to the *setup* script itself
```sh
CYAN='\033[1;36m'
NO_COLOR='\033[0m'
LABEL="sqldb-welcome-setup"
printf "${CYAN}==== ${LABEL}${NO_COLOR}\n"- Execute the Setup script to experience the visual enhancements in action.

Text Transformation with Stream editor
The sed command is a stream editor in Unix that can be used to perform various operations on text files, such as searching, replacing, inserting, and deleting text.
It is a powerful tool that can be used to automate many text processing tasks.
First, we will start by elucidating the command. Subsequently, we will delve into structured examples, enabling you to ultimately attain the sed mastery.
The basic syntax of the sed command is as follows:
sed [options] 'command' [file]- The
optionsare optional modifiers that control the behavior of the sed command. - The
commandis the actual text processing operation that you want to perform. - The
fileis the name of the file that you want to process.
The sed command supports a variety of commands, but some of the most common ones include:
s- Substitute text. This command replaces all instances of a specified text with another text.d- Delete text. This command deletes all lines that match a specified pattern.i- Insert text. This command inserts text at the beginning of each line that matches a specified pattern.p- Print text. This command prints all lines that match a specified pattern.
Open Example For Cats and Dogs
The following example shows how to use the sed command to replace:
- The word
dogwith the wordcat; - The word
lovelywithfunny;
In a file called yaya.txt
THIS IS TEXT FILE

I am same
A dog is lovely.
This command will read the file yaya.txt line by line and replace all instances of the word dog with the word cat and the word funny with lovely
sed 's/dog/cat/g; s/lovely/funny/g; s/same/not/g' yaya.txtThe output of the sed command will be written to the standard output.
THIS IS TEXT FILE

I am not
A cat is funny.
Cruddur Removing Substring from Database Connection URLs
Take our drop script for instance without the shebang.
# Using sed to remove '/cruddur' from CONNECTION_URL
NO_DB_CONNECTION_URL=$(sed 's/\/cruddur//g' <<< "$CONNECTION_URL")
psql "$NO_DB_CONNECTION_URL" -c "drop database cruddur;"
The sed command is used to replace all occurrences of /cruddur with an empty string in the CONNECTION_URL variable. The modified URL is then used to drop the database named cruddur using the psql command.
This example assumes that the /cruddur portion of the URL is related to a specific endpoint and is not required for database operations such as dropping or creating databases.
sed For The Real World
This was part of my great time on Google Cloud (opens in a new tab). I made sure to keep it close, and the time comes to expose it for you, beautifully presented!
Consider you work for a doctor and possess a configuration file that requires customization for client-associated IDs and related information.
{
  "VISION_TOPIC": "projects/[PROJECT-ID]/topics/visionapiservice",
  "VIDEOINTELLIGENCE_TOPIC": "projects/[PROJECT-ID]/topics/videointelligenceservice",
  "BIGQUERY_TOPIC": "projects/[PROJECT-ID]/topics/bqinsert",
  "REJECTED_BUCKET": "[FLAGGED_BUCKET_NAME]",
  "RESULT_BUCKET": "[FILTERED_BUCKET_NAME]",
  "DATASET_ID": "[DATASET_ID]",
  "TABLE_NAME": "[TABLE_NAME]",
  "GCS_AUTH_BROWSER_URL_BASE": "https://storage.cloud.google.com/" ,
  "API_Constants": {
        "ADULT" : "adult",
        "VIOLENCE" : "violence",
        "SPOOF" : "spoof",
        "MEDICAL" : "medical"
  }
}
Instead of manually changing each ID and making specific modifications, you can efficiently use the sed command.
sed -i 's/[PROJECT-ID]/$PROJECT_ID/g' config.jsonThis command tells the sed command to open the file config.json in interactive mode and replace all occurrences of the text [PROJECT-ID] with the value of the environment variable $PROJECT_ID.
The -i flag tells sed to make the changes to the file in place.
The following commands work in a similar way:
sed -i 's/[FLAGGED_BUCKET_NAME]/$FLAGGED_BUCKET_NAME/g' config.json
sed -i 's/[FILTERED_BUCKET_NAME]/$FILTERED_BUCKET_NAME/g' config.json
sed -i 's/[DATASET_ID]/$DATASET_ID/g' config.json
sed -i 's/[TABLE_NAME]/$TABLE_NAME/g' config.json
Assuming you have the following environment variables defined.
$PROJECT_IDwith a value like"yaya-project"$FLAGGED_BUCKET_NAMEwith a value like"flagged-bucket"$FILTERED_BUCKET_NAMEwith a value like"filtered-bucket"$DATASET_IDwith a value like"yaya-dataset"$TABLE_NAMEwith a value like"yaya-table"
After running these commands, the content of config.json would be updated as follows:
{
  "VISION_TOPIC": "projects/yaya-project/topics/visionapiservice",
  "VIDEOINTELLIGENCE_TOPIC": "projects/yaya-project/topics/videointelligenceservice",
  "BIGQUERY_TOPIC": "projects/yaya-project/topics/bqinsert",
  "REJECTED_BUCKET": "flagged-bucket",
  "RESULT_BUCKET": "filtered-bucket",
  "DATASET_ID": "yaya-dataset",
  "TABLE_NAME": "yaya-table",
  "GCS_AUTH_BROWSER_URL_BASE": "https://storage.cloud.google.com/" ,
  "API_Constants": {
        "ADULT" : "adult",
        "VIOLENCE" : "violence",
        "SPOOF" : "spoof",
        "MEDICAL" : "medical"
  }
}
And there you have it, ladies and gentlemen, a compelling use case of the sed command.
This process can be further streamlined by scripting these commands into one.
- Create a file and call it
wo-sed-ho
#!/bin/bash

# Replace these with your actual values
PROJECT_ID="your_project_id"
FLAGGED_BUCKET_NAME="your_flagged_bucket"
FILTERED_BUCKET_NAME="your_filtered_bucket"
DATASET_ID="your_dataset_id"
TABLE_NAME="your_table_name"

# Define a function to perform the sed replacement
replace_value() {
    sed -i "s/\[$1\]/$2/g" config.json
}

# Run the sed commands concurrently
replace_value "PROJECT-ID" "$PROJECT_ID" &
replace_value "FLAGGED_BUCKET_NAME" "$FLAGGED_BUCKET_NAME" &
replace_value "FILTERED_BUCKET_NAME" "$FILTERED_BUCKET_NAME" &
replace_value "DATASET_ID" "$DATASET_ID" &
replace_value "TABLE_NAME" "$TABLE_NAME" &

# Wait for all background processes to finish
wait

echo "Yaya Gains You Time. Replaced!"- Make the file executable
chmod u+x wo-sed-ho- Run the
wo-sed-hoscript
./bin/wo-sed-ho

Yaya Gains You Time. Replaced!
Implement PostgreSQL Client
Currently, the data we have access to is in a simulated state. In order to retrieve actual information from our database—essentially making a connection between PostgreSQL and Python—we need to develop a PostgreSQL client specifically designed for Python integration using a database pooling.
- Step 1: Install Required Libraries
- Step 2: Set Environment Variable
- Step 3: Create
db.pyUtility Library - Step 4: Integrate
db.pyinto Activities - Step 5: Refactor API Call in home_activities
- Step 6: Verify and Test
The following file structure is our target for this implementation:
./backend-flask
├── db
│   └── seed.sql
├── lib
│   └── db.py
├── services
│   └── home_activities.py
└── requirements.txt
Step 1: Install Required Libraries
- Add the necessary libraries to your
backend-flask/requirements.txtfile:
psycopg[binary]
psycopg[pool]- Install the libraries using the following command:
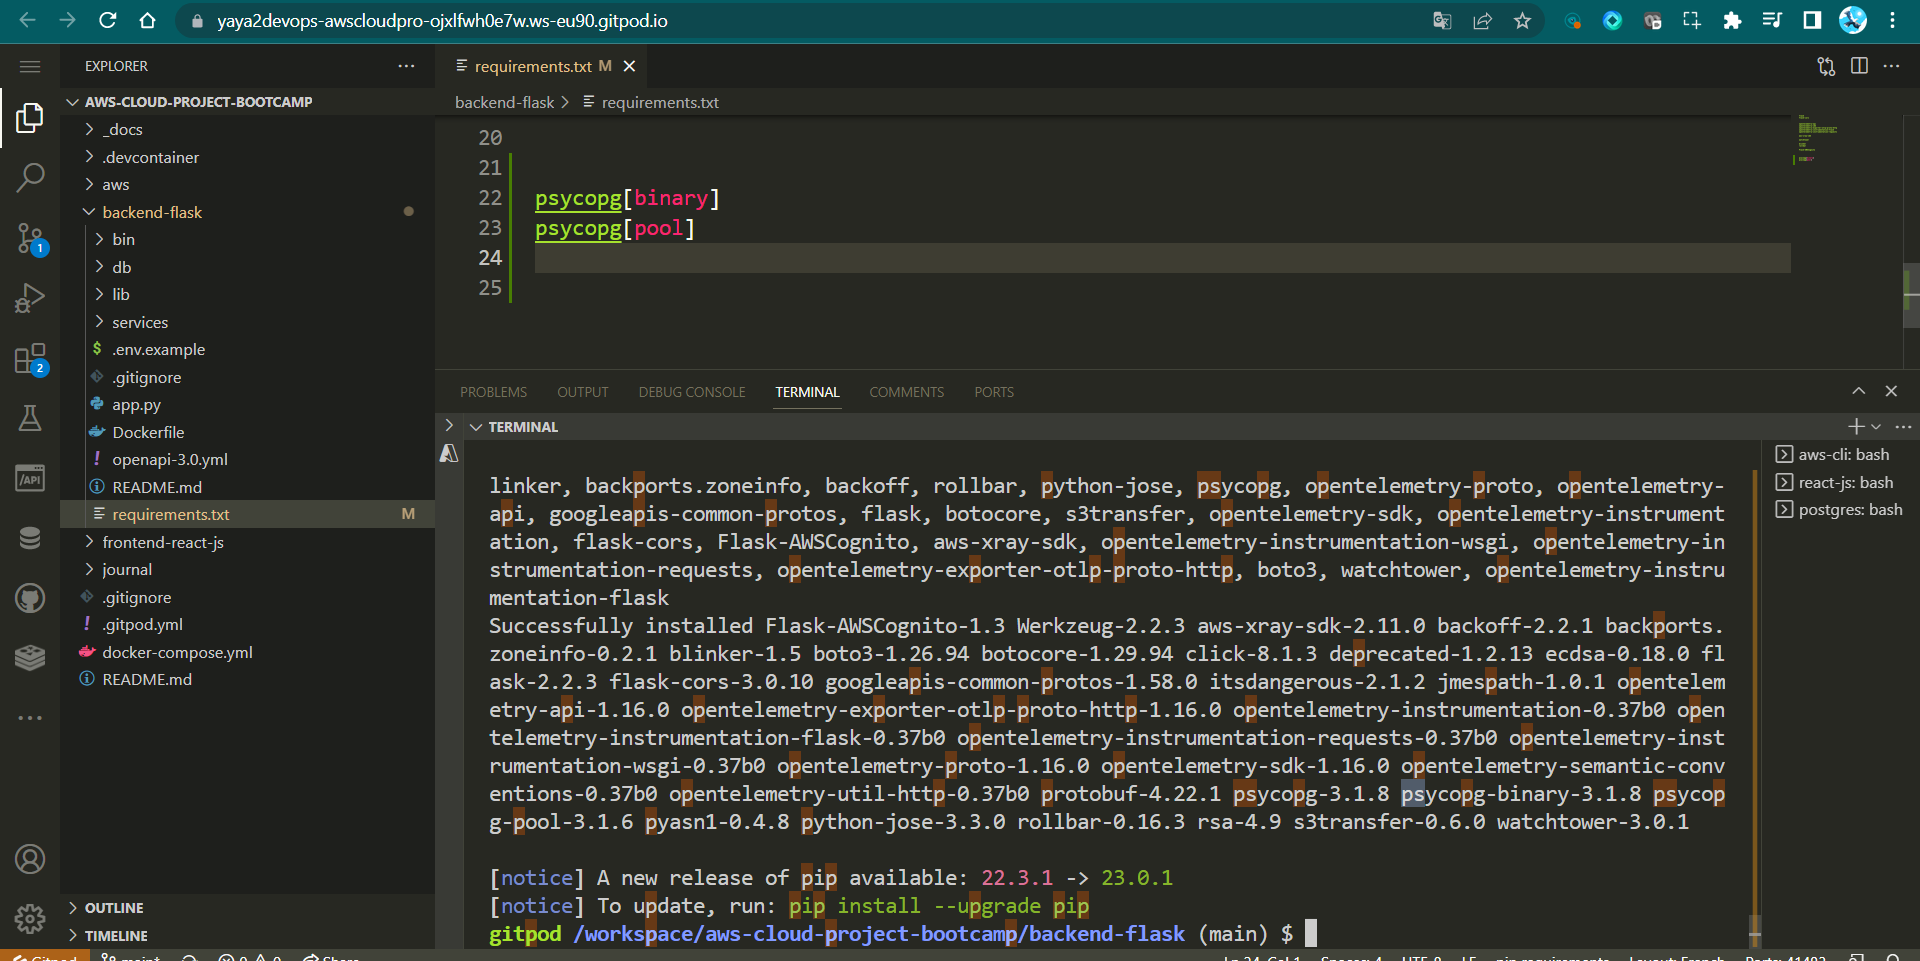
pip install -r requirements.txtStep 2: Set Environment Variable
In your docker-compose.yml file, set the environment variable for your backend-flask application:
CONNECTION_URL: "postgresql://postgres:password@db:5432/cruddur"Important: Avoid using a password that ends with the character '!' because this can lead to an issue with the URL structure. The combination of '!' and '@' in the URL might trigger errors when launching certain commands.
Step 3: Create db.py Utility Library
Create a utility library named db.py under the backend-flask/lib.
- Purpose: This file is a utility library that manages interactions with a PostgreSQL database in the Python application.
- Import: The
psycopg_poollibrary'sConnectionPoolis imported to handle connection pooling. - Import: The
osmodule is imported to access environment variables.
from psycopg_pool import ConnectionPool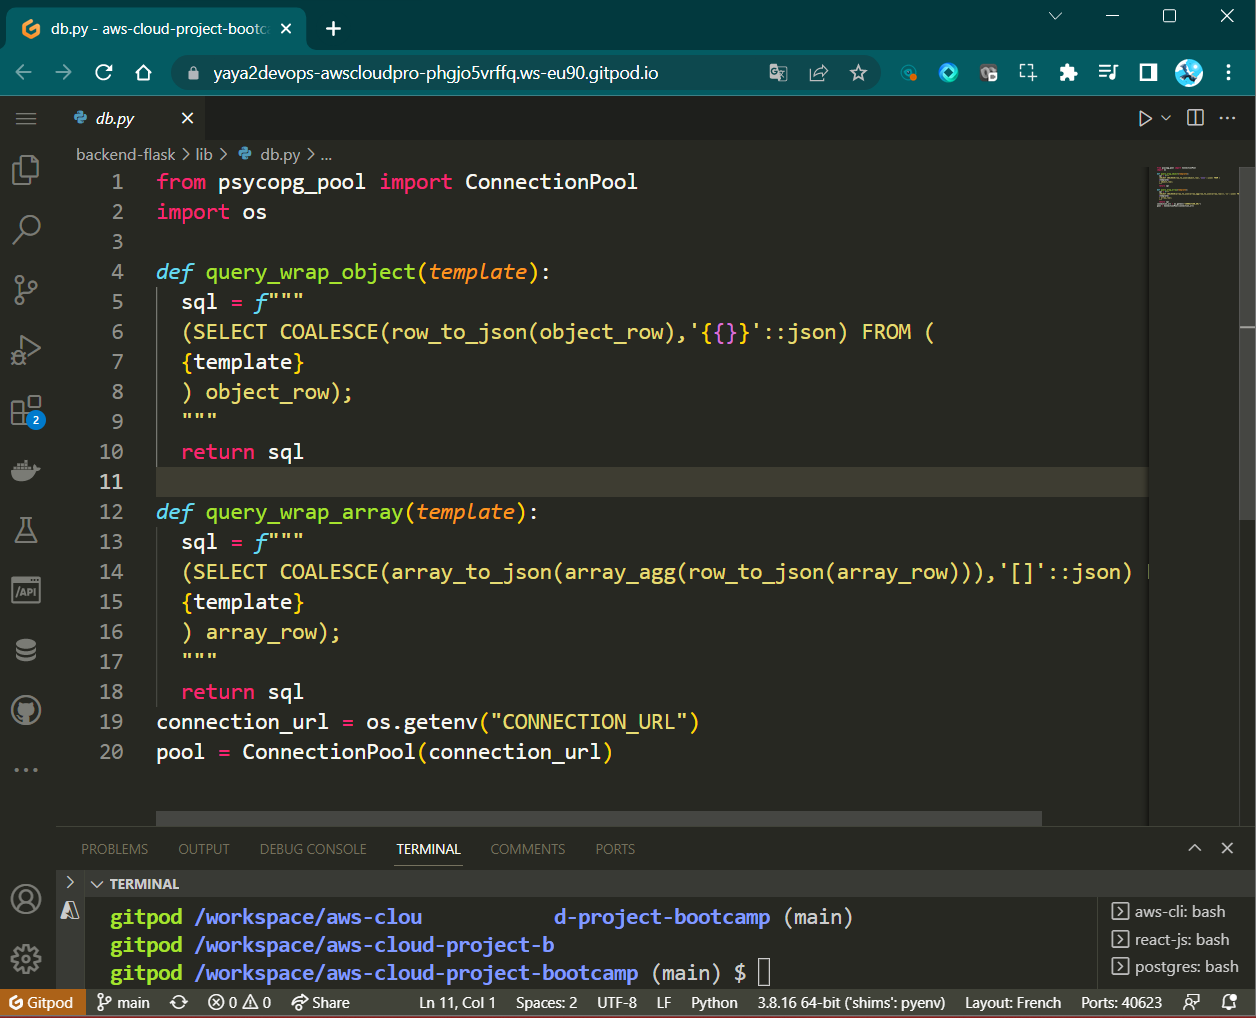
import os- Function
query_wrap_object(template):- This function wraps a provided SQL query template in a structure that fetches a single JSON object result.
- It uses the
row_to_jsonfunction to convert the result row into a JSON object. - The
COALESCEfunction ensures that an empty JSON object is returned if the result is null.
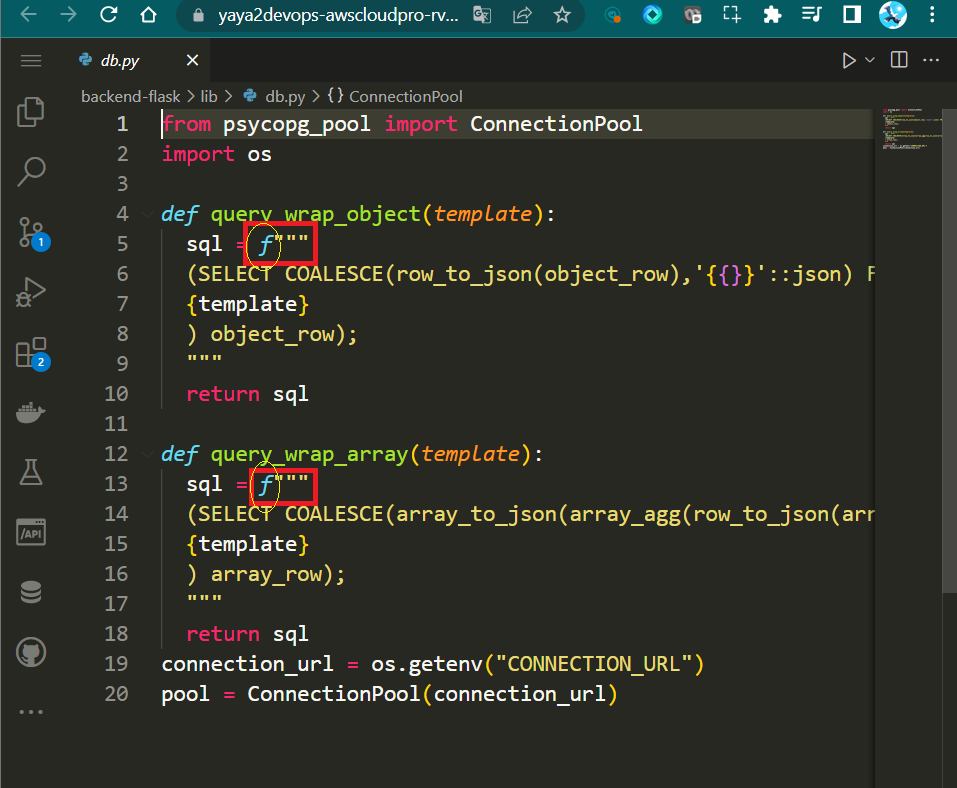
def query_wrap_object(template):
    sql = f"""
    (SELECT COALESCE(row_to_json(object_row),'{{}}'::json) FROM (
    {template}
    ) object_row);
    """
return sql- Function
query_wrap_array(template):- This function wraps a provided SQL query template in a structure that fetches a JSON array of rows.
- It employs
array_to_jsonandarray_aggfunctions to convert result rows into a JSON array. - The
COALESCEfunction handles cases where the result is null, returning an empty JSON array.
def query_wrap_array(template):
    sql = f"""
    (SELECT COALESCE(array_to_json(array_agg(row_to_json(array_row))),'[]'::json) FROM (
    {template}
    ) array_row);
    """
return sql- Connection URL:
- The environment variable
CONNECTION_URLis fetched usingos.getenv. - This URL is necessary for establishing a connection to the PostgreSQL database.
- The environment variable
connection_url = os.getenv("CONNECTION_URL")
pool = ConnectionPool(connection_url)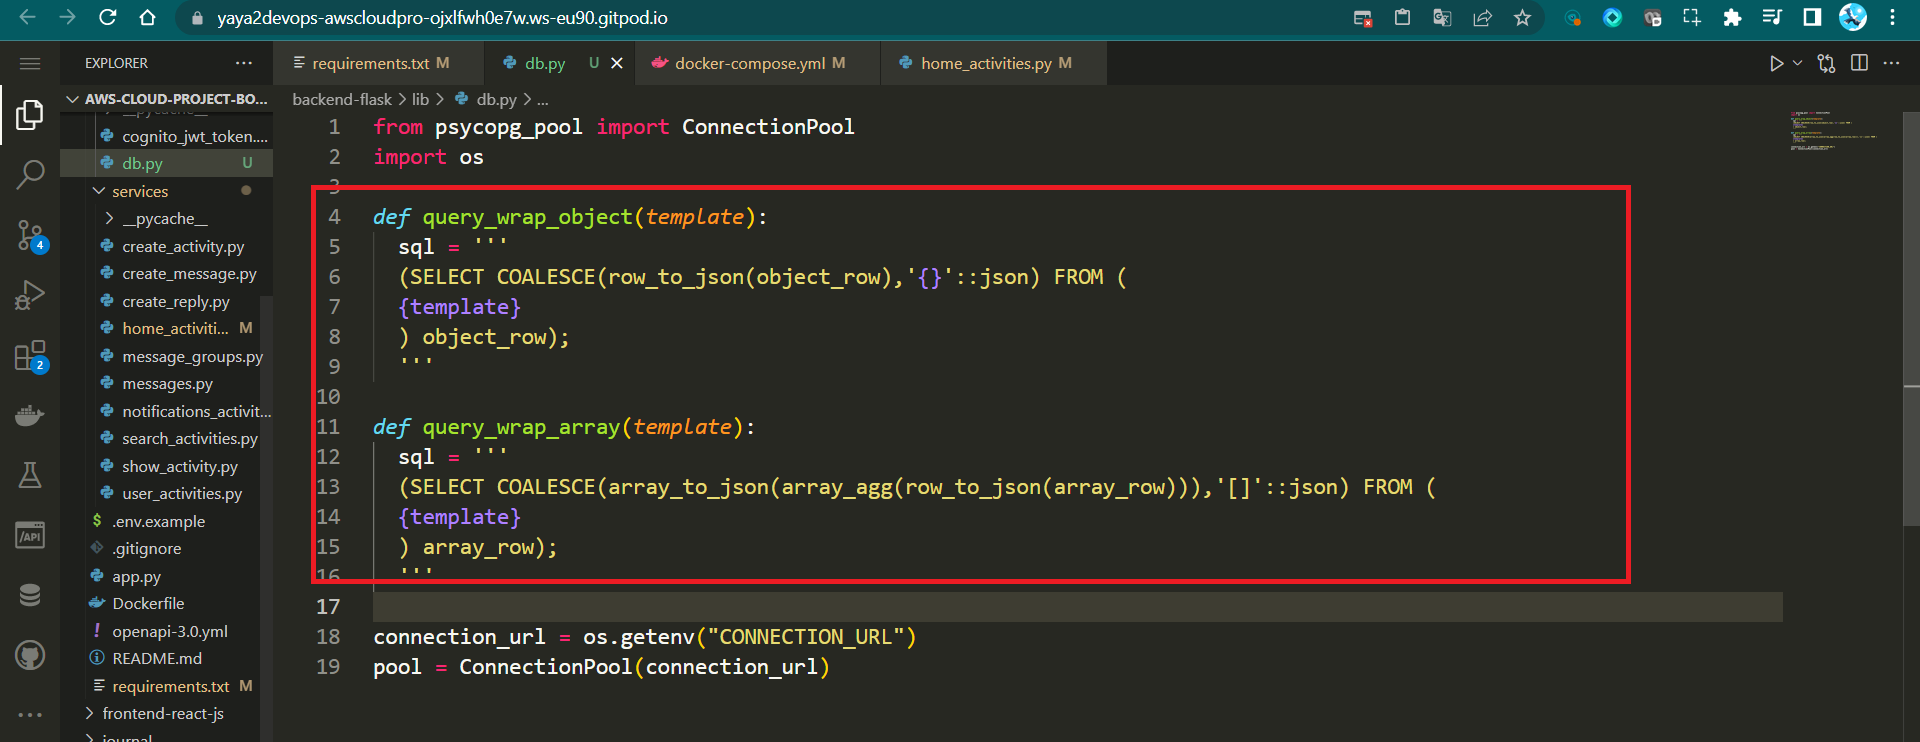
- Connection Pool:
- The
ConnectionPoolis instantiated using the fetchedCONNECTION_URL. - Connection pooling optimizes database connections for efficiency and performance.
- The
Step 4: Integrate db.py into Activities
- Import the required functions and objects from
db.pyinto yourhome_activities:
from lib.db import pool, query_wrap_array- Initiate a basic query
- Inject the current SQL and examine the user interface.
- Design the required to retrieve specific columns from two tables:
activitiesandusers.
SELECT
  activities.uuid,
  users.display_name,
  users.handle,
  activities.message,
  activities.replies_count,
  activities.reposts_count,
  activities.likes_count,
  activities.reply_to_activity_uuid,
  activities.expires_at,
  activities.created_at
FROM public.activities
LEFT JOIN public.users ON users.uuid = activities.user_uuid
ORDER BY activities.created_at DESC- Columns being retrieved:
activities.uuid: Unique identifier for each activity.users.display_name: Display name of the user associated with the activity.users.handle: User's handle or username.activities.message: Content or message of the activity.activities.replies_count: Number of replies received by the activity.activities.reposts_count: Number of times the activity has been reposted.activities.likes_count: Number of likes received by the activity.activities.reply_to_activity_uuid: UUID of the activity to which this activity is a reply.activities.expires_at: Expiry date of the activity.activities.created_at: Timestamp of when the activity was created.
- The
LEFT JOINoperation connects theuserstable with theactivitiestable using the UUIDs, linking user information to each activity. - The results are ordered by the
created_attimestamp in descending order.
- Pass it to sql and create multi-line strings with
"""
sql = """
  QUERY GOES HERE
"""- Using triple quotes eliminates the need to escape line breaks or other special characters within the query.
- Print the SQL to help you up verify the query and debug any issues.
print(sql)- Fetch data from a database, and handling the results.
span.set_attribute("app.result_length", len(results))
with pool.connection() as conn:
    with conn.cursor() as cur:
        cur.execute(sql)
        json = cur.fetchall()
return json[0]- Sets an attribute related to the length of query results.
- Establishes a connection to the database using a connection pool.
- Creates a cursor to interact with the database.
- Executes the SQL query using the cursor.
- Fetches all results from the executed query.
- Returns the first row of fetched data as a tuple.
This process effectively retrieves data from the database, processes it, and returns a specific data point for further handling or display.
- Replace the existing code in the
home_activitiesscript with the code we just created.
sql = """
      SELECT
        activities.uuid,
        users.display_name,
        users.handle,
        activities.message,
        activities.replies_count,
        activities.reposts_count,
        activities.likes_count,
        activities.reply_to_activity_uuid,
        activities.expires_at,
        activities.created_at
      FROM public.activities
      LEFT JOIN public.users ON users.uuid = activities.user_uuid
      ORDER BY activities.created_at DESC
      """
print(sql)
span.set_attribute("app.result_length", len(results))
with pool.connection() as conn:
    with conn.cursor() as cur:
        cur.execute(sql)
        json = cur.fetchall()
return json[0]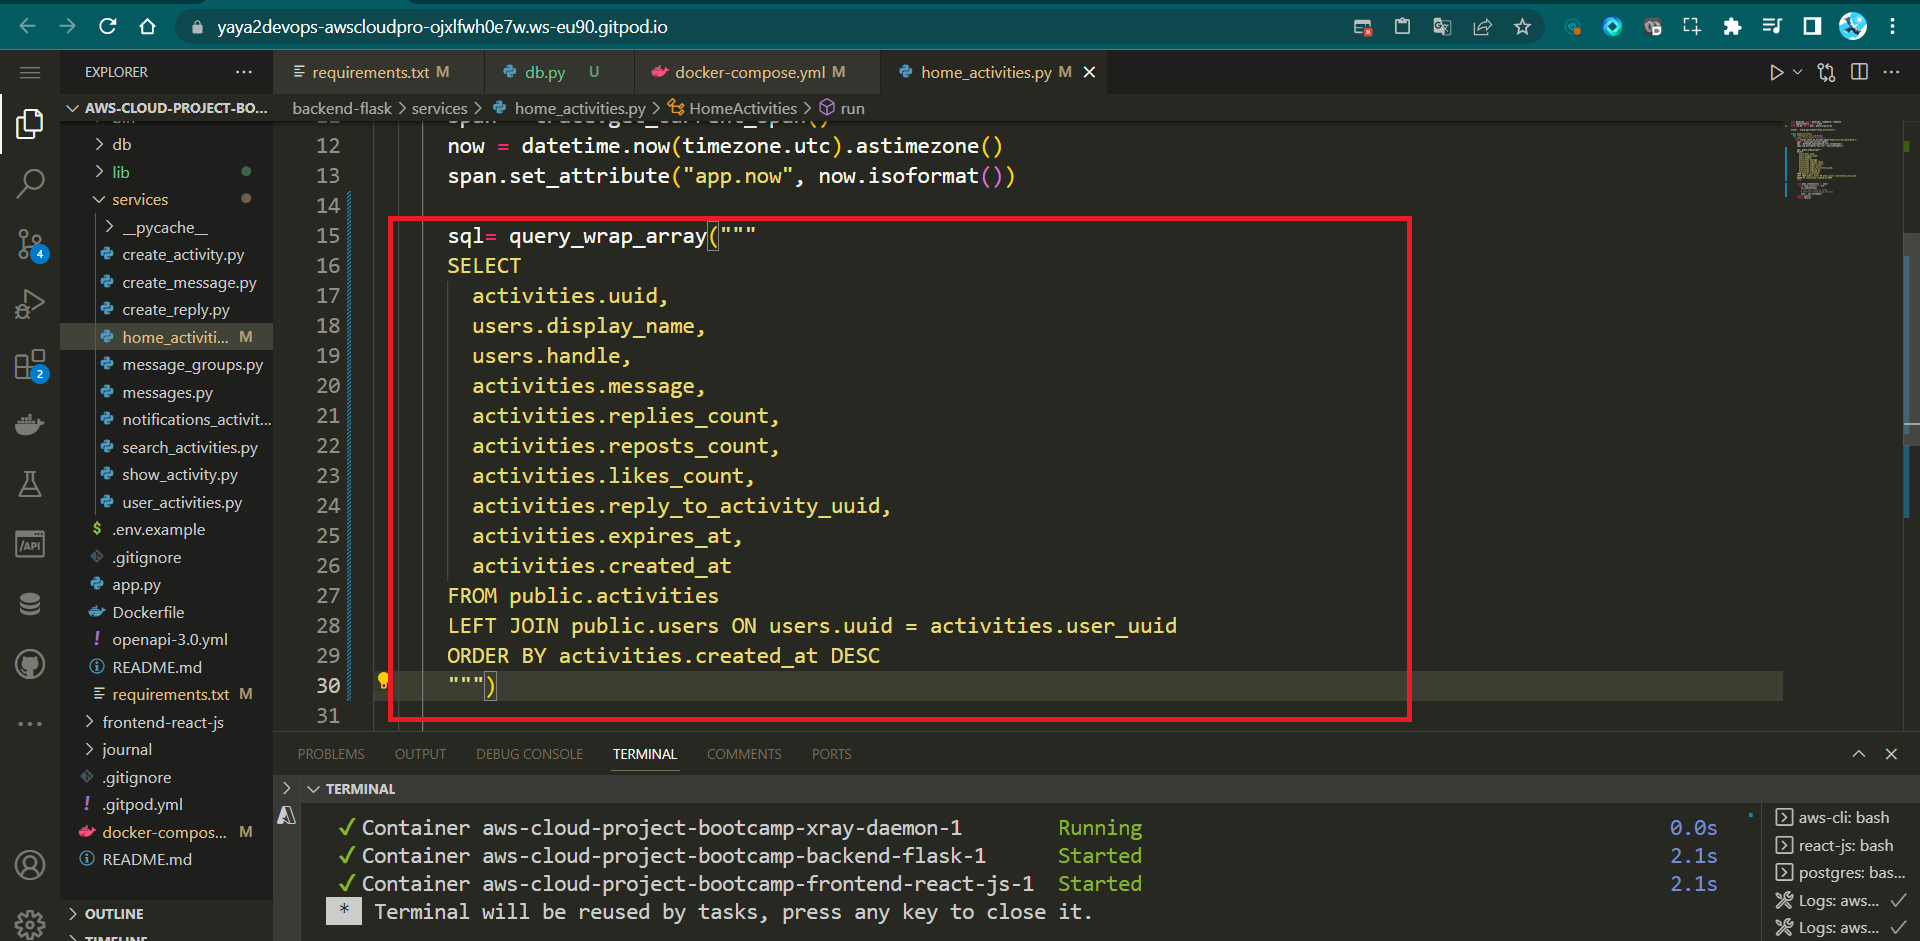
Reechoing, the code is responsible for executing the SQL query, fetching data from a PostgreSQL database, and processing the results.
Step 5: Refactor API Call in home_activities
Refactor the API call in the home_activities script to load SQL templates and query data using the functions from db.py:
sql = db.load_template('activities', 'home')
params = {}
results = db.query_array_json(sql, params)
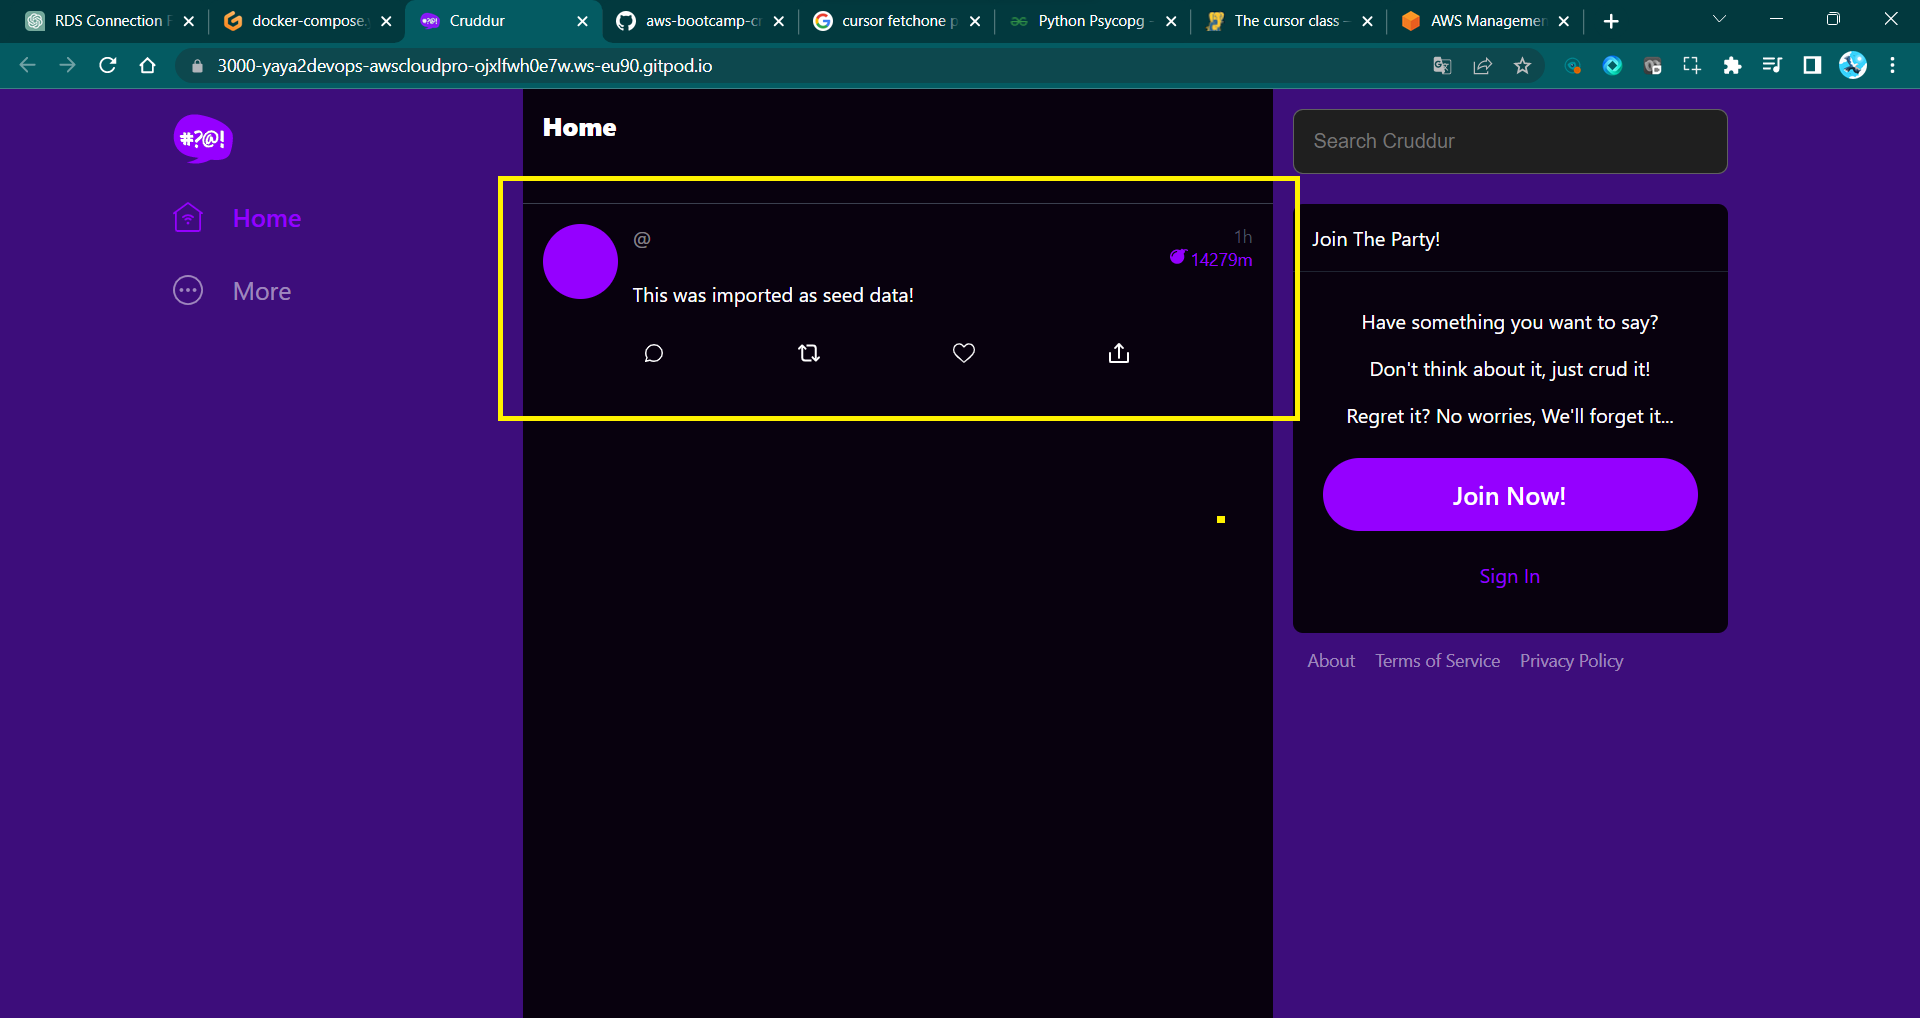
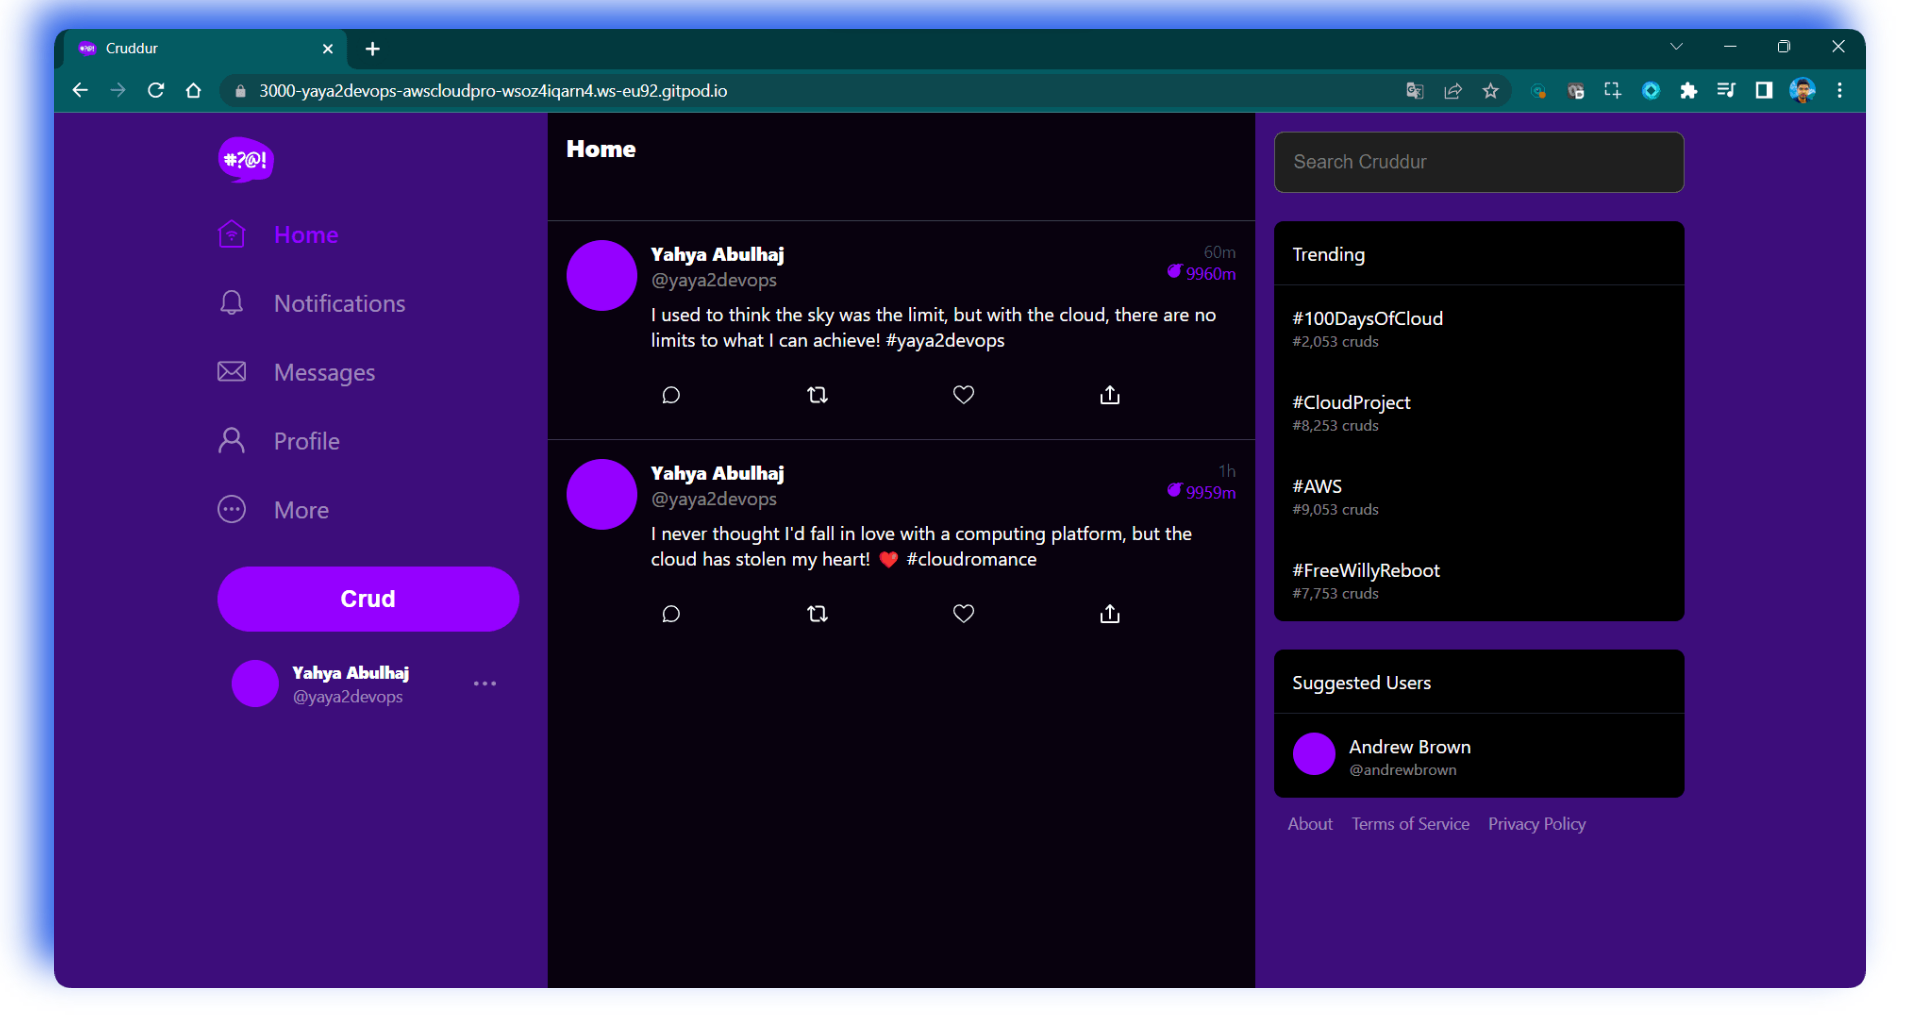
return resultsStep 6: Verify and Test
After composing your Docker containers, the home page should display activity data from the db/seed.sql file instead of mock data.

A Database of Experiences
This development holds immense significance within our application. We'll ensure the storage of users and activities in a production environment, aligned with our SQL schema design.

Lambda for Cognito Post Confirmation
Upon user sign-ups , we lay their entry into the users table. To achieve this, we are considering the implementation of an AWS Lambda function that triggers the user sign up process and store it in RDS.
Get your strokes ready; We'll create and employ the following.
./aws-cloud-project-bootcamp
├── aws
│   ├── lambdas
│   │   └── cruddur-post-confirmation.py
│   └── policies
│       └── LambdaVPCAccessPolicy.json
├── bin
│   ├── db-schema-load prod
│   ├── db-connect prod
└── docker-compose.yml
Step 0 : Create in aws/lambdas/ a cruddur-post-confirmation.py in your codebase.
- Step 1: Create Lambda Function
- Step 2: Configure Environment Variables
- Step 3: Add
Psycopg2Layer - Step 4: Connect Lambda to VPC
- Step 5: Create Lambda Code
- Step 6: Configure Execution Role Permissions
- Step 7: Deploy Lambda Function
- Step 8: Configure Cognito Trigger
- Step 9: Testing and Verifying
- Step 10 : Post Verify
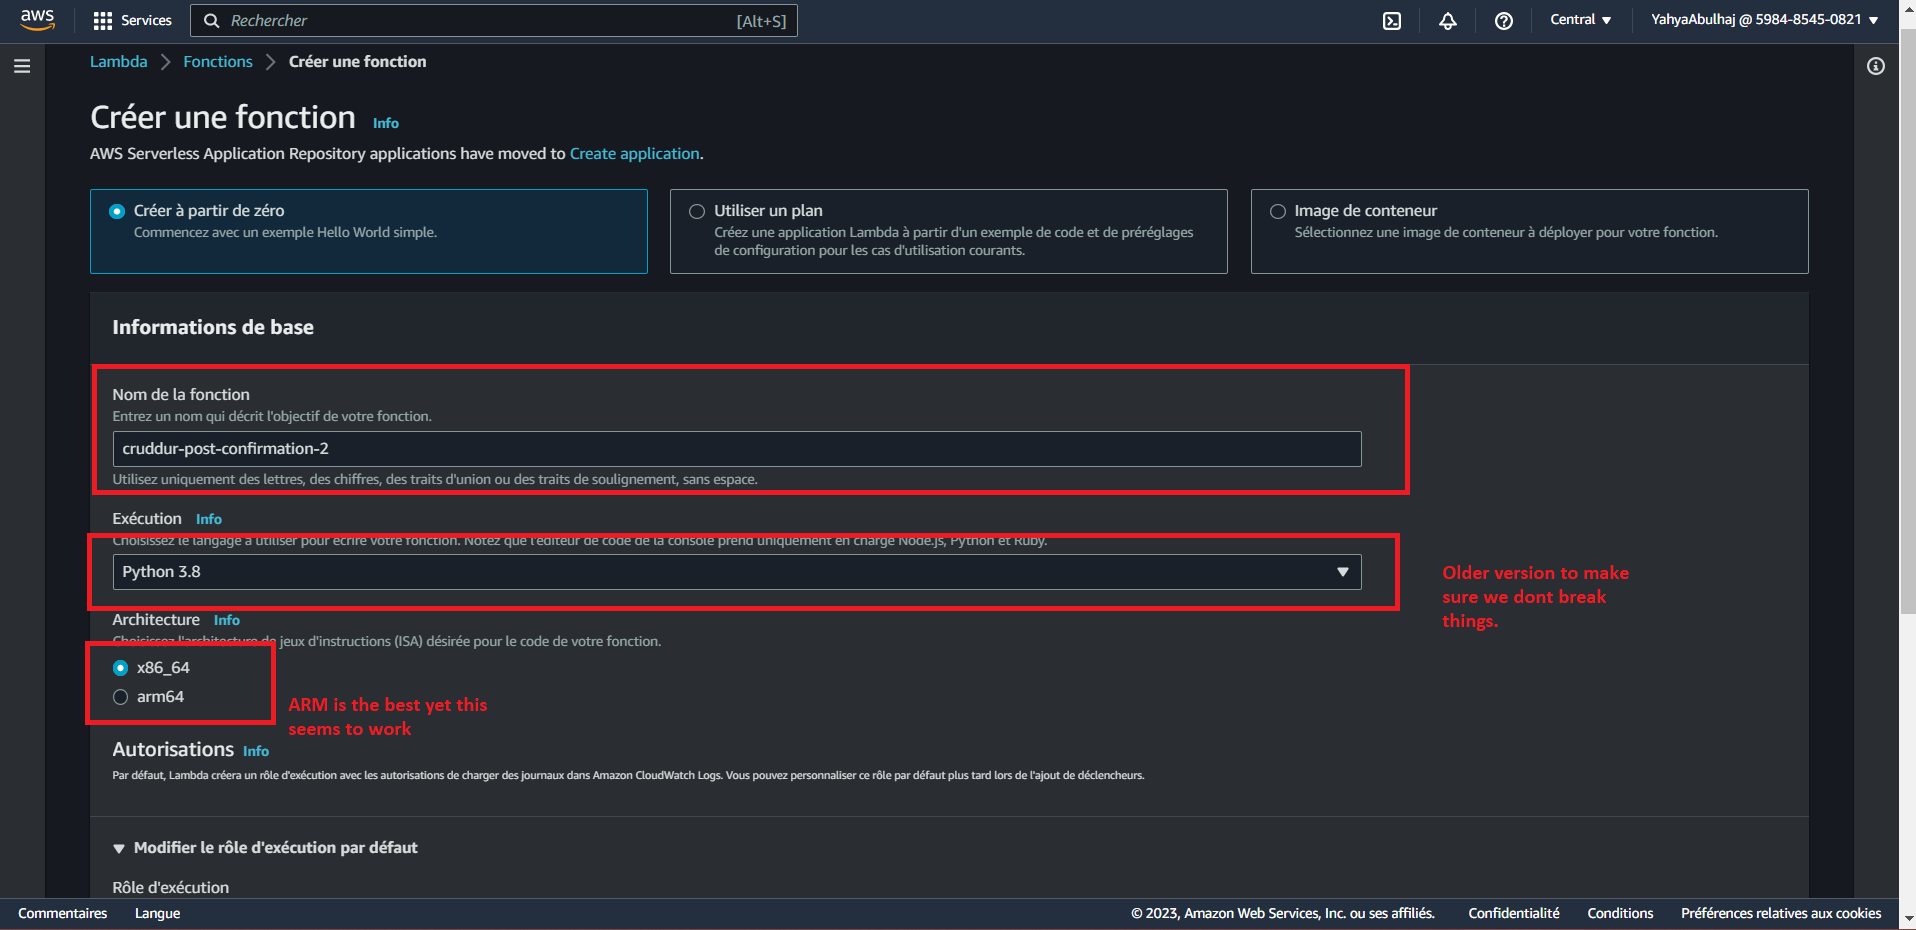
Step 1: Create Lambda Function
- Navigate to the AWS Management Console.
- Open the Lambda service.
- Click on "Create function."
- Choose "Author from scratch."
- Provide the function name as
cognito-post-confirm-functionand select runtime as "Python 3.8." - Keep the default settings for other configurations and click "Create function."
Step 2: Configure Environment Variables
- In the Lambda function's configuration, go to the "Environment variables" section.
- Add a new variable with the key as
CONNECTION_URLand the value as yourPROD_CONNECTION_URL. - In your
docker-compose.ymlmake backend environment as follows:
CONNECTION_URL: "${PROD_CONNECTION_URL}"Step 3: Add Psycopg2 Layer
PostgreSQL libraries being unavailable in the AWS Lambda AMI image, it was necessary for us to undertake the compilation of psycopg2 along with the inclusion of the PostgreSQL libpq.
- In the "Layers" section of the Lambda configuration, click on "Add a layer."
- Use the ARN of Psycopg2 layer to your Lambda function:
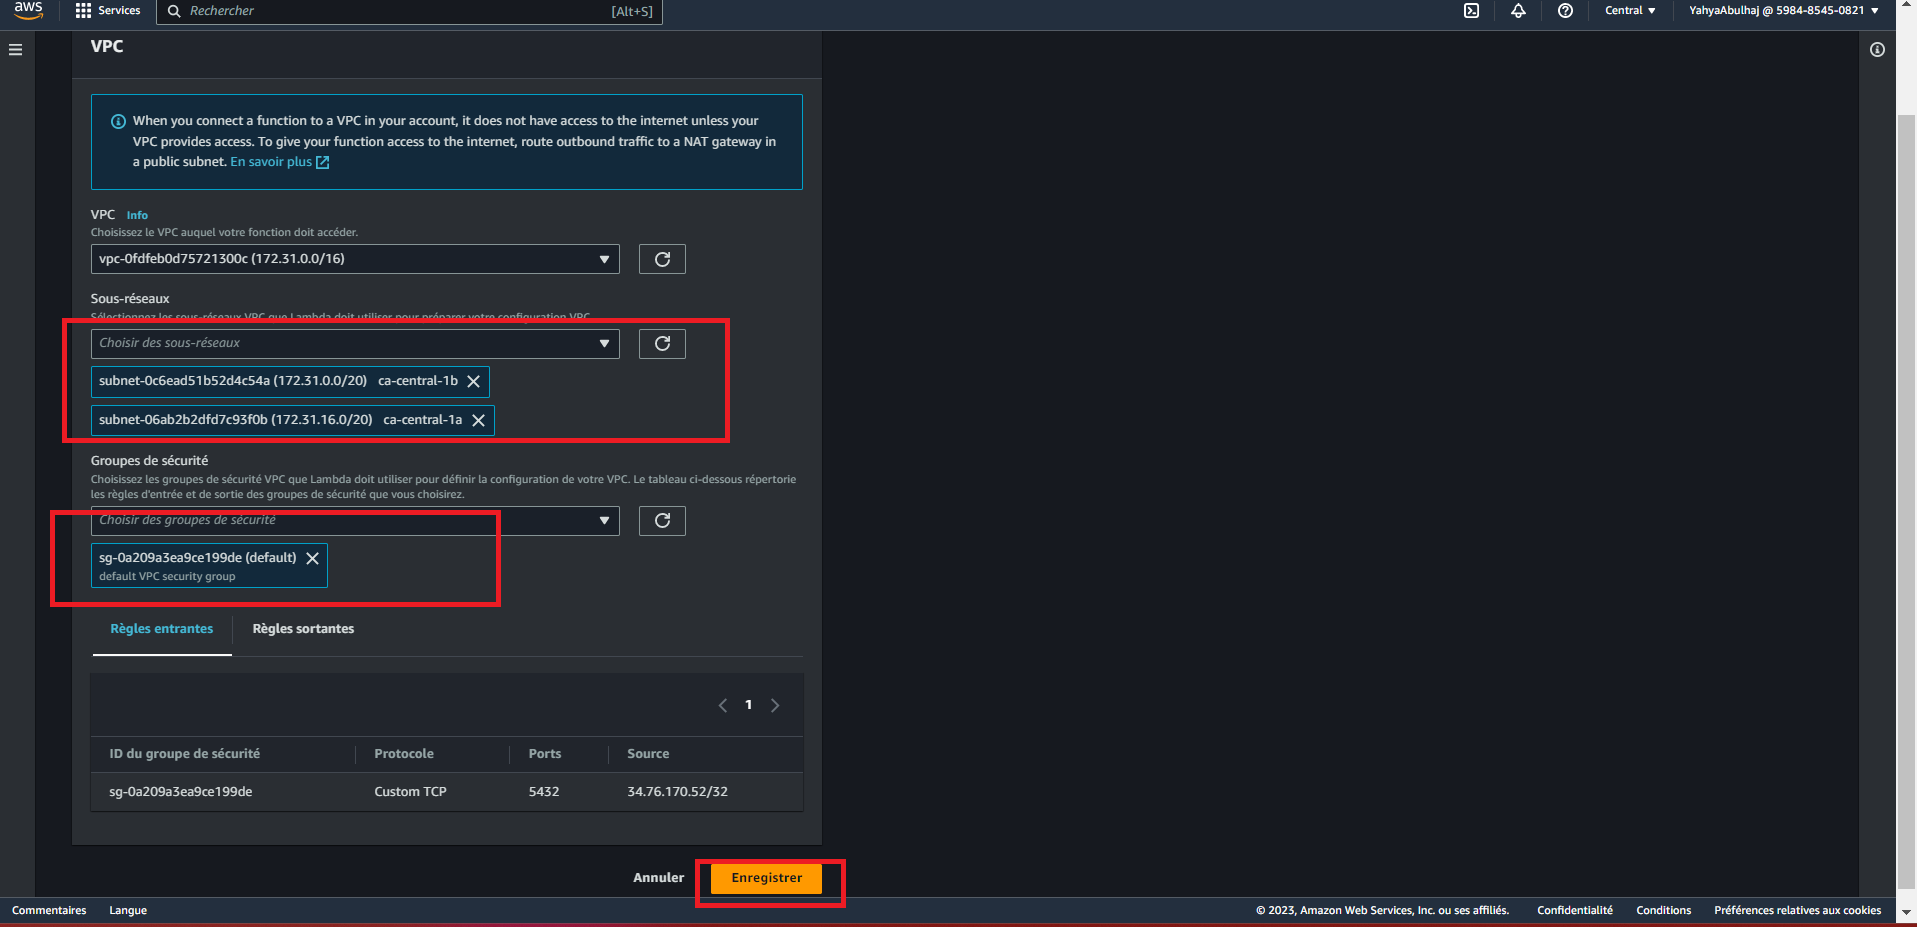
arn:aws:lambda:us-east-1:898466741470:layer:psycopg2-py38:2Step 4: Connect Lambda to VPC
- Open the Functions page of the Lambda console.
- Choose a function.
- Choose Configuration go to Network
- Under Network, choose Edit.
- Choose the VPC.
For reference, I used this link (opens in a new tab)
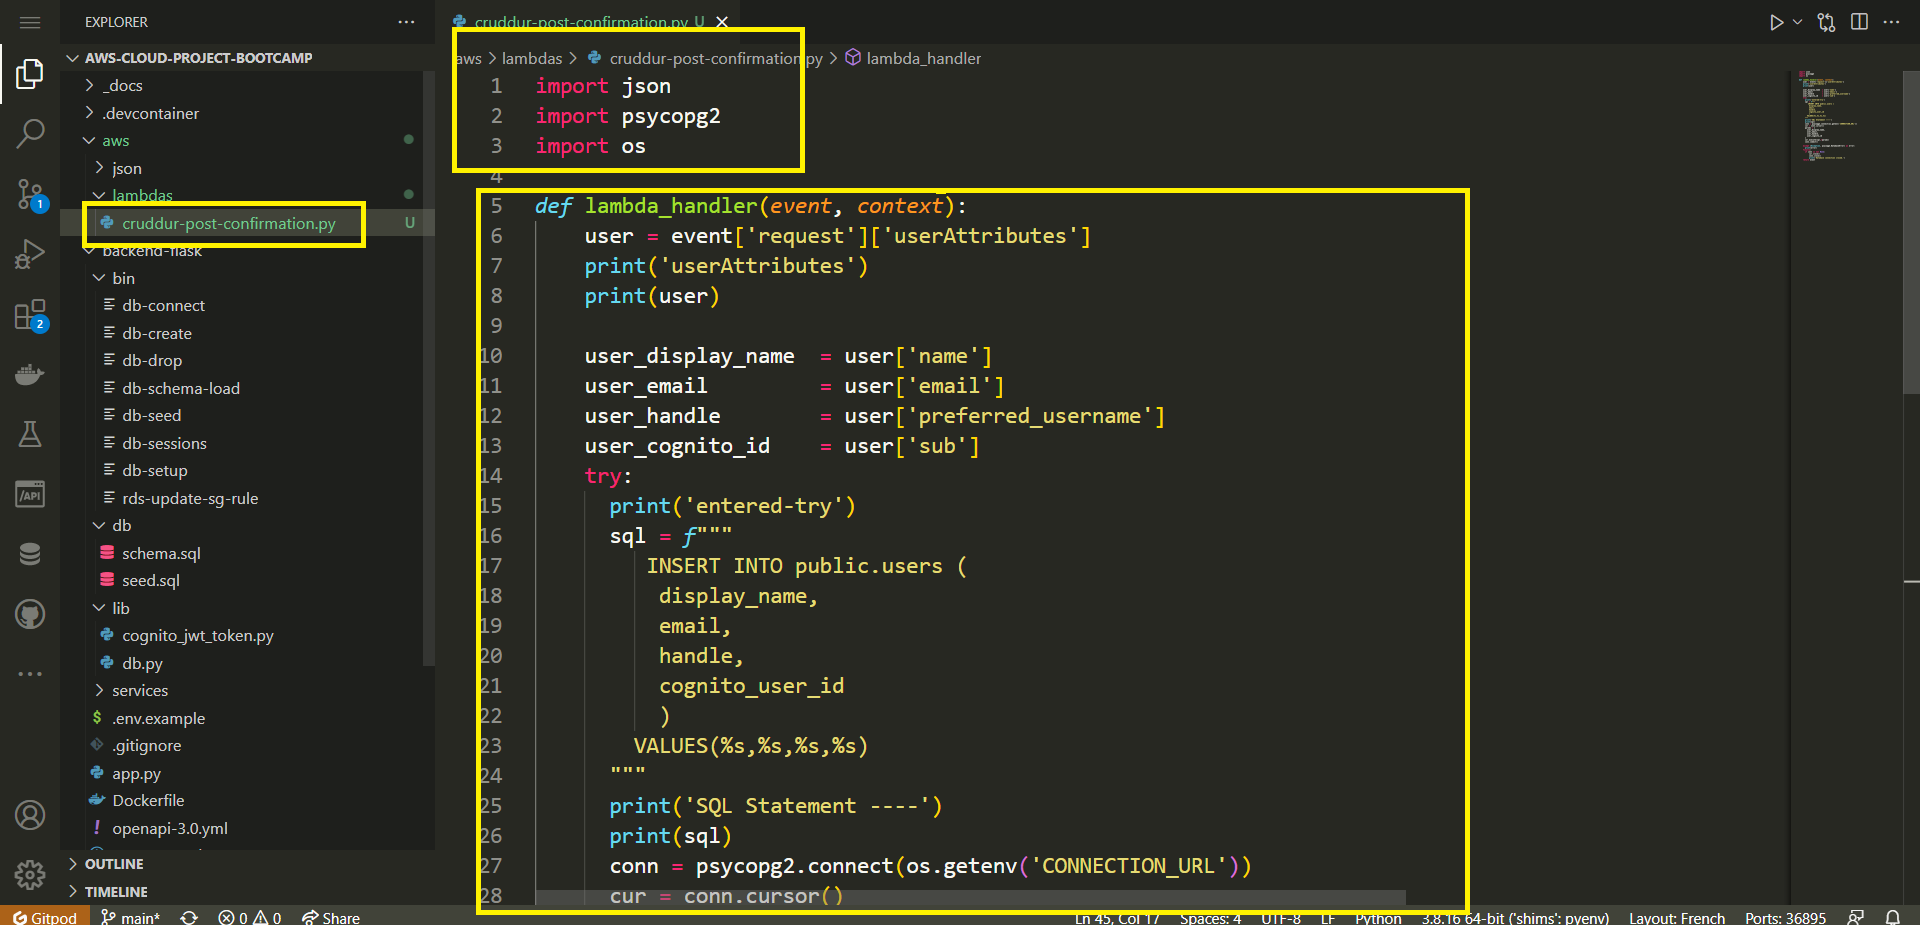
Step 5: Create Lambda Code
Let me break down the magic of this function for you.
- Start by the import of the Required Modules
import json
import psycopg2
import os
Here the necessary modules are imported: json for JSON manipulation, psycopg2 for PostgreSQL database interaction, and os for accessing environment variables.
- Define the Lambda Handler
def lambda_handler(event, context):The lambda_handler function is the entry point for the Lambda function. It takes two arguments, event (containing input data) and context (Lambda runtime information).
- Extract User Attributes
user = event["request"]["userAttributes"]Here, the user attributes are extracted from the incoming event dictionary.
- Establish Database Connection
    try:
        conn = psycopg2.connect(os.getenv("CONNECTION_URL"))
        cur = conn.cursor()
a connection to the PostgreSQL database is established using the connection URL retrieved from the environment variables. A cursor object is created to execute SQL commands.
- Prepare SQL Parameters using a Parameters List
parameters = [
    user["name"],
    user["email"],
    user["preferred_username"],
    user["sub"],
]

sql = f"INSERT INTO public.users (display_name, email, handle, cognito_user_id) VALUES (%s, %s, %s, %s)"
In this part, a list of parameters is created from the extracted user attributes. The SQL command for insertion is prepared using placeholders to avoid SQL injection.
- Or Assigning Variables Directly
user_display_name  = user['name']
user_email         = user['email']
user_handle        = user['preferred_username']
user_cognito_id    = user['sub']

sql = f"""
  INSERT INTO public.users(
    display_name,
    email,
    handle,
    cognito_user_id)
  VALUES ( %s, %s, %s, %s)
"""
Both approaches achieve the same result.
This one provides better readability and allows you to use more descriptive variable names, making the code more self-explanatory.
- Execute SQL Command
cur.execute(sql, *parameters)The SQL command is executed using the cursor, and the parameters are passed in to complete the insertion operation.
- Commit Changes and Handle Exceptions
    conn.commit()

except (Exception, psycopg2.DatabaseError) as error:
    print(error)
The changes are committed to the database. If an exception occurs during the database interaction, the error is printed.
- Close Database Connection
finally:
    if conn is not None:
        cur.close()
        conn.close()
        print("Database connection closed.")
In the finally block, the cursor and connection are closed to ensure proper resource management.
- Return Event
return eventThe Lambda function concludes by returning the event dictionary.
- After undergoing rigorous development, your function's code now appears as follows:
import json
import psycopg2
import os

def lambda_handler(event, context):
    user = event['request']['userAttributes']
    user_display_name  = user['name']
    user_email         = user['email']
    user_handle        = user['preferred_username']
    user_cognito_id    = user['sub']

    sql = f"""
      INSERT INTO public.users(
        display_name,
        email,
        handle,
        cognito_user_id)
      VALUES ( %s, %s, %s, %s)
    """

    params = [user_display_name, user_email, user_handle, user_cognito_id]

    try:
        conn = psycopg2.connect(os.getenv('CONNECTION_URL'))
        cur = conn.cursor()
        cur.execute(sql, *params)
        conn.commit()

    except (Exception, psycopg2.DatabaseError) as error:
        print(error)

    finally:
        if conn is not None:
            cur.close()
            conn.close()
            print('Database connection closed.')

    return event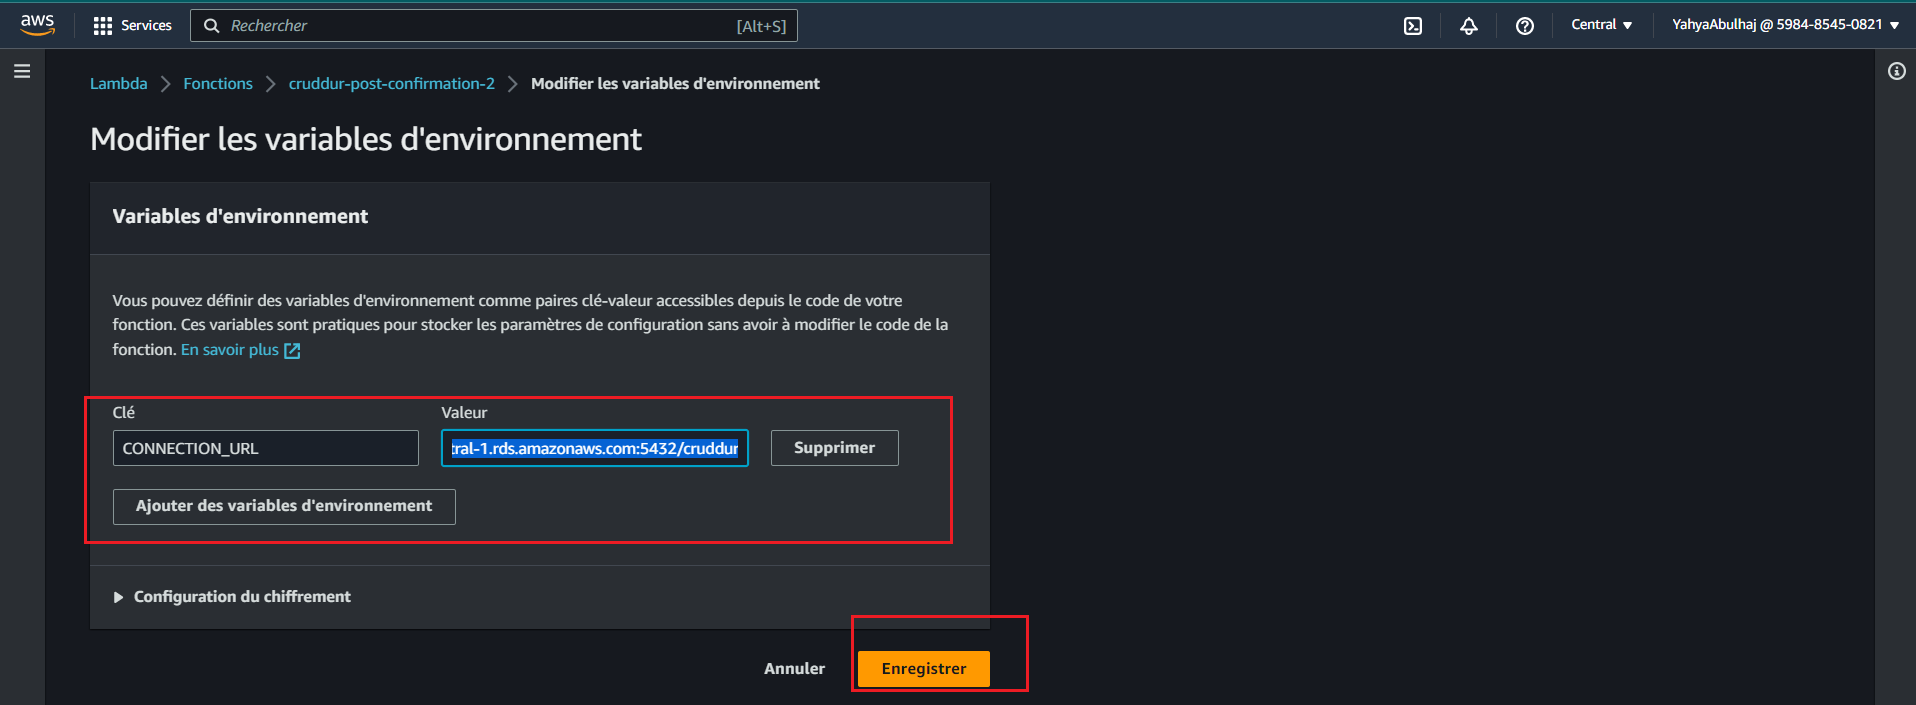
Remember to replace CONNECTION_URL with the actual environment variable name that holds your PostgreSQL connection URL.
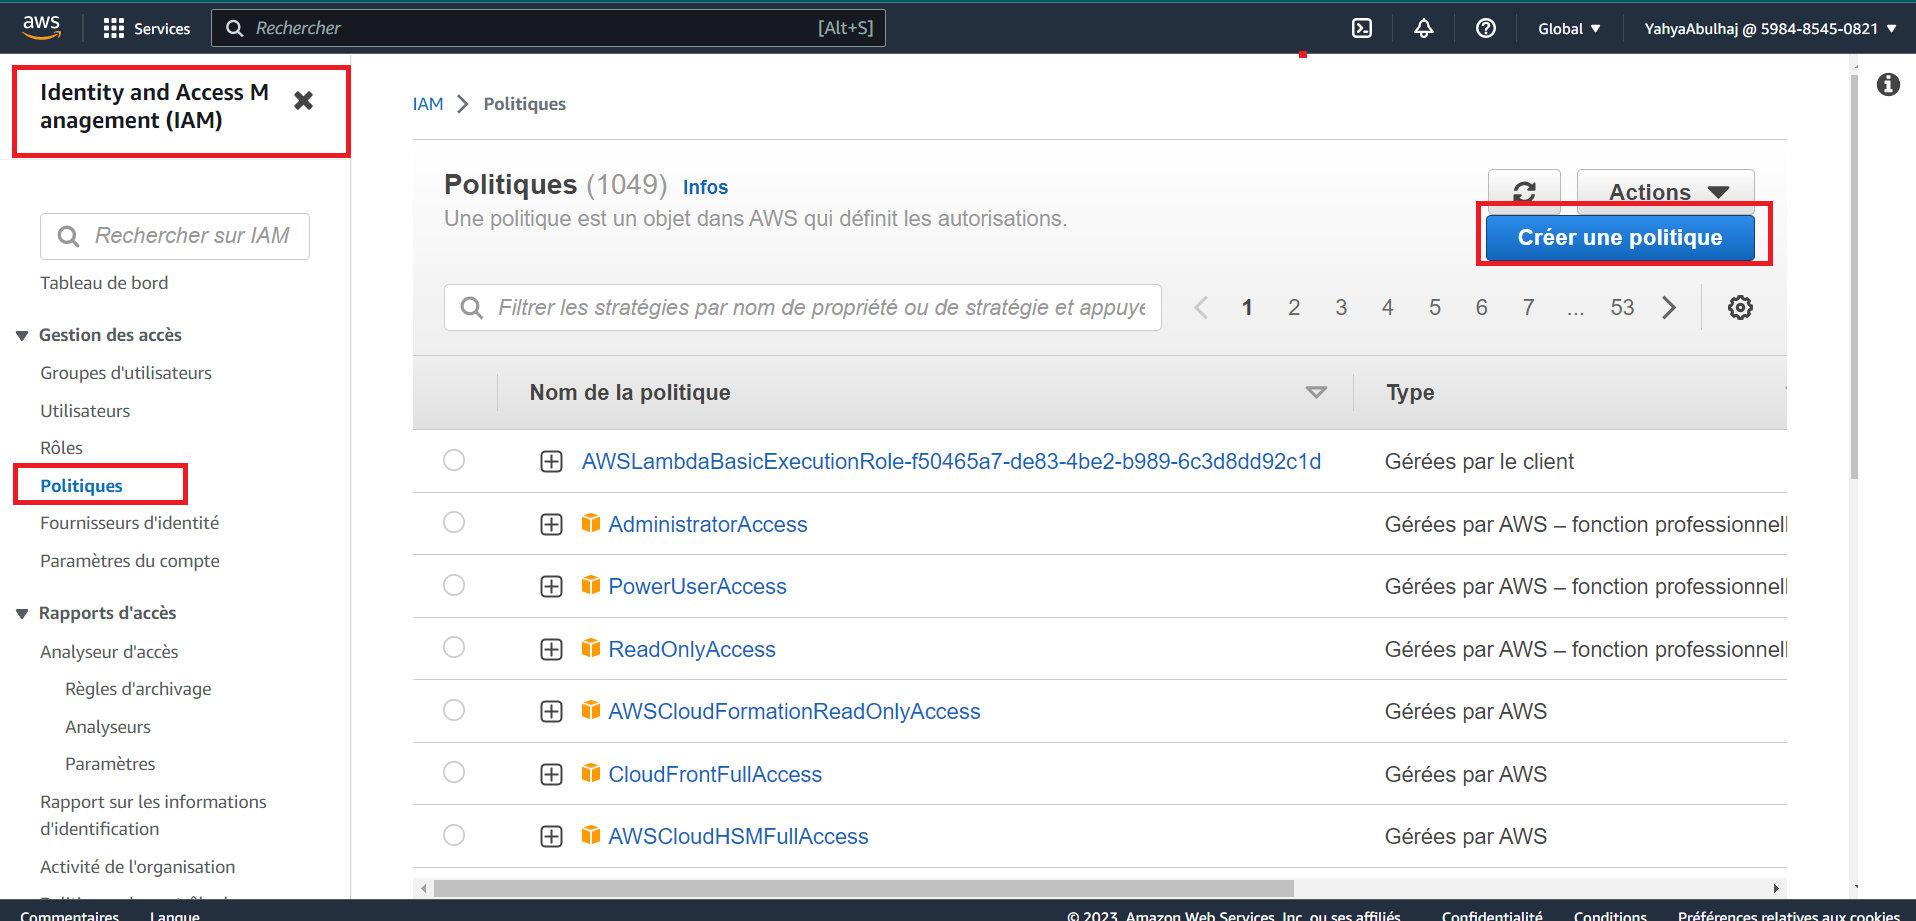
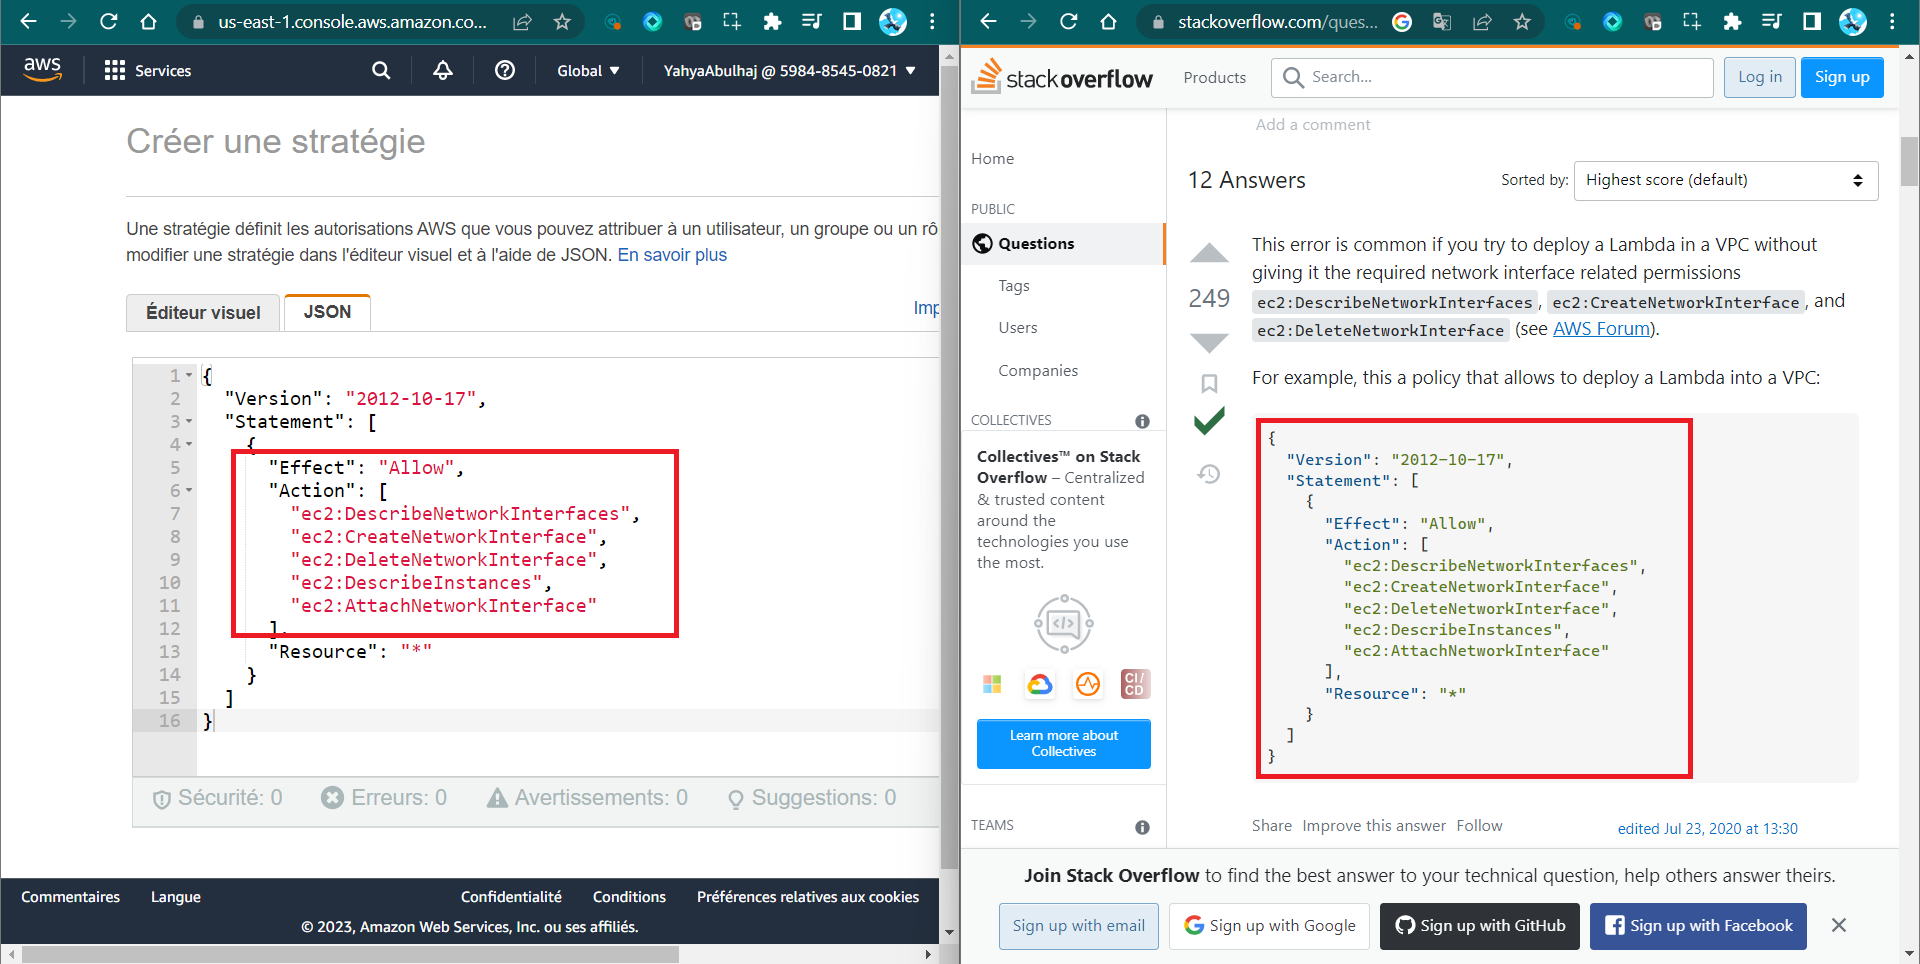
Step 6: Configure Execution Role Permissions
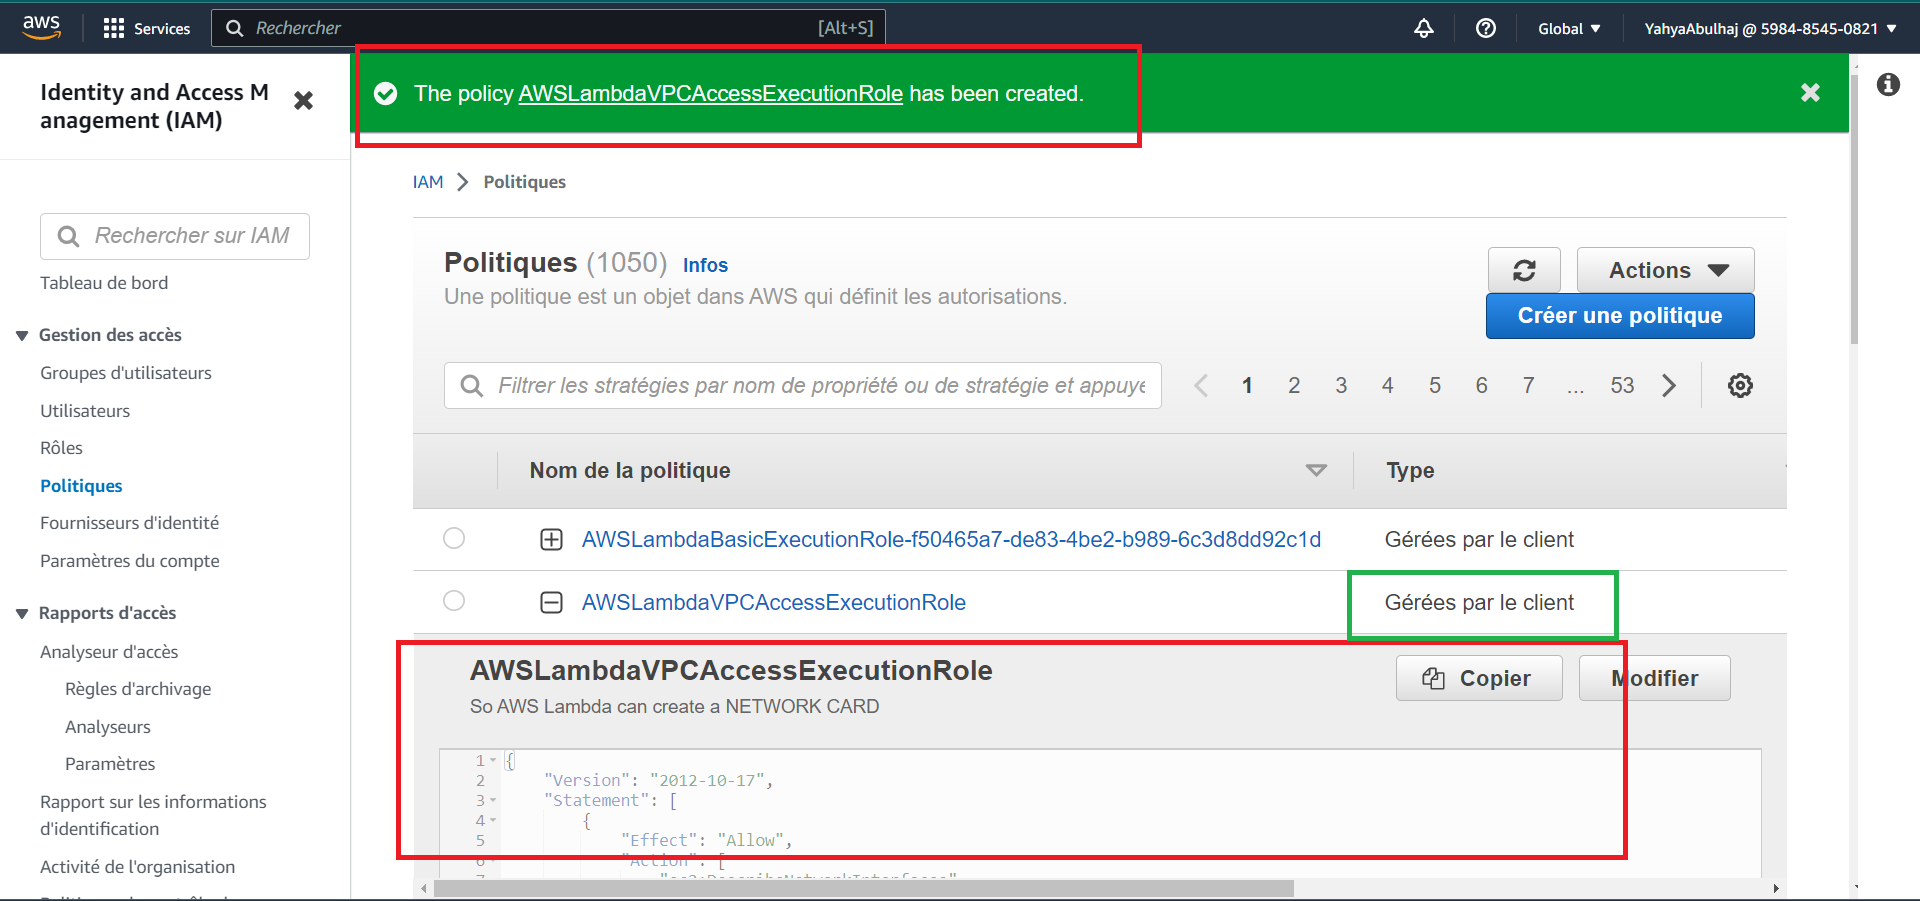
- Create a policy named
LambdaVPCAccessPolicyin IAM Policies. You can employ this right away.
{
    "Version": "2012-10-17",
    "Statement": [
        {
            "Effect": "Allow",
            "Action": [
                "ec2:CreateNetworkInterface",
                "ec2:DeleteNetworkInterface",
                "ec2:DescribeNetworkInterfaces"
                ],
                "Resource": "*"
        }]
}
- Attach the
LambdaVPCAccessPolicypolicy to the execution role of your Lambda function.
Step 7: Deploy Lambda Function
- In the Lambda function's configuration, click "Deploy" to deploy the code.
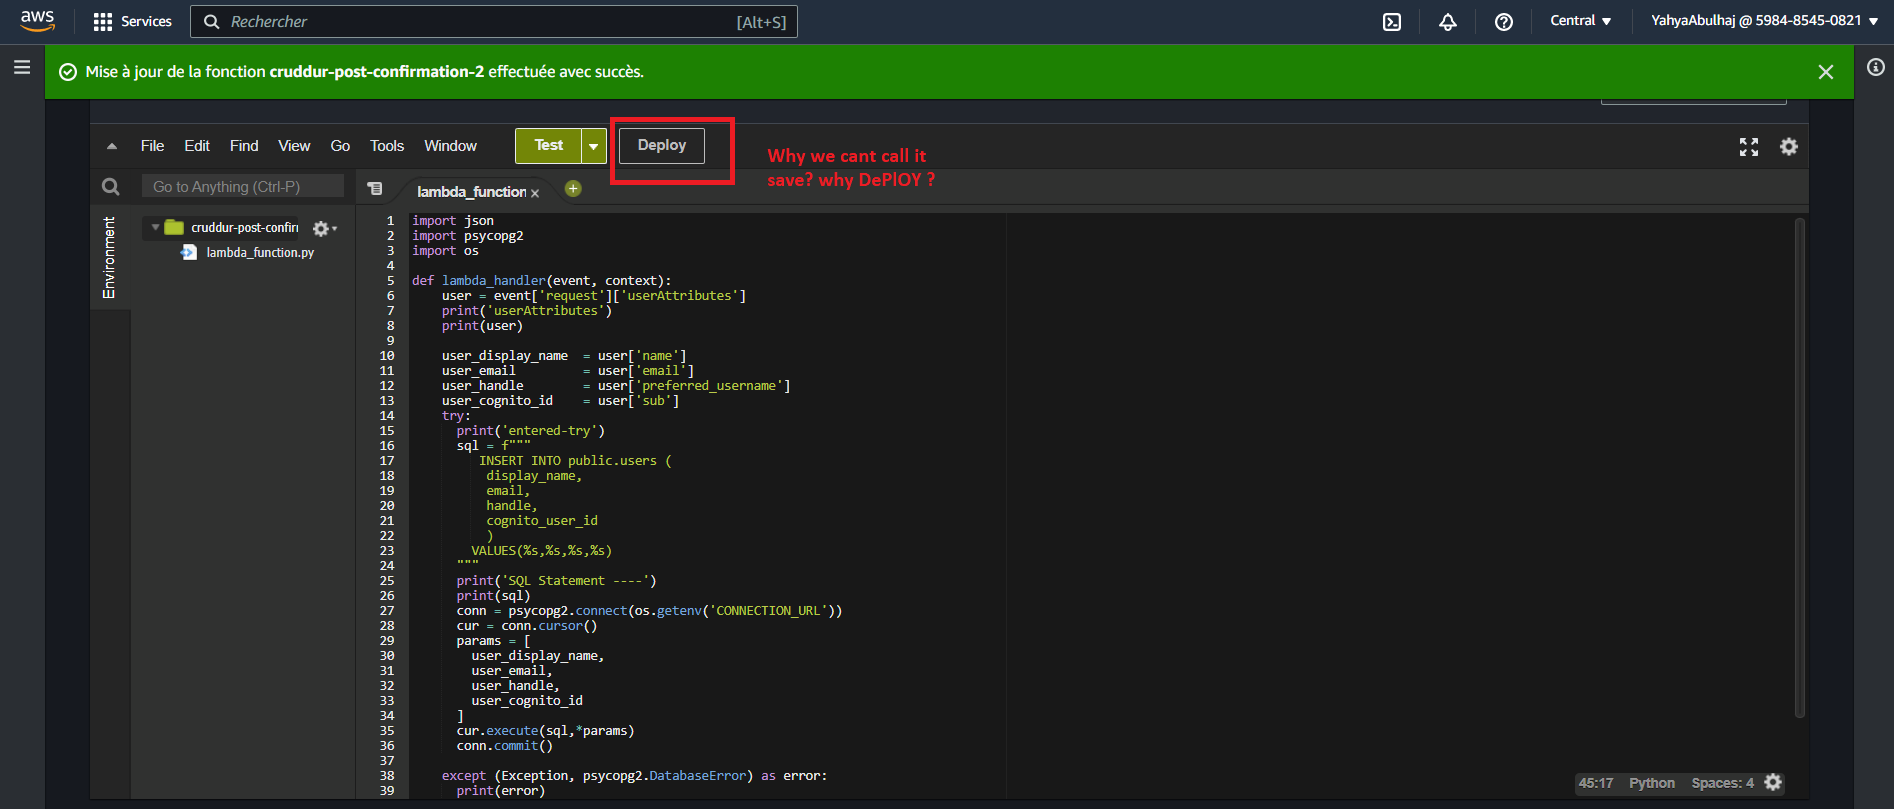
That's what the step about. Deploy your Lambda when It is ready.
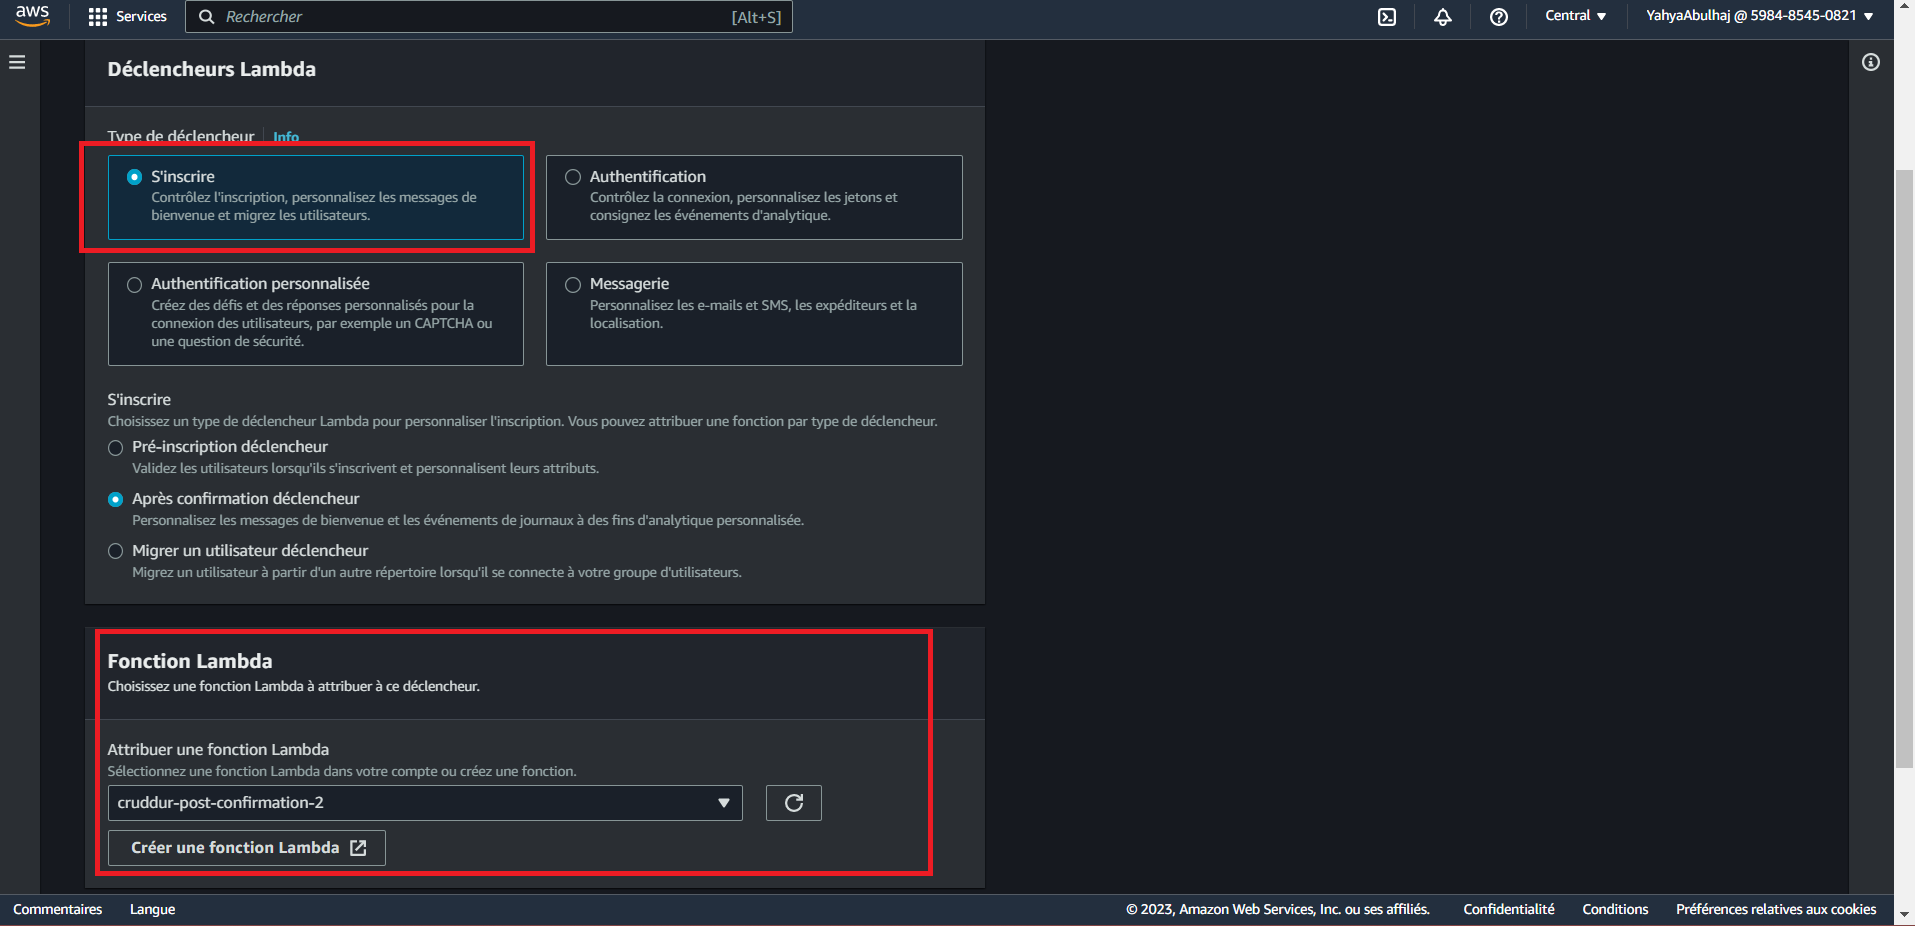
Step 8: Configure Cognito Trigger
- Open your AWS Cognito User Pool settings.
- Under the "Triggers" tab, configure a trigger for "Post Confirmation."
- Go to User Pool Properties.
- Assign the previously created Lambda function (
cognito-post-confirm-function) to this trigger. - Click Add Lambda Trigger.
Step 9: Testing and Verifying
- Ensure your Docker environment is up using
docker-compose up. - Load the production database schema using
./bin/db-schema-load prod.
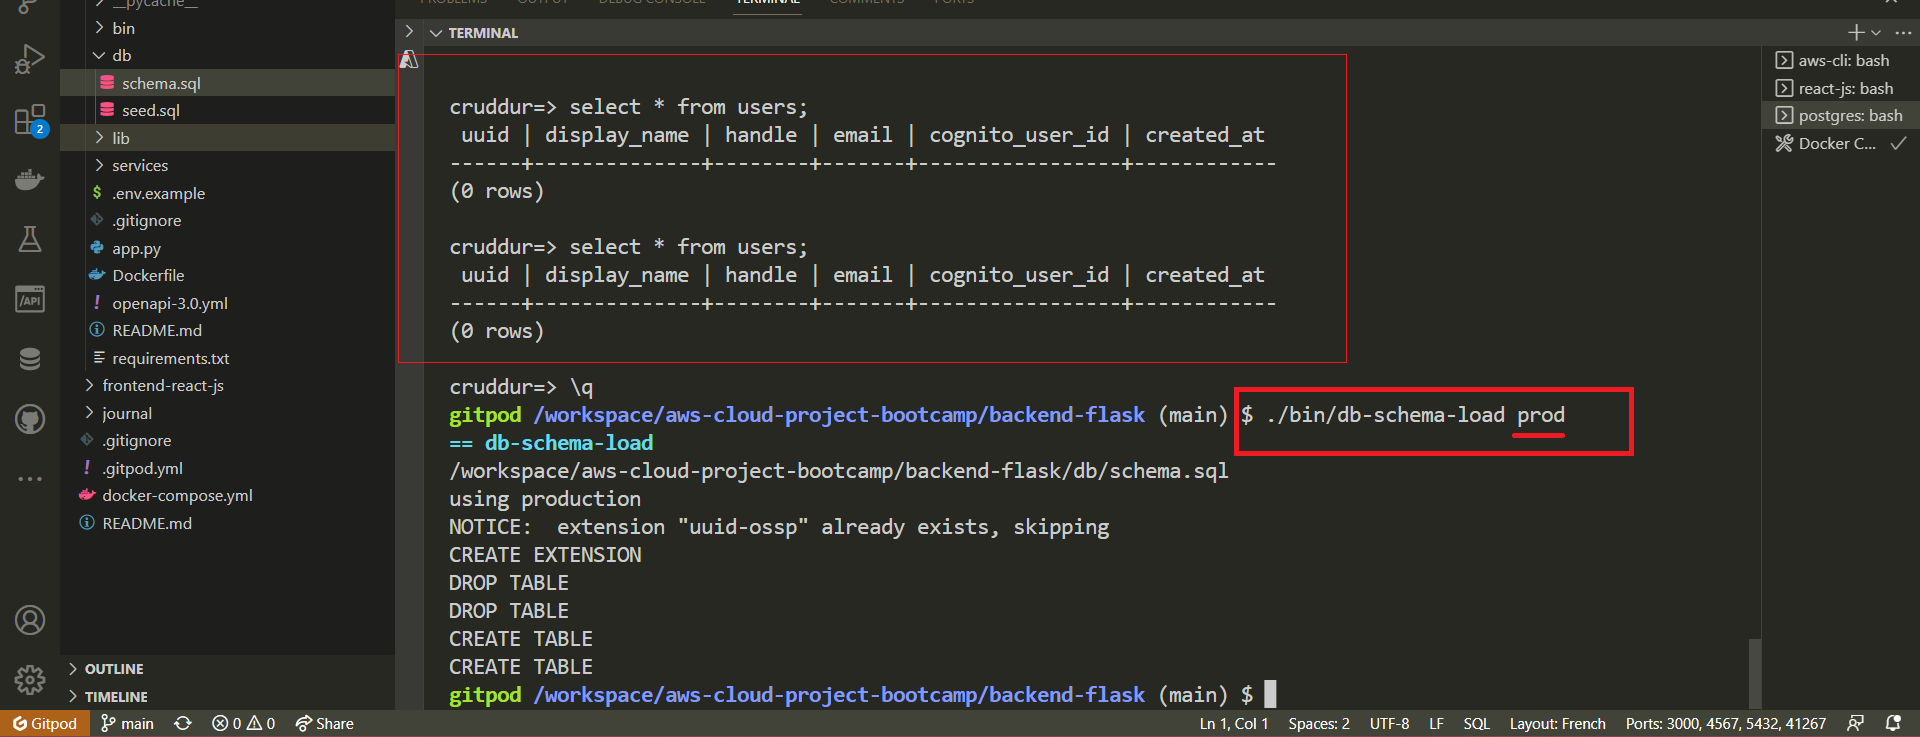
- Sign up to the Cruddur web app.
- Connect to the prod DB using
./bin/db-connect prod - Verify that the newly signed-up user is added to the users table using the database command:
SELECT * FROM users;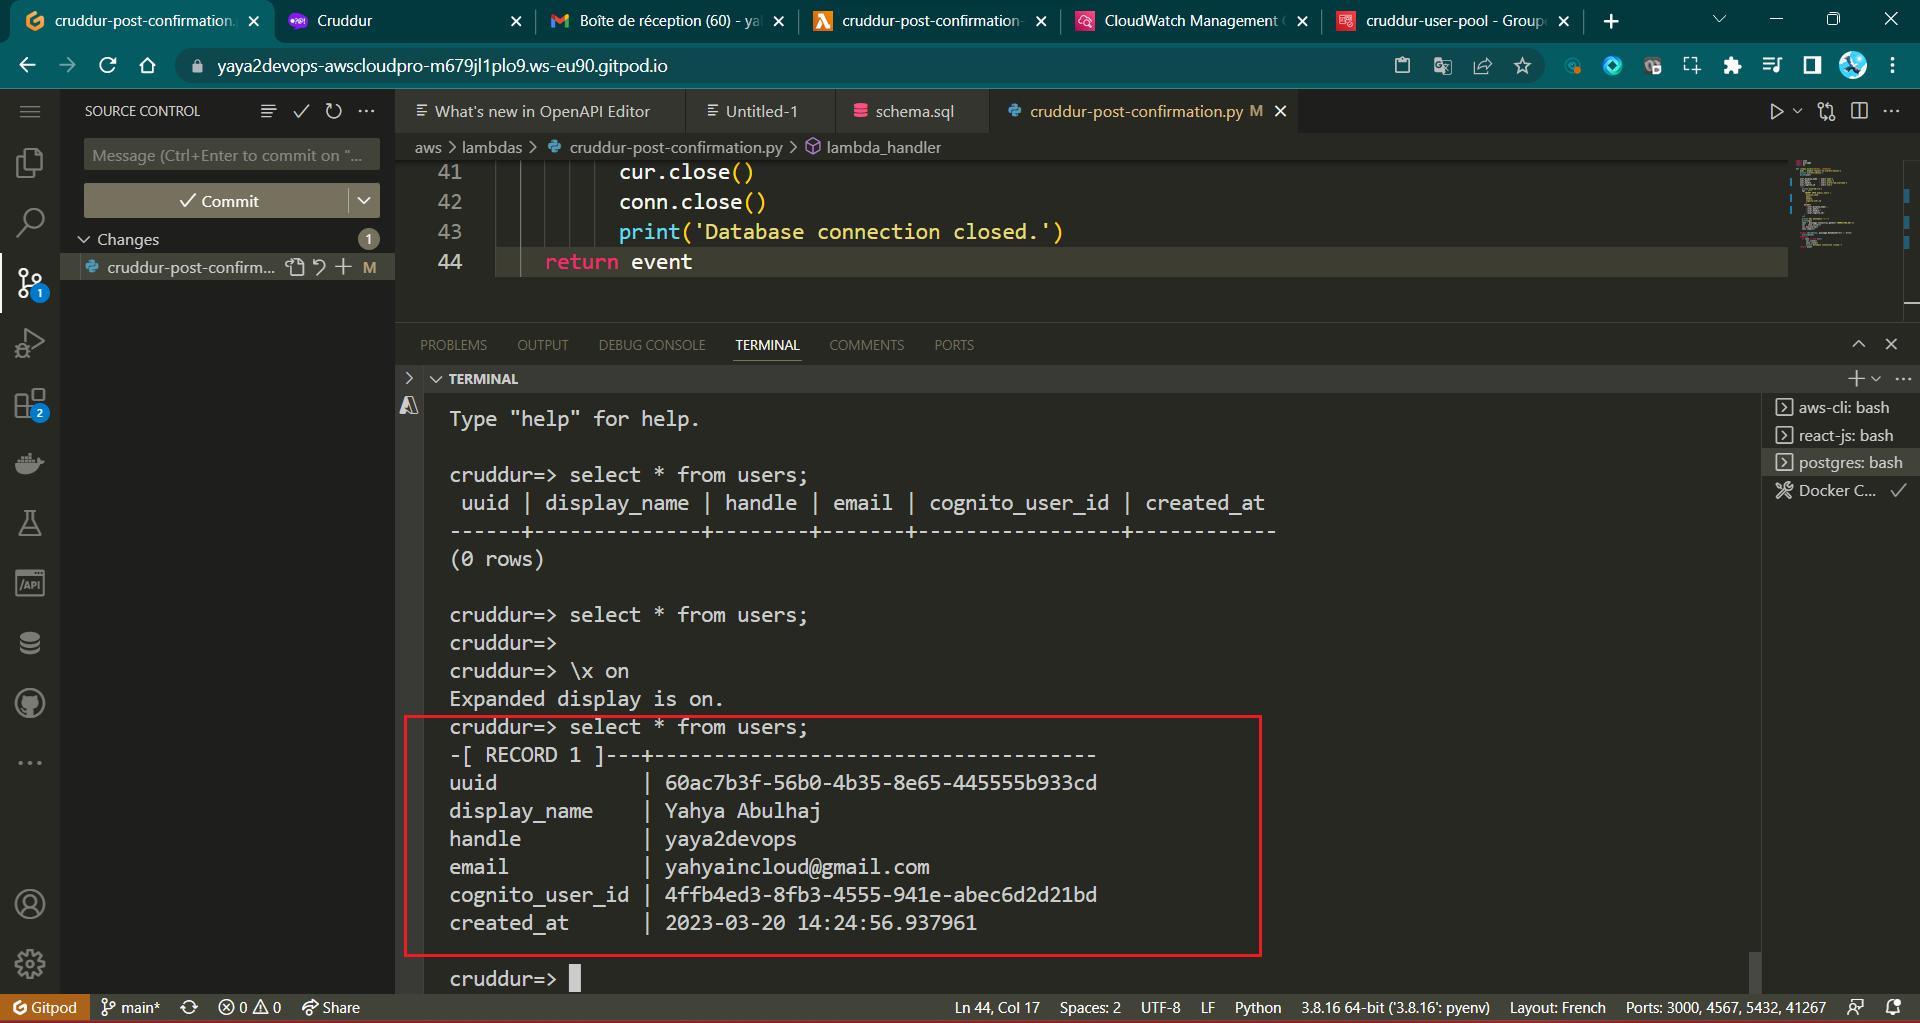
cruddur=>
-[ RECORD 1 ]---+-------------------------------------
uuid            | UUID1
display_name    | Yahya Abulhaj
handle          | yaya2devops
email           | yah..@..
cognito_user_id | UUID2
created_at      | DATE TIME.ID
Step 10 : Post Verify
We can ensure absolute certainty regarding this process by consulting the CloudWatch logs.
- Open
CloudWatch. - Navigate to
Log groups. - Select
/aws/lambda/cruddur-post-confirmation. - Review the logs displayed.
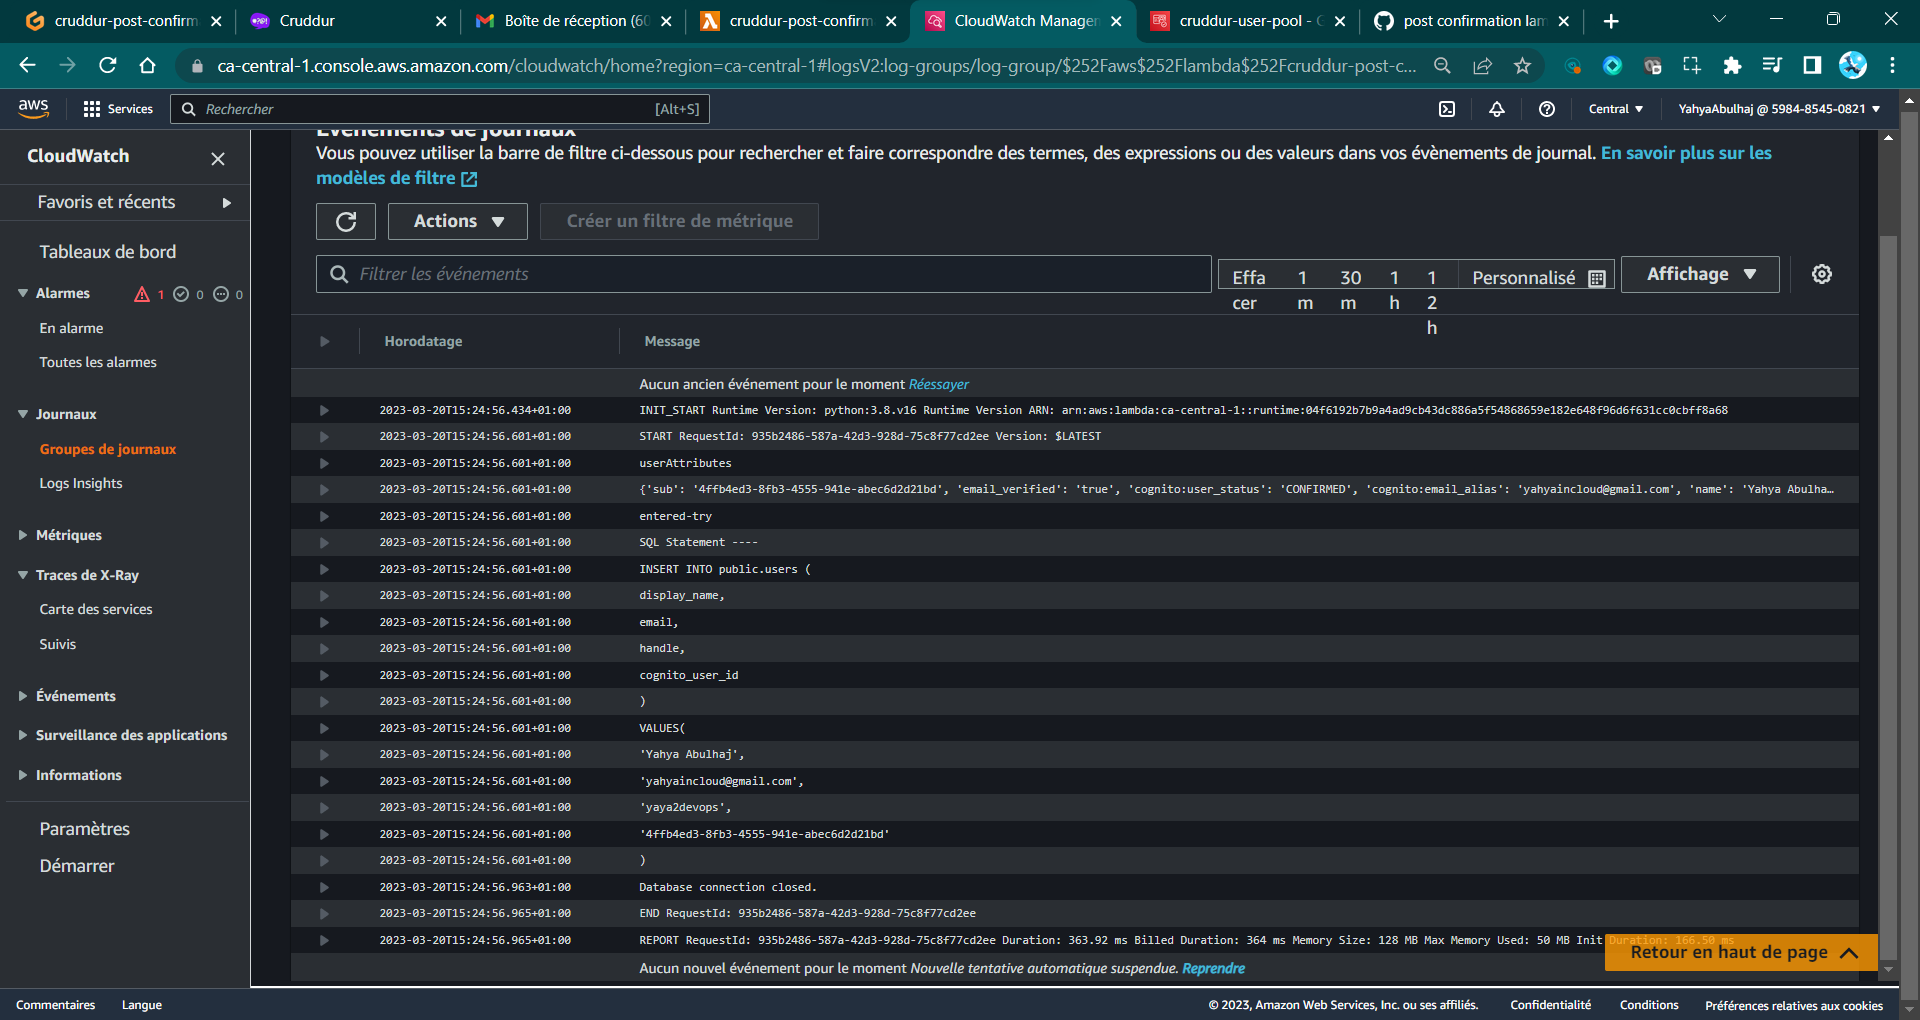
I encountered several errors prior to reaching the above state.
You can find more in this directory. (opens in a new tab)
Cruddur User Activities
We should engage in further coding to establish and present the activity feed. This will involve incorporating a database insert to enable the creation of new activities.
Please proceed to the psql interface and examine the contents of the activities table.
- Start Your RDS Instance and Connect to the psql prod
- List the activities.
cruddur=# SELECT * FROM activities;
-[ RECORD 1 ]----------+-------------------------------------
Nothing to see, Exact. Not for too long.
We will develop functions that allow us to directly retrieve JSON bidirectional from the database and the Web App Cruddur.
- Step 1: Develop
home_activities.pySQL Query - Step 2: Develop
create_activity.pyEndpoint - Step 3: The SQL Activity Manager
- Step 4: Create PSQL Library
- Thoughful Step : Debug and Resolve
- Final Step: Test Activity Prod
To do so we are making use of the following;
./cloud-project-bootcamp
├── backend-flask/
│ ├── lib/
│ │ └── db.py
│ ├── db/
│ │ └── sql/
│ │ └── activities/
│ │ ├── create.sql
│ │ ├── home.sql
│ │ └── object.sql
│ ├── services/
│ │ ├── create_activity.py
│ │ └── home_activities.py
│ └── app.py
├── frontend-react-js/
│ ├── src/
│ │ ├── pages/
│ │ │ └── HomeFeedPage.js
│ │ └── components/
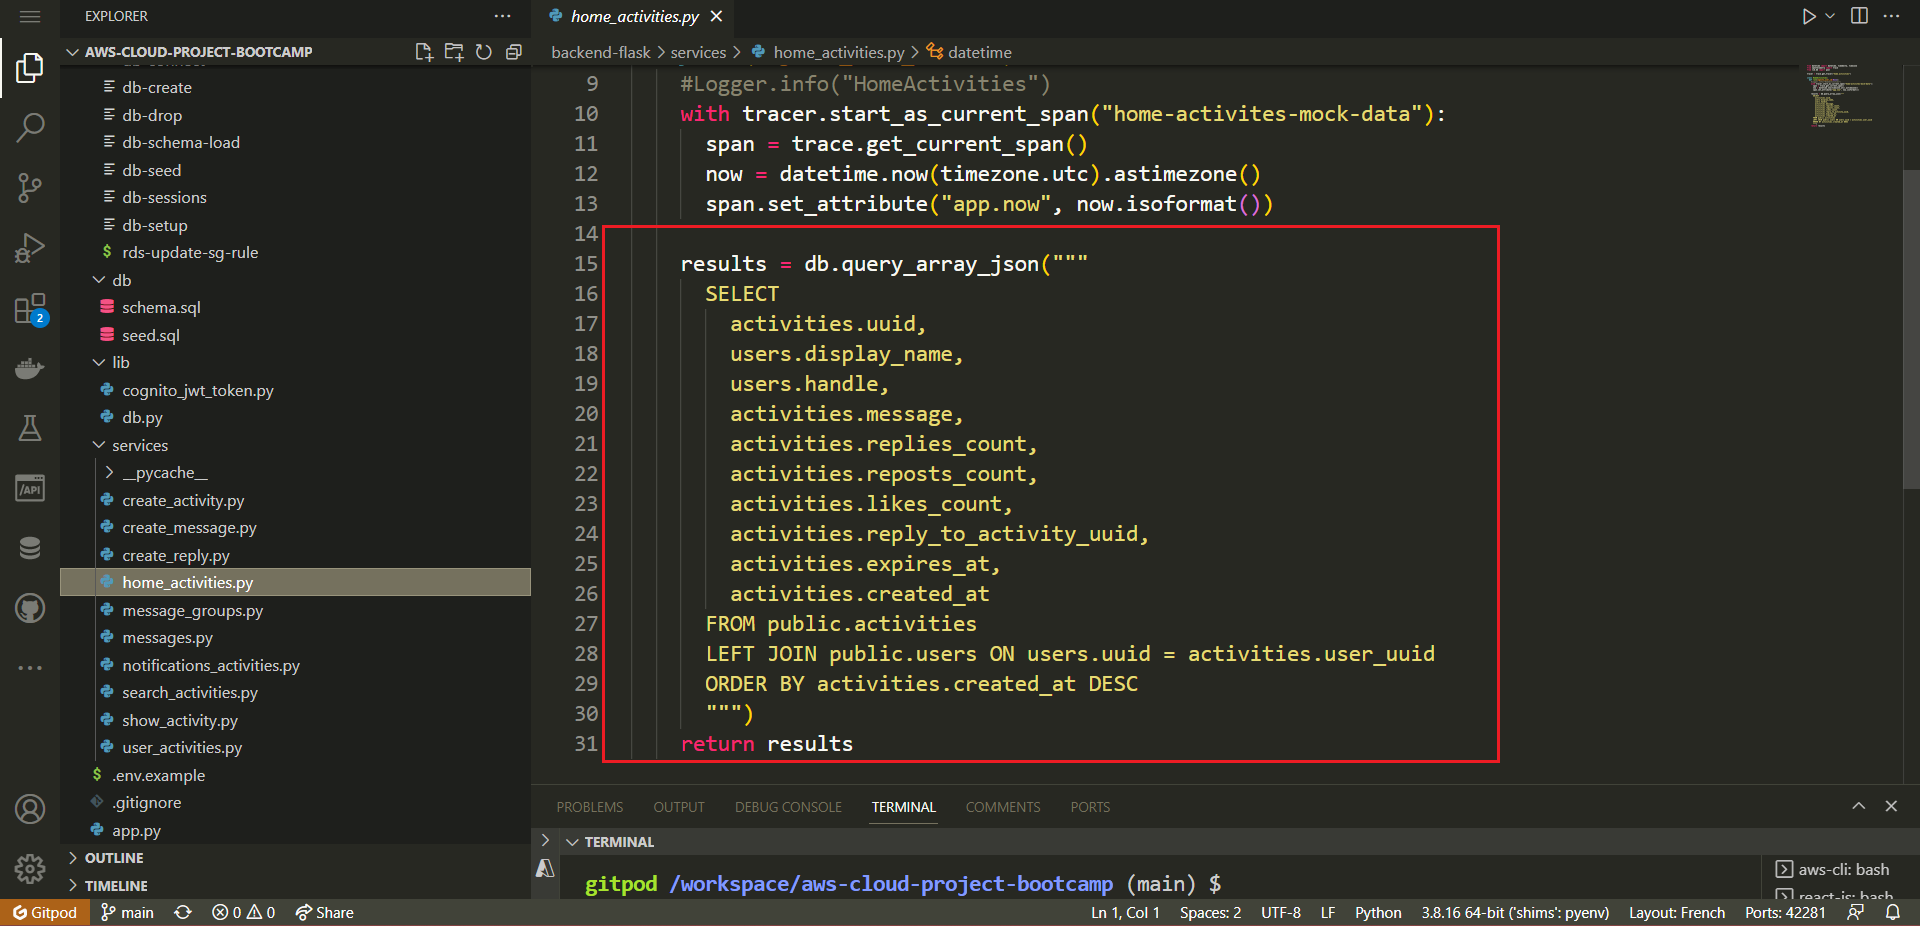
└──────── └── ActivityForm.jsStep 1: Develop home_activities.py SQL Query
- Inside the 'HomeActivities' class Load an SQL query template for retrieving home activity data
        sql = db.load_template('activities', 'home')
params = {}- Query the database for activity data using the template and parameters
results = db.query_array_json(sql, params)- Return the retrieved activity data with
return resultsand compare your code with mine.
from datetime import datetime, timedelta, timezone
from lib.db import db

class HomeActivities:
    def run(logger, cognito_user_id=None):
        sql = db.load_template('activities', 'home')
        params = {}

        results = db.query_array_json(sql, params)

return results- Import Statement: The import for
dbfromlib.dbis included to enable database-related operations. - SQL Query Template: The line
sql = db.load_template('activities', 'home')loads the SQL query template for retrieving home activity data. The template name is'home', which is specific to retrieving activity data for the home page. - Parameters: The
paramsdictionary is kept empty, as it appears that no specific parameters are being passed to the SQL query template for the home activity. - Database Query: The line
results = db.query_array_json(sql, params)executes the SQL query using the loaded template and parameters. It retrieves an array of activity data in JSON format. - Result Return: The variable
resultscontains the retrieved activity data, which is then returned from therun()method.
Updated have been implemented, including the instrumentation of the endpoint for both CloudWatch and Honeycomb. Further the refactoring.
To learn more, refer to the details provided in the file itself, routes and lib directories within the backend.
Step 2: Develop create_activity.py Endpoint
- Create
create_activity()method responsible for creating a new activity entry in the database
   def create_activity(handle, message, expires_at):
        """
        this method creates a crud and commits in RDS
        """
        sql = db.load_template('activities', 'create')
        params = {'handle': handle, 'message': message,
                  'expires_at': expires_at}
        user_uuid = db.query_commit(sql, params)
return user_uuid- Parameters:
handle(user handle)message(activity message)expires_at(expiry timestamp)
- Generates SQL query template for activity creation.
- Executes query and commits data to the database.
- Returns the UUID of the new activity.
- Create
query_object_activity(uuid)method that retrieves details of an activity based on its UUID.
    def query_object_activity(activity_uuid):
        """
        select crud data to show on front-end
        """
        sql = db.load_template('activities', 'object')
        params = {'uuid': activity_uuid}
return db.query_object_json(sql, params)- Parameter:
uuid(activity's unique identifier)
- Generates SQL query template for selecting activity details.
- Retrieves activity data from the database in JSON format.
- Returns JSON representation of activity details.
- Create
run(message, user_handle, ttl)that coordinates the process of creating an activity, handling errors, and preparing the response model.
def run(message, user_handle, ttl):
    """
    Executes the activity creation process and prepares the model response.
    """
    model = {"errors": None, "data": None}

    now = datetime.now(timezone.utc).astimezone()

    ttl_offsets = {
        "30-days": timedelta(days=30),
        "7-days": timedelta(days=7),
        "3-days": timedelta(days=3),
        "1-day": timedelta(days=1),
        "12-hours": timedelta(hours=12),
        "3-hours": timedelta(hours=3),
        "1-hour": timedelta(hours=1)
    }

    if ttl in ttl_offsets:
        ttl_offset = ttl_offsets[ttl]
    else:
        model["errors"] = ["ttl_blank"]

    if not user_handle or len(user_handle) < 1:
        model["errors"] = ["user_handle_blank"]

    if not message or len(message) < 1:
        model["errors"] = ["message_blank"]
    elif len(message) > 280:
        model["errors"] = ["message_exceed_max_chars"]

    if model["errors"]:
        model["data"] = {"handle": user_handle, "message": message}
    else:
        expires_at = now + ttl_offset
        created_activity_uuid = CreateActivity.create_activity(user_handle, message, expires_at)

        object_json = CreateActivity.query_object_activity(created_activity_uuid)
        model["data"] = object_json
    return model
This run method coordinates the activity creation process, handles error checking, and prepares the response model. Here's a breakdown of its functionality:
- It initializes a
modeldictionary to store errors and data. - It defines a dictionary of time-to-live (TTL) offsets for different durations.
- It performs various validations:
- Checks if the provided TTL is valid.
- Ensures the user handle is not blank.
- Verifies that the message is not blank and doesn't exceed 280 characters.
- If there are any errors, it populates the
model["errors"]field. - If there are no errors, it:
- Calculates the expiry time based on the TTL.
- Calls
create_activityto create the new activity. - Queries the newly created activity using
query_object_activity. - Populates the
model["data"]field with the activity details.
- Finally, it returns the prepared response model.
This revised version of create_activity.py ensures that the creation and querying of activities are performed using actual database operations rather than mocked data.
Step 3: The SQL Activity Manager
We are creating the SQL functions queries in /db/sql/here that way we are adhering to the principle of separation of concerns, code organization, modularity, and maintainability.
Further, that was used to load the above code in both home_activities.py and create_activity.py .
./backend-flask
├── db/
│   └── sql/
│       └── activities/
│           ├── create.sql
│           ├── home.sql
└─ └── object.sqlcreate.sql- Inserting a New Activity — This query is designed to insert a new activity into the database when a user initiates a new activity.
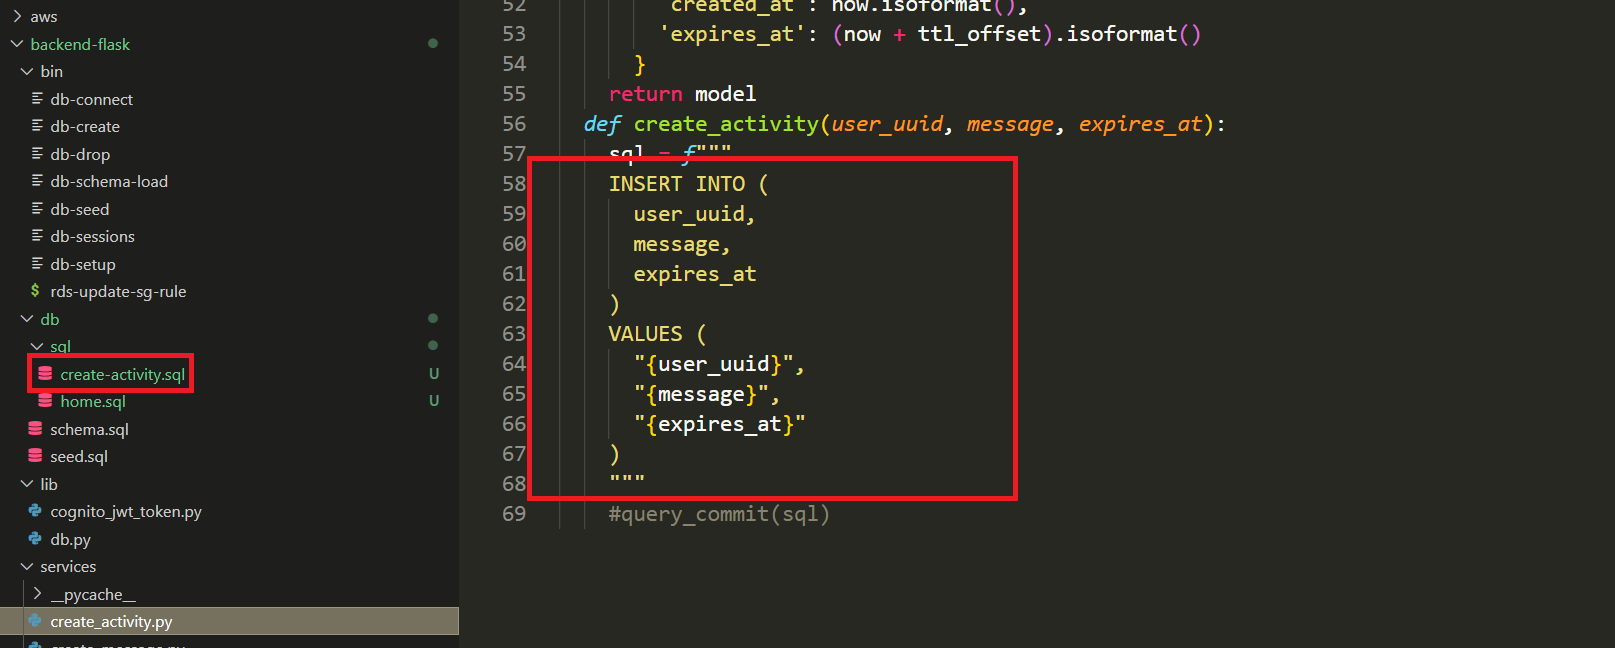
INSERT INTO public.activities (
  user_uuid,
  message,
  expires_at
)
VALUES (
  (SELECT uuid
    FROM public.users
    WHERE users.handle = %(handle)s
    LIMIT 1
  ),
  %(message)s,
  %(expires_at)s
) RETURNING uuid;- Adds a new activity to the database and associates it with a specific user.
- Allows users to create and contribute new activities.
- Enables tracking of user-generated content in the activity feed.
home.sql- Retrieving Activities for Home Feed — This query retrieves a list of activities for display in a user's home activity feed.
SELECT
  activities.uuid,
  users.display_name,
  users.handle,
  activities.message,
  activities.replies_count,
  activities.reposts_count,
  activities.likes_count,
  activities.reply_to_activity_uuid,
  activities.expires_at,
  activities.created_at
FROM public.activities
LEFT JOIN public.users ON users.uuid = activities.user_uuid
ORDER BY activities.created_at DESC;- Populates the home activity feed with a list of activities and relevant user details.
- Provides users with a personalized feed showcasing various activities.
- Facilitates user engagement and content discovery.
object.sql- Fetching a Created Activity for a User — This query fetches details about a specific activity created by a user, enhancing the user experience.
SELECT
  activities.uuid,
  users.display_name,
  users.handle,
  activities.message,
  activities.created_at,
  activities.expires_at
FROM public.activities
INNER JOIN public.users ON users.uuid = activities.user_uuid
WHERE
activities.uuid = %(uuid)s;- Displays detailed information about an activity that a user has created.
- Allows users to view and interact with their own content easily.
- Provides a seamless way to access and manage one's own activities.
Step 4: Create PSQL Library
We have imported the library in both files, but does it actually exist? The answer is yes, as long as we create it at this moment.
- Create a folder named
libin the root directory of your project. This folder will contain your custom libraries/modules. - Inside the newly created
libfolder, create a file nameddb.py. - Paste the provided code into the
db.pyfile. This code defines a Python class calledDbfor database interactions.
from psycopg_pool import ConnectionPool
import os
import re
import sys
from flask import current_app as app

class Db:
    def __init__(self):
        self.pool = ConnectionPool(os.getenv("CONNECTION_URL"))

    # ... (rest of the code)

    # Define all the methods and functions here

    # ...

db = Db()- The code starts by importing necessary modules and classes.
- The
Dbclass is defined, which contains methods to interact with the database. - The
__init__method initializes a connection pool using the provided connection URL. - The class includes various methods for querying and interacting with the database.
- The
db = Db()line creates an instance of theDbclass, which can be used to access the database methods.
- Let's go over and create required methods for our requirements.
- Create
template(self, *args):
def template(self, *args):
    pathing = list(
        (
            app.root_path,
            "db",
            "sql",
        )
        + args
    )
    pathing[-1] = pathing[-1] + ".sql"

    template_path = os.path.join(*pathing)

    green = "\033[92m"
    no_color = "\033[0m"
    print("\n")
    print(f"{green} Load SQL Template: {template_path} {no_color}")

    with open(template_path, "r") as f:
        template_content = f.read()
    return template_content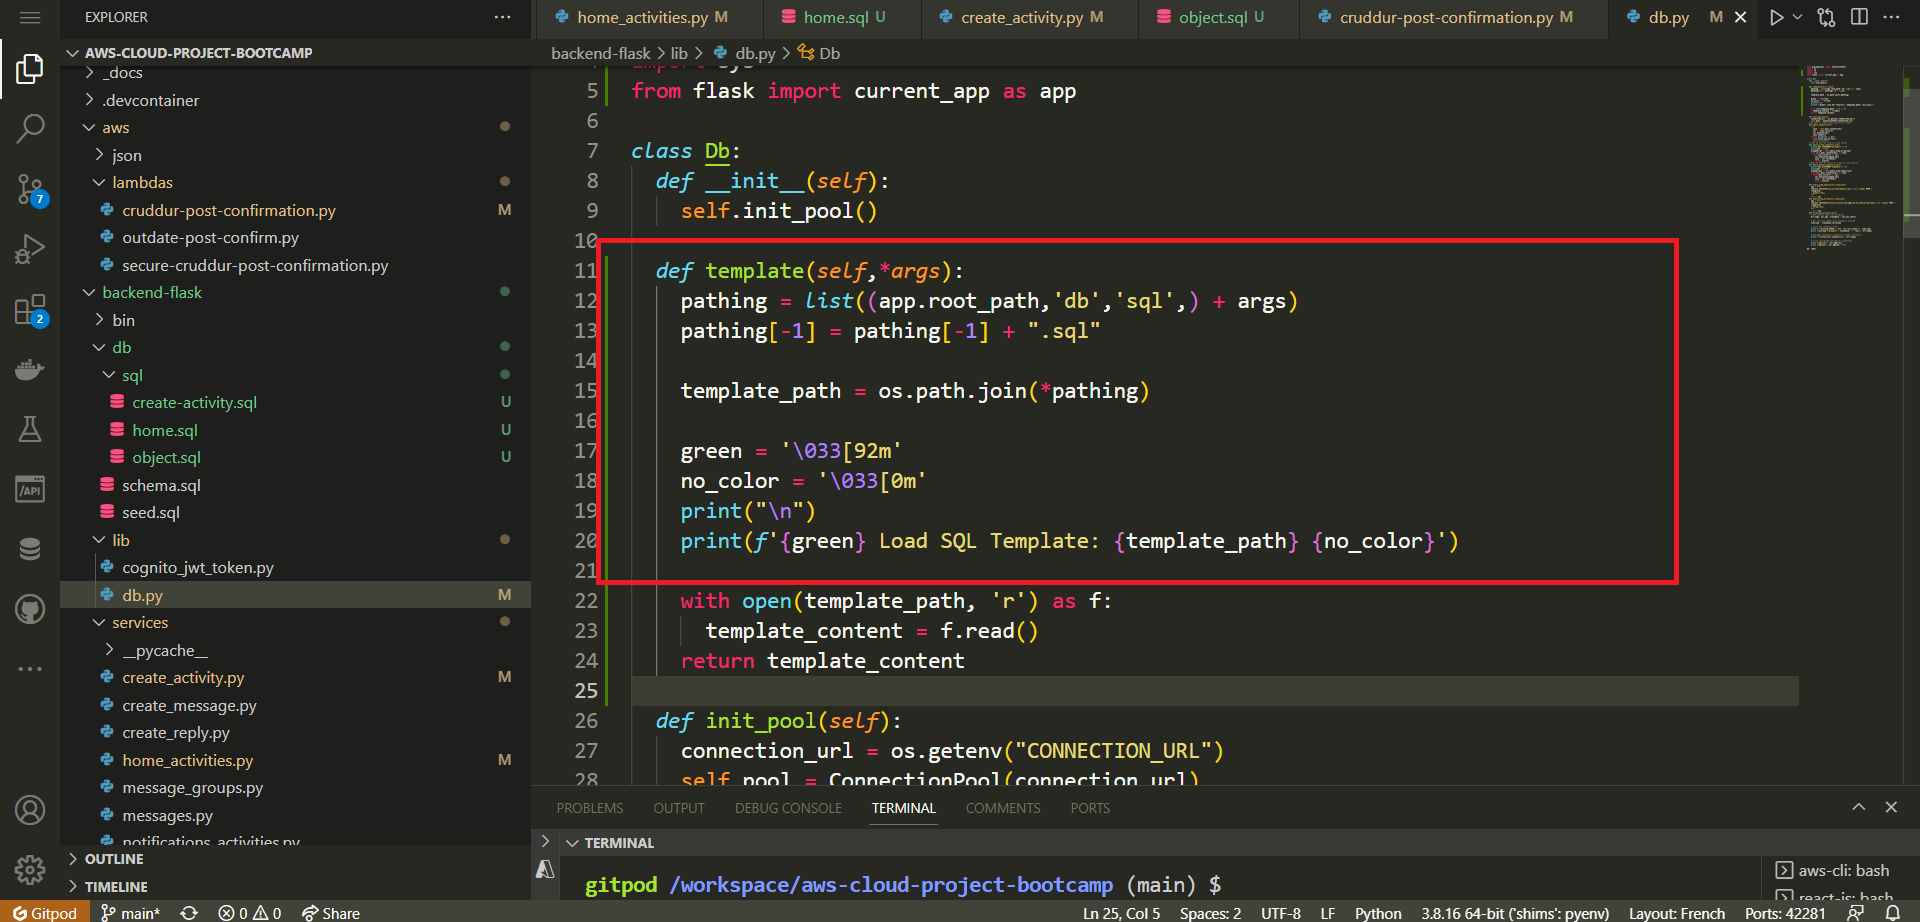
- Constructs a file path based on input arguments.
- Reads and returns the content of an SQL template file.
- Create
print_params(self, params):
def print_params(self, params):
        blue = "\033[94m"
        no_color = "\033[0m"
        print(f"{blue} SQL Params:{no_color}")
        for key, value in params.items():
print(key, ":", value)- Prints SQL parameters for debugging purposes.
- Create
print_sql(self, title, sql):
def print_sql(self, title, sql):
    cyan = "\033[96m"
    no_color = "\033[0m"
    print(f"{cyan} SQL STATEMENT-[{title}]------{no_color}")
    print(sql)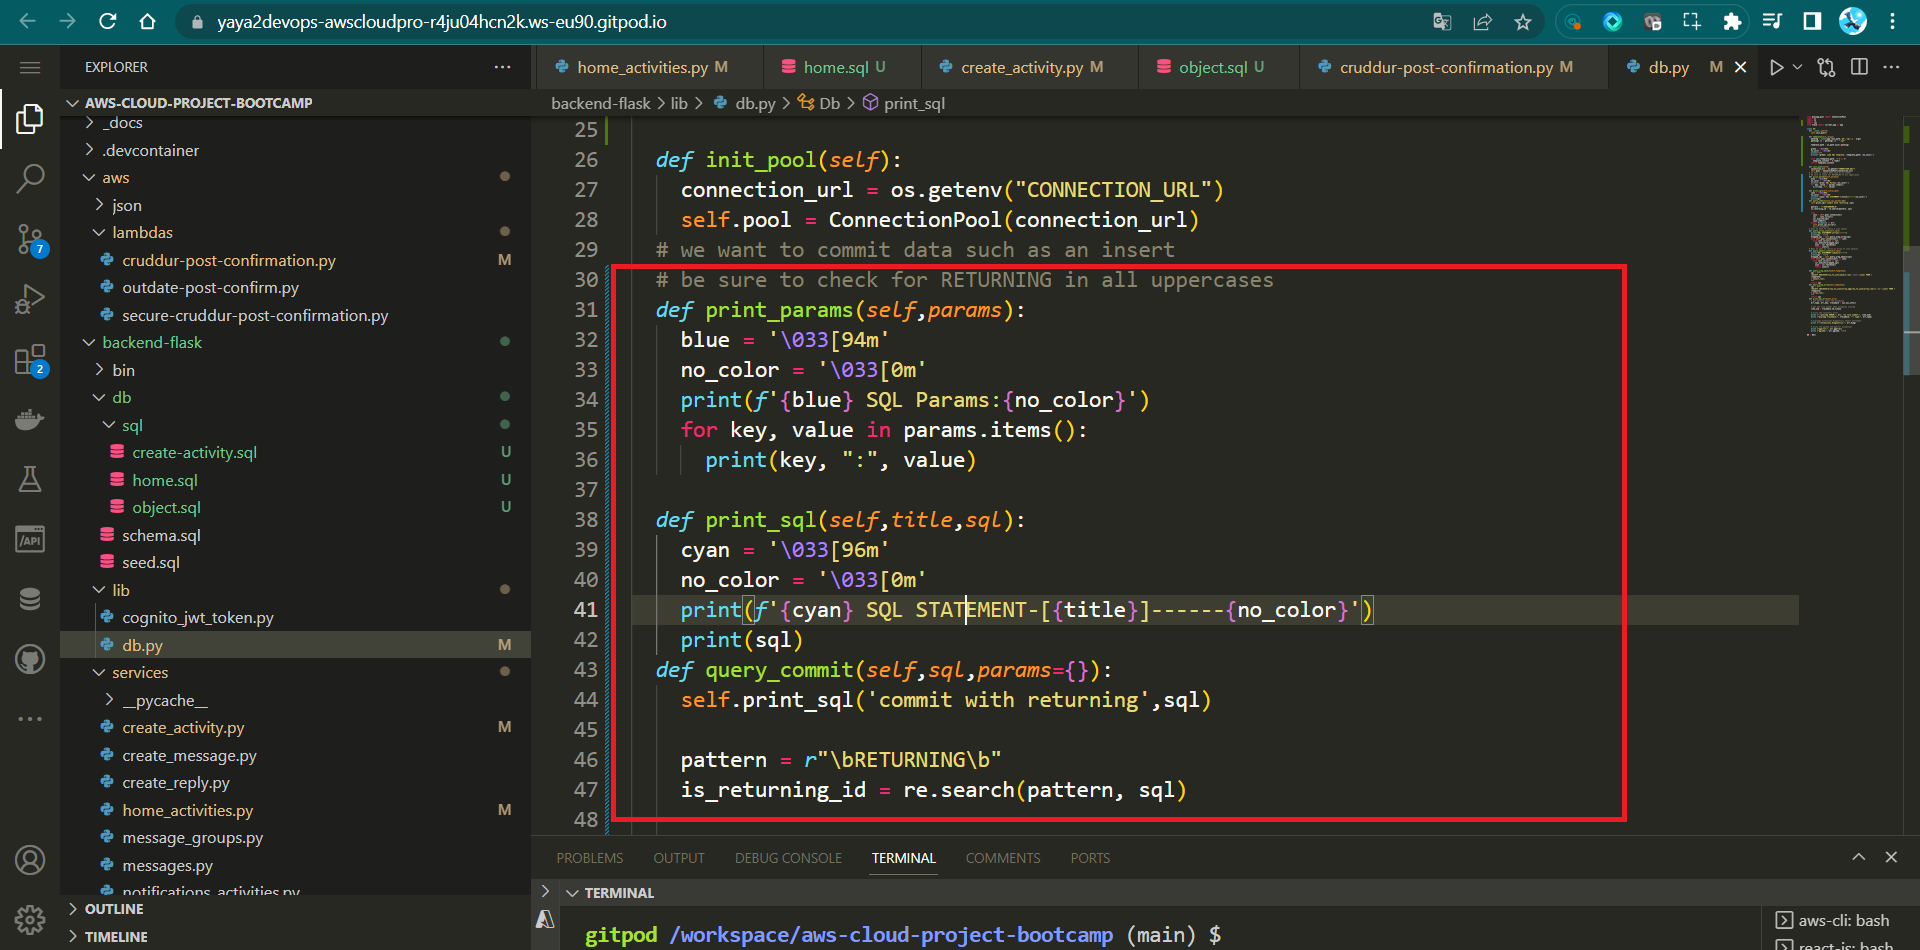
- Prints an SQL statement for debugging.
- Includes a specified title before printing the SQL.
- Create
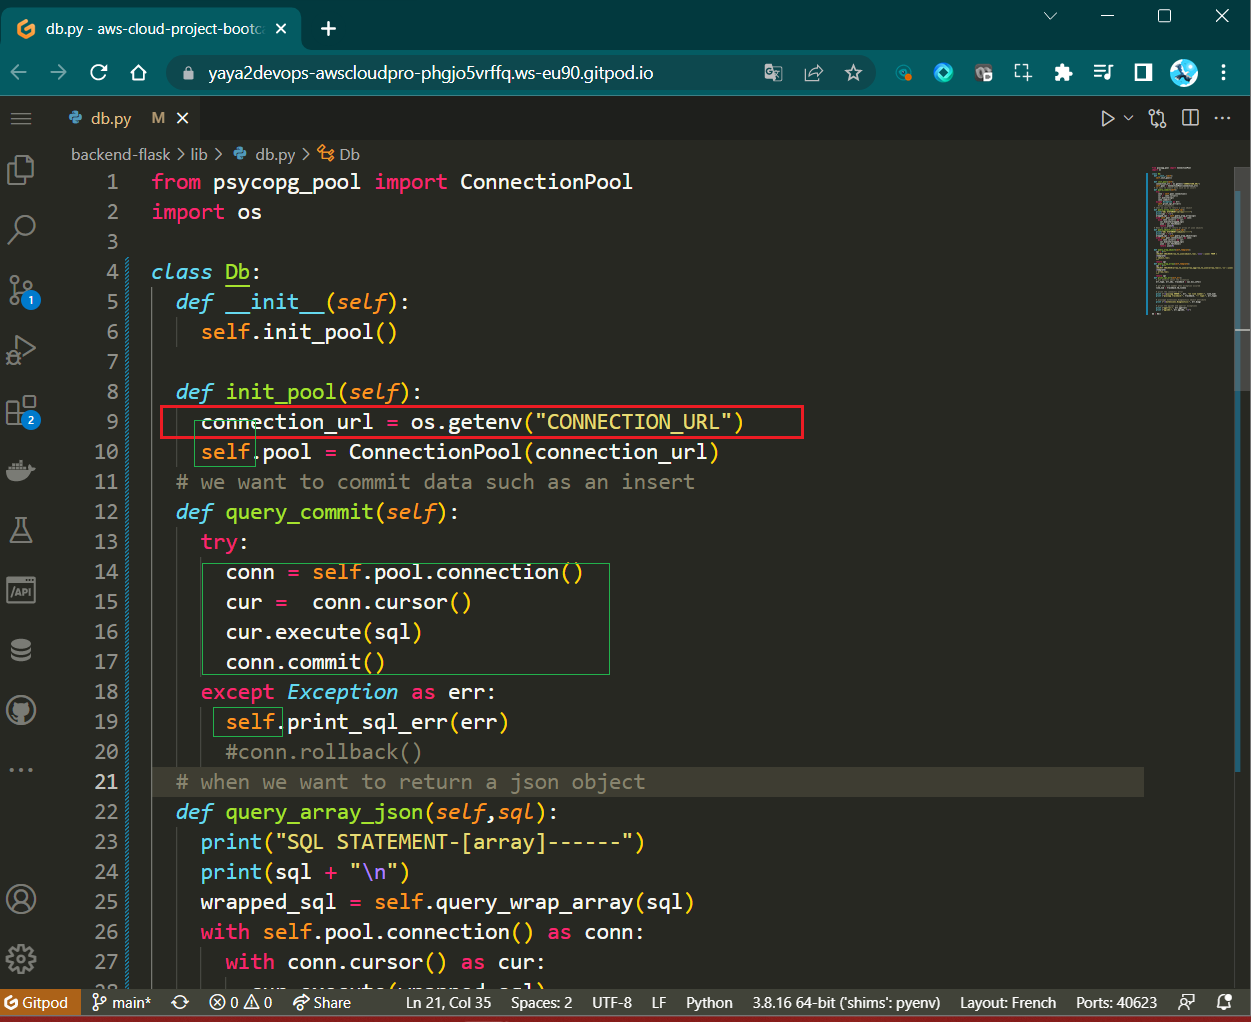
query_commit(self, sql, params={}):
def query_commit(self, sql, params={}):
    self.print_sql("commit with returning", sql)

    pattern = r"\bRETURNING\b"
    is_returning_id = re.search(pattern, sql)

    try:
        with self.pool.connection() as conn:
            cur = conn.cursor()
            cur.execute(sql, params)
            if is_returning_id:
                returning_id = cur.fetchone()[0]
            conn.commit()
            if is_returning_id:
                return returning_id
    except Exception as err:
self.print_sql_err(err)- Executes SQL queries involving changes (inserts, updates).
- If SQL contains "RETURNING", fetches returning value and commits.
- Commits transaction if no "RETURNING" in SQL.
- Create
query_array_json(self, sql, params={}):
def query_array_json(self, sql, params={}):
    self.print_sql("array", sql)

    wrapped_sql = self.query_wrap_array(sql)
    with self.pool.connection() as conn:
        with conn.cursor() as cur:
            cur.execute(wrapped_sql, params)
            json = cur.fetchone()
return json[0]- Executes SQL query, returning a JSON array result.
- Create
query_object_json(self, sql, params={}):
def query_object_json(self, sql, params={}):
      self.print_sql("json", sql)
      self.print_params(params)
      wrapped_sql = self.query_wrap_object(sql)

      with self.pool.connection() as conn:
          with conn.cursor() as cur:
              cur.execute(wrapped_sql, params)
              json = cur.fetchone()
              if json == None:
                  "{}"
              else:
return json[0]- Executes SQL query, returning a JSON object result.
- Create
query_wrap_object(self, template):
def query_wrap_object(self, template):
    sql = f"""
(SELECT COALESCE(row_to_json(object_row),'{{}}'::json) FROM (
{template}
) object_row);
"""
return sql- Wraps SQL template in a query converting result to JSON object.
- Create
query_wrap_array(self, template):
def query_wrap_array(self, template):
    sql = f"""
(SELECT COALESCE(array_to_json(array_agg(row_to_json(array_row))),'[]'::json) FROM (
{template}
) array_row);
"""
return sql- Wraps SQL template in a query converting result to JSON array.
- Create
print_sql_err(self, err):
def print_sql_err(self, err):
    #  Details the exception
    err_type, err_obj, traceback = sys.exc_info()

    # get the line number when exception occured
    line_num = traceback.tb_lineno

    # print the connect() error
    print("\npsycopg ERROR:", err, "on line number:", line_num)
    print("psycopg traceback:", traceback, "-- type:", err_type)

    # print the pgcode and pgerror exceptions
    print("pgerror:", err.pgerror)
print("pgcode:", err.pgcode, "\n")- Prints PostgreSQL error details for debugging.
- The
Dbclass encapsulates these methods for PostgreSQL.
- Going back to
home_activities.py,create_activity.py, etc.), you should find the import and thedbcall.
In essence, this library streamlines psql interactions to Cruddur by providing methods for querying, handling query results in JSON format, and assisting in debugging by printing SQL statements and parameters.
Too many errors occurred on the process that It took me too much critical thinking to resolve.
| 💡 | In Python, Functions are often referred to as methods when they are defined within a class. |
|---|
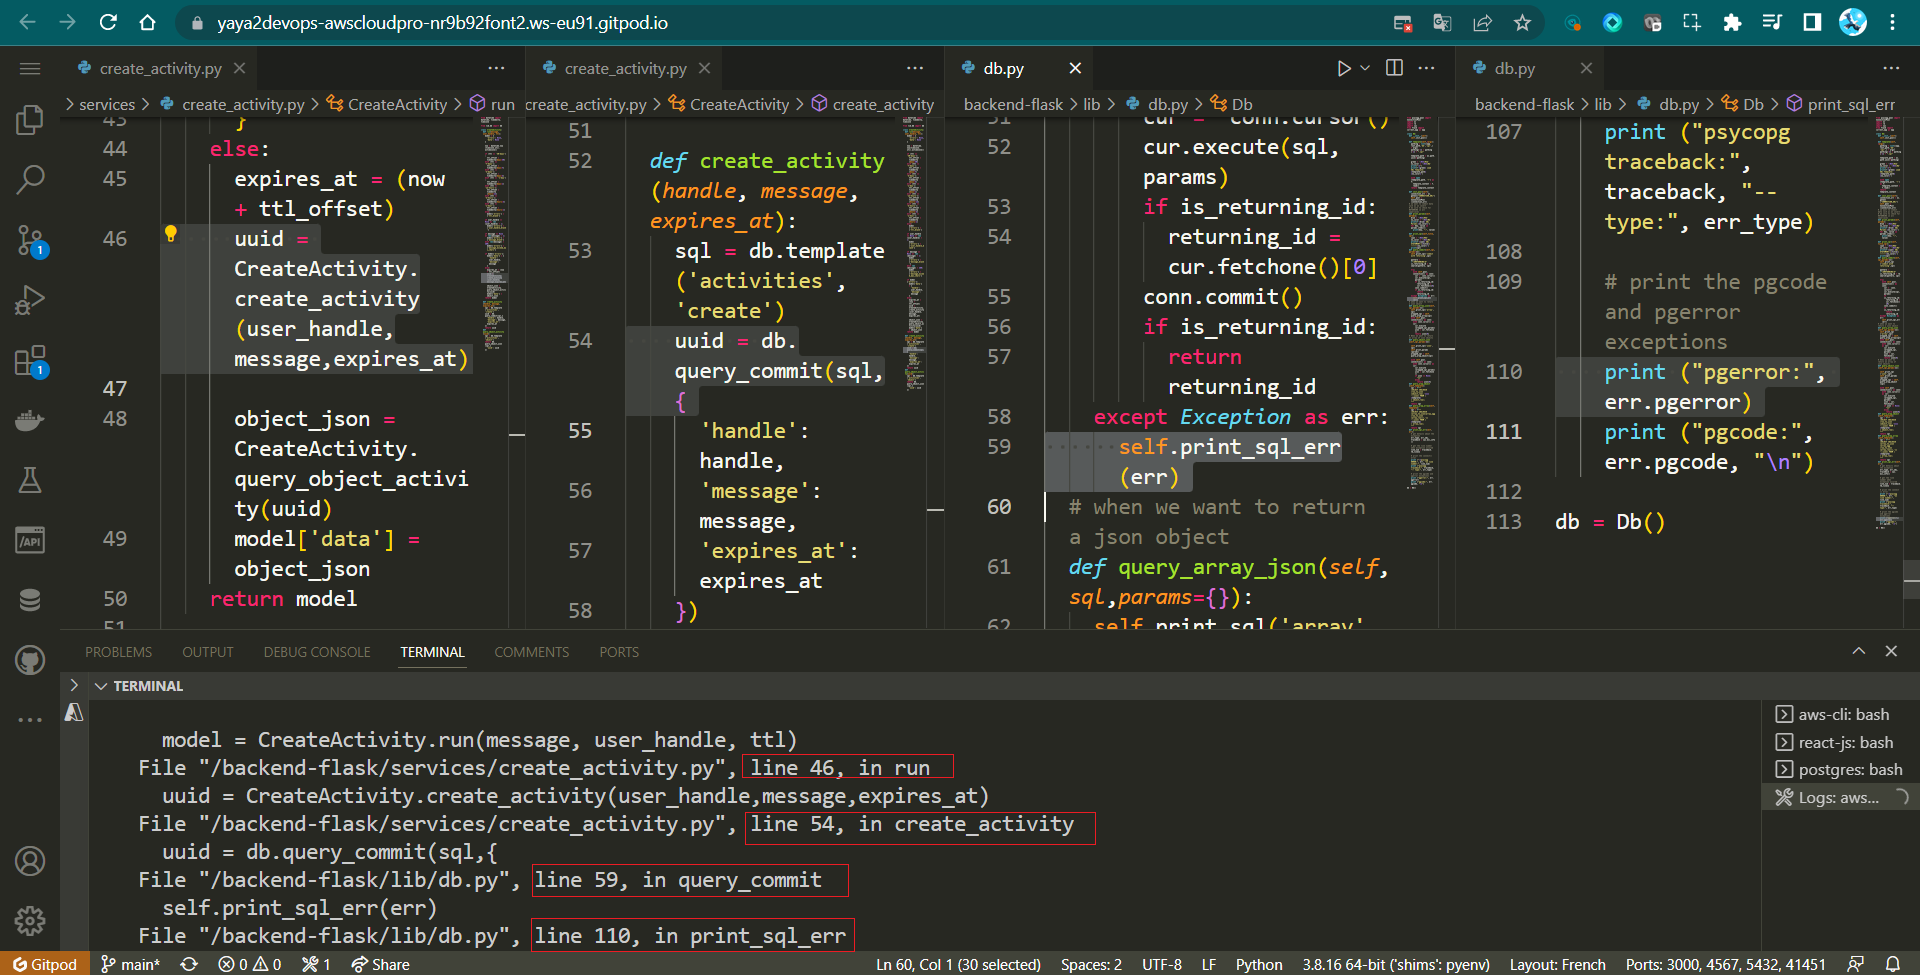
Thoughtful Step : Debug and Resolve
The backend displays an error indicating UUID: None. Follow the instructions provided below sequentially to set up the process for creating CRUDs with varying expiration dates and shipping the data straight to RDS.
- Update the ActivityForm component in
pages/HomeFeedPage.jsto include the user_handle prop:
<ActivityForm
  user_handle={user}
  popped={popped}
  setPopped={setPopped}
  setActivities={setActivities}
/>- Within the
components/ActivityForm.jscomponent, enhance the fetch request body to encompass theuser_handle:
body: JSON.stringify({
  user_handle: props.user_handle.handle,
  message: message,
  ttl: ttl
}),- In the
app.pyfile, specifically within the/api/activitiesroute, assign theuser_handlevariable as follows:
user_handle = request.json["user_handle"]- Adjust the
api/activitiesroute's user_handle to reflect your authentication username e.g.
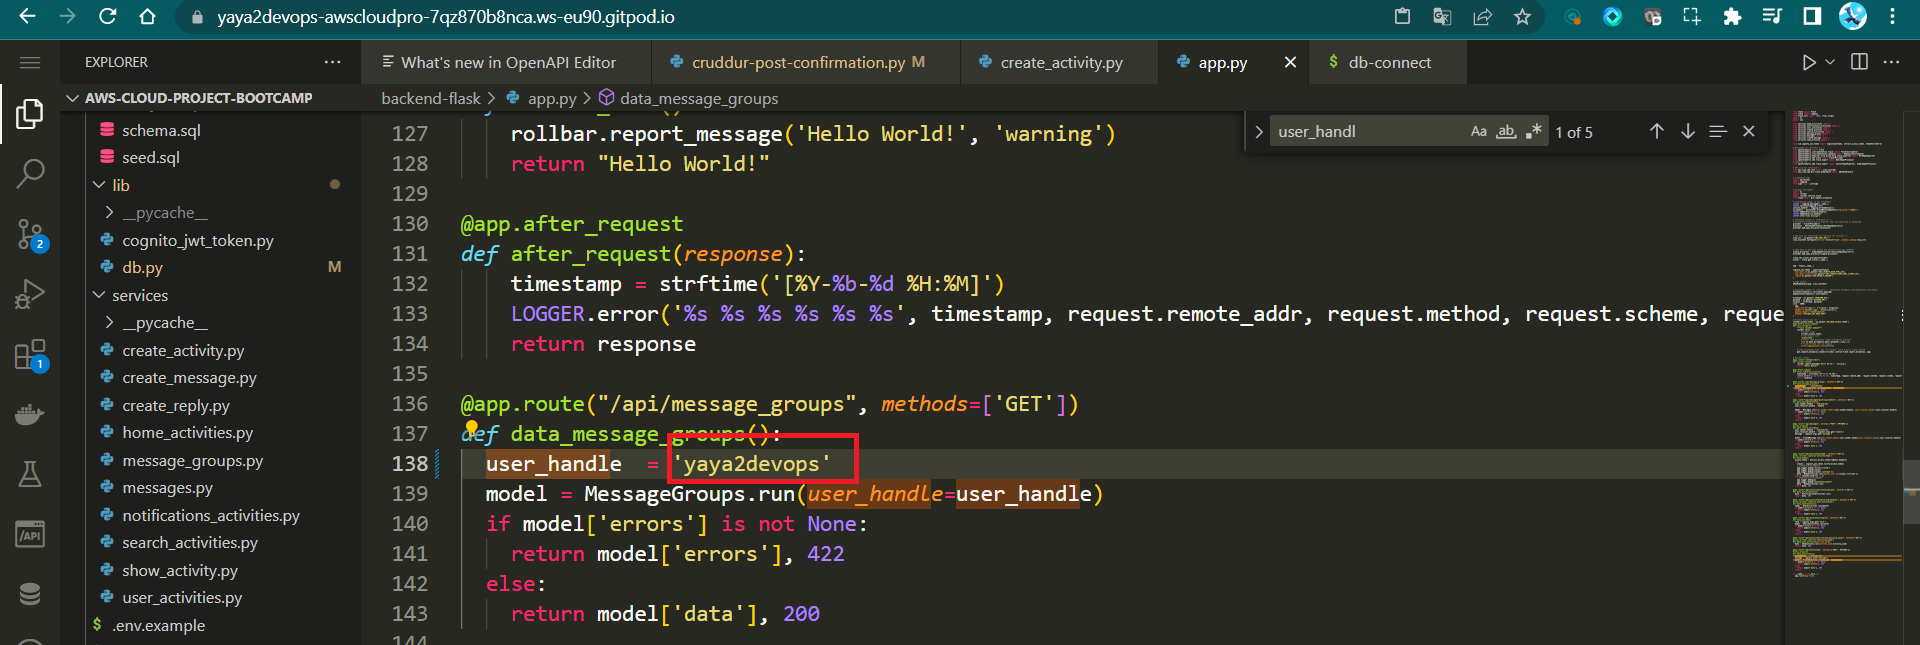
user_handle = yaya2devopsFinal Step: Test Activity Prod
- Sign in-ups to the platform
- Write great insights and click post a.k.a
Crud
- Connect to Prod PSQL
./bin/db-connect prod- List Activities From the prod DB using the following command
SELECT * FROM activities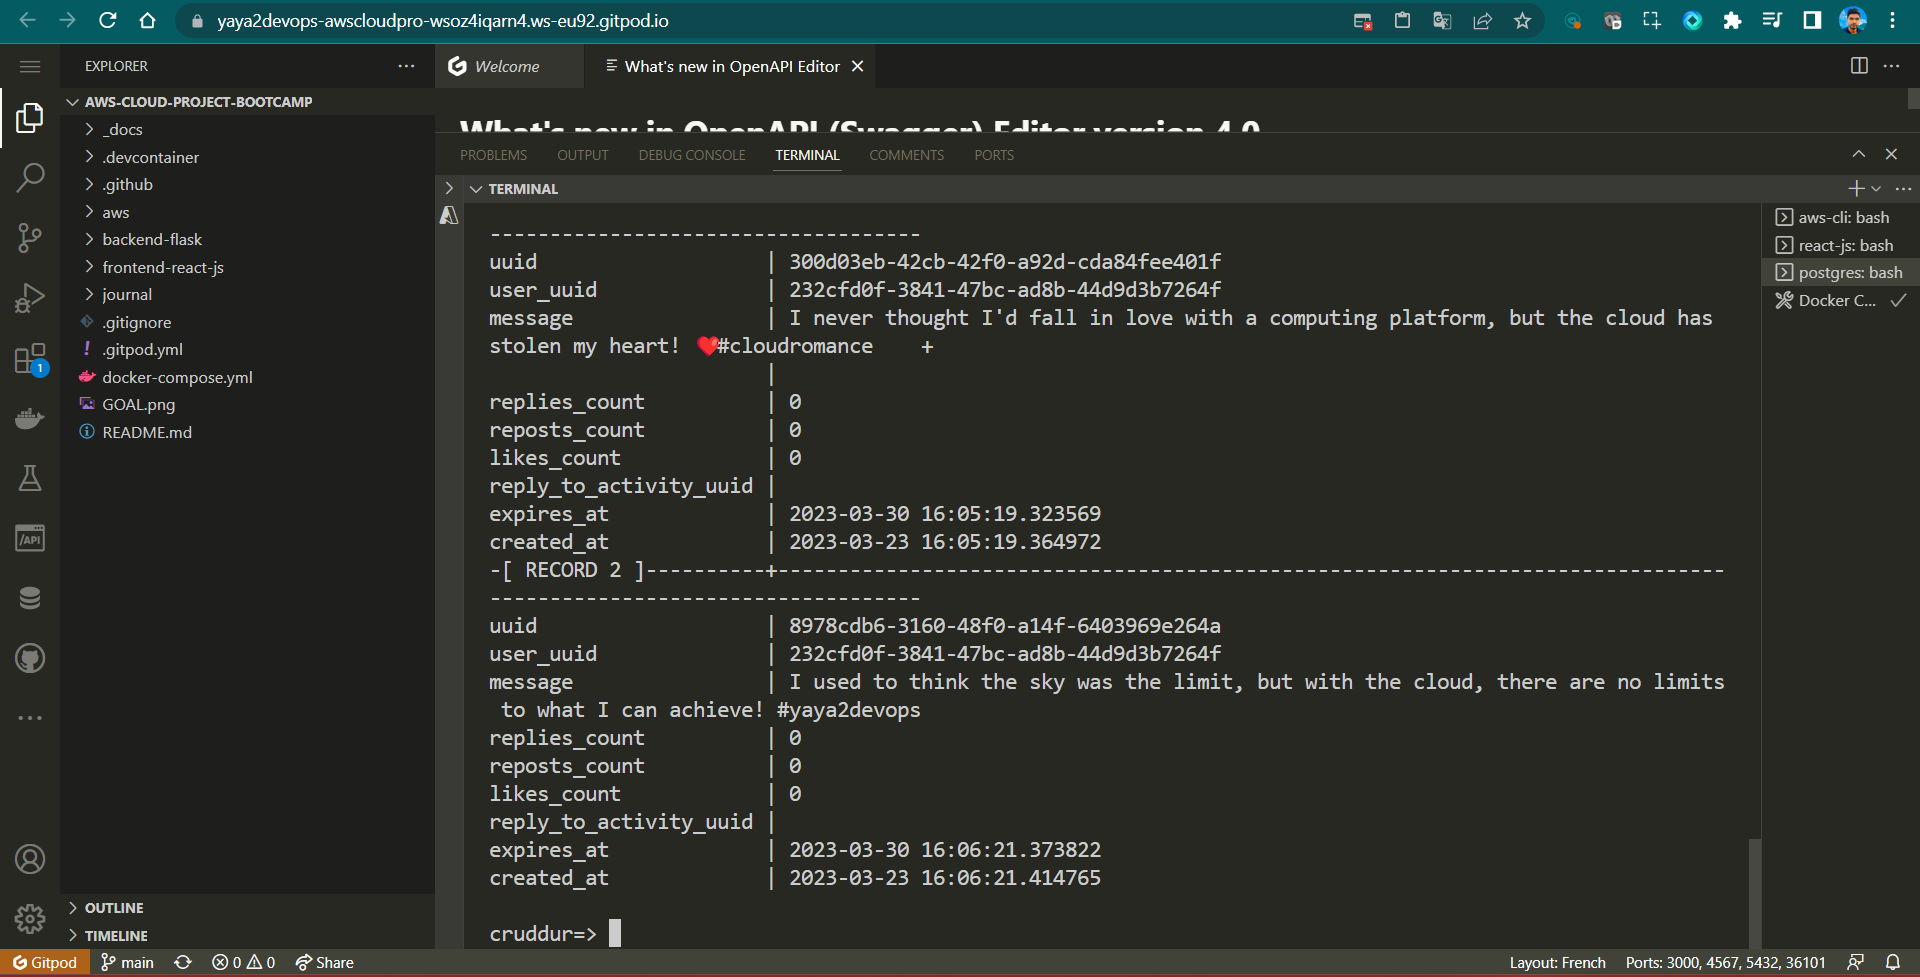
- Please review the logs pertaining to CRUD operation and verify whether the executed operations are generating the anticipated SQL queries.
Week Four ScreenCast — T🔙
Reference
- The future of PostgreSQL in an automated world (opens in a new tab)
- What is Database Privacy? (opens in a new tab)
- Google: Data will be unified, flexible, and accessible (opens in a new tab)
- Complete Guide To System Design (opens in a new tab)
- DBMS Normalization (opens in a new tab)
- Data Governance and Compliance (opens in a new tab)
- IBM About Data Modeling (opens in a new tab)