CI/CD with CodePipeline, CodeBuild and CodeDeploy
This week, our focus will be on streamlining repetitive tasks within the application and establishing an automated pipeline.
Reflecting on my own practical know-how, CI/CD means that I can easily deploy my code to production without the need to manually
- Build: Automatically compile or package the code to create an executable or deployable img.
- Tag: Assign a specific version or label to the artifact, typically for tracking purposes or to indicate a milestone.
- Test: Execute automated tests to verify the functionality and quality of the code.
- Push: Upload the artifact to a repository or deploy it to a fargate, making it accessible for end-users.
Explore the file in different formats like SVG (opens in a new tab), PNG (opens in a new tab), and Drawio (opens in a new tab)

Various AWS services are used in here, with CodePipeline acting as the central control point for managing the stages.
- CodePipeline the main orchestrator of the CI/CD pipeline, coordinating the different stages and automating the release process.
- CodeBuild It is tightly integrated with ECR, the Amazon Elastic Container Registry, enabling the creation and management of container images. CodeBuild executes build processes, such as compiling code, running tests, and generating the container image that will be deployed.
- CodeDeploy This technology is attached to all stages of the pipeline and facilitates the smooth deployment of the application. It automates the process of rolling out new versions of the application, manages traffic routing, and provides rollback capabilities if issues arise.
- S3 Bucket CodeBuild and CodeDeploy leverage an S3 bucket to store artifacts, such as build output and deployment packages. This allows for easy access to these artifacts during the pipeline execution.
When configured correctly, we can then simply commit our changes to a remote Git repo e.g. GitHub, and push to the pre-configured branch e.g. PROD.
The CI/CD pipeline takes over, orchestrating a series of automated steps to ensure the code's successful delivery to production.
Week Nine Main Tasks
- Configuring AWS CodePipeline
- Configuring AWS CodeBuild
- Build stage to CodePipeline
- CICD Pipeline Security
- Buildspec and Parameter Store
- ECR CodeBuild Permissions
- Create Test Build Step
- Add Test step to CodePipeline
CodePipeline Setup
To set up the pipeline, follow the steps below:
- Create a new pipeline with a unique name. Let's name it cruddur-backend-fargate.
- Select GitHub (version 2) as the source provider.
- Connect to GitHub by clicking on Connect to GitHub and assigning the name cruddur to the connection.
- Install a new application, specifying the GitHub organization, and choose Only select repositories to pick the desired Cruddur repository.
- After the installation completes, click on Connect.
- Choose the repository name and create a new branch named
prodin the Cruddur GitHub repository. - In CodePipeline, set the Branch name as
prod.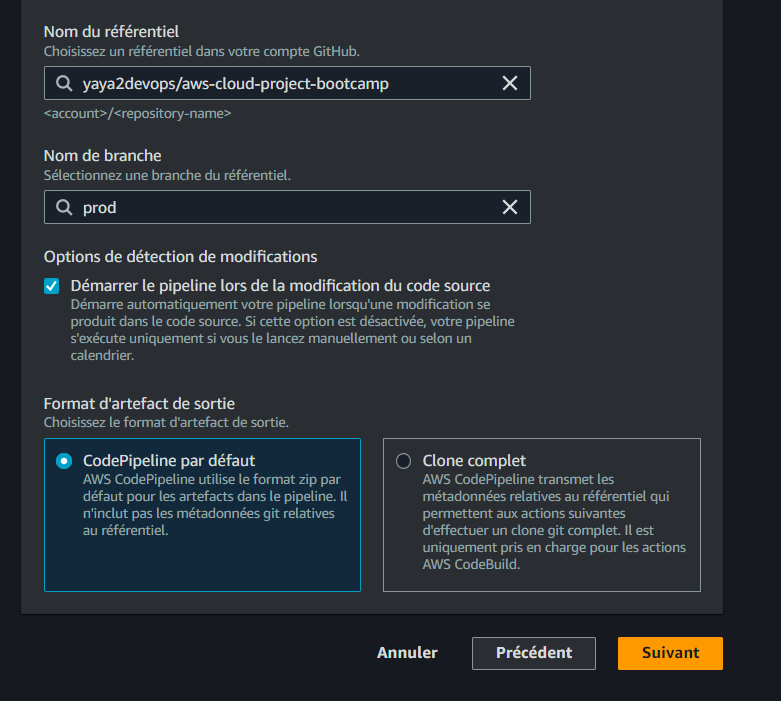
- Ensure that the Start the pipeline on source code change option is selected.
- Set the Output artifact format to CodePipeline default.
- Click on Next, skipping the build stage for now.
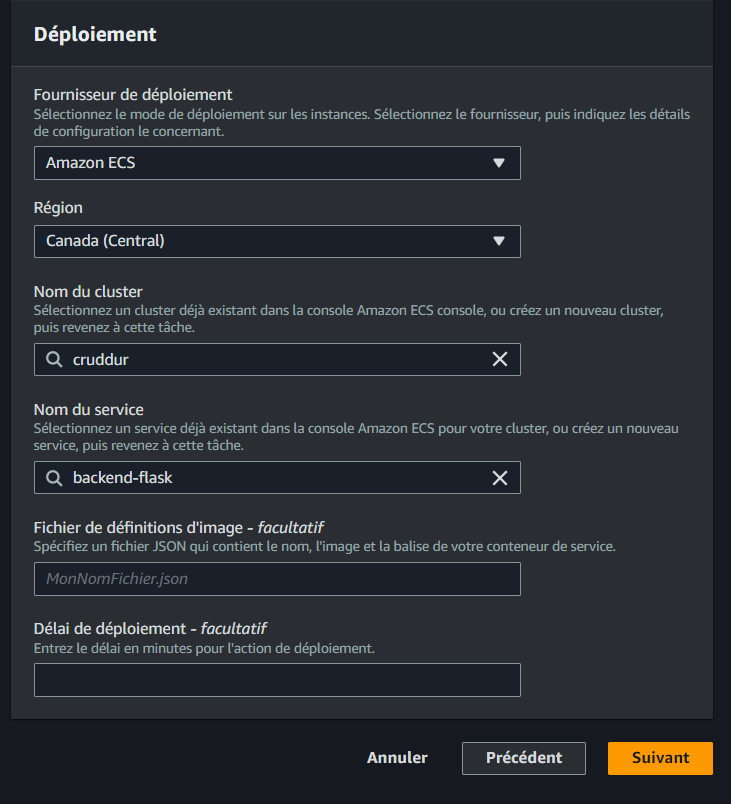
- For the Deploy provider, select Amazon ECS.
- From the cluster name dropdown, choose cruddur.
- Enter backend-flask as the service name and click Next.
- Finally, click on Create Pipeline to complete the configuration.
Configure CodeBuild Project
To set up the CodeBuild project, follow the steps below:
- Go to CodeBuild.
- Create a new build project with the name
cruddur-backend-flask-bake-image. - Enable the build badge to display the build status on the GitHub repository.
- Set the Source provider to GitHub and connect to GitHub using OAuth.
- Once the authentication is complete, select Repository in my GitHub account.
- Choose the Cruddur GitHub Repo.
- Optionally, set the Source version to Prod.
- In the Primary source webhook events section, check the Rebuild every time a code change is pushed to this repository checkbox.
- Select PULL_REQUEST_MERGED from the Event type dropdown.
- In the Environment image: Managed Image section, select Amazon Linux 2 as the operating system as it is the best managed.
- Set the runtime to Standard.
- Choose the latest image for Image.
- Check the Enable this flag if you want to build Docker images or want your builds to get elevated privileges checkbox.
- In the Additional configuration section, set the Timeout to 15 minutes.
- Create a
buildspec.yamlfile for ENV VARS. - In the Buildspec section, choose Use a buildspec file and set the Buildspec name - optional to
backend-flask/buildspec.yml. - Turn on CloudWatch Logs.
- Click on Create build project.
buildspec.yml Configuration
To configure the buildspec.yml for the above codebuild, follow the bonus steps below:
- Create a new file named
backend-flask/buildspec.ymlwith the following content:
version: 0.2
phases:
  install:
    runtime-versions:
      docker: 20
    commands:
      - echo "cd into $CODEBUILD_SRC_DIR/backend"
      - cd $CODEBUILD_SRC_DIR/backend-flask
      - aws ecr get-login-password --region $AWS_DEFAULT_REGION | docker login --username AWS --password-stdin $IMAGE_URL
  build:
    commands:
      - echo Build started on `date`
      - echo Building the Docker image...
      - docker build -t backend-flask .
      - "docker tag $REPO_NAME $IMAGE_URL/$REPO_NAME"
  post_build:
    commands:
      - echo Build completed on `date`
      - echo Pushing the Docker image..
      - docker push $IMAGE_URL/$REPO_NAME
      - cd $CODEBUILD_SRC_DIR
      - echo "imagedefinitions.json > [{\"name\":\"$CONTAINER_NAME\",\"imageUri\":\"$IMAGE_URL/$REPO_NAME\"}]" > imagedefinitions.json
      - printf "[{\"name\":\"$CONTAINER_NAME\",\"imageUri\":\"$IMAGE_URL/$REPO_NAME\"}]" > imagedefinitions.json

env:
  variables:
    AWS_DEFAULT_REGION: ca-central-1
    CONTAINER_NAME: backend-flask
    REPO_NAME: backend-flask:latest

  parameter-store:
    AWS_ACCOUNT_ID: "/cruddur/backend-flask/AWS_ACCOUNT_ID"
    IMAGE_URL: "/cruddur/backend-flask/BACKEND_IMAGE_URL"

artifacts:
  files:
    - imagedefinitions.json
Parameter Store Configuration in buildspec.yml
To securely retrieve sensitive information from Parameter Store in your buildspec.yml file, follow the steps below:
-
Create the necessary parameters in AWS Systems Manager Parameter Store. For example, you can use the following parameter names:
/cruddur/backend-flask/AWS_ACCOUNT_ID: The AWS account ID./cruddur/backend-flask/BACKEND_IMAGE_URL: The URL for the backend image.
-
In your
buildspec.ymlfile, add theparameter-storesection under theenvsection. Specify the parameter names as the values for the corresponding environment variables.
   env:
     variables:
       AWS_DEFAULT_REGION: ca-central-1
       CONTAINER_NAME: backend-flask
       REPO_NAME: backend-flask:latest

     parameter-store:
       AWS_ACCOUNT_ID: "/cruddur/backend-flask/AWS_ACCOUNT_ID"
IMAGE_URL: "/cruddur/backend-flask/BACKEND_IMAGE_URL"- Save the changes to your
buildspec.yml.
Always seek to store any sensitive information in the parameter store and use itsvalues in the buildspec or any other to fetch them securely.
- CodeBuild Operation Succeeded
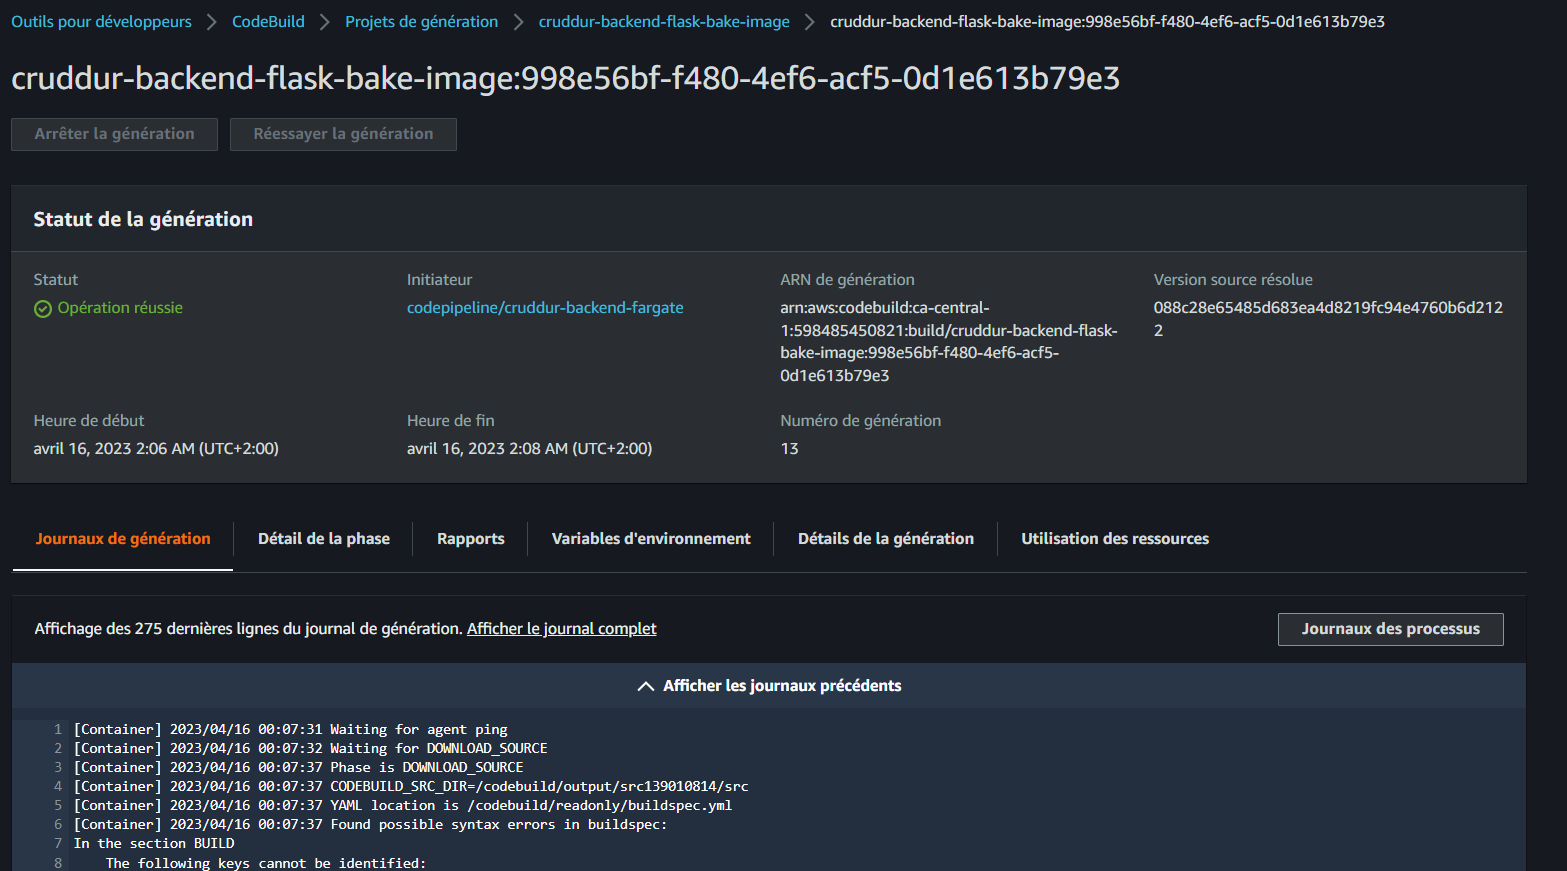
Consult logs in JSON (opens in a new tab) or TABLUAR (opens in a new tab) JSON.
Add Build Stage to Pipeline
- To add the build stage to the pipeline, follow these steps:
- In CodePipeline, select the created pipeline and click on Edit.
- Add a stage between the Source and Deploy stages. Set the stage name as "build".
- Configure the build stage with the following action:
- Specify the action name as "bake".
- Select AWS CodeBuild as the action provider.
- Set the input artifacts to SourceArtifact.
- Choose the appropriate build stage for the project name.
- Set the output artifacts to imageDefinition.
- Click Done to save the action.
- Edit the Deploy stage:
- Change its input artifacts to imageDefinition.
- Save the changes made to the pipeline.
Start Pipeline
When you're ready to begin the pipeline execution, click on the Release Changes button to initiate the process.
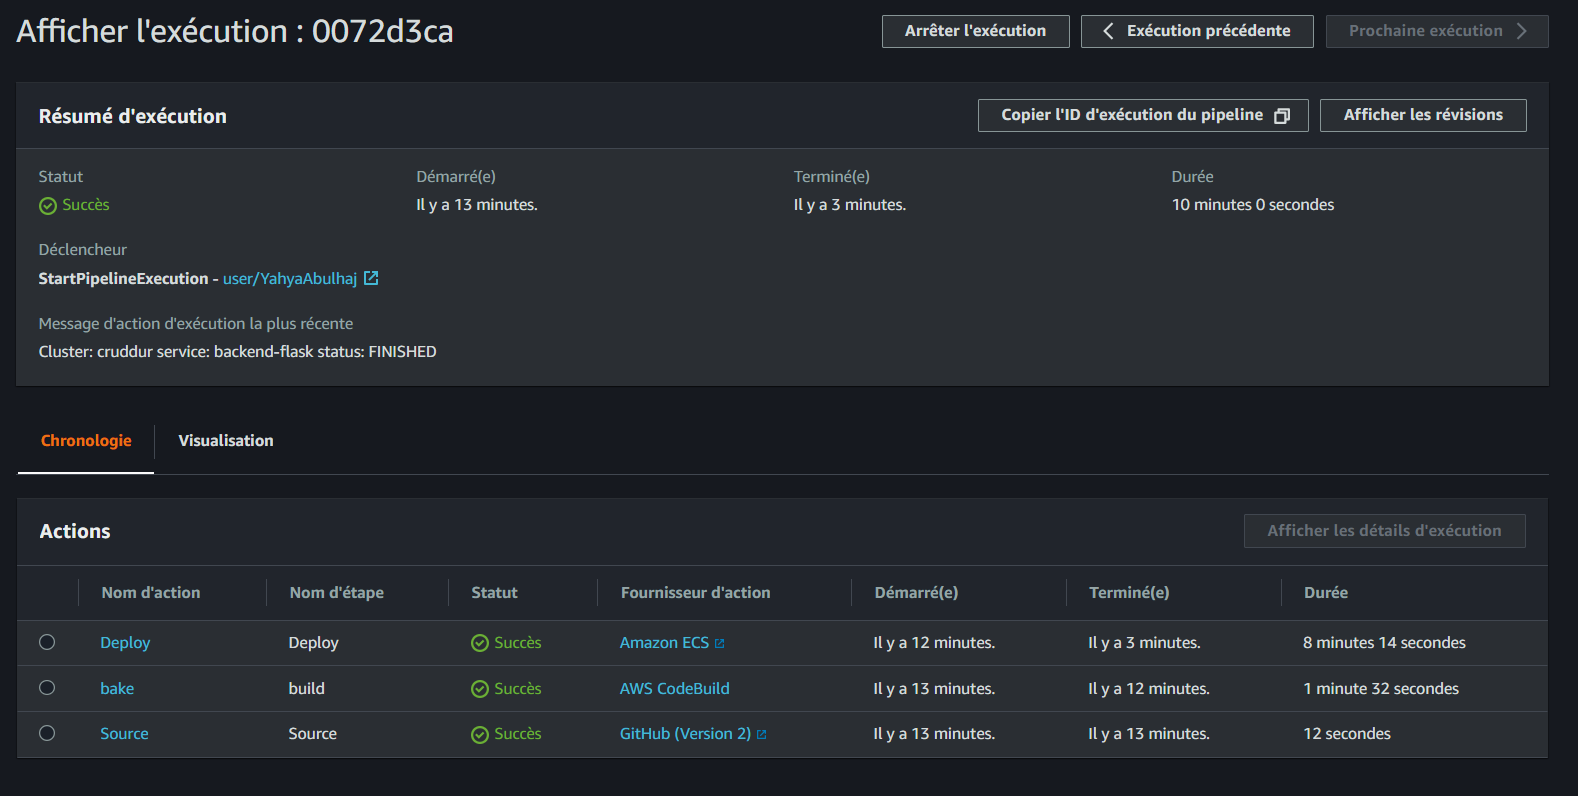
Ensure that each stage successfully completes for the pipeline to progress.
Google Opinion on Build Pipelines Security
I was doing a lab in the Google Cloud Platform (opens in a new tab) and came across some valuable security best practices that I believe are worth sharing.
Google advises the implementation of two key security features in the container build pipeline.
-
Deployment policies: Google recommends deployment policies as part of the container build pipeline to help enforce security measures and control the deployment of container images.
-
Vulnerability scanning: Google emphasizes this which incl. scanning container images for known vulnerabilities and analyzing the packages within the images to identify potential security issues.
Trigger Pipeline
Make any required change you see needed.
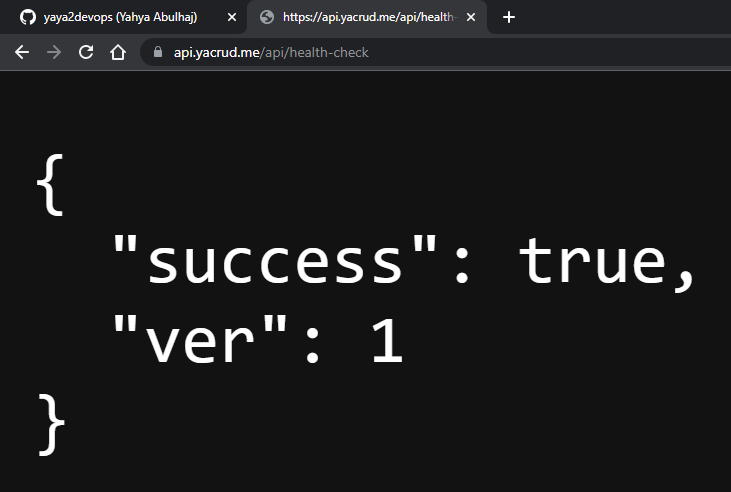
- Update the return statement in the health check section of
app.pywith the following code:return {"success": True, "ver": 1}, 200
- Pushed Technical Instructions from Github
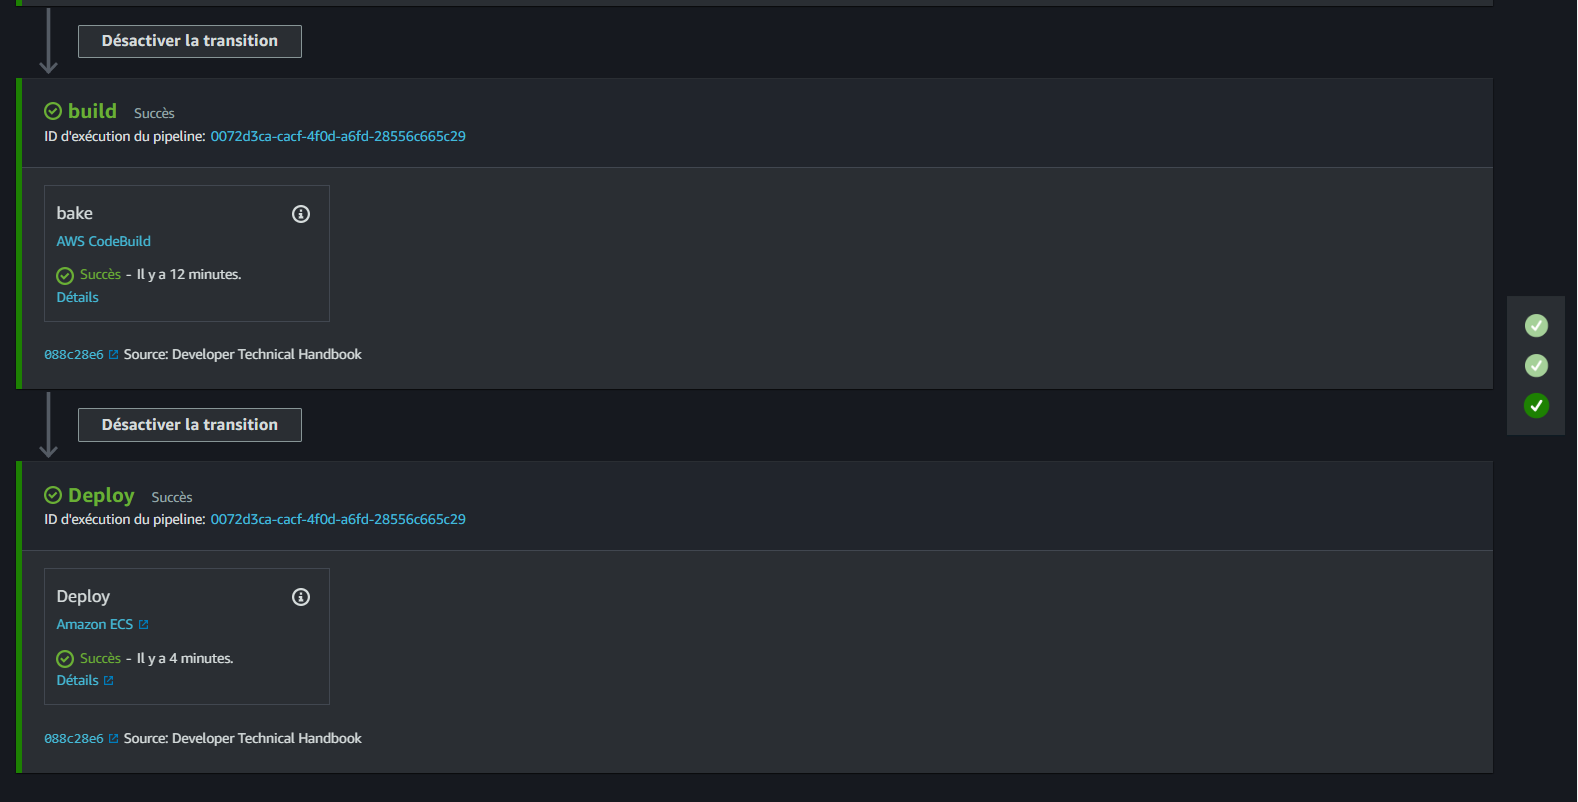
- Pipeline From Source to Build:
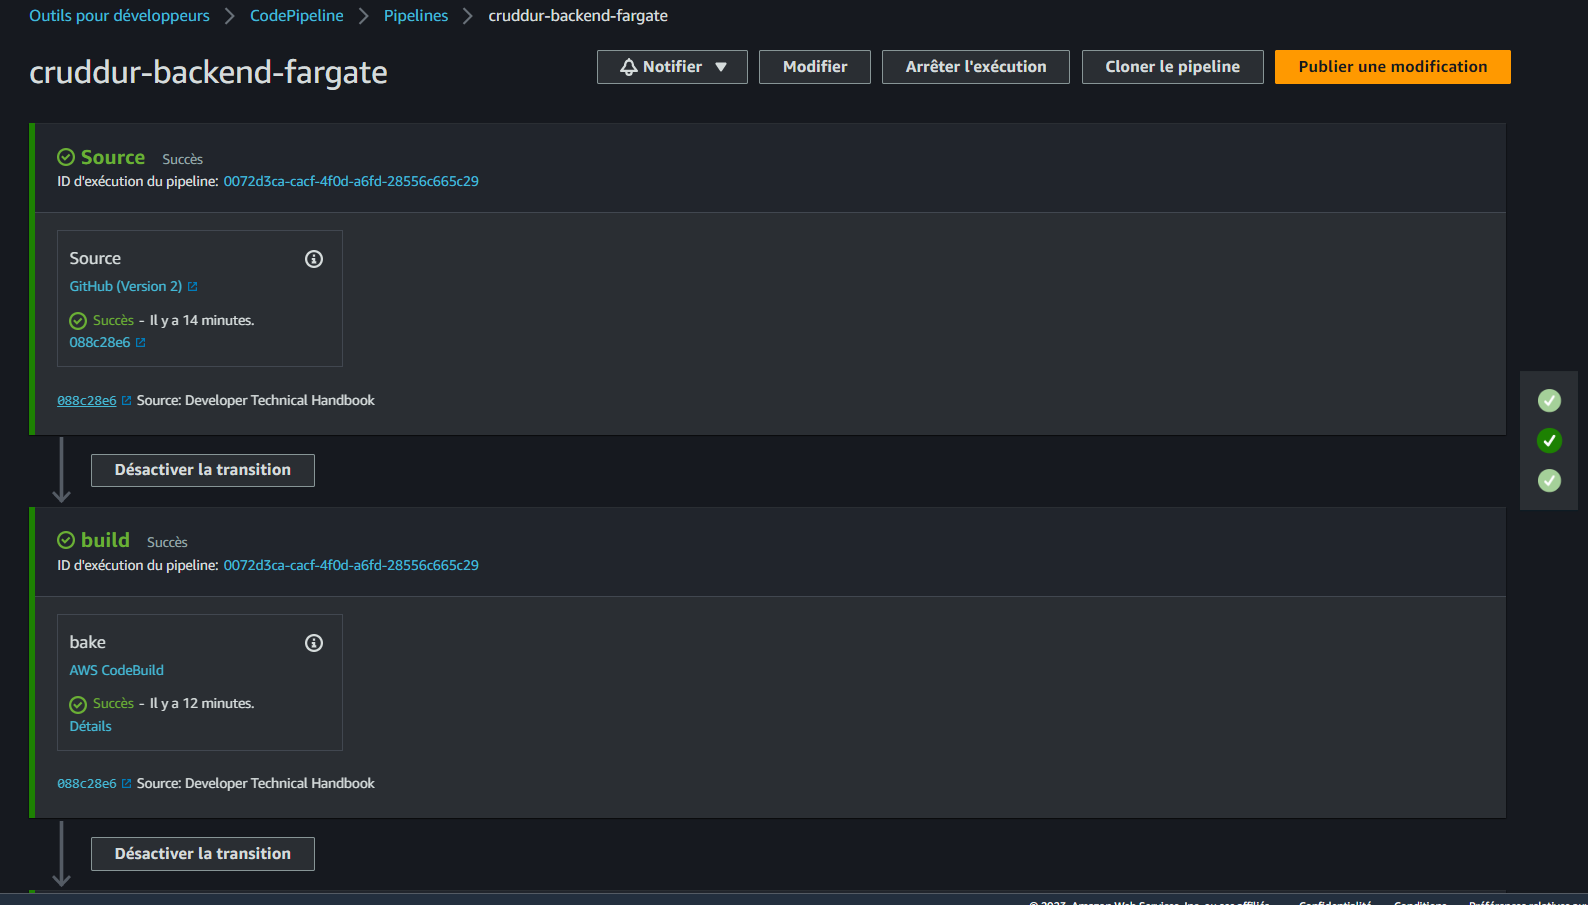
- Pipeline From Build to Prod:
ECR CodeBuild Permissions
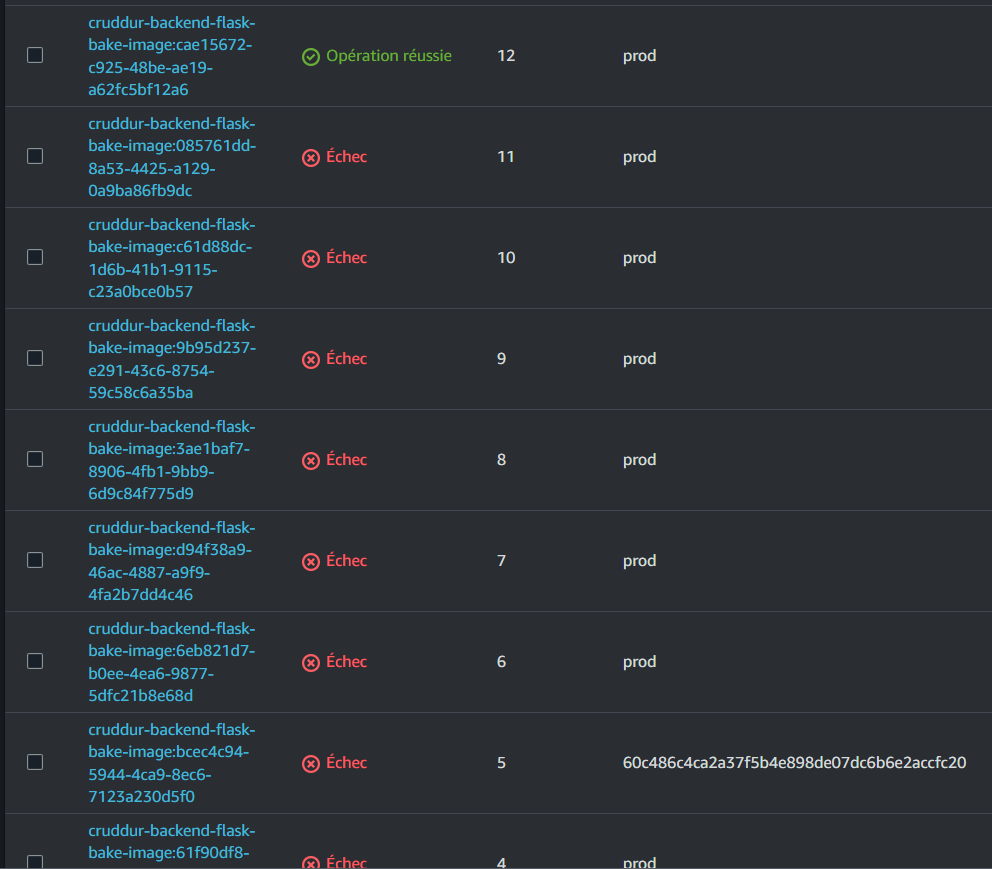
I faced many errors when trying to start the build that I resolved one after the other.
Error message (opens in a new tab)
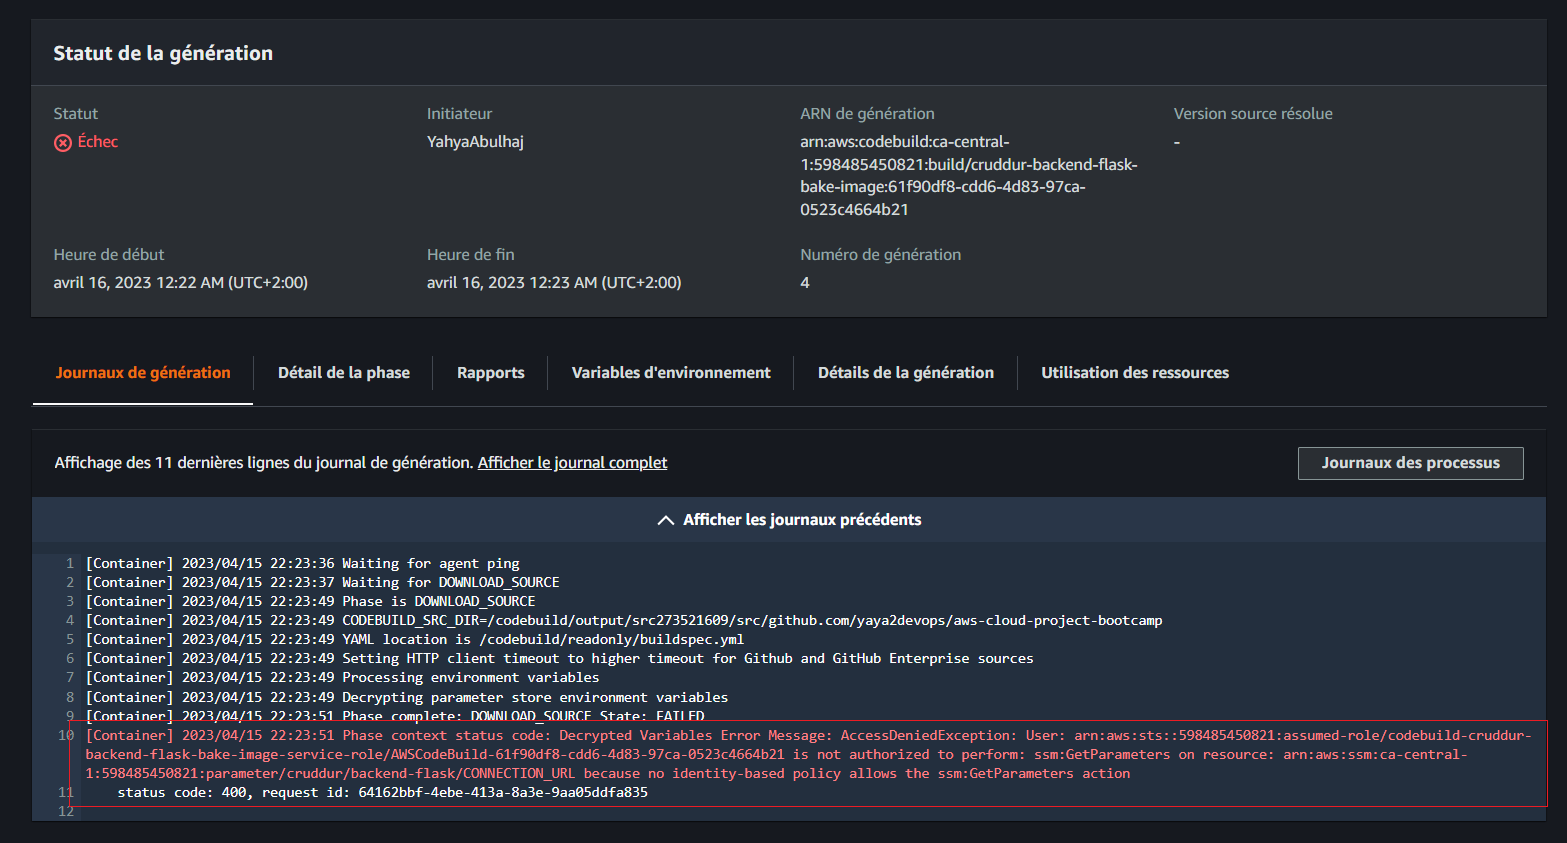
I also dealt with this error (opens in a new tab) and this one. (opens in a new tab)
To resolve this one due to a lack of ECR permissions.
- Open the AWS Management Console and navigate to the Identity and Access Management (IAM) service.
- In the left navigation pane, click on Roles.
- Search for the IAM role associated with your CodeBuild project and click on its name.
- In the Permissions tab, click on the Add inline policy button to create a new policy.
- Select the JSON tab to enter the policy in JSON format.
- Copy and paste the provided policy into the policy editor.
- Click on the Review policy button.
- Provide a name and description for the policy.
- Click on the Create policy button to save the policy.
- Go back to your CodeBuild project configuration.
- Edit the project settings to associate the newly created policy with the appropriate IAM role.
- Save the changes.
You can go ahead and add the following policy
{
"Version": "2012-10-17",
"Statement": [
{
"Sid": "VisualEditor0",
"Effect": "Allow",
"Action": [
"ecr:BatchCheckLayerAvailability",
"ecr:CompleteLayerUpload",
"ecr:GetAuthorizationToken",
"ecr:InitiateLayerUpload",
"ecr:PutImage",
"ecr:UploadLayerPart",
"ecr:BatchGetImage",
"ecr:GetDownloadUrlForLayer"
],
"Resource": "*"
}
]
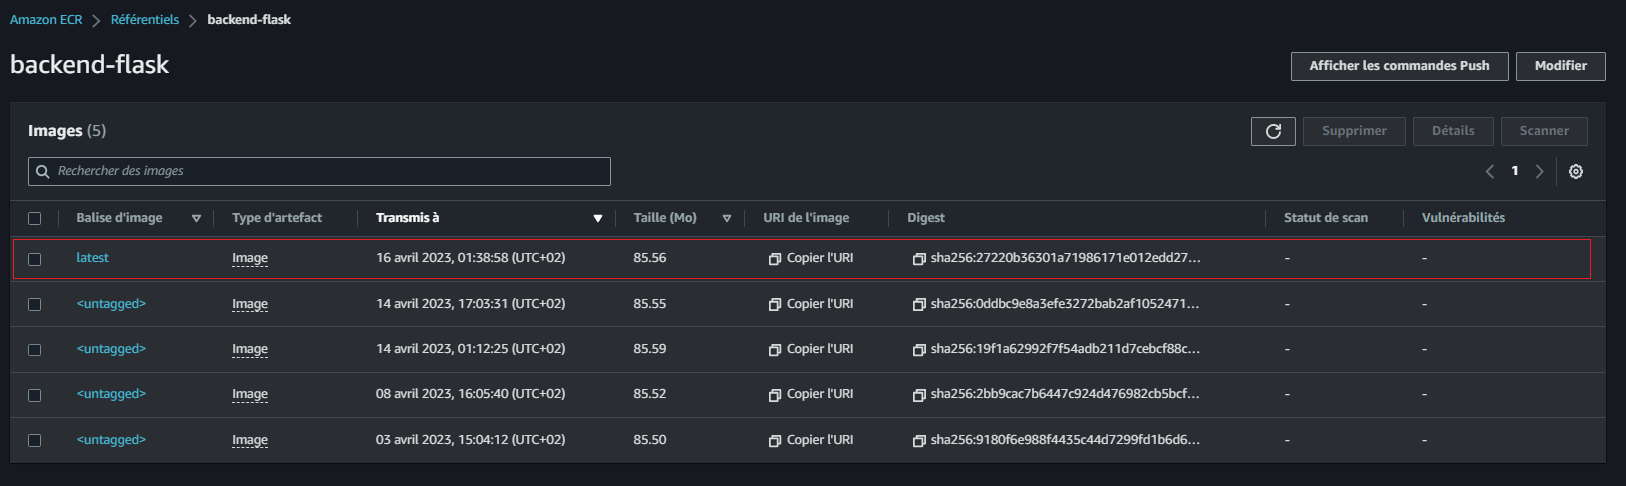
}When done, you will find your image pushed to ECR
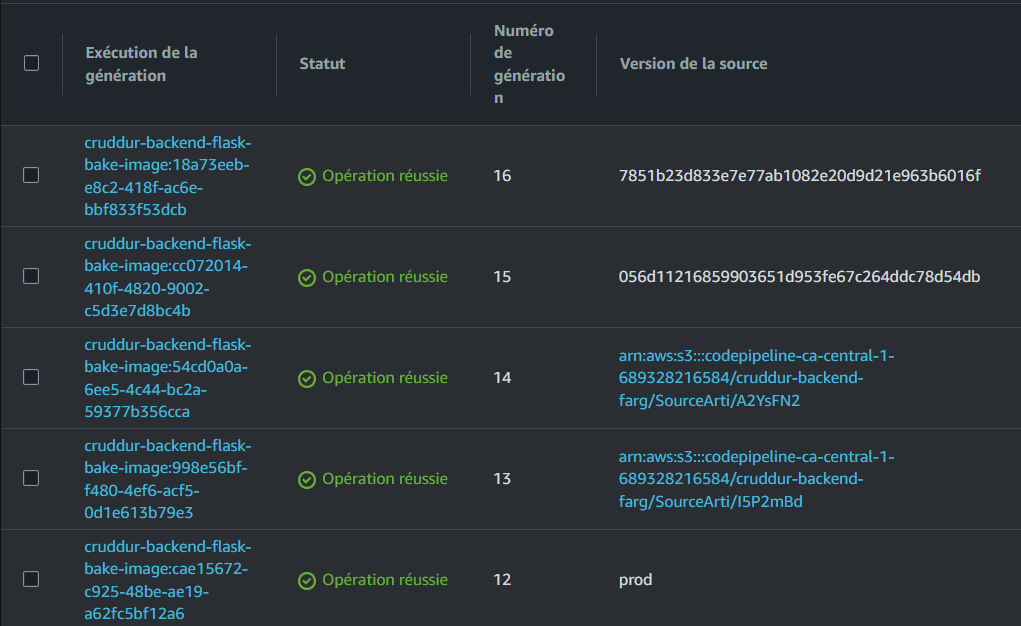
And CodeBuild returns Ops Success
- Everything starts hard..
- Until you become a master
Refer to CodeBuild process in CSV (opens in a new tab).
Incorporating DevSecOps
CI/CD practices have become essential for efficient and rapid software delivery.
However, it is equally crucial to ensure that security is not compromised in the pursuit of speed.
DevSecOps Principles
DevSecOps promotes a collaborative and integrated approach to software development, where security is a shared responsibility among development, security, and operations teams.
The following principles form the foundation of DevSecOps
- Shift-Left Security: Incorporate security practices early in the software development lifecycle to detect and address vulnerabilities at the earliest stages.
- Automation: Automate security testing, code analysis, and vulnerability scanning within the CI/CD pipeline to ensure consistent and reliable security checks.
- Continuous Monitoring: Implement continuous security monitoring to detect and respond to security incidents promptly.
- Culture of Security: Foster a culture that emphasizes security awareness, education, and collaboration among all stakeholders.
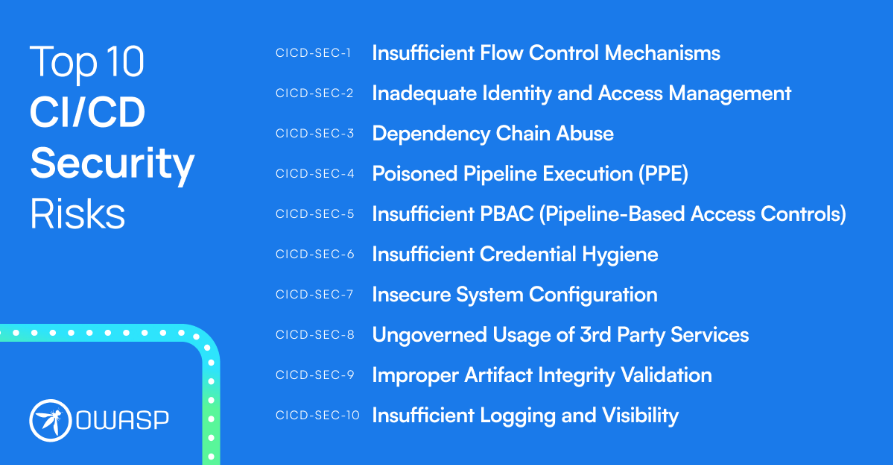
OWASP Top 10 CI/CD Security Risks
The OWASP Top 10 project is an initiative by OWASP that identifies and highlights the top ten most critical web application security risks.
It serves as a guide for developers, security professionals, and organizations.
Below are TOP CI-CD Security Risks provided by OWASP
CI/CD Security Best Practices
The following table summarizes more CI/CD security best practices for your reference.
| Best Practice | Description |
|---|---|
| Secure Configuration Management | Use secure configuration management tools and practices to manage and version control the CI/CD pipeline configurations. |
| Restrict access to configuration files and credentials, ensuring they are encrypted and stored securely. | |
| Regularly review and update configurations to address security vulnerabilities. | |
| Secure Code Repository | Implement secure coding practices and perform regular code reviews to identify and fix security vulnerabilities. |
| Utilize version control systems with strong access controls and authentication mechanisms. | |
| Monitor the code repository for any unauthorized changes or malicious activity. | |
| Automated Security Testing | Integrate security testing tools, such as Static Application Security Testing (SAST) and Dynamic Application Security Testing (DAST). |
| Set up automated security tests to scan for common vulnerabilities and weaknesses in the application code and dependencies. | |
| Ensure that security test results are automatically reported and tracked for further analysis. | |
| Vulnerability Management | Utilize Software Composition Analysis (SCA) tools to identify and manage vulnerabilities in third-party libraries and components. |
| Regularly update and patch vulnerable dependencies to minimize the risk of exploitation. | |
| Establish a process for tracking and addressing security vulnerabilities, including timely communication and remediation. |
Employing the above principles of DevSecOps is crucial to ensure the development and delivery of secure software. We can establish a robust and efficient CI/CD security framework that minimizes risks and protects sensitive data.
Note: This information above is my effort to provide an overview of CI/CD security best practices, and it is recommended to refer to additional resources and specific guidelines for detailed implementation.
Test Using pytest
- Install the pytest library by running the following command:
pip3 install pytestMake sure to add it to the requirements.txt file.
- Create a
tests/folder in the backend flask directory. - Configure pytest by creating a conftest.py file inside the
backend-flask/tests/directory.
Add the following code to the file:
import pytest
from app import app as flask_app

@pytest.fixture()
def app():
    yield flask_app

@pytest.fixture()
def client(app):
return app.test_client()- Inside the
backend-flask/tests/, create a test file, e.g.test_project.py, with the following content:
def test_health(client):
    response = client.get("/api/health-check")
    assert response.status_code == 200

def test_notifications(client):
    response = client.get("/api/activities/notifications")
    assert response.status_code == 200
    assert response.json["data"][0]["handle"] == "Tron"

def test_home(client):
    response = client.get("/api/activities/home")
    assert response.status_code == 200
assert response.json["data"][0]["handle"] == "yaya2devops"- To make Python recognize the
tests/as a package, create a file called__init__.pyinside the folder.
Run pytest to test the Flask application.
❯ pytest
========================= test session starts ==========================
platform linux -- Python 3.10.6, pytest-7.3.1, pluggy-1.0.0
rootdir: /**/aws-cloud-project-bootcamp/backend-flask
plugins: postgresql-4.1.1
collected 3 items

tests/test_project.py ..                                         [100%]

========================== 3 passed in 0.04s ===========================
Buildspec for Test Phase
- Add the
installphase to install PostgreSQL and its dependencies:
install:
  runtime-versions:
    python: 3.x
  commands:
    - echo "cd into $CODEBUILD_SRC_DIR/backend"
    - echo "Installing PostgreSQL"
    - yum install -y postgresql
    - cd $CODEBUILD_SRC_DIR/backend-flask
- pip3 install -r requirements.txt- Add the
pre_buildphase to start a PostgreSQL container:
pre_build:
  commands:
    - echo "SETUP PostgreSQL"
    - docker pull postgres:13-alpine
    - docker run -e POSTGRES_PASSWORD=password -e POSTGRES_USER=postgres -d -p 5432:5432 postgres:13-alpine
- sleep 15- I used netcat to check if psql is accepting connections on port 5432.
      echo "Waiting for PostgreSQL to start"
      until nc -z localhost 5432; do
          sleep 2
done- It waits until the connection is successful
nc -zexits with a 0 status, before proceeding to the next command.
The script sleeps for 2 seconds between each check.
pre_build Adjusted
pre_build:
  commands:
    - echo "Starting PostgreSQL"
    - docker pull postgres:13-alpine
    - docker run -e POSTGRES_PASSWORD=password -e POSTGRES_USER=postgres -d -p 5432:5432 postgres:13-alpine
    - |
      echo "Waiting for PostgreSQL to start"
      until nc -z localhost 5432; do
          sleep 2
done- Add the
buildphase to perform testing steps:
build:
  commands:
    - echo "Build Test Phase"
    - export CONNECTION_URL="postgresql://postgres:password@localhost:5432/cruddur"
    - export ABS_PATH=$CODEBUILD_SRC_DIR
    - cd $CODEBUILD_SRC_DIR
    - bash ./bin/db/create
    - bash ./bin/db/schema-load
    - bash ./bin/db/seed
    - cd $CODEBUILD_SRC_DIR/backend-flask/tests
- python -m pytest- Update the environment variables in the
envsection
env:
  variables:
    AWS_DEFAULT_REGION: ca-central-1
    FRONTEND_URL: <FRONTEND-URL>
BACKEND_URL: <BACKEND-URL>- Update the parameter store variables in the parameter-store section
parameter-store:
  AWS_COGNITO_USER_POOL_CLIENT_ID: /cruddur/backend-flask/AWS_COGNITO_USER_POOL_CLIENT_ID
  AWS_COGNITO_USER_POOL_ID: /cruddur/backend-flask/AWS_COGNITO_USER_POOL_ID
AWS_USER_POOLS_ID: /cruddur/backend-flask/AWS_COGNITO_USER_POOL_IDAdding Test Stage
Add CodePipeline Stage
To enhance the backend pipeline in the CodePipeline console, follow these steps:
- Open the CodePipeline console and locate the backend pipeline you wish to modify.
- Select the pipeline and proceed to the Edit option.
- Beneath the Source stage, find the option to Add stage and assign the name Test to the new stage.
- Confirm the creation of the stage by clicking Create.
- Configure an action group for the stage.
- Set the Action name as "Test".
- Choose CodeBuild as the Action provider.
- Specify SourceArtifact as the Input artifacts.
- Under the Project Name section, select Create Project.
Add Test Phase to CodeBuild
- Set the name of the project as "cruddur-backend-flask-test".
- Choose the environment image as Managed Image with the operating system set to Amazon Linux 2.
- Utilize the same steps as the Build stage.
- In the Buildspec section, choose the option to use a buildspec file and set the buildspec name (optional) to
backend-flask/tests/buildspec.yml. - Proceed by clicking Continue to CodePipeline.
Testing The Phase
- Get something to PROD.
- visualize the test build logs to verify the success of the entire process incl. the Test phase.
- Consult the pipeline.
Reference