Deploying Containers on AWS
Weeks 6 and 7 were consolidated into a two-week period of harmony, in here i'll organize them as separate weeks and give it a proper structure.
This covers the essential steps and best practices for containerizing your applications and deploying them using Amazon Elastic Container Service (ECS) and Fargate. We'll walk through the process of setting up your environment, creating and pushing container images, configuring task definitions, and managing your deployments, with detailed explanations for each step and code snippet.
Table of Contents
- Architectural Blueprint and System Overview
- Development Ecosystem Configuration
- Application Containerization Strategies
- Amazon Elastic Container Registry (ECR) Integration
- Elastic Container Service (ECS) Cluster Orchestration
- Persistent Data Layer Configuration
- Application Resilience and Availability Assurance
- ECS Task Definition Blueprints
- Cryptographic Secret Management
- Identity and Access Management (IAM) Role Configuration
- AWS Fargate Serverless Deployment Strategy
- Operational Intelligence and Diagnostics
- Production-Grade Optimization Techniques
- Security Best Practices and Hardening Strategies
- Supplementary Learning Resources and Documentation
Architecture Overview
The deployment process is thoroughly explained, covering both backend and frontend services. The section includes instructions for implementing health checks, setting up security groups, and configuring networking.
Before we dive into the details, let's take a look at the high-level architecture of our containerized application deployment:
Initial Version (opens in a new tab)
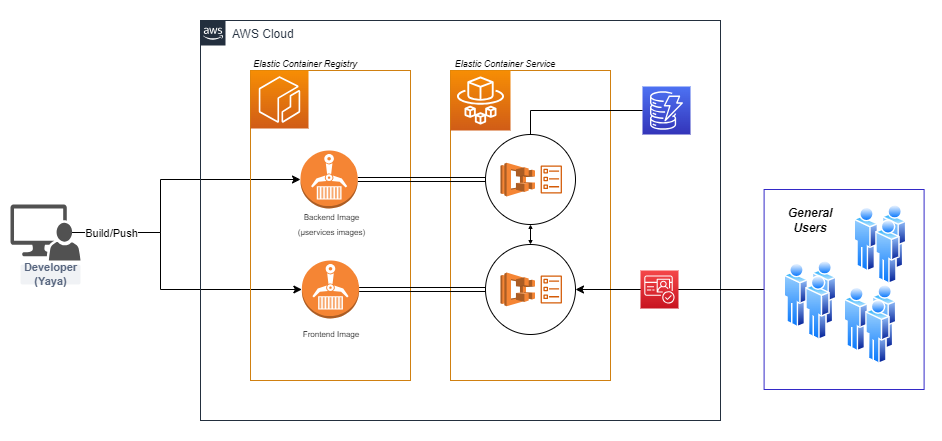
This architecture showcases the integration of our containerized frontend and backend services with AWS services such as ECS, ECR, and RDS. The use of Fargate allows for serverless container management, reducing operational overhead.
Download Architecture Diagram (opens in a new tab)
Environment Setup
Before we begin deploying containers, it's crucial to set up your development environment properly. Ensure you have the following tools installed and configured:
- AWS CLI
- Docker
- Git (for version control)
Configure your AWS CLI with the appropriate credentials:
aws configureThis command will prompt you to enter your AWS Access Key ID, Secret Access Key, default region, and output format. These credentials allow the AWS CLI to interact with your AWS account and resources.
Containerization
Backend Flask Application
- Create a
Dockerfilein your backend Flask application directory:
FROM python:3.10-slim-buster

WORKDIR /backend-flask

COPY requirements.txt requirements.txt
RUN pip3 install -r requirements.txt

COPY . .

ENV FLASK_ENV=development

EXPOSE 5000

CMD [ "python3", "-m" , "flask", "run", "--host=0.0.0.0", "--port=5000"]
Let's break down this Dockerfile:
FROM python:3.10-slim-buster: This line specifies the base image for our container, using Python 3.10 on a slim Debian Buster base.WORKDIR /backend-flask: Sets the working directory inside the container.COPY requirements.txt requirements.txt: Copies the requirements file into the container.RUN pip3 install -r requirements.txt: Installs the Python dependencies listed in the requirements file.COPY . .: Copies the rest of the application code into the container.ENV FLASK_ENV=development: Sets an environment variable for Flask to run in development mode.EXPOSE 5000: Informs Docker that the container will listen on port 5000 at runtime.CMD [ "python3", "-m" , "flask", "run", "--host=0.0.0.0", "--port=5000"]: Specifies the command to run when the container starts, which launches the Flask application.
- Build the backend image:
docker build -t backend-flask .This command builds a Docker image from the Dockerfile in the current directory (.) and tags it with the name backend-flask.
Frontend React Application
- Create a
Dockerfilein your frontend React application directory:
FROM node:16.18

WORKDIR /frontend-react-js

COPY package*.json ./

RUN npm install

COPY . .

ENV PORT=3000

EXPOSE ${PORT}

CMD ["npm", "start"]
Explanation of this Dockerfile:
FROM node:16.18: Uses Node.js version 16.18 as the base image.WORKDIR /frontend-react-js: Sets the working directory inside the container.COPY package*.json ./: Copies package.json and package-lock.json (if it exists) into the container.RUN npm install: Installs the Node.js dependencies defined in package.json.COPY . .: Copies the rest of the application code into the container.ENV PORT=3000: Sets an environment variable for the port number.EXPOSE ${PORT}: Informs Docker that the container will listen on the port specified by the PORT environment variable.CMD ["npm", "start"]: Specifies the command to run when the container starts, which launches the React application.
- Build the frontend image:
docker build -t frontend-react-js .This command builds a Docker image for the frontend application and tags it with the name frontend-react-js.
ECS Cluster Creation
To create a new ECS cluster, run the following command in your terminal:
aws ecs create-cluster \
--cluster-name cruddur \
--service-connect-defaults namespace=cruddur
Explanation:
- This AWS CLI command creates a new ECS (Elastic Container Service) cluster named "cruddur".
- The
--service-connect-defaultsflag sets up a default namespace for service discovery, also named "cruddur". - This namespace creation enables services within the cluster to communicate using friendly names instead of IP addresses or load balancer DNS names.
RDS Connection Test
Create the file backend-flask/bin/db/test and make it executable. This script will test the connection to your RDS database.
Run the script to test the RDS connection:
❯ ./backend-flask/bin/db/test
attempting connection
Connection successful!
Explanation:
- This script attempts to establish a connection to your RDS (Relational Database Service) instance.
- If successful, it prints "Connection successful!", indicating that your backend can reach the database.
- This test is crucial to ensure that your application can interact with the database before proceeding with further deployments.
Backend Health Check
Add a health check endpoint in app.py:
@app.route("/api/health-check")
def health_check():
    return {"success": True}, 200
Explanation:
- This Flask route creates a simple health check endpoint at
/api/health-check. - When accessed, it returns a JSON response
{"success": True}with a 200 HTTP status code. - This endpoint allows external services (like load balancers) to verify if the backend is operational.
Hint: pros dont Ops compose up specific services, but get all using
docker compose upin CLI
Create the file backend-flask/bin/flask/health-check and make it executable:
#!/usr/bin/env python3

import urllib.request

try:
  response = urllib.request.urlopen('http://localhost:4567/api/health-check')
  if response.getcode() == 200:
    print("[OK] Flask server is running")
    exit(0)  # success
  else:
    print("[BAD] Flask server is not running")
    exit(1)  # error
except Exception as e:
  print(e)
  exit(1)  # error
Explanation:
- This Python script checks if the Flask server is running by making a request to the health check endpoint.
- It uses
urllib.requestto make an HTTP GET request tohttp://localhost:4567/api/health-check. - If the response code is 200, it prints a success message and exits with code 0 (success).
- If the response code is not 200 or if there's an exception, it prints an error message and exits with code 1 (error).
- This script can be used in automation pipelines or monitoring systems to verify the backend's status.
Python Image
Duplicable Process
- Create a new repository named cruddur-python using the following command:
aws ecr create-repository \
  --repository-name cruddur-python \
  --image-tag-mutability MUTABLE
Explanation:
- This AWS CLI command creates a new Elastic Container Registry (ECR) repository named "cruddur-python".
- The
--image-tag-mutability MUTABLEflag allows overwriting of existing image tags, which is useful for updating images without changing the tag.
- Log in to ECR using the following command:
aws ecr get-login-password --region $AWS_DEFAULT_REGION | docker login --username AWS --password-stdin "$AWS_ACCOUNT_ID.dkr.ecr.$AWS_DEFAULT_REGION.amazonaws.com"Explanation:
- This command retrieves an authentication token from ECR and uses it to authenticate Docker with your ECR registry.
- It uses your AWS credentials to get the token, then pipes it to the Docker login command.
- Export the repo URL:
export ECR_PYTHON_URL="$AWS_ACCOUNT_ID.dkr.ecr.$AWS_DEFAULT_REGION.amazonaws.com/cruddur-python"
echo $ECR_PYTHON_URL
Explanation:
- This sets an environment variable
ECR_PYTHON_URLwith the URL of your ECR repository. - The
echocommand prints the URL, allowing you to verify it's set correctly.
- Get the image from your spot what we call pull image:
docker pull python:3.10-slim-busterExplanation:
- This Docker command pulls the Python 3.10 slim-buster image from Docker Hub.
- It's a lightweight Python image based on Debian Buster, suitable for containerized Python applications.
- Tag it:
docker tag python:3.10-slim-buster $ECR_PYTHON_URL:3.10-slim-busterExplanation:
- This command tags the pulled Python image with your ECR repository URL.
- It associates the local image with your ECR repository, preparing it for pushing.
- Get it straight to ECR:
docker push $ECR_PYTHON_URL:3.10-slim-buster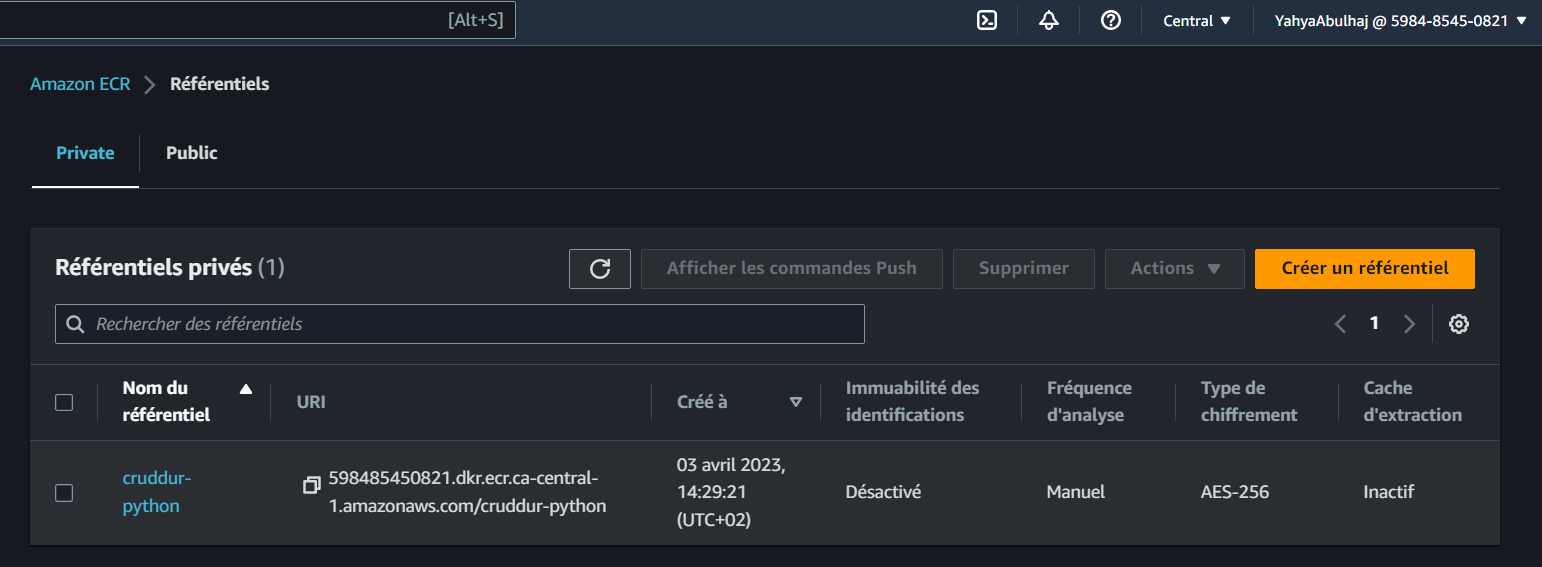
Explanation:
- This command pushes the tagged image to your ECR repository.
- After this, the image will be available in your ECR for use in ECS tasks or other AWS services.
ECR Backend
Build the backend image:
- Make sure you have the Dockerfile and necessary frontend code in a directory.
- Open a terminal or command prompt and navigate to the directory with the Dockerfile.
- Build the image with the script.
Login To ECR and AWS CLI:
- Ensure you have the AWS CLI installed and configured with the appropriate credentials.
- Open a terminal or command prompt and start the sign in (opens in a new tab) script.
- Push the frontend image to ECR using the
backend-pushscript (opens in a new tab).
Explanation:
- These steps involve building your backend Docker image and pushing it to ECR.
- The sign-in script authenticates your local machine with ECR.
- The backend-push script tags your local image and pushes it to the ECR repository.
ECR Frontend
Bin is restructured in week 7, check from now (opens in a new tab).
Build the frontend image:
- Ensure that you have the Dockerfile and the necessary frontend code in a directory.
- Open a terminal or command prompt and navigate to the directory containing the Dockerfile.
- Build the frontend image using the appropriate build command or script.
Log in to ECR and the AWS CLI:
- Open a terminal or command prompt and run the sign-in script, if you haven't done it above, which will handle the ECR login process and authentication with the AWS CLI.
Push the frontend image to ECR:
- Execute the frontend-push script (opens in a new tab).
Explanation:
- Similar to the backend process, these steps build and push your frontend Docker image to ECR.
- The frontend-push script is specifically designed to tag and push the frontend image to your ECR repository.
Register Frontend Task Definition
Console
- Open the Amazon ECS console and navigate to the "Task Definitions" page.
- Click on the "Create new Task Definition" button.
- Select the launch type compatibility as "Fargate" and click on the "Next step" button.
- Provide a name for your task definition in the "Task definition name" field.
Configure the task size and resources:
- Set the task memory and CPU values based on your application's requirements and the available Fargate task sizes.
- Ensure that the selected task size is within the limits specified by Fargate.
- Scroll down to the "Container Definitions" section and click on the "Add container" button.
In the container configuration:
- Call the container
frontend-react-js. - Specify the image URL of the frontend container pushed to ECR above.
- Set any required environment variables.
- Configure port mappings if necessary.
- Scroll down and configure any additional container settings as needed.
Review the task definition details and click on the "Create" button.
Explanation:
- This process creates a task definition for your frontend application using the AWS Management Console.
- A task definition is a blueprint for your application, specifying things like which Docker images to use, how much CPU and memory to allocate, and what networking and storage requirements your application has.
Register the task definition
- On the "Task Definitions" page, select the task definition you just created.
- Click on the "Actions" button and choose "Register new revision" from the dropdown menu.
- Review the details of the new revision and click on the "Create" button to register the task definition.
Explanation:
- This process creates a new revision of your task definition.
- Each time you update your task definition, a new revision is created, allowing you to track changes and roll back if necessary.
Using CLI
Use frontend-react-js.json, adjust it with your info and run the register script (opens in a new tab).
Explanation:
- This method uses a JSON file to define your task definition and a script to register it via the AWS CLI.
- It's a more automated approach that can be easily integrated into CI/CD pipelines.
Backend Task Definitions
To register task definitions for the backend, follow these instructions:
- Create a new file called backend-flask.json in the aws/task-definitions directory.
Use the register script (opens in a new tab).
Explanation:
- Similar to the frontend, this process creates a task definition for your backend service.
- The JSON file defines the configuration for your backend container, including the Docker image to use, resource allocations, and environment variables.
Parameter Store
| Secret Storage Option | Features | Costs |
|---|---|---|
| Secrets Manager | Securely store and manage secrets such as passwords, API keys, and database credentials. | $$$$$ |
| Parameter Store | Store secrets as key-value pairs or encrypted strings. | $ |
Use something easy so you can call it somewhere e.g. (opens in a new tab)
SecureString is a parameter type to store sensitive data such as passwords, API keys, and other secrets in an encrypted format.
As easy as typing this in your AWS CLI:
aws ssm put-parameter --type "SecureString" --name "/cruddur/backend-flask/AWS_ACCESS_KEY_ID" --value $AWS_ACCESS_KEY_ID
aws ssm put-parameter --type "SecureString" --name "/cruddur/backend-flask/AWS_SECRET_ACCESS_KEY" --value $AWS_SECRET_ACCESS_KEY
aws ssm put-parameter --type "SecureString" --name "/cruddur/backend-flask/CONNECTION_URL" --value $PROD_CONNECTION_URL
aws ssm put-parameter --type "SecureString" --name "/cruddur/backend-flask/ROLLBAR_ACCESS_TOKEN" --value $ROLLBAR_ACCESS_TOKEN
aws ssm put-parameter --type "SecureString" --name "/cruddur/backend-flask/OTEL_EXPORTER_OTLP_HEADERS" --value "x-honeycomb-team=$HONEYCOMB_API_KEY"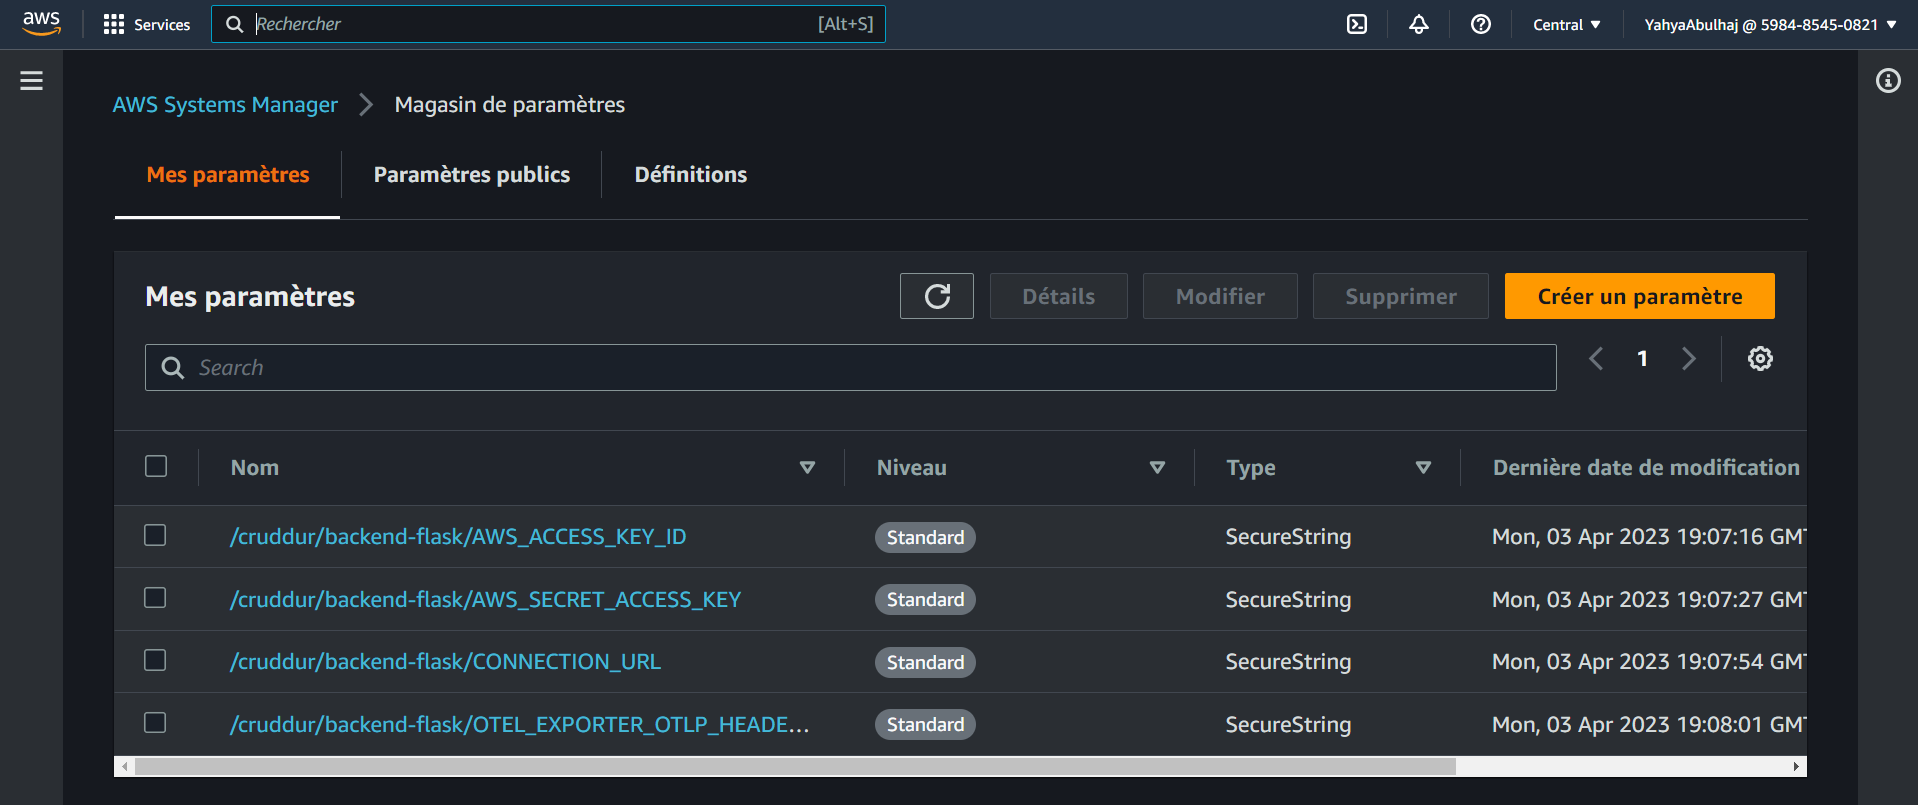
Explanation:
- These AWS CLI commands store various secrets in AWS Systems Manager Parameter Store as SecureStrings.
- Each command creates a new parameter with a specific name (e.g., "/cruddur/backend-flask/AWS_ACCESS_KEY_ID") and value.
- The
--type "SecureString"flag ensures that the values are encrypted at rest using your AWS account's default KMS key. - This approach allows you to securely store and retrieve sensitive information in your AWS account, which can then be accessed by your ECS tasks or other AWS services.
- This is now scripted into a file (opens in a new tab).
Create The Required Role and Permissions
- Refer to Execution Cruddur Role (opens in a new tab) Instructions
- Refer to Task Role (opens in a new tab) Instructions
Explanation:
- These links provide instructions for creating the necessary IAM roles for your ECS tasks.
- The Execution Role is used by ECS to pull container images and publish logs to CloudWatch.
- The Task Role is assumed by your running containers, giving them permissions to access other AWS services.
Deploy to Fargate
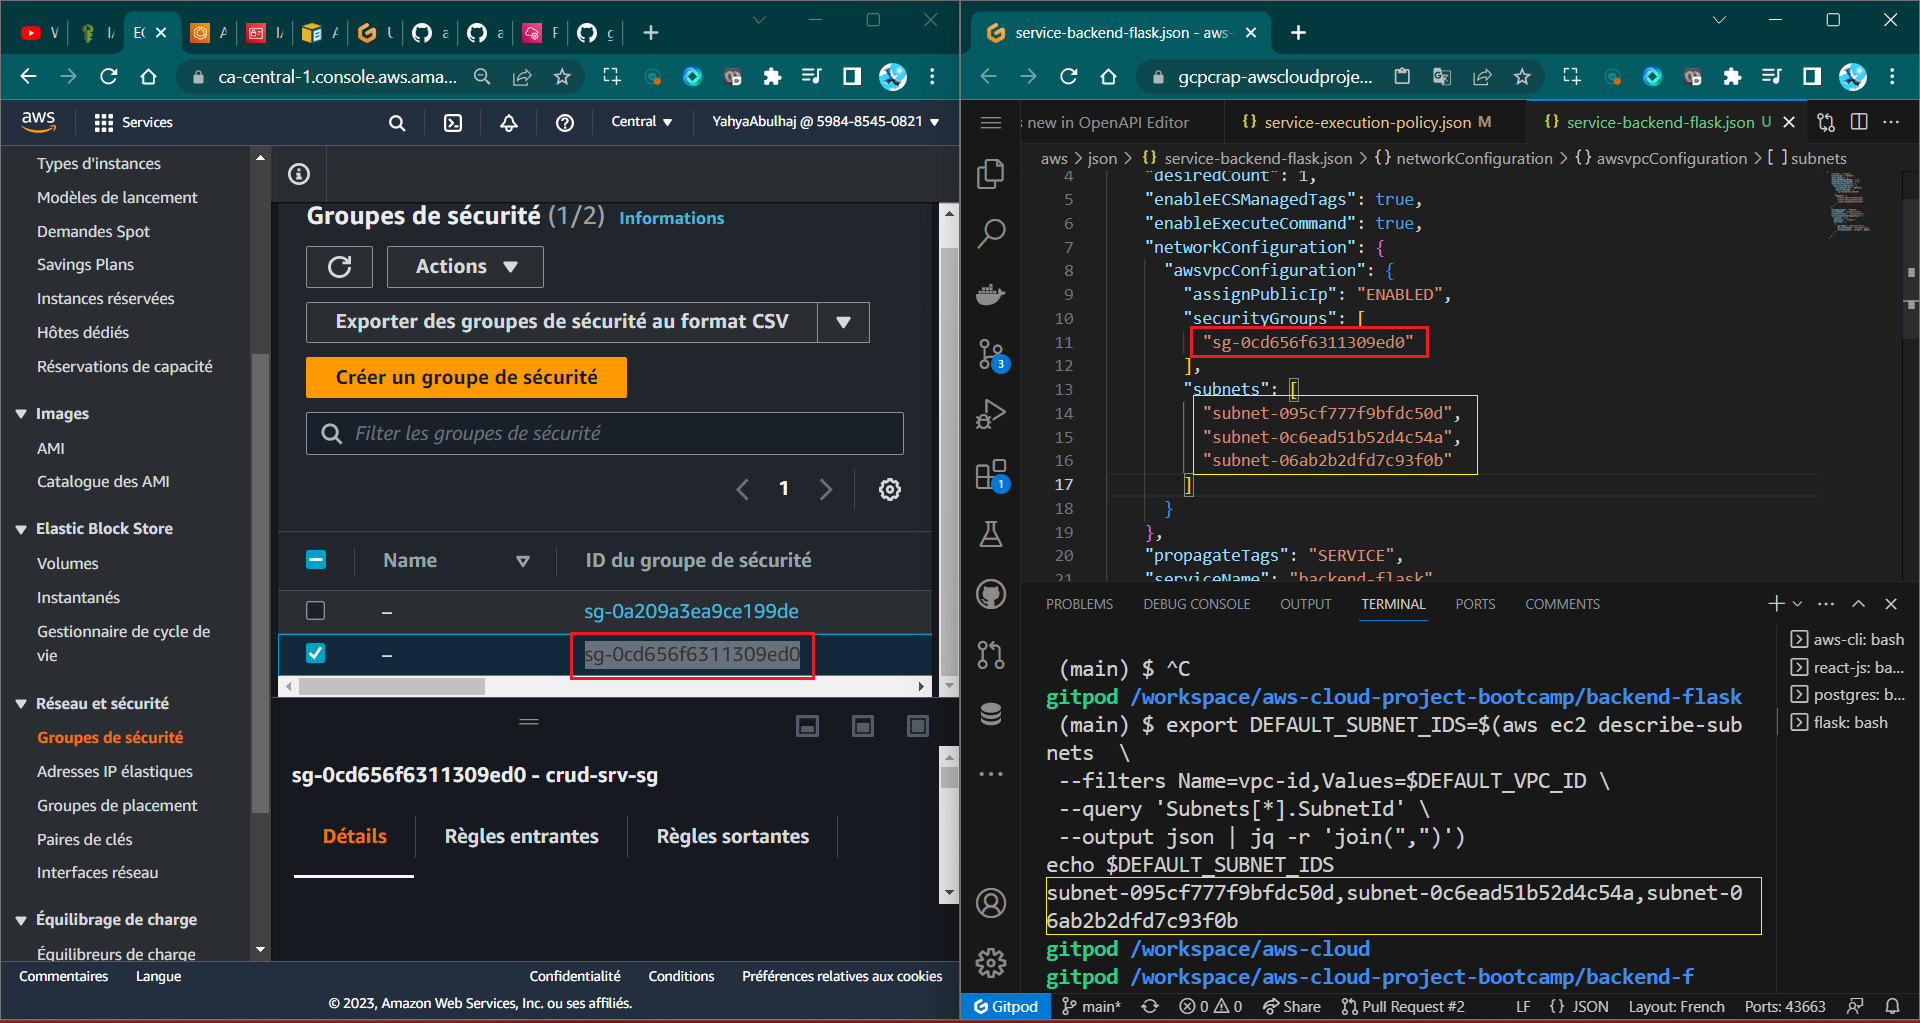
Creating Security Group
Execute the following commands to store the VPC ID in an environment variable:
export DEFAULT_SUBNET_IDS=$(aws ec2 describe-subnets  \
 --filters Name=vpc-id,Values=$DEFAULT_VPC_ID \
 --query 'Subnets[*].SubnetId' \
 --output json | jq -r 'join(",")')
echo $DEFAULT_SUBNET_IDs
Explanation:
- This command retrieves the subnet IDs associated with your default VPC.
- It uses the AWS CLI to describe the subnets, filters them by the default VPC ID, and extracts their IDs.
- The result is stored in an environment variable
DEFAULT_SUBNET_IDSas a
Amazon ECR Integration
Amazon Elastic Container Registry (ECR) is a fully managed container registry that makes it easy to store, manage, and deploy container images. Let's push our images to ECR.
Create ECR Repositories
Create repositories for both backend and frontend images:
aws ecr create-repository --repository-name cruddur-backend --image-tag-mutability MUTABLE
aws ecr create-repository --repository-name cruddur-frontend --image-tag-mutability MUTABLE
These commands create two ECR repositories:
cruddur-backend: For storing backend Flask application imagescruddur-frontend: For storing frontend React application images
The --image-tag-mutability MUTABLE flag allows you to overwrite image tags, which is useful for updating images with the same tag (e.g., "latest").
Push Images to ECR
- Authenticate Docker to your ECR registry:
aws ecr get-login-password --region $AWS_DEFAULT_REGION | docker login --username AWS --password-stdin $AWS_ACCOUNT_ID.dkr.ecr.$AWS_DEFAULT_REGION.amazonaws.comThis command does two things:
-
aws ecr get-login-passwordretrieves an authentication token from ECR. -
The token is then piped to
docker login, which authenticates your local Docker client with your ECR registry. -
Tag and push the backend image:
docker tag backend-flask:latest $AWS_ACCOUNT_ID.dkr.ecr.$AWS_DEFAULT_REGION.amazonaws.com/cruddur-backend:latest
docker push $AWS_ACCOUNT_ID.dkr.ecr.$AWS_DEFAULT_REGION.amazonaws.com/cruddur-backend:latest
These commands:
-
Tag the local
backend-flaskimage with the ECR repository URI. -
Push the tagged image to the ECR repository.
-
Tag and push the frontend image:
docker tag frontend-react-js:latest $AWS_ACCOUNT_ID.dkr.ecr.$AWS_DEFAULT_REGION.amazonaws.com/cruddur-frontend:latest
docker push $AWS_ACCOUNT_ID.dkr.ecr.$AWS_DEFAULT_REGION.amazonaws.com/cruddur-frontend:latest
Similar to the backend, these commands tag and push the frontend image to its ECR repository.
ECS Cluster Creation
Create an ECS cluster to manage your containerized applications:
aws ecs create-cluster \
  --cluster-name cruddur \
  --service-connect-defaults namespace=cruddur
This command creates an ECS cluster named "cruddur" and sets up a service connect namespace. The namespace enables easier internal communication between services within the cluster.
Task Definitions
Task definitions are required to run Docker containers in Amazon ECS. They specify various parameters for your containers, such as which images to use, how many CPU units and how much memory to use, and more.
Backend Task Definition
Create a file named backend-flask.json in the aws/task-definitions directory:
{
"family": "backend-flask",
"executionRoleArn": "arn:aws:iam::YOUR_AWS_ACCOUNT_ID:role/CruddurServiceExecutionRole",
"taskRoleArn": "arn:aws:iam::YOUR_AWS_ACCOUNT_ID:role/CruddurTaskRole",
"networkMode": "awsvpc",
"cpu": "256",
"memory": "512",
"requiresCompatibilities": [
"FARGATE"
],
"containerDefinitions": [
{
"name": "backend-flask",
"image": "YOUR_AWS_ACCOUNT_ID.dkr.ecr.YOUR_AWS_REGION.amazonaws.com/cruddur-backend:latest",
"essential": true,
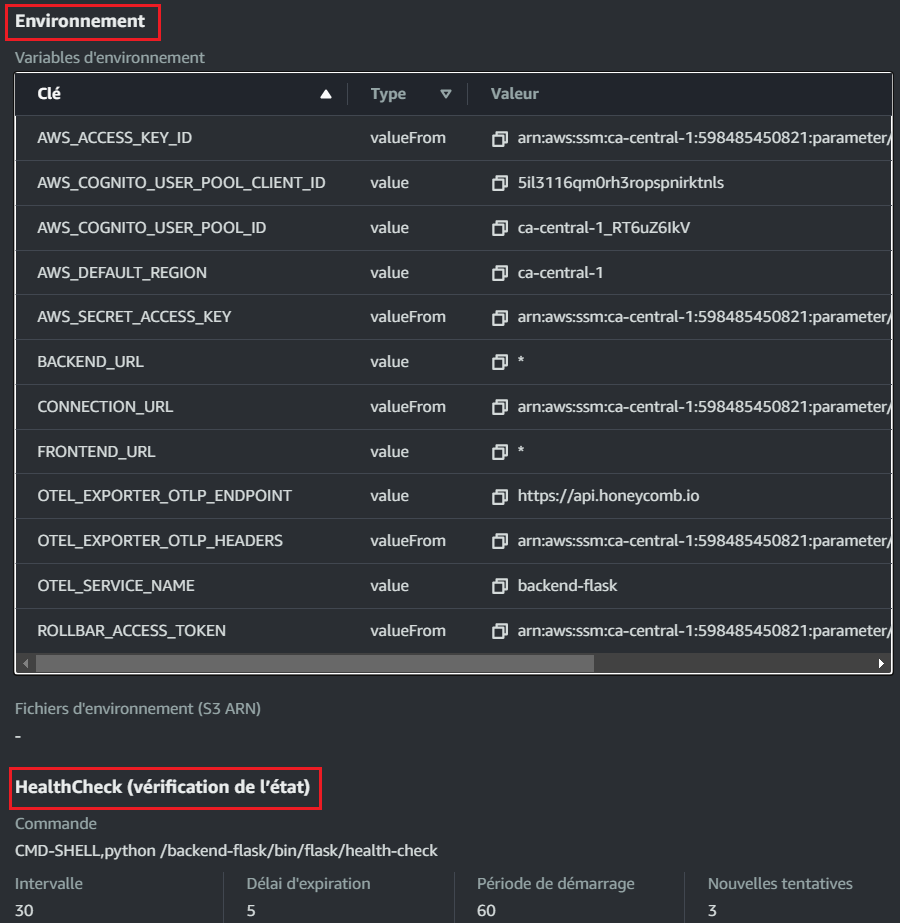
"healthCheck": {
"command": [
"CMD-SHELL",
"python /backend-flask/bin/flask/health-check"
],
"interval": 30,
"timeout": 5,
"retries": 3,
"startPeriod": 60
},
"portMappings": [
{
"name": "backend-flask",
"containerPort": 5000,
"protocol": "tcp",
"appProtocol": "http"
}
],
"logConfiguration": {
"logDriver": "awslogs",
"options": {
"awslogs-group": "cruddur",
"awslogs-region": "YOUR_AWS_REGION",
"awslogs-stream-prefix": "backend-flask"
}
},
"environment": [
{"name": "OTEL_SERVICE_NAME", "value": "backend-flask"},
{"name": "OTEL_EXPORTER_OTLP_ENDPOINT", "value": "https://api.honeycomb.io"},
{"name": "AWS_COGNITO_USER_POOL_ID", "value": "YOUR_COGNITO_USER_POOL_ID"},
{"name": "AWS_COGNITO_USER_POOL_CLIENT_ID", "value": "YOUR_COGNITO_USER_POOL_CLIENT_ID"},
{"name": "FRONTEND_URL", "value": "YOUR_FRONTEND_URL"},
{"name": "BACKEND_URL", "value": "YOUR_BACKEND_URL"},
{"name": "AWS_DEFAULT_REGION", "value": "YOUR_AWS_REGION"}
],
"secrets": [
{"name": "AWS_ACCESS_KEY_ID" , "valueFrom": "arn:aws:ssm:YOUR_AWS_REGION:YOUR_AWS_ACCOUNT_ID:parameter/cruddur/backend-flask/AWS_ACCESS_KEY_ID"},
{"name": "AWS_SECRET_ACCESS_KEY", "valueFrom": "arn:aws:ssm:YOUR_AWS_REGION:YOUR_AWS_ACCOUNT_ID:parameter/cruddur/backend-flask/AWS_SECRET_ACCESS_KEY"},
{"name": "CONNECTION_URL" , "valueFrom": "arn:aws:ssm:YOUR_AWS_REGION:YOUR_AWS_ACCOUNT_ID:parameter/cruddur/backend-flask/CONNECTION_URL"},
{"name": "ROLLBAR_ACCESS_TOKEN" , "valueFrom": "arn:aws:ssm:YOUR_AWS_REGION:YOUR_AWS_ACCOUNT_ID:parameter/cruddur/backend-flask/ROLLBAR_ACCESS_TOKEN"},
{"name": "OTEL_EXPORTER_OTLP_HEADERS" , "valueFrom": "arn:aws:ssm:YOUR_AWS_REGION:YOUR_AWS_ACCOUNT_ID:parameter/cruddur/backend-flask/OTEL_EXPORTER_OTLP_HEADERS"}
]
}
]
}Let's break down this task definition:
family: Gives a name to the task definition family.executionRoleArnandtaskRoleArn: Specify the IAM roles for executing the task and for the task itself.networkMode: Set to "awsvpc" for Fargate compatibility.cpuandmemory: Specify the resources allocated to the task.requiresCompatibilities: Indicates this task is designed for Fargate.containerDefinitions: Defines the containers in the task.name: Names the container.image: Specifies the ECR image to use.essential: Indicates if the container is essential for the task.healthCheck: Defines how to check if the container is healthy.portMappings: Maps container ports to host ports.logConfiguration: Configures logging to CloudWatch.environment: Sets environment variables.secrets: Specifies secrets to be injected into the container, sourced from AWS Systems Manager Parameter Store.
Register the backend task definition:
aws ecs register-task-definition --cli-input-json file://aws/task-definitions/backend-flask.jsonThis command registers the task definition with ECS, making it available for use in service deployments.
Frontend Task Definition
├── frontend
│   ├── build
│   ├── connect
│   ├── deploy
│   ├── generate-env
│   ├── push
│   ├── register
│   ├── repo
│   ├── run
│   ├── service-off
└───└──service-on
Create a file named frontend-react-js.json in the aws/task-definitions directory:
{
  "family": "frontend-react-js",
  "executionRoleArn": "arn:aws:iam::YOUR_AWS_ACCOUNT_ID:role/CruddurServiceExecutionRole",
  "taskRoleArn": "arn:aws:iam::YOUR_AWS_ACCOUNT_ID:role/CruddurTaskRole",
  "networkMode": "awsvpc",
  "cpu": "256",
  "memory": "512",
  "requiresCompatibilities": [
    "FARGATE"
  ],
  "containerDefinitions": [
    {
      "name": "frontend-react-js",
      "image": "YOUR_AWS_ACCOUNT_ID.dkr.ecr.YOUR_AWS_REGION.amazonaws.com/cruddur-frontend:latest",
      "essential": true,
      "healthCheck": {
        "command": [
          "CMD-SHELL",
          "curl -f http://localhost:3000 || exit 1"
        ],
        "interval": 30,
        "timeout": 5,
        "retries": 3,
        "startPeriod": 60
      },
      "portMappings": [
        {
          "name": "frontend-react-js",
          "containerPort": 3000,
          "protocol": "tcp",
          "appProtocol": "http"
        }
      ],
      "logConfiguration": {
        "logDriver": "awslogs",
        "options": {
            "awslogs-group": "cruddur",
            "awslogs-region": "YOUR_AWS_REGION",
            "awslogs-stream-prefix": "frontend-react-js"
        }
      },
      "environment": [
        {"name": "REACT_APP_BACKEND_URL", "value": "YOUR_BACKEND_URL"}
      ]
    }
  ]
}
This frontend task definition is similar to the backend one, with a few key differences:
- It uses the frontend React image.
- The health check uses
curlto check if the frontend is responding. - The
environmentsection sets the backend URL for the frontend to use.
Register the frontend task definition:
aws ecs register-task-definition --cli-input-json file://aws/task-definitions/frontend-react-js.jsonThis command registers the frontend task definition with ECS, making it available for use in service deployments.
Fargate Deployment
Now that we have our task definitions registered, let's deploy our services using AWS Fargate.
Creating Security Group
First, we need to create a security group for our ECS services:
export DEFAULT_VPC_ID=$(aws ec2 describe-vpcs --filters Name=isDefault,Values=true --query 'Vpcs[0].VpcId' --output text)
export DEFAULT_SUBNET_IDS=$(aws ec2 describe-subnets  \
 --filters Name=vpc-id,Values=$DEFAULT_VPC_ID \
 --query 'Subnets[*].SubnetId' \
 --output json | jq -r 'join(",")')

export CRUD_SERVICE_SG=$(aws ec2 create-security-group \
  --group-name "crud-srv-sg" \
  --description "Security group for Cruddur services on ECS" \
  --vpc-id $DEFAULT_VPC_ID \
  --query "GroupId" --output text)
echo $CRUD_SERVICE_SG
Explanation:
- The first command retrieves the ID of your default VPC.
- The second command gets the subnet IDs associated with the default VPC.
- The third command creates a new security group named "crud-srv-sg" in your default VPC and stores its ID in the
CRUD_SERVICE_SGenvironment variable.
Deploying Services
Backend Service
Create a file named service-backend-flask.json in the aws/json directory:
{
    "cluster": "cruddur",
    "launchType": "FARGATE",
    "serviceName": "backend-flask",
    "taskDefinition": "backend-flask",
    "desiredCount": 1,
    "networkConfiguration": {
       "awsvpcConfiguration": {
          "assignPublicIp": "ENABLED",
          "securityGroups": [ "$CRUD_SERVICE_SG" ],
          "subnets": [ "$DEFAULT_SUBNET_IDS" ]
       }
    },
    "serviceConnectConfiguration": {
      "enabled": true,
      "namespace": "cruddur",
      "services": [
        {
          "portName": "backend-flask",
          "discoveryName": "backend-flask",
          "clientAliases": [{"port": 4567}]
        }
      ]
    }
}
Deploy the backend service:
aws ecs create-service --cli-input-json file://aws/json/service-backend-flask.jsonExplanation:
- This JSON file defines the configuration for your backend ECS service.
- The
create-servicecommand deploys the service based on this configuration. - The
serviceConnectConfigurationenables service discovery within your ECS cluster.
Frontend Service
Create a similar JSON file for the frontend service (service-frontend-react-js.json) and deploy it:
aws ecs create-service --cli-input-json file://aws/json/service-frontend-react-js.jsonMonitoring and Debugging
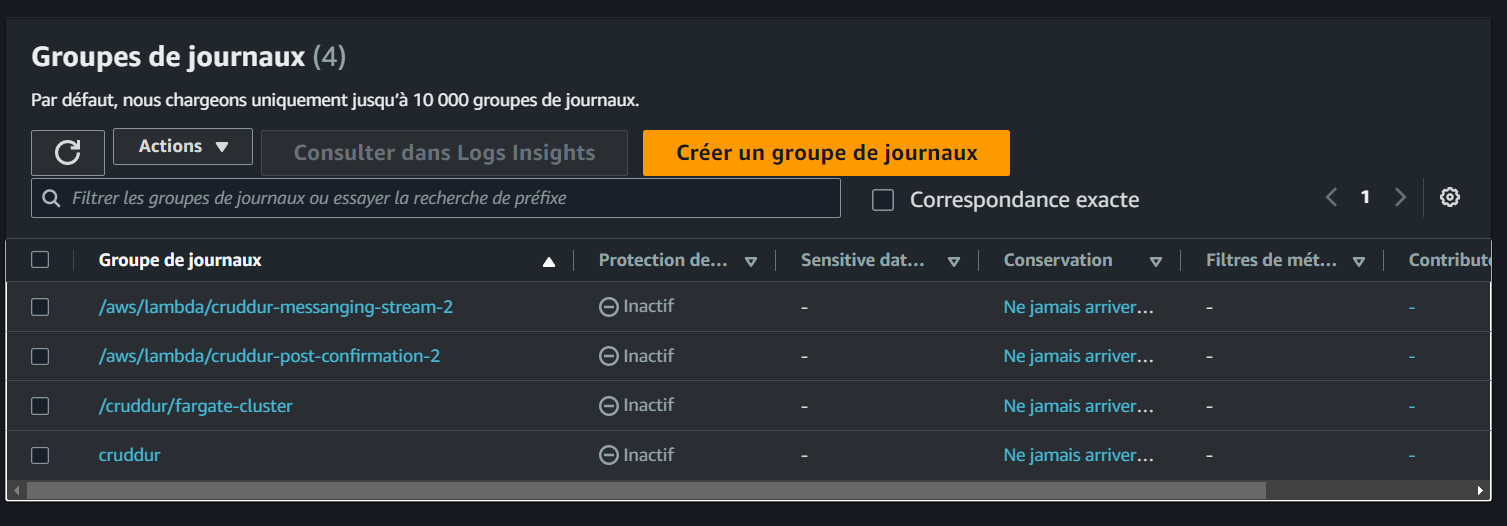
CloudWatch Logs
To set up CloudWatch logging for your ECS services:
aws logs create-log-group --log-group-name cruddur
aws logs put-retention-policy --log-group-name cruddur --retention-in-days 1
Explanation:
- These commands create a CloudWatch log group named "cruddur" and set a retention policy of 1 day to manage storage costs.
Connecting to Running Containers
To connect to a running container for debugging, use AWS Systems Manager Session Manager:
- Install the Session Manager plugin:
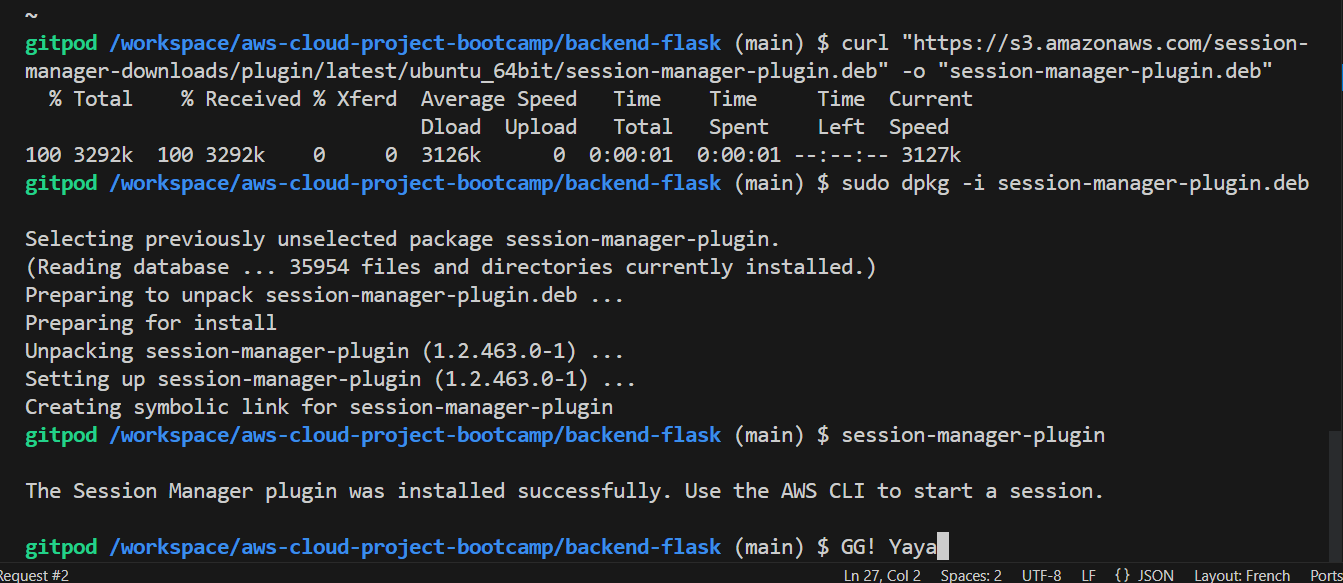
curl "https://s3.amazonaws.com/session-manager-downloads/plugin/latest/ubuntu_64bit/session-manager-plugin.deb" -o "session-manager-plugin.deb"
sudo dpkg -i session-manager-plugin.deb- Connect to a running container:
aws ecs execute-command  \
--region YOUR_AWS_REGION \
--cluster cruddur \
--task TASK_ID \
--container backend-flask \
--command "/bin/bash" \
--interactive
Replace YOUR_AWS_REGION with your AWS region and TASK_ID with the ID of the running task you want to connect to.
- Add this to .gitpod.yml to auto install session manager auto.
- name: fargate
    before: |
      curl "https://s3.amazonaws.com/session-manager-downloads/plugin/latest/ubuntu_64bit/session-manager-plugin.deb" -o "session-manager-plugin.deb"
      sudo dpkg -i session-manager-plugin.deb
      cd backend-flask
curl is bad practice in docker. Potential threat.
Now to make this into a script create this file backend-flask/bin/ecs/connect-to-service and make it executable. It's later migrated to just connect under backend.

Security Best Practices
-
Use IAM Roles: Always use IAM roles for EC2 instances and ECS tasks instead of hardcoding AWS credentials.
-
Encrypt Sensitive Data: Use AWS Secrets Manager or Systems Manager Parameter Store to securely store and manage sensitive information.
-
Implement Least Privilege: Assign the minimum necessary permissions to your IAM roles and users.
-
Enable VPC Flow Logs: Monitor network traffic in your VPC for security analysis and troubleshooting.
-
Regular Updates: Keep your container images and task definitions up to date with the latest security patches.
-
Use Private Subnets: When possible, place your ECS tasks in private subnets and use a NAT gateway for outbound internet access.
-
Enable AWS Config: Use AWS Config to assess, audit, and evaluate the configurations of your AWS resources.
You'll have a robust, scalable, and secure containerized application deployment on AWS using ECS and Fargate. Remember to continuously monitor your services and iterate on your deployment strategy as your application grows and evolves.
I'm also good in Azure, wanna see? (opens in a new tab)
Debug Master: CloudWatch Log
To effectively monitor and troubleshoot your Fargate tasks, setting up CloudWatch logging is crucial. Follow these steps to create a log group and configure retention policies:
# Create a CloudWatch log group
aws logs create-log-group --log-group-name cruddur

# Set retention policy to 1 day to manage costs
aws logs put-retention-policy --log-group-name cruddur --retention-in-days 1
This configuration allows you to access logs for debugging while managing storage costs effectively.
Serving Static Assets with Nginx
For the frontend React application, it's recommended to use Nginx to serve static assets in production.

To improve performance and security for your frontend in a production environment, follow these steps:
-
Create a production-ready Dockerfile:
- In the
frontend-react-jsdirectory, create a new file namedDockerfile.prod - Add the following content:
# Build stage FROM node:16 as build WORKDIR /app COPY package*.json ./ RUN npm install COPY . . RUN npm run build # Production stage FROM nginx:stable-alpine COPY --from=build /app/build /usr/share/nginx/html COPY nginx.conf /etc/nginx/conf.d/default.conf EXPOSE 80 CMD ["nginx", "-g", "daemon off;"] - In the
-
Add
build/to your.gitignorefile to exclude build artifacts from version control. -
Create an Nginx configuration file (
frontend-react-js/nginx.conf):server { listen 80; location / { root /usr/share/nginx/html; index index.html index.htm; try_files $uri $uri/ /index.html; } } -
Build the frontend for production:
cd frontend-react-js
npm run build
docker build -f Dockerfile.prod -t frontend-react-prod .
You can find the complete build script here (opens in a new tab).
Pushing to Amazon Elastic Container Registry (ECR)
After building your production-ready Docker image, you need to push it to Amazon ECR for storage and easy deployment. Follow these detailed steps:
-
Create an ECR repository for the frontend: Use the frontend repository creation script (opens in a new tab) to set up a new ECR repository. This script likely uses the AWS CLI command:
aws ecr create-repository --repository-name your-frontend-repo-name -
Authenticate Docker with ECR: Use the ECR login script (opens in a new tab) to authenticate. This script typically runs:
aws ecr get-login-password --region your-region | docker login --username AWS --password-stdin your-account-id.dkr.ecr.your-region.amazonaws.com -
Push the image to ECR: Use the frontend push script (opens in a new tab) to tag and push your image. This script likely includes commands like:
docker tag your-local-image:tag your-account-id.dkr.ecr.your-region.amazonaws.com/your-repo-name:tag
docker push your-account-id.dkr.ecr.your-region.amazonaws.com/your-repo-name:tag
Optimizing Flask App for Production
For the backend Flask application, create a production-optimized setup:
-
Create a new Dockerfile for production (
Dockerfile.prod) in the backend directory:# Use the Python image from your ECR as the base FROM ${ECR_PYTHON_URL}:3.10-slim-buster # Set the working directory in the container WORKDIR /backend-flask # Copy the requirements file and install dependencies COPY requirements.txt requirements.txt RUN pip3 install -r requirements.txt # Copy the rest of the application code COPY . . # Expose the port the app runs on EXPOSE 5000 # Use Gunicorn as the production WSGI server CMD [ "gunicorn", "-b", "0.0.0.0:5000", "app:app" ]Explanation of the Dockerfile:
- We use a pre-built Python image from your ECR for consistency.
- The
WORKDIRsets the working directory inside the container. - We copy and install requirements before copying the rest of the code for better layer caching.
- Gunicorn is used as a production-grade WSGI server, offering better performance than Flask's development server.
-
Create an ECR repository for the backend: Use the backend repository creation script (opens in a new tab).
-
Push the backend image to ECR:
- Login to ECR (opens in a new tab)
- Build the image:
docker build -f Dockerfile.prod -t backend-flask-prod . - Tag and push the image using the backend push script (opens in a new tab)
By following these steps, you'll have production-ready containers for both your frontend and backend applications, optimized for performance and security. The use of ECR ensures that your images are securely stored and easily accessible for deployment to ECS or other AWS services.
Remember to update your ECS task definitions to use these new production-optimized images from ECR when deploying to your production environment.
Interested in Azure solutions? Check out my Azure Sentinel project (opens in a new tab) for cloud security insights!
Additional Resources
To deepen your understanding of container deployment on AWS, consider exploring these valuable resources:
- Amazon Elastic Container Service (ECS) Documentation (opens in a new tab)
- Amazon Elastic Container Registry (ECR) Overview (opens in a new tab)
- EC2 vs Fargate: Choosing the Right Container Deployment Strategy (opens in a new tab)
- Ensuring Security and Assurance for AWS Fargate Containers (opens in a new tab)
- Key Considerations for Fargate Task Definitions (opens in a new tab)
These resources provide in-depth information on best practices, security considerations, and advanced configurations for containerized applications on AWS.