Billing & Architecture
A monolithic architecture is a traditional way of designing and developing apps where all of the application's code and data are contained in a single codebase.

- It is difficult to develop. Because all of the code and data are in a single codebase, not practical to track changes and make updates which lead to errors and bugs.
- It is difficult to deploy. The entire application is deployed as a single unit, when you deploy changes to the application you can affect other parts of the application.
- It is difficult to scale. If the application experiences increased traffic, it can be difficult to scale the application without targeting performance.
In addressing the challenge at hand, a profound and enduring resolution emerged - the adoption of a cloud-native architecture.
This forward-thinking approach harnessed the power of cloud technologies to reshape the very fabric of our systems, opening up a world of possibilities and transformative potential
- Billing & Architecture
- Types of Architectural Diagrams
- Frameworks for Efficient Design
- Security Considerations
- Spend Considerations
- Open Support ticket
- Health Dashboard with SNS
- Serverless Notification API
Command AWS Like a Pro
Welcome to AWS CLI onboarding experience helping you get things done more effectively.
- Command-Line Interface In The Console
- Empower Your Favorite IDE with AWS
- Go to Your Favorite IDE
- Install AWS CLI
- Checking AWS Connections with Console
- AWS CLI auto-prompt
- Create AWS Budget Using the CLI
- Creating a CloudWatch Alarm
Build Scalable and Resilient Applications
Cloud-native architecture is a design methodology that uses cloud services to allow dynamic and agile application development techniques that take a modular approach to building, running, and updating software through a suite of cloud-based microservices versus a monolithic application infrastructure.
Before the release of the app, cloud architects typically follow these steps to ensure its successful implementation.
- Define the project goals
The first step towards great cloud-native architecture is the discussions with both the technical and business team to ensure that the project's objectives are met in its entirety. It is also important to consider the risks, assumptions, and constraints that may be involved in the project. - Design the architecture
This step involves breaking down the application into microservices, which are small, independent services that can be developed, deployed, and scaled independently. Designs and its type will be break down below. - Implement the microservices
Developing the microservices using a variety of technologies and deploying them to the cloud. The cloud platform e.g AWS will provide the infrastructure for running the microservices and managing their scaling.
The µservices can be developed using a variety of technologies e.g. as Java, Go, or Python our case. - Test and deploy the application
The final step (Starting point) is to test and deploy the application. This involves testing the microservices individually and then testing the application as a whole.
| Goals | Substantiation |
|---|---|
| Define the project goals | Fund to PM |
| Design the architecture | Architectures |
| Implement the microservices | Code Structure |
| Test and deploy the application | Containerization |
This project application is constructed upon this robust architecture, and we have committed to accomplishing each step outlined above.
The Fundamental Pillars of Project Management
In the realm of project management, certain key factors play a pivotal role in shaping the destiny of any endeavor.
Before proceeding - prioritize reviewing the project scenario and its objectives (opens in a new tab).
The Iron Triangle is a project management concept that refers to the three constraints that are commonly considered to be the most important in determining the success or failure of a project.
The three constraints are,
| Constraint | Description |
|---|---|
| Time | Refers to the amount of time available to complete a project. The project needs to be completed within a specific timeframe, and any delays can have a significant impact on the project's success. |
| Cost | Refers to the budget available to complete a project. The project needs to be completed within the allocated budget, and any cost overruns can have a significant impact on the project's success. |
| Scope | Refers to the goals, deliverables, and features of a project. The project needs to meet the agreed-upon scope, and any changes or deviations from the scope can have a significant impact on the project's success. |
Benefits of the Iron Triangle
The Iron Triangle provides several benefits for project managers, including:
- It helps to ensure that projects are completed on time, within budget, and with the agreed-upon scope.
- It provides a framework for making decisions about project trade-offs.
- It helps to identify and manage risks.
- It provides a common language for communicating with stakeholders.
How to Use the Iron Triangle
The Iron Triangle can be used to manage projects by following these steps:
- Identify the three constraints for your project.
- Set realistic expectations for each constraint.
- Monitor the constraints throughout the project.
- Make trade-offs as needed to ensure that the project is completed successfully.
Additional Considerations,
| Concept | Description | Examples |
|---|---|---|
| Risks | Events that could happen and have a negative impact on the project | Late delivery, user commitment, technical problems |
| Assumptions | Things that we believe to be true but that haven't been proven | The budget being approved, sufficient network bandwidth, the availability of key resources |
| Constraints | Limitations that the project must adhere to | Time, budget, technical requirements |
Understanding the three constraints and how they interact, also the assumptions and the risks project managers can increase their chances of success.
Develop a Common Dictionary
Have you ever wondered what would be a valuable tip I could share with you? READ.
- Ask questions — Don't be afraid to ask questions, even if you think they're obvious. This will help to ensure that everyone is on the same page.
- Play "be-the-packet" — This exercise can help you to understand how data is transmitted through the network.
- Document everything — This includes both technical and non-technical documentation.
By doing so, you can
- Prevents misunderstandings
Everyone will be using the same terminology, so there will be no confusion about what different terms mean. - Makes communication easier
It will be easier for people to understand each other and to collaborate on projects. - Improves the quality of the product
When everyone is on the same page, the product will be more likely to be successful.
How to Overcome Challenges?
Be patient. It takes time.💯
Be consistent and use the same terminology throughout the project and be willing to compromise.
Not everyone will agree on everything.
But it's important to find common ground.
Types of Architectural Diagrams
Architectural diagrams are visual representations of a software system's architecture. They are used to communicate the system's design to stakeholders, and to help developers understand how the system works.
There are three main types of architectural diagrams:
- Conceptual diagrams (aka napkin designs) provide a high-level overview of the system. They show the system's major components and how they interact.
- Logical diagrams (aka blueprints) show the system's functionality in more detail. They show how the system's components interact, and how data flows through the system.
- Physical diagrams show the physical components of the system, such as hardware, software, and networks. They show how these components are connected, and how they interact with each other.
Each type of architectural diagram has its own purpose, and they are often used together to provide a complete picture of the system's architecture.
When to Use Each Type of Architectural Diagram
- Conceptual diagrams are used early in the development process, when the system's requirements are still being defined. They are a quick and easy way to communicate the overall idea of the system to stakeholders.
- Logical diagrams are used later in the development process, when the system's functionality is being designed. They are a more detailed way to communicate the system's design to developers.
- Physical diagrams are used in the final stages of development, when the system is being implemented. They are a way to communicate the system's design to system administrators and other technical staff.
Architectural diagrams are a valuable tool for communicating the design of a software system. They really can be used to expand your vision to whoever.
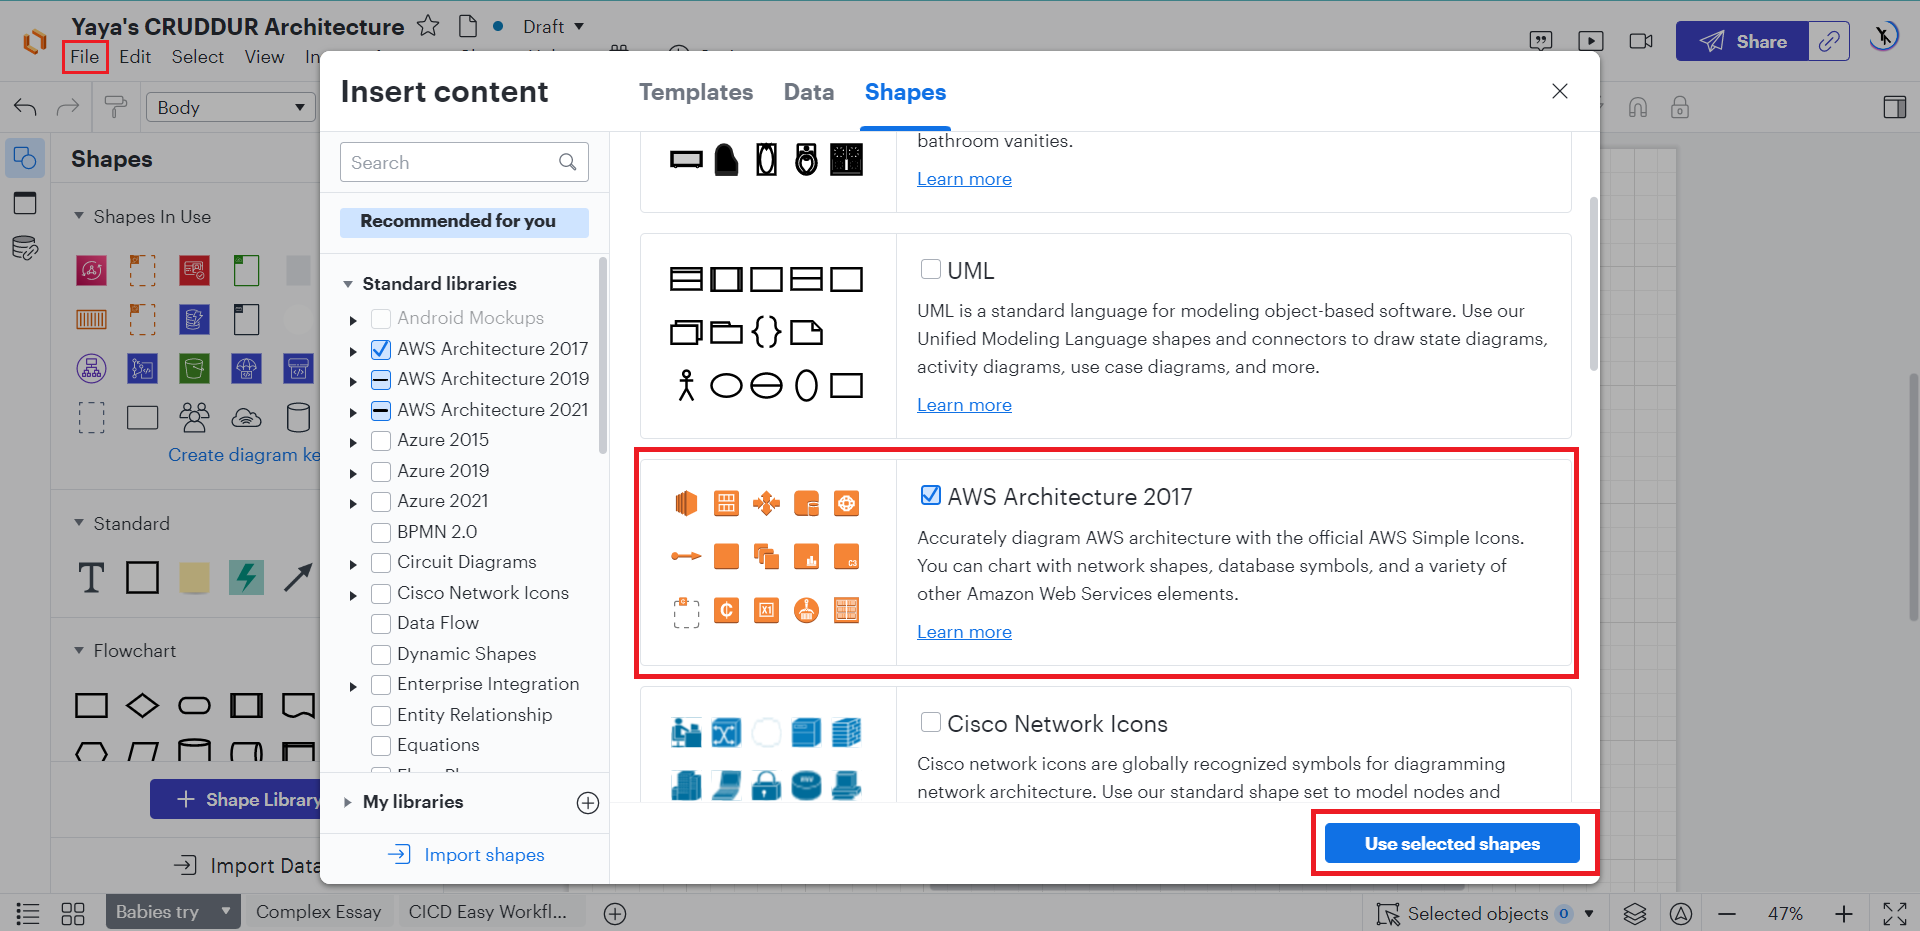
How to Create an Architectural Diagram
Here are different tools that can be used to create architectural diagrams.
I personally like first two.
- Lucidchart (Paid)
- draw.io (FREE)
- Microsoft Visio (Paid)
I used Draw.io extensively in weeks 5, 6, 7, 8 and nine.
In week 10, you'll also find CloudFormation architectures I built using Lucidchart, which highlights the potential differences.
Logic, comparing a free product and a paid one.
In Lucidchart, you can conveniently access built-in shapes by navigating to "File" → "Import Data," making it an ideal platform for working with AWS-related projects.
- Here is a DRAWIO Sample. (opens in a new tab)
- Here is a Lucidchart Sample. (opens in a new tab)
Find additional diagramming tools, and AWS icons. (opens in a new tab)
Get started Now
⚡If budget is a concern, I highly recommend starting with Draw.io (opens in a new tab). 💯
There's even an extension available in VS Code (opens in a new tab) for you to design directly from your favorite IDE.
I have included all the extensible files for your convenience. e.g. visit this masterpiece (opens in a new tab)
Meaning, you can easily begin by importing one of my architecture files to DRAWIO and make edits on top.
Happy diagramming!
Creating Logical Diagram
Logical diagrams are more detailed than conceptual diagrams.
Communicate the system's design to coders.
- System architecture: The system will be a three-tier architecture, consisting of a presentation layer, a business logic layer, and a data access layer.
- Data flow: The data flow will be unidirectional, with users entering data into the presentation layer, which will then pass the data to the business logic layer for processing.
This also effectively showcases the diverse components comprising the Cruddur product ecosystem.
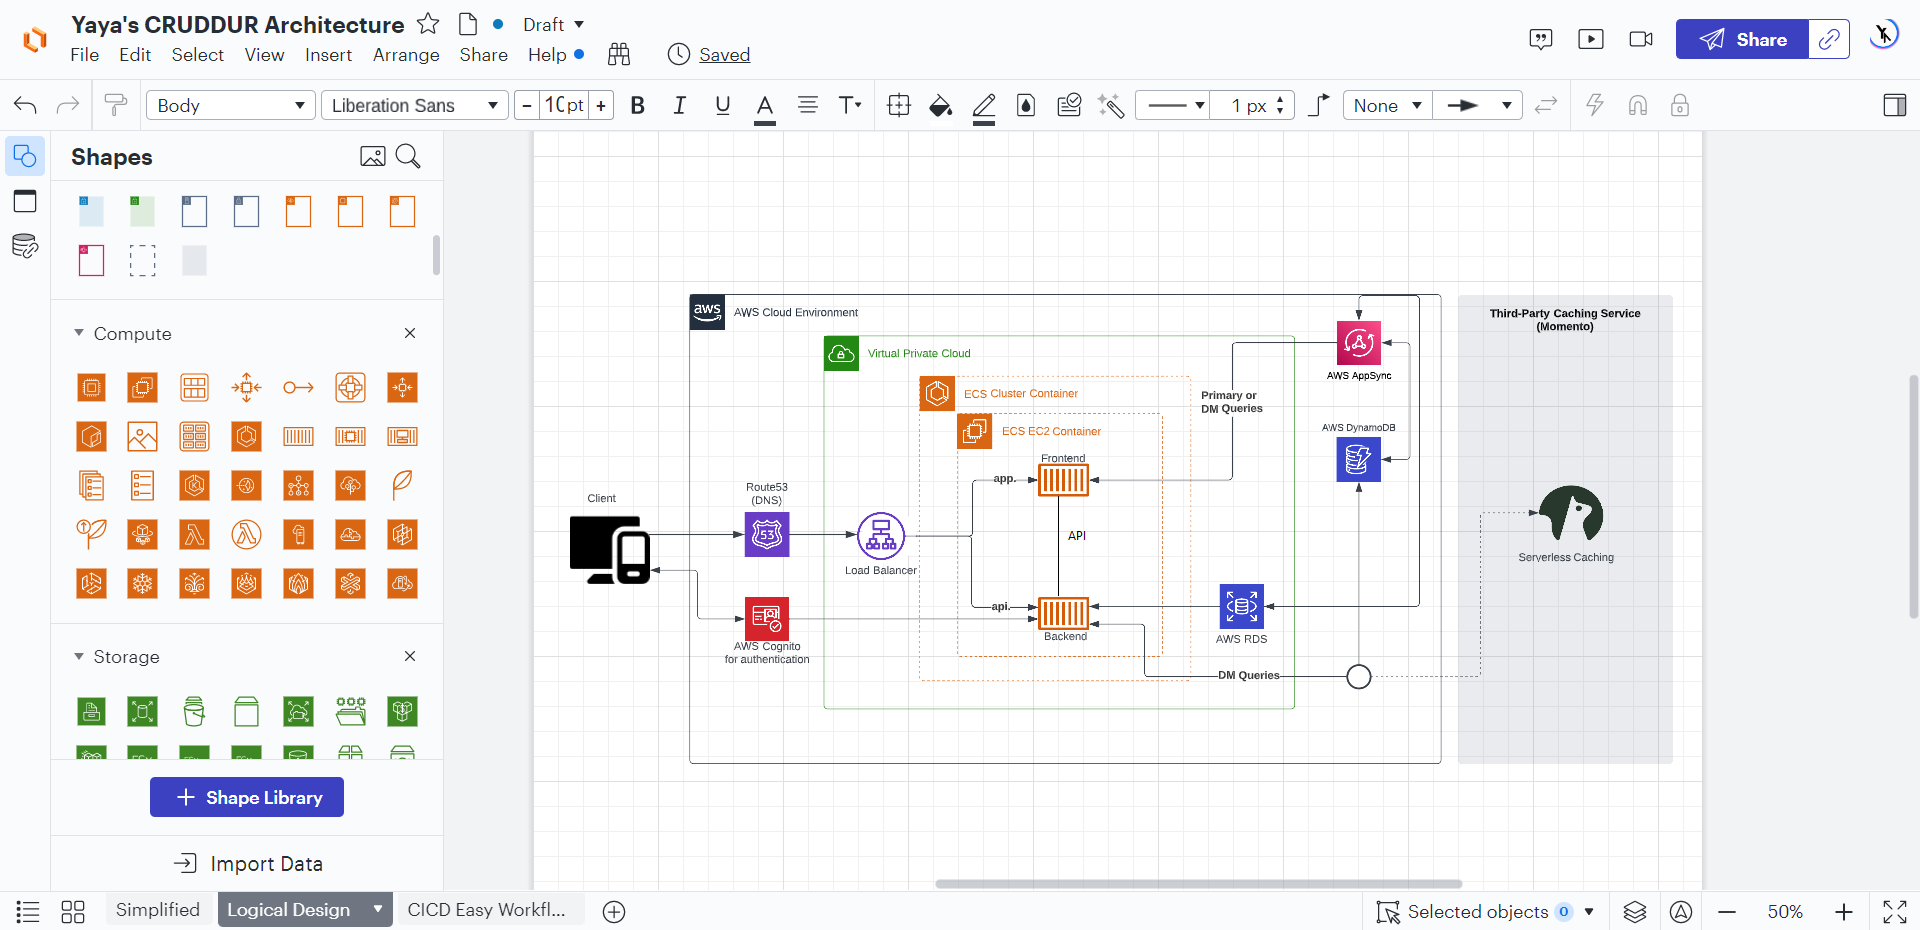
The business logic layer will then pass the data to the data access layer for storage.
Unveiling the Application Layers
An application layer is a software layer that provides a set of services for the application. The application layer is responsible for interacting with the user, processing business logic, and accessing data.
The application layer is typically divided into three sublayers,
- User interface layer: The user interface layer is responsible for interacting with the user. It provides a way for the user to input data and view output.
- Business logic layer: The business logic layer is responsible for processing business logic. It implements the rules and procedures that define the application's functionality.
- Data access layer: The data access layer is responsible for accessing data. It provides a way for the application to store and retrieve data from a database or other data source.
The application layer is a critical part of any software application.
The application layer should be well-designed, well-implemented, and well-tested to ensure that the application is reliable and secure.
Creating Conceptual Design
Overall idea and scope to create a system that will allow users to share information and collaborate on projects. Conceptual diagrams are often drawn on napkins or whiteboards, hence the nickname "napkin designs."
With genuine enthusiasm and a touch of artistic flair, I created this captivating design, delicately sketching every stroke with two pens - one dipped in serene blue and the other ablaze with passionate red. We hope you like it!
I ensured that the architecture was designed with the following key features in mind:
- Secure Platform: considering Security best practices
- Robust Data Storage System: A reliable and scalable data storage system was integrated.
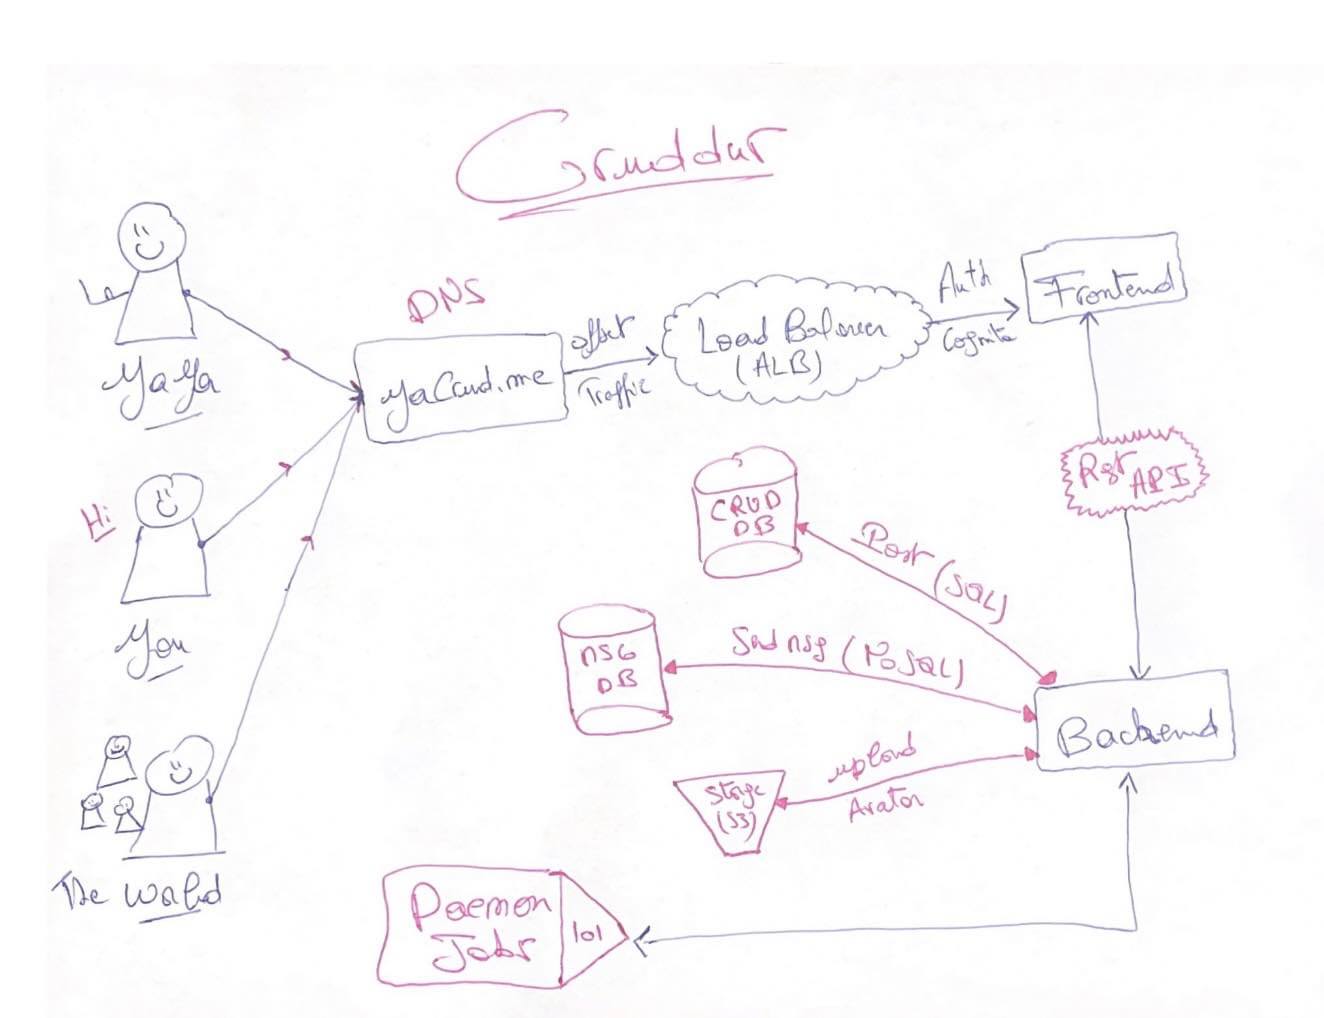
When designing, the following constraints were also put forward.
- The system must be scalable to accommodate a large number of users.
- The system must be affordable to operate with costs considerations.
I believe you'll greatly appreciate my design, so I've provided it in PDF format (opens in a new tab) for your convenience and enjoyment.
More! Behind the scenes
Welcome to my cozy space, where you can indulge in the delightful aroma of my freshly brewed AWS cup of coffee while finding abundant inspiration!
When not at work, I work!
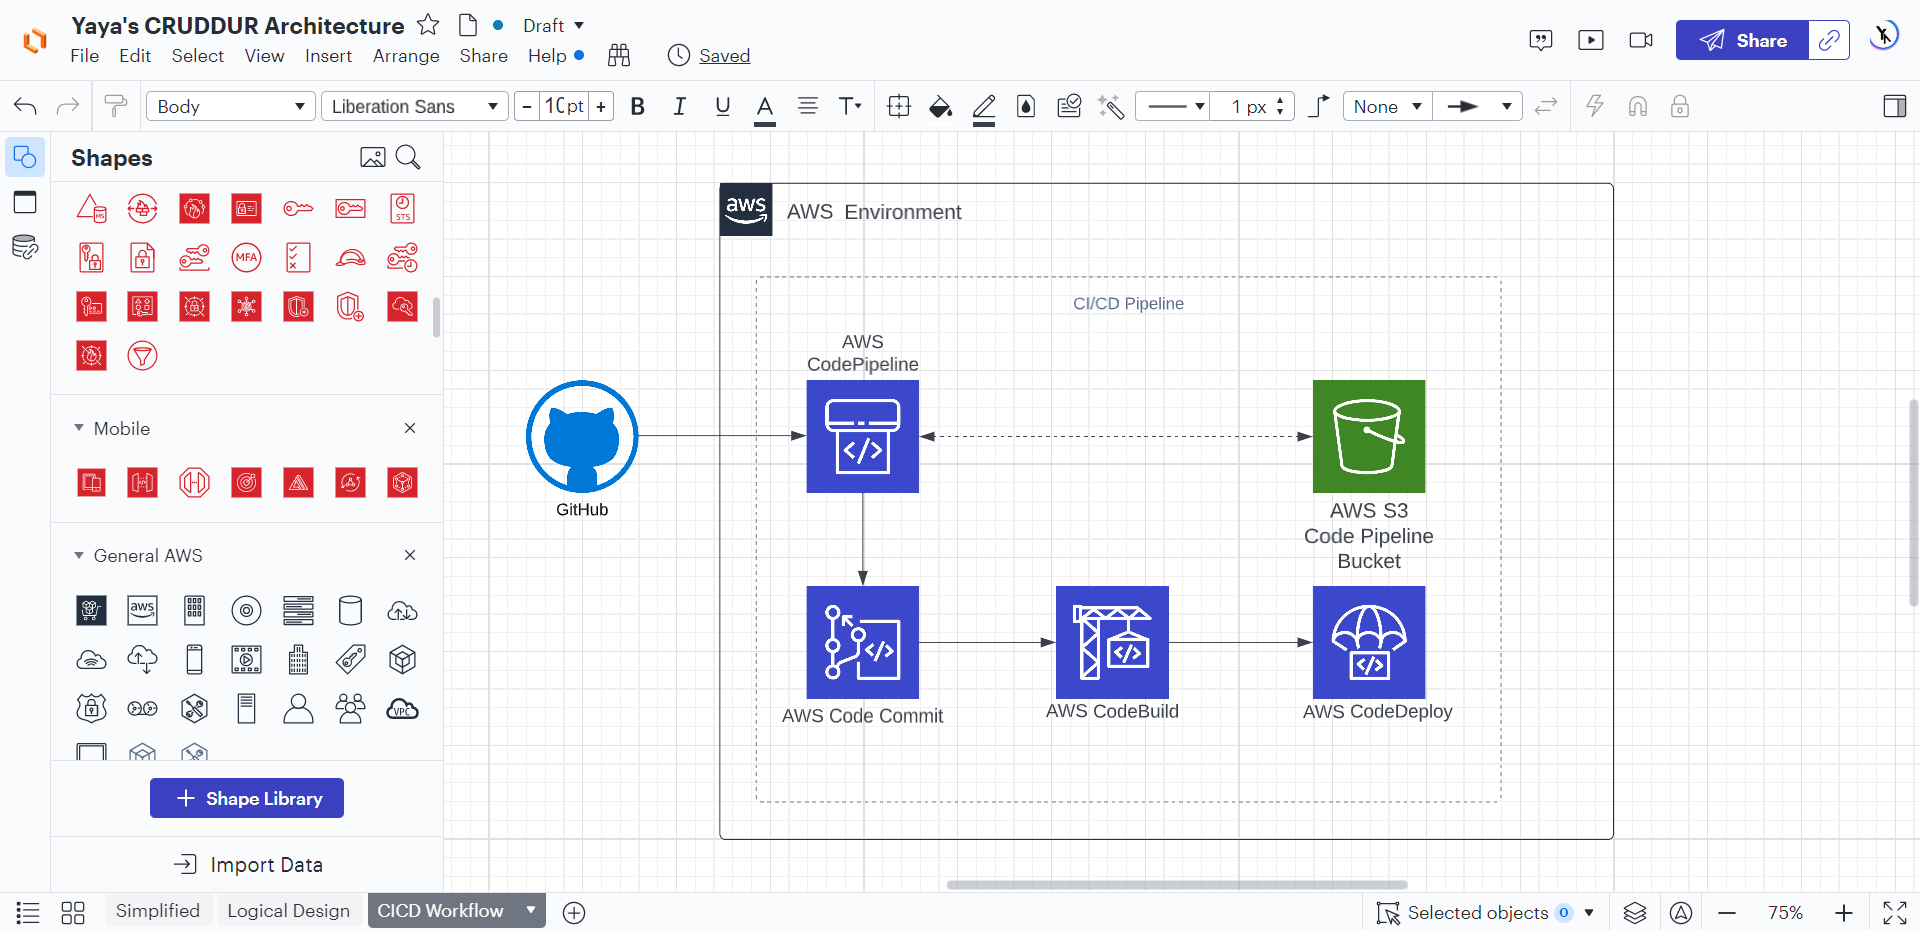
Creating CI/CD Flow
Outlined below is the CI/CD pipeline I have designed, which aims to automate the process of code integration, testing, and deployment. This pipeline fosters collaboration and accelerates the delivery of high-quality software, facilitating a more responsive development environment.
- Developer commits code to GitHub repository.
- AWS CodePipeline is triggered.
- The pipes are stored in the S3 pipeline bucket.
- Code changes are retrieved from AWS CodeCommit and passed to AWS CodeBuild.
- CodeBuild compiles and builds the application artifacts.
- AWS CodeDeploy deploys the artifacts to the target environment.
Week zero marked the initial phase of our journey towards establishing robust DevOps and CI/CD pipelines.
The real progress and significant advancements were witnessed during week 9.
Throughout this, we delved deep into the realm of DevOps and CI/CD pipelines, where the focus shifted from theoretical concepts to hands-on implementation and real-world application.
Kindly direct your attention to week nine, also find below lucidchart architectures.
Frameworks for Efficient Design
Frameworks are a valuable tool for any designer, architect or a technologist.

Frameworks are essential for reducing complexity, minimizing errors, and making the design process more efficient.
Frameworks provide a common language and methodology for teams to follow, which can help to ensure that everyone is on the same page and that the final product meets the desired requirements.
The Open Group Architecture Framework
TOGAF is a widely used framework for enterprise architecture. It provides a comprehensive set of tools and techniques for designing, implementing, and managing enterprise architecture. TOGAF is structured into four main components:
- Architecture Development Method: A systematic approach to creating and implementing enterprise architecture.
- Enterprise Continuum: A classification scheme for organizing architecture artifacts.
- Architecture Content Framework: Defining the necessary skills, processes, and tools for efficient enterprise architecture development and management.
- Architecture Capability Framework: Establishing the core content of enterprise architecture.
Paving the Way for Robust Systems
Emphasizing six critical pillars, the AWS Well-Architected Tool fosters the creation of highly reliable, secure, performant, and cost-efficient systems, while enabling agile responses to changing market trends and customer needs.
These pillars are,
| Pillar | Focus |
|---|---|
| Operational Excellence | Utilizing a fully automated operations pipeline for IT operations |
| Security | Ensuring that security accounts are always up to date |
| Reliability | Building highly reliable systems that self-heal and recover quickly |
| Performance Efficiency | Ensuring that systems are running at peak performance efficiently |
| Cost Optimization | Reducing costs by utilizing cost optimization principles |
| Business Agility | Enabling rapid responses to changing customer requirements and market trends |
Empowering Design with AWS Well-Architected Framework
The AWS Well-Architected Framework can be used to assess the current state of your applications and to identify areas where you can improve your architecture.
The tool also provides recommendations for how to improve your architecture.
The AWS Well-Architected Framework incorporates a set of insightful questions aligned with the aforementioned pillars of the well-architected approach.
Based on the inputs provided, the framework generates a comprehensive report, aiding businesses in achieving optimal and sustainable design outcomes.
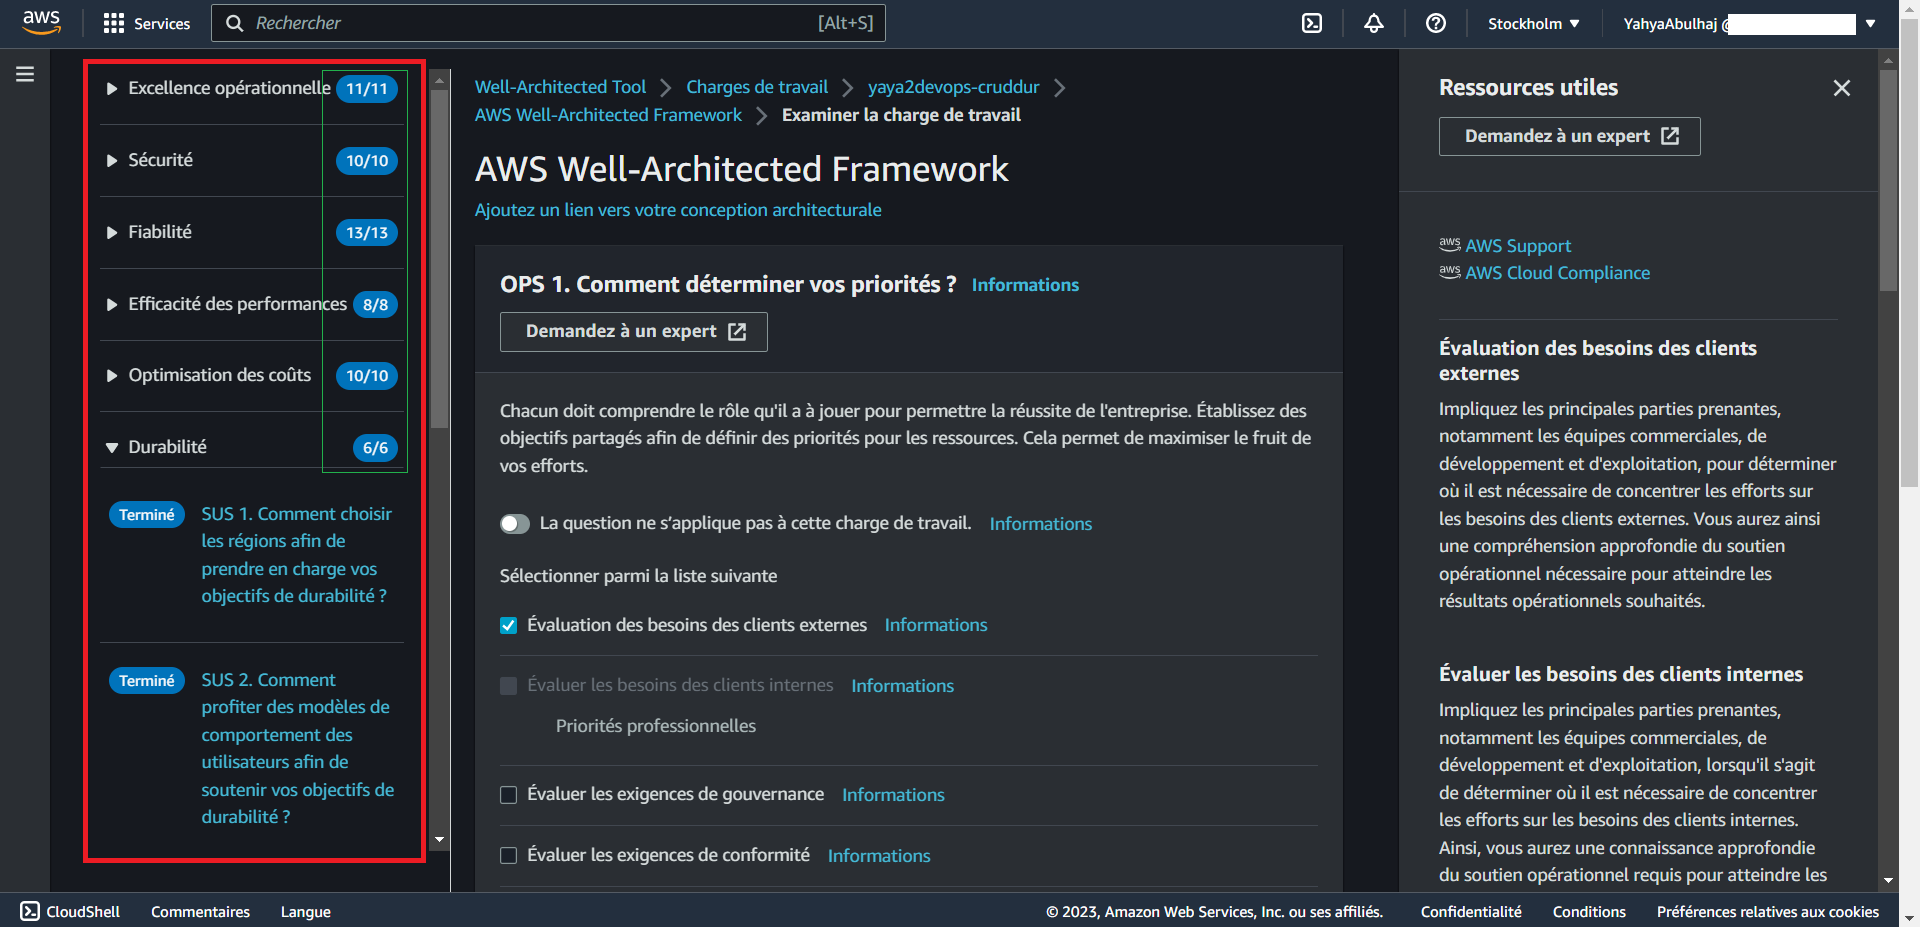
aws : Is a term I use before a name to refer the act of searching a service in the console.
To get started, from the console aws AWS Well-Architected Framework.
Security Considerations
AWS is literally a secure cloud platform, but it is as important to implement additional security measures to protect your data and applications.
Zero Trust, Verify Explicitly.
Also, Microsoft champions the path of zero compromise and explicit validation, setting a resolute standard for unwavering security and reliability.

- Use strong authentication and authorization mechanisms. Use IAM to create and manage users and roles, and requiring MFA for all users with access to sensitive data.
- Implement network security. This includes using security groups to control network traffic, and enabling encryption for data in transit and at rest.
- Continuously monitor your resources. Employ CloudTrail to track all API calls, and CloudWatch to monitor resource usage and performance.
- Use secure coding practices. Write code that is free of vulnerabilities, and using secure development practices such as code reviews and penetration testing.
| Security Increase | Description |
|---|---|
| Data Protection & Residency | Protect your data by encrypting it at rest and in transit, and storing it in a region that meets your compliance requirements. |
| Governance & Compliance | Use the right AWS services and configure them correctly, and regularly audit your AWS environment to ensure that it is compliant with your security policies. |
| Shared Responsibility of Threat Detection | AWS takes responsibility for the security of the underlying cloud infrastructure, but you are responsible for the security of your data and applications. This includes detecting and responding to threats. |
| Incident Response Plans | Have a plan in place for responding to security incidents, including steps for identifying, containing, and remediating incidents. |
During camping, we addressed most security considerations. Below, you will find more of what matters.
- Use the principle of least privilege. This means only giving users the permissions they need to perform their jobs, and no more.
- Segment your network. This will help to isolate your resources in case of a security breach.
- Back up your data regularly. To recover from a data breach or other disaster.
- Have a disaster recovery plan. Better restore your services in the event of a disaster.
Additionally, for CloudWatch configurations and continuous monitoring during the 12-week period and beyond, you can refer back to week two.
How to Apply MFA to the AWS Root User
The root user is the most powerful user in an AWS account, so it is important to secure it properly.
One way to do this is to enable multi-factor authentication. MFA adds an extra layer of security by requiring users to provide two forms of identification when they sign in.
To enable MFA for the root user, follow these steps:
- Sign in to the AWS Management Console as the root user.
- In the navigation bar, choose Your Account, then Security Credentials.
- In the Multi-Factor Authentication (MFA) section, choose Assign MFA device.
- Follow the instructions to configure your MFA device.
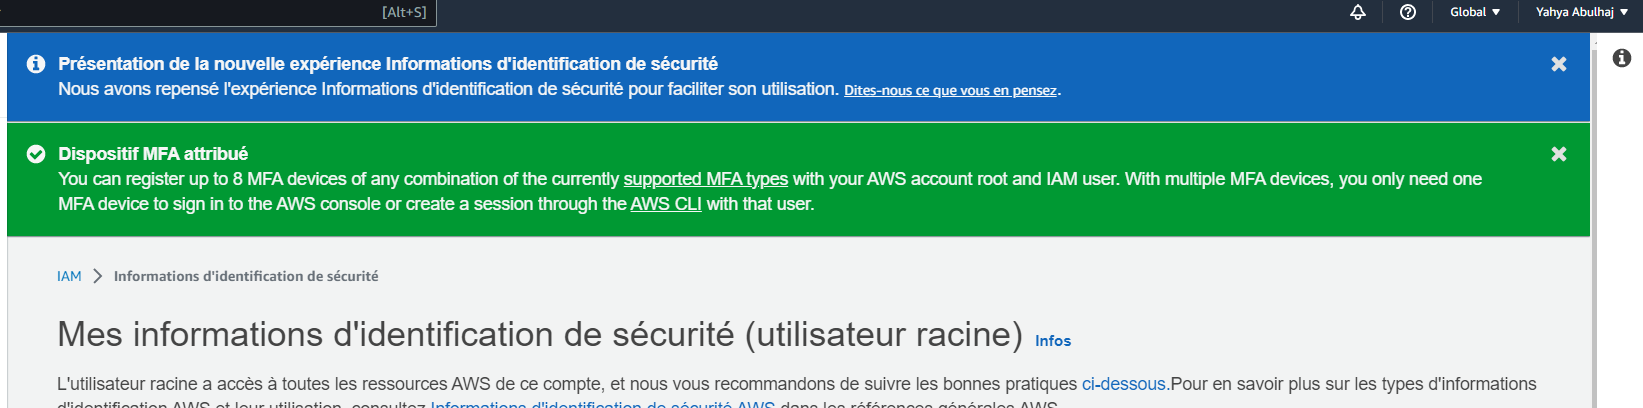
- AWS strongly recommends enforcing MFA for all organization resources without any exceptions.
Once you have enabled MFA for the root user, you will need to provide your MFA token when you sign in.
This will help to protect your account from unauthorized access.
Account Management with AWS Organizations
AWS Organizations is a service provided by AWS that enables centralized management of multiple AWS accounts within an organization.
The standard procedure for integrating into your team generally involves the sequential stages outlined below, which we will proceed to implement.
☁️ Get Started w/ AWS NOW. (opens in a new tab)

This helps businesses efficiently manage their cloud resources by allowing them to create a hierarchy of accounts, which can represent different departments, projects, or teams.
Starting out, you have no organizational units except for a root unit.
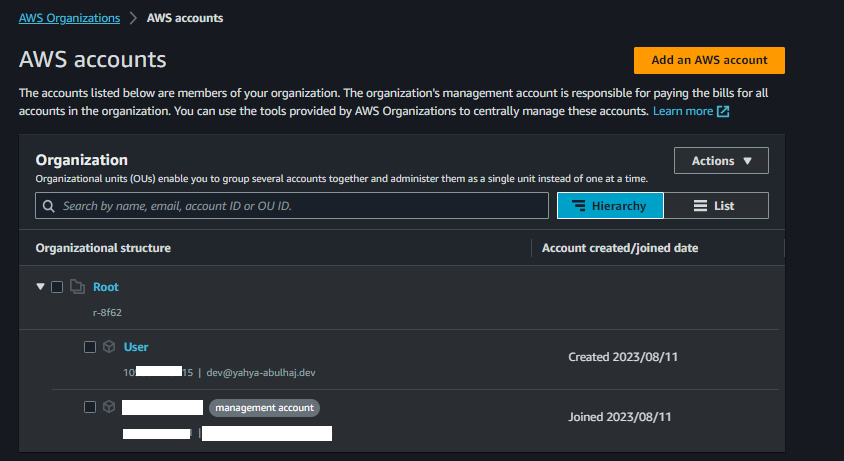
What is an AWS Organization Unit?
An AWS Organization Unit (OU) is a logical grouping of AWS accounts within an AWS Organization. OUs can be used to organize and manage AWS accounts more effectively, and to simplify account management tasks.
Root (Management Account)/
│
├── Production OU /
│   └── Production Account 1
│   └── Production Account 2
│   └── ...
│
├── Development OU /
│   └── Development Account 1
│   └── Development Account 2
│   └── ...
│
├── Test OU /
│   └── Test Account 1
│   └── Test Account 2
│   └── ...
│
└── Yacrud /
├── Yacrud Developers
│   └── Yacrud Developer 1 Account
│   └── ...
│
├── Yacrud Admins
│   └── Yacrud Admin Account
│   └── ...
│
└── Yacrud Root (Responsability)
└── Yacrud Root Account
└── ...
Why use AWS Organization Units?
- To organize your AWS accounts by business unit, department, or application. This can make it easier to track costs, assign permissions, and manage compliance.
- To simplify account management tasks. For example, you can use OUs to set up billing and cost allocation, and to apply policies to groups of accounts.
- To improve security. You can use OUs to restrict access to resources, and to enforce security policies.
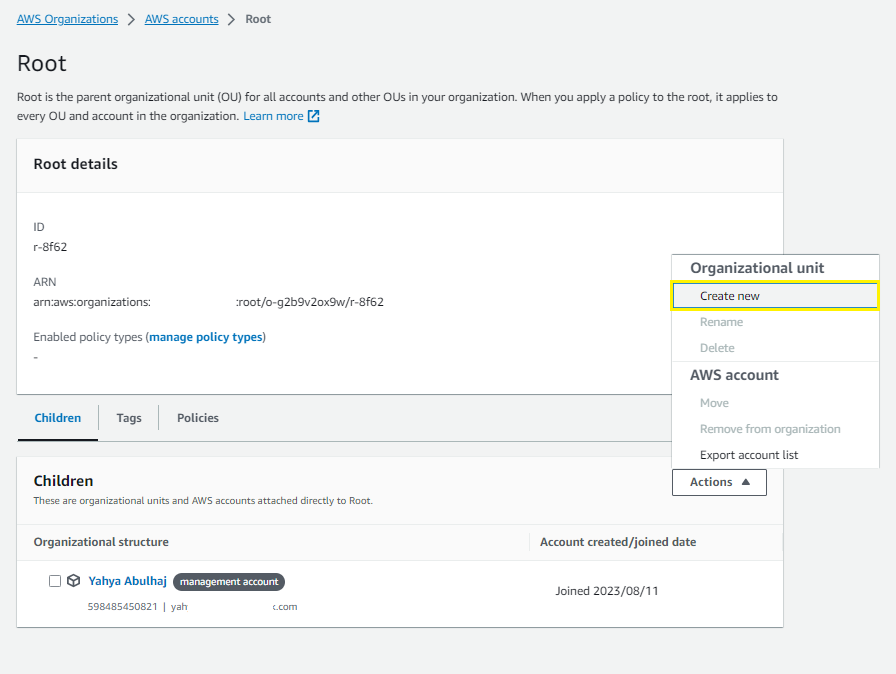
How to create an AWS Organization Unit
To create an AWS Organization Unit, you can use the AWS Organizations console or the AWS CLI. Here are the steps to create an OU using the console:
- Go to the AWS Organizations console.
- Click the Organization Units tab.
- Click the Create organizational unit button.
- Enter a name for the OU.
- (Optional) Enter a description for the OU.
- Click the Create button.
You can now use it to organize your AWS accounts and to simplify account management tasks by business unit, application or department.
Managing IAM Users and Roles in AWS
IAM users and roles are the foundation of AWS security. They allow you to control who can access your AWS resources and what they can do with them.
- Roles: A set of permissions that can be assumed by entities like users or services, allowing them to perform specific actions on AWS resources.
- Policies: JSON documents that define what actions are allowed or denied on AWS resources, providing fine-grained control over access permissions.
IAM users can be given specific roles to access AWS resources, which are controlled through policies assigned (technically attached) to these roles.
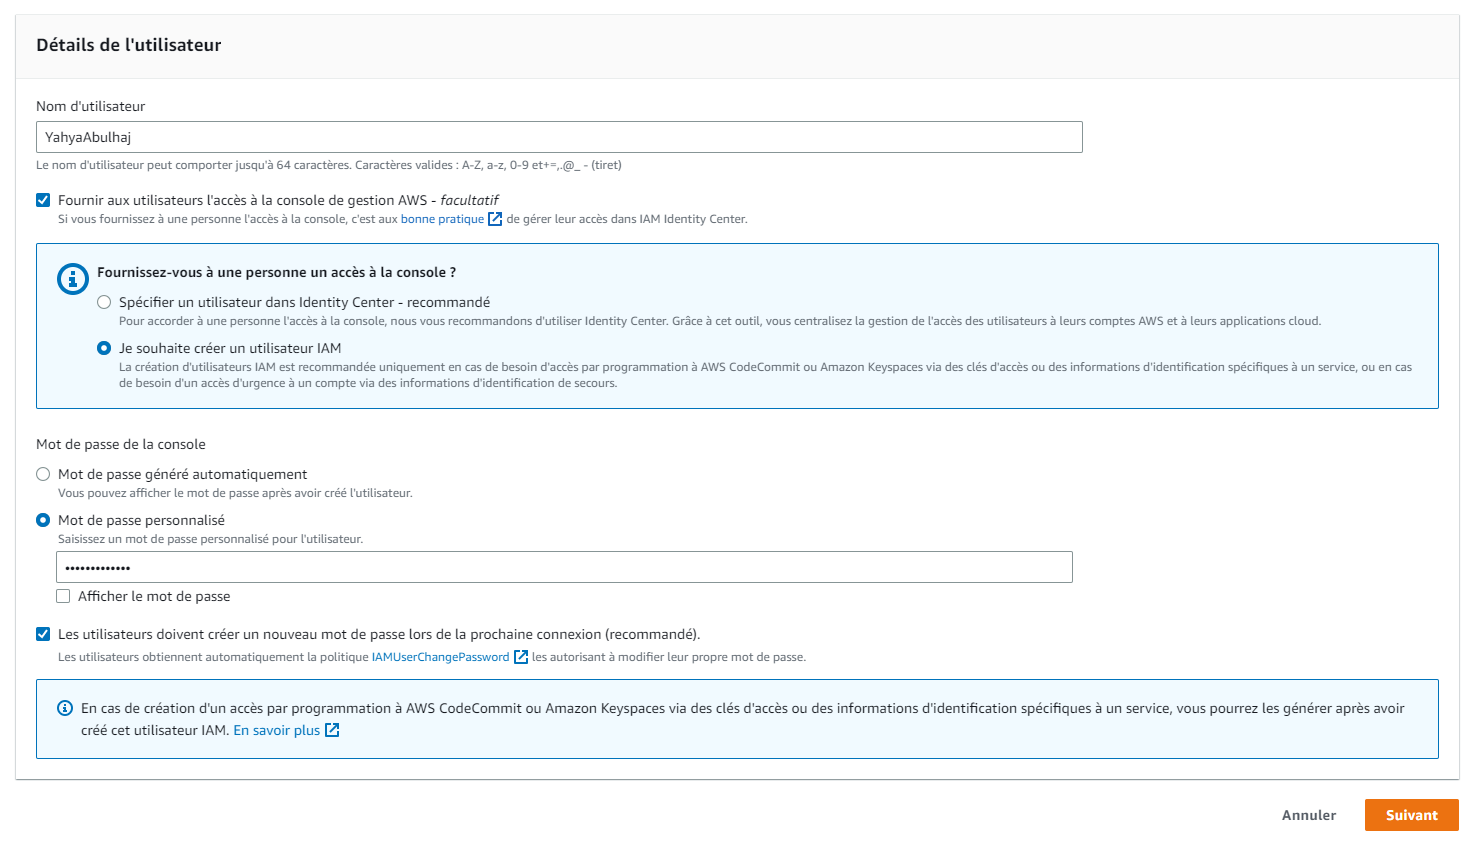
How to Set up an IAM User
An IAM user is an individual or application that uses AWS resources. To set up an IAM user, you need to:
- Create a user name and password for the user.
- (Optional) Tag the user with metadata.
- Click next or
Suivant;)
Email Addresses with Aliasing
AWS aliases are a way to create friendly names for AWS resources. For example, you could create an alias for an email address, a Lambda function, or a KMS key.
To create an AWS alias, you can take note of the following,
- Use the AWS CLI, the AWS Management Console, or the AWS SDKs.
- AWS alias names must be unique within your account and region.
- AWS alias names can contain letters, numbers, and the characters
-,_, and..
Some examples of valid AWS aliases Incl,
exampleexample-aliasexample.aliasexample+alias
Here is how to create an alias for an email address using the AWS CLI:
aws ses create-alias --alias-name example --email-address example@example.com- aws ses: This part of the command tells the AWS CLI to interact with the Amazon SES service.
- create-alias: This is the specific action that tells the AWS SES service to create an alias.
- --alias-name example: This option specifies the name of the alias you want to create. In this case, the alias name will be "example".
- --email-address example@example.com: This option specifies the email address to which the alias will be associated. In this case, the alias "example" will be associated with the email address "example@example.com".
📧 Real-World Application
Let's say you have an online store that sends order confirmation emails to customers.
The primary email address you use for sending these emails is orders@boutiquoo.com and this email address is already verified in Amazon SES.
You now want to create an alias for tracking emails related to order cancellations.
To do this, you can use the AWS CLI with the following command:
aws ses create-alias --alias-name order-cancellations --email-address orders@boutiquoo.com- The alias name is "order-cancellations".
- The email address associated with the alias is
orders@boutiquoo.com. - The alias email address itself for
order-cancellationsisorder-cancellations@boutiquoo.com
Seamless IAM User Connection
Once you have set up an IAM user, you can connect to the AWS Management Console as that user.
- Open the AWS Management Console in a web browser.
- In the sign-in dialog box, select IAM user.
- Enter the user name and password for the IAM user.
- Click Sign in.
Crafting an Efficient AWS Role:
- Select the type of role you want to create.
- Attach a policy to the role that grants the role the permissions it needs to access your AWS resources.
- (Optional) Tag the role with metadata.

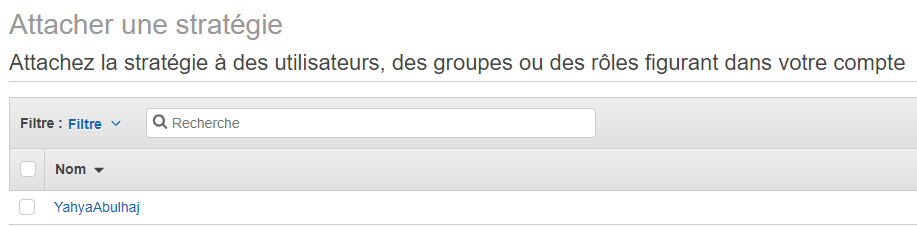
Policy Attachment in AWS
- Go to the IAM console in the AWS Management Console.
- In the navigation pane, select Policies.
- Select the policy that you want to attach.
- Click Attach Policy.
- Select the role or user group that you want to attach the policy to.
- Click Attach.
Service Control Policies
SCPs are a type of organization policy that you can use to manage permissions in your organization.
- SCPs can help to simplify the management of permissions in an organization.
- SCPs can help to improve security by preventing unauthorized users from performing certain actions.
- SCPs can help to reduce costs by preventing users from creating unnecessary accounts or resources.
SCPs are enforced at the root of your organization, and they can be used to deny or allow specific actions for all accounts in your organization.
- In the navigation IAM pane, select Service control policies.
- Click Create policy.
- In the Policy name field, enter a name for your SCP.
- In the Policy document field, paste the JSON code for your SCP.
{
    "Version": "2012-10-17",
    "Statement": [
        {
            "Effect": "Deny",
            "Action": [
                "organizations:LeaveOrganization"
            ],
            "Resource": "*"
        }
    ]
}- Click Create.
Once you have created your SCP, you need to attach it to the root of your organizational unit (OU).
- In the navigation pane, select Organization.
- In the Accounts tab, select the root of your organization or the OU that you want to attach the SCP to.
- Click Service control policies.
- Click Attach policy.
- In the Policy list, select the SCP that you want to attach.
- Click Attach.
| Information | Description |
|---|---|
| SCP order of application | SCPs are applied in the order that they are attached. The first SCP that matches an action will be the one that is enforced. |
| Multiple SCPs | You can attach multiple SCPs to the same root or OU. In this case, the SCPs will be evaluated in the order that they are attached. |
| IAM policy overrides | SCPs can be overridden by IAM policies. If an IAM policy grants a user or role permission to perform an action that is denied by an SCP, the IAM policy will take precedence. |
The SCP will now be applied to the root of your organization or to the OU that you selected.
Trailblazing with AWS CloudTrail
In general, a trail refers to a marked or beaten path or track, often in a natural environment such as a forest, mountain, or wilderness area.
AWS Cloud Trail is an auditing service that records AWS API calls and related events.
This data can be used to,
- Security Analysis
- Incident Response
- Audit logs and compliance
- Track user activity
- Troubleshoot issues
Create a Cloud Trail
- aws AWS CloudTrail.
- Click CreateTrail.
- Enter a name for your trail.
- Select the regions and accounts that you want to monitor.
- Select the events that you want to log.
- Choose a S3 bucket to store your Cloud Trail logs.
- Click Create.

Integrate Health Dashboard with SNS
In this part, I'll walk you through the process of configuring a Sub/Pub system with SNS and EventBridge to enable notifications for your Health Dashboard.
The Health Dashboard is a critical component for monitoring the well-being of your application. It tracks vital metrics, such as server health, response times, and resource utilization.
Integrating the Health Dashboard with SNS via EventBridge, you can receive real-time notifications on important events and take immediate action when necessary.
Step 1: Create an SNS Topic - Pub
Begin by creating an SNS topic using the AWS Command Line Interface (CLI):
aws sns create-topic --name eventbridge-alertThis command will return the Amazon Resource Name (ARN) of the newly created topic:
{
    "TopicArn": "arn:aws:sns:<AWS-REGION>:<aws-id>:eventbridge-alert"
}
Step 2: Subscribe to the SNS Topic
Next, subscribe to the SNS topic with your preferred communication channel (e.g., email) to receive notifications:
aws sns subscribe \
--topic-arn arn:aws:sns:<REGION>:<ACCOUNTID>:eventbridge-alert \
--protocol <email> \
--notification-endpoint <EMAIL>
The system will provide a response in JSON format.
The response will include a key-value pair, where the key is "SubscriptionArn" and the value is "pending confirmation."
{
"SubscriptionArn": "pending confirmation"
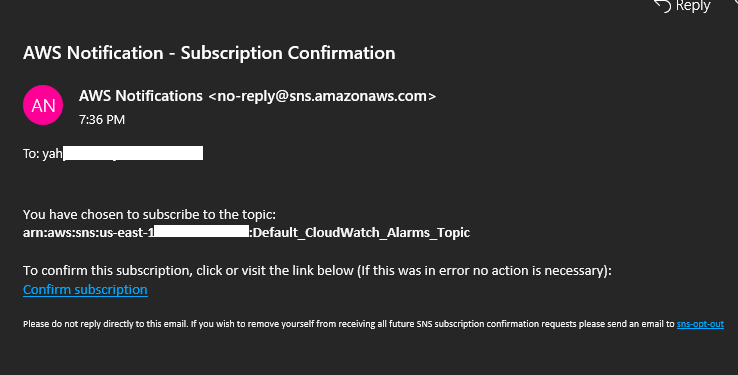
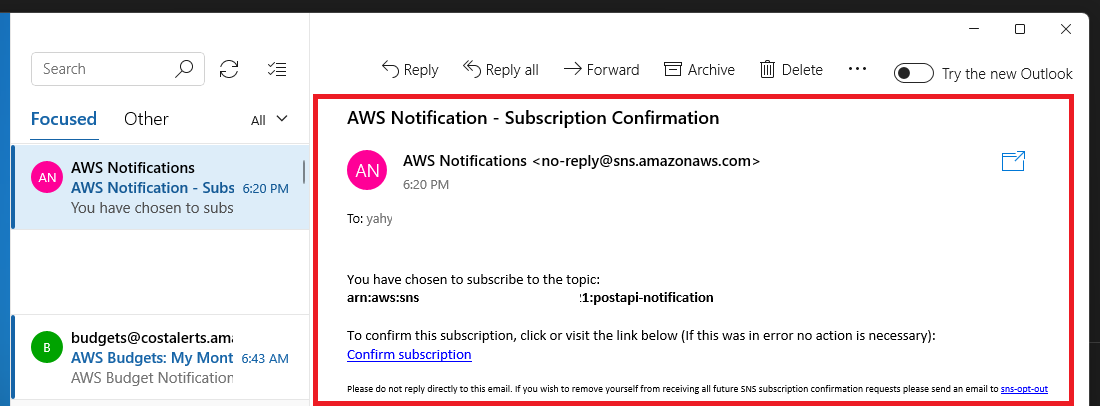
}Upon subscription, a confirmation email will be sent to the specified EMAIL, containing a confirmation link.
You have chosen to subscribe to the topic:
arn:aws:sns:<aws-region>:<aws-id>:eventbridge-alert
To confirm this subscription, click or visit the link below (If this was in error no action is necessary):
Confirm subscription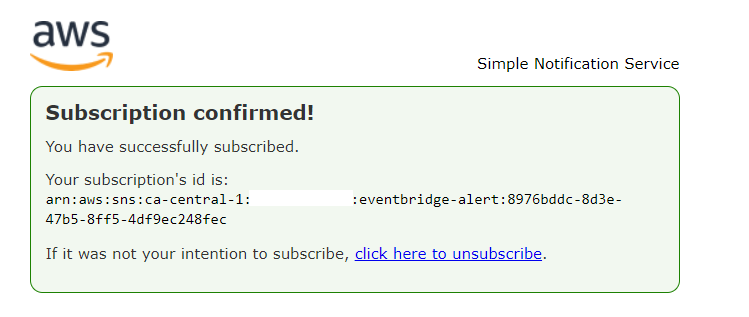
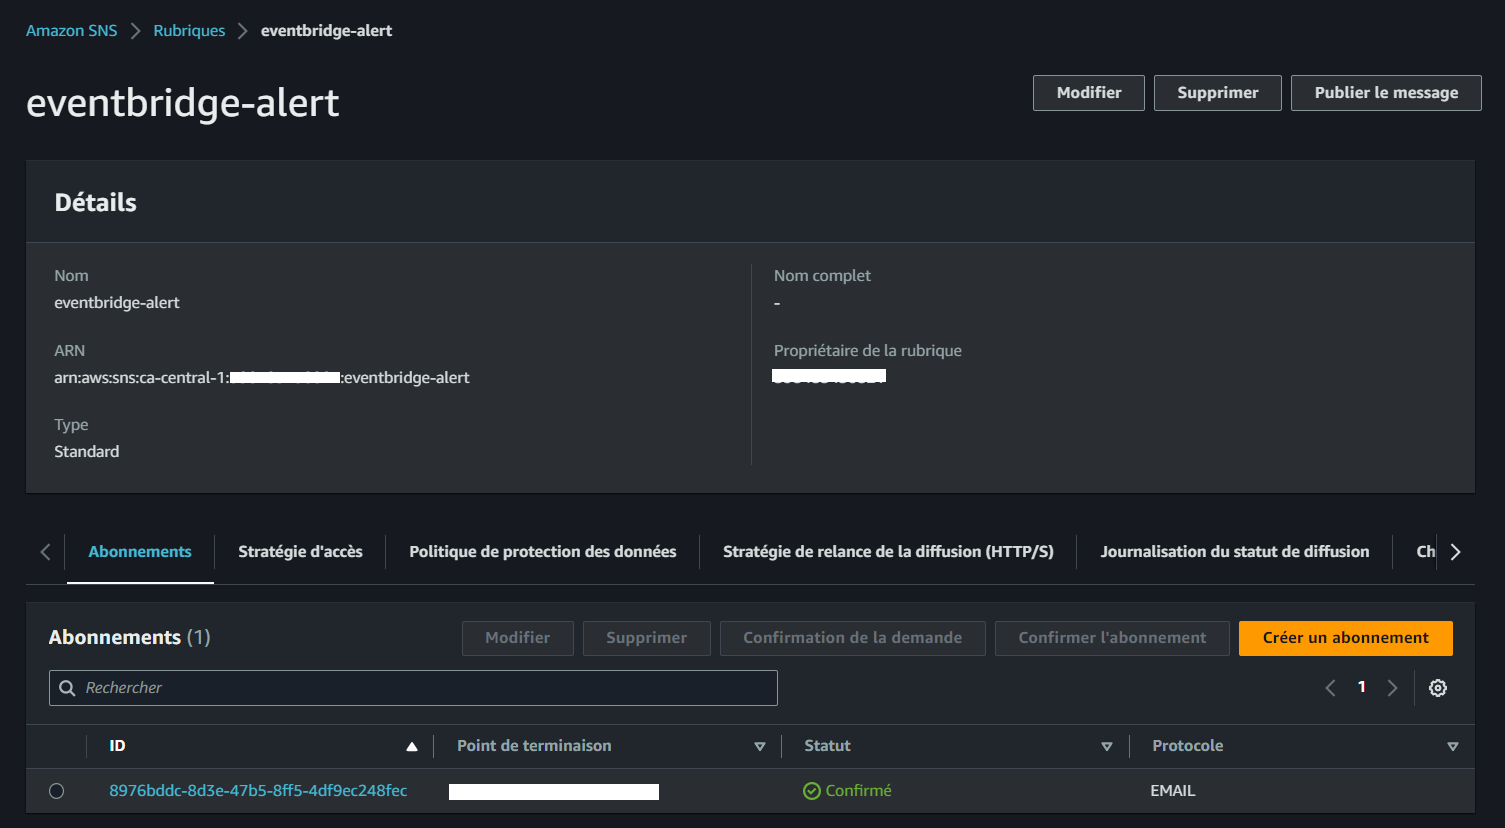
- Please access the console and navigate to SNS to locate the confirmations. It will be listed in the subscription column.
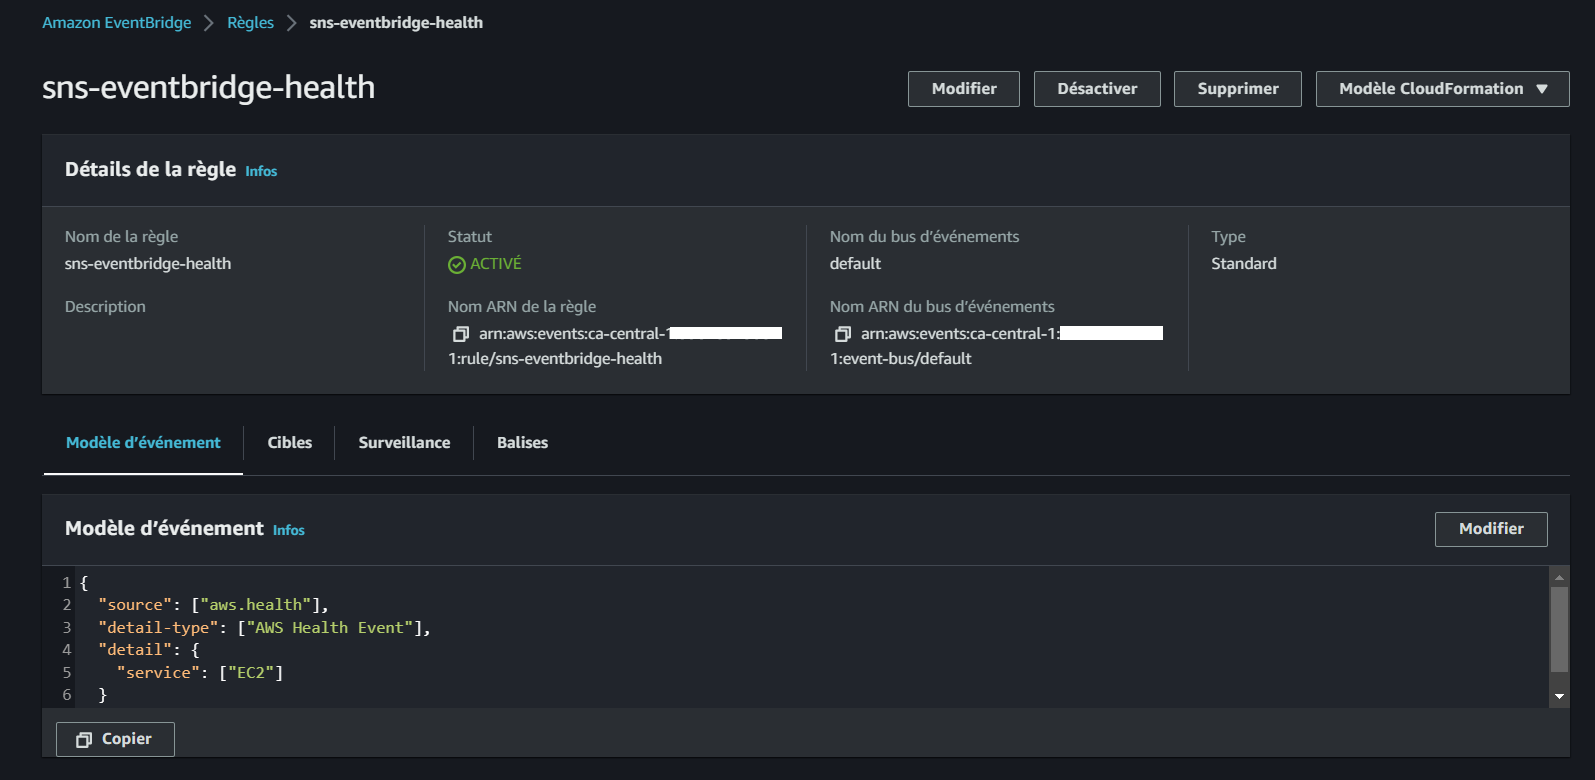
Step 3: Create an EventBridge Rule
- Use the provided file to create an EventBridge rule that defines the event pattern:
aws events put-rule --name "sns-eventbridge-health" \
--event-pattern file://aws/json/sns-event-bridge.json- Upon successful execution, the command will return the ARN of the created rule:
{
    "RuleArn": "arn:aws:events:<AWS-REGION>:<AWS-ID>:rule/sns-eventbridge-health"
}
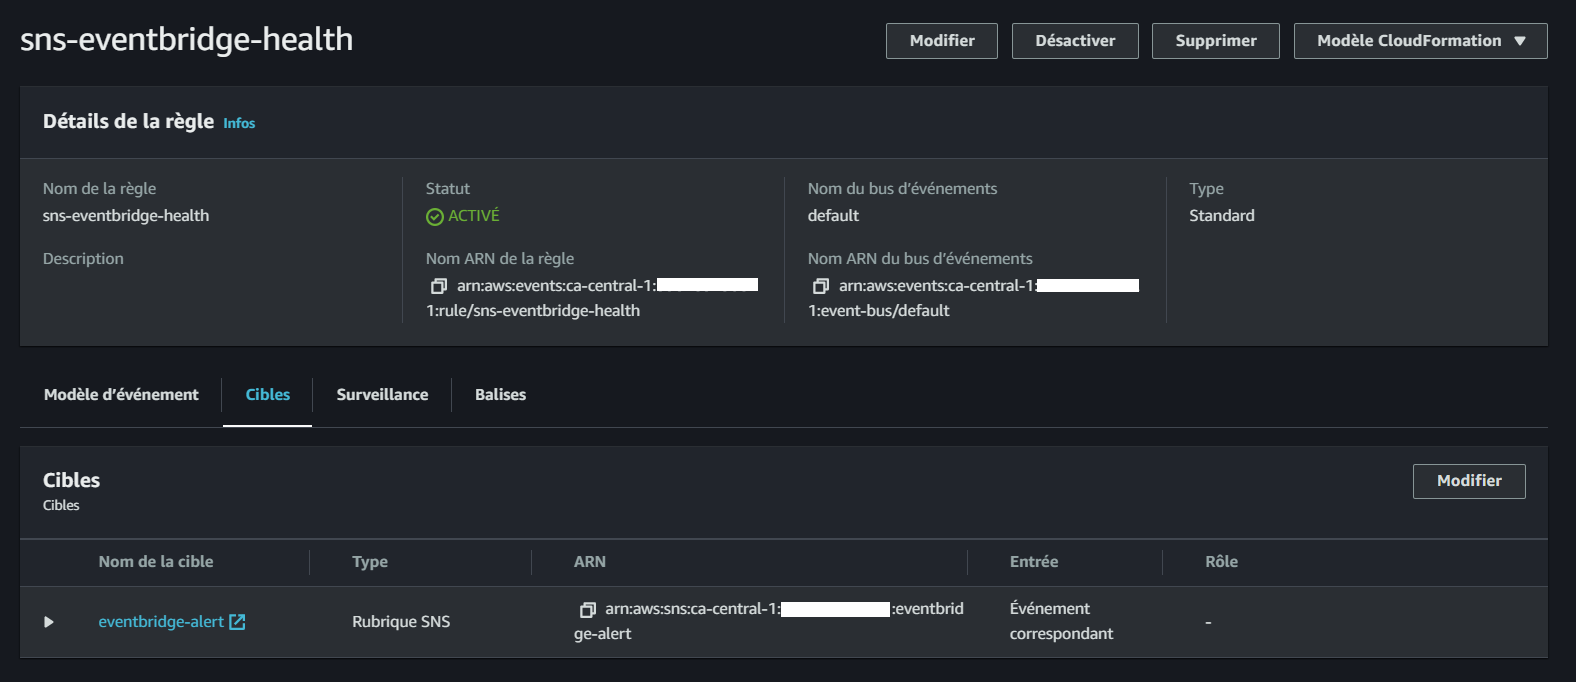
Step 4: Add a Target to the Rule
- Finally, add the SNS topic as the target for the EventBridge rule:
aws events put-targets --rule sns-eventbridge-health --targets "Id"="1","Arn"="arn:aws:sns:<AWS-REGION>:<REDACTED>7434:eventbridge-alert"If successful, the command will return a response indicating no failure entries:
{
    "FailedEntryCount": 0,
    "FailedEntries": []
}
Step 5: Navigate to the Console
You have successfully integrated your Health Dashboard with SNS using EventBridge.
Spend Considerations
The costs of services can vary depending on many factors which it is being offered.
Here are some approaches, self-architected, to consider when planning your AWS spend.
Understanding Cost Variability
The costs of services can vary based on factors such as the type of service and the region where it is provisioned.
| Factor | Description |
|---|---|
| Type of service | Some services, such as EC2 instances, are charged by the hour, while others, such as S3 buckets, are charged by the GB. |
| Region | The cost of a service can vary depending on the region in which it is being offered. For example, the cost of an EC2 instance in the us-east-1 region is different from the cost of an EC2 instance in the us-west-2 region. |
| Amount of usage | The more you use a service, the more you will pay. For example, if you run an EC2 instance for 10 hours, you will pay more than if you run it for 1 hour. |
It's essential to be aware of these variations and make informed decisions to control expenses.
Choosing the Right Pricing Model
When selecting instances, you have three primary pricing options,
| Pricing Model | Description |
|---|---|
| On-Demand | Pay as you go. You are charged for the resources you use, when you use them. |
| Reserved Instances | Pay a one-time upfront fee for a reserved capacity. You will receive a discount on the hourly rate for the reserved capacity. |
| Spot Instances | Pay a discounted price for spare EC2 instances. Spot Instances are available when demand for resources is low. |
Continuously Monitor and Optimize Spending
AWS offers a plethora of options and services that can be leveraged to optimize spending while maintaining high-performance levels.
| Service | Description |
|---|---|
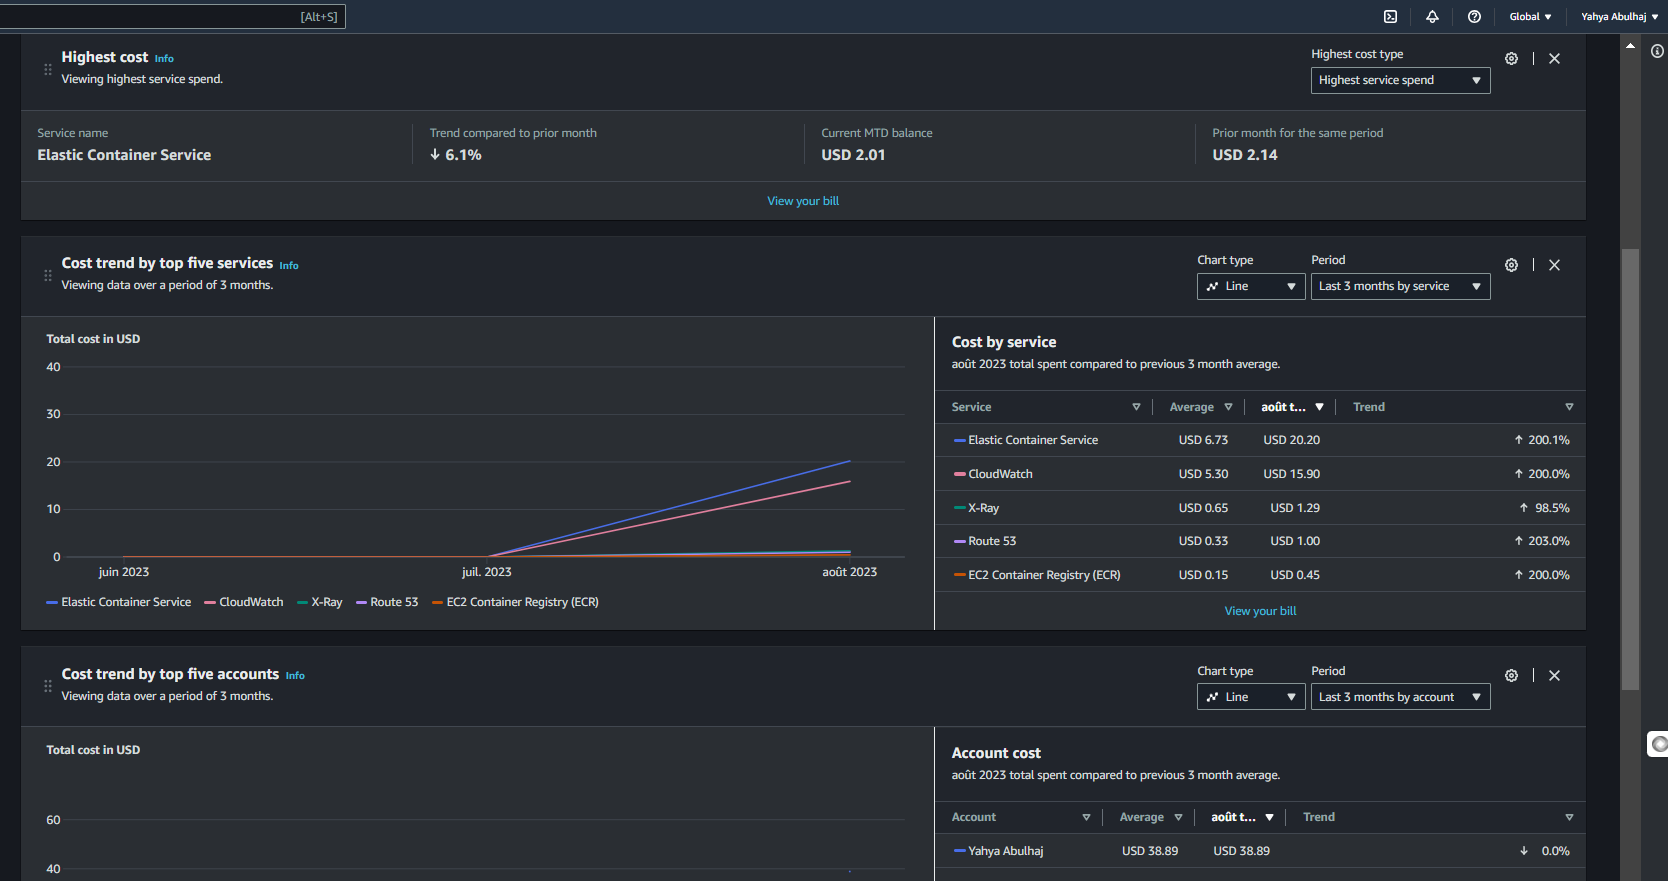
| Cost Explorer | Cost Explorer provides a graphical view of your AWS costs. You can use Cost Explorer to track your costs over time, identify areas where you can save money, and set budgets. |
| AWS Budgets | AWS Budgets allows you to set alerts and notifications when your AWS costs exceed a certain threshold. This can help you avoid unexpected costs. |
| Spot Instances | Spot Instances are spare EC2 instances that are available at a discounted price. You can use Spot Instances to save money on compute resources. |
| AWS Trusted Advisor | AWS Trusted Advisor offers real-time guidance to optimize your AWS infrastructure across various aspects, including cost optimization, security, performance, and fault tolerance. |
Viewing Your AWS Spending
To view your AWS spending and services currently running, follow these steps:
- Log in to your AWS Management Console.
- In the left pane, click on "Profile."
- From the dropdown, select "Billing Dashboard."
- Click on "Bills" to access the detailed billing information.
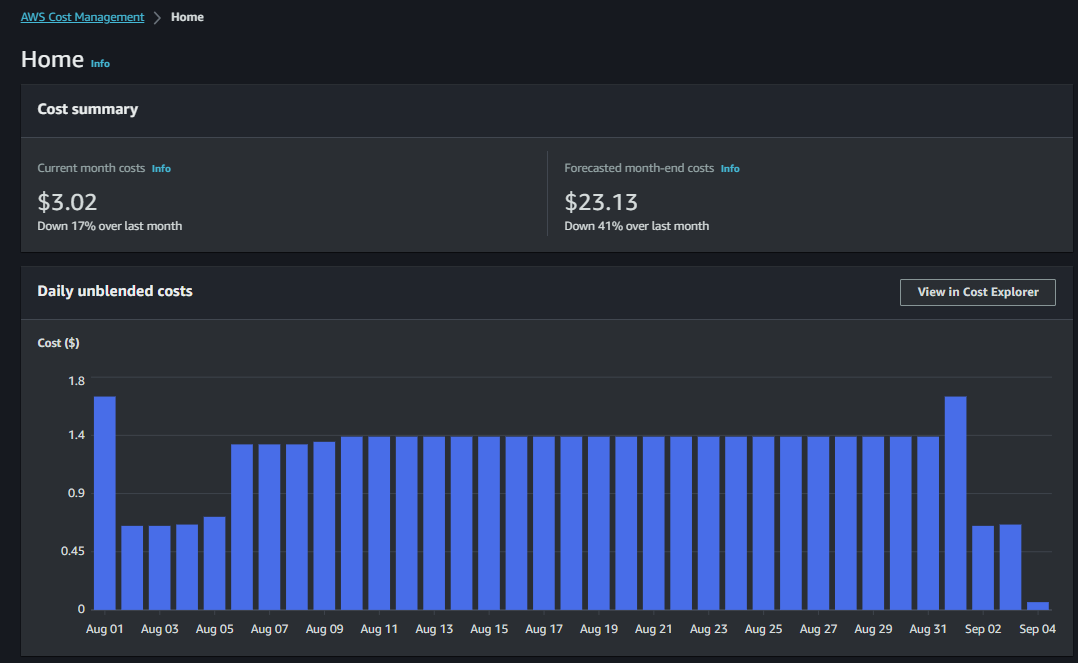
Gain insights into your current and past bills, helping you keep track of your AWS expenditure
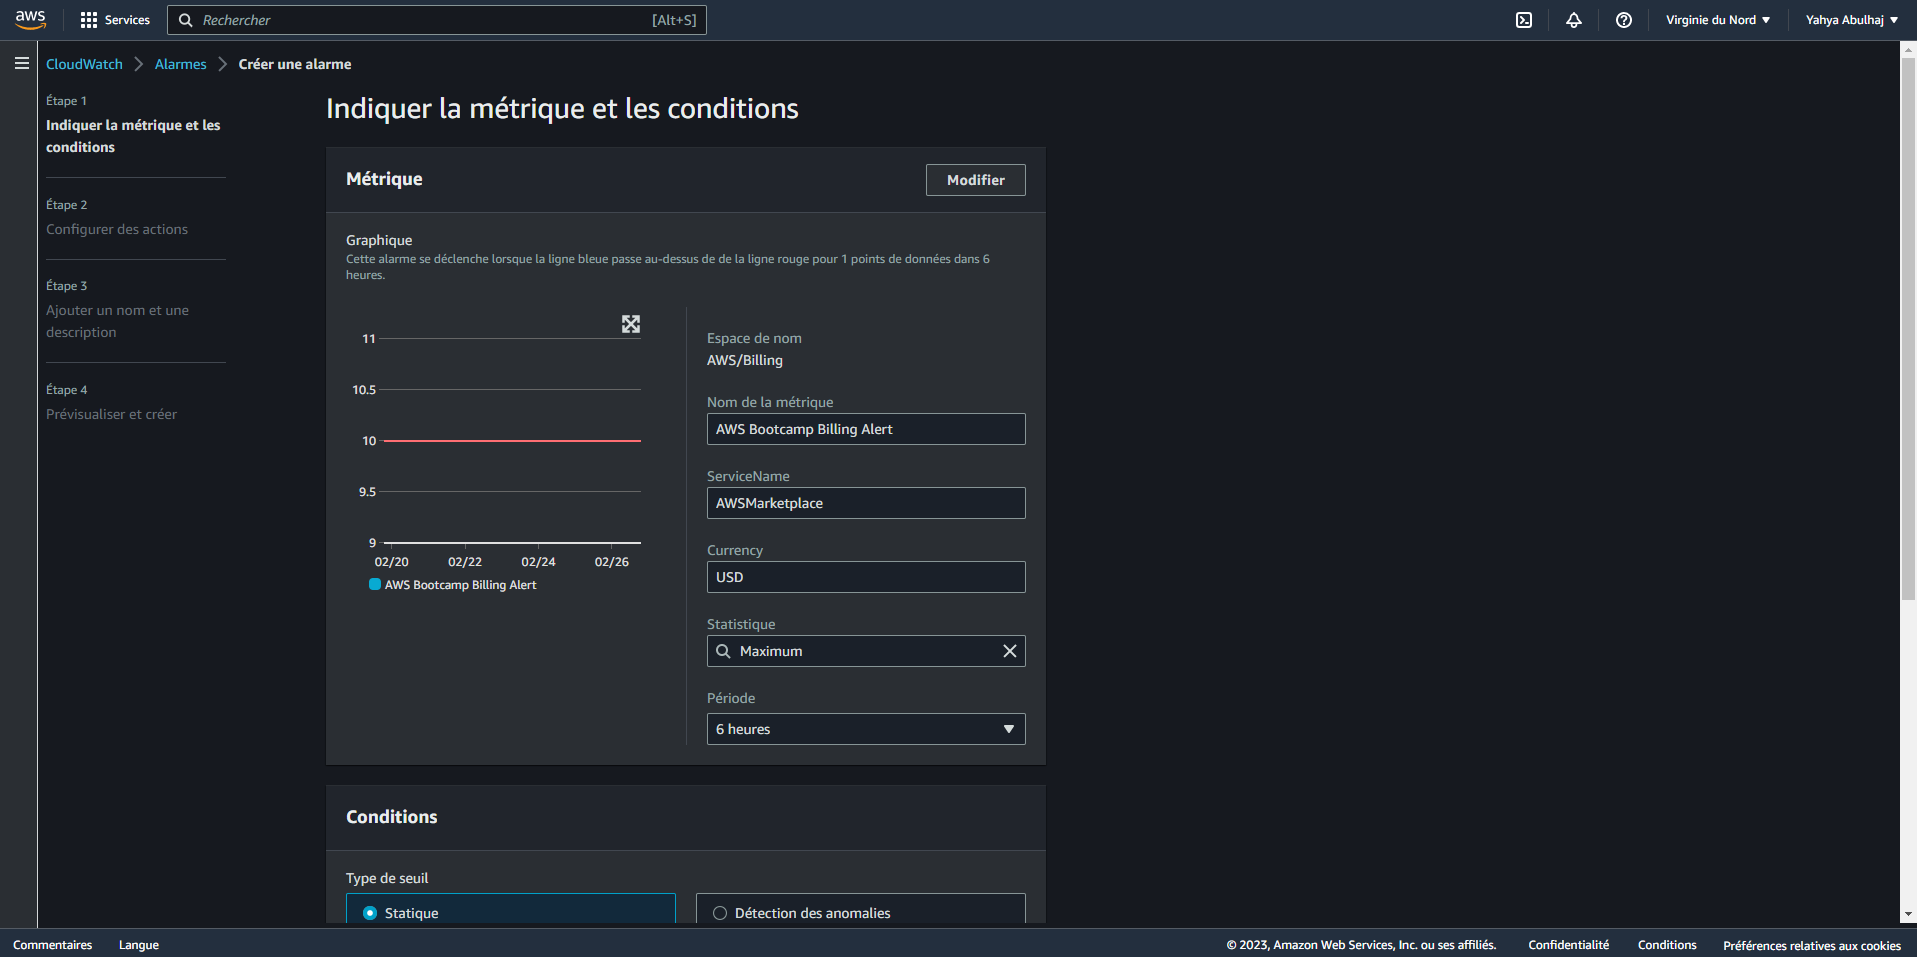
CloudWatch Alarm
CloudWatch alarms are a powerful way to monitor your AWS resources and take action when certain conditions are met. For example, you can create an alarm that will send you an email notification if your EC2 instance CPU utilization exceeds 80%.
- Go to the CloudWatch console (opens in a new tab).
- Click the Alarms tab.
- Click the Create Alarm button.
- In the Select Metric dialog box, select the metric that you want to monitor.
- In the Threshold dialog box, specify the threshold value and the evaluation period.
- In the Actions dialog box, specify the actions that you want to take when the alarm is triggered.
- Click the Create Alarm button.
- Get Notified Receive Cloudwatch Alarm Topic Notifications Directly to Your Inbox.
I started my journey in the US East Central region and subsequently shifted to CA Central for upcoming weeks.
AWS Budget Made Easy
AWS Budgets offer a more advanced approach to managing and monitoring your AWS spending compared to traditional alerts. With Budgets, you can establish spending limits and receive timely notifications when your expenses approach or exceed these predefined thresholds.
To set up an AWS Budget:
- Navigate to the AWS Billing Console (opens in a new tab)
- Click on the "Create budget" button
- Follow the prompts to configure your budget settings

You can set up notifications for various scenarios, such as:
- When actual spending reaches 85% of the budget
- When forecasted spending is expected to reach 100% of the budget
Checking and Claiming AWS Credits
AWS credits are an excellent way to reduce your AWS expenses. There are several ways to obtain AWS credits:
- AWS Activate: A program offering eligible startups up to $100,000 in AWS credits.
- AWS Promotional Credits: Offered to customers meeting specific criteria, such as signing up for a new AWS service or attending an AWS event.
- AWS Partner Credits: Provided by AWS partners to their customers.
To check your AWS credit balance and claim credits:
- Go to the AWS Billing console (opens in a new tab)
- Click on the "Profile" tab
- Select the "Billing Dashboard" tab
- Click on the "Credits" tab in the left pane
The Credits tab displays a list of your AWS credits, including the credit amount, expiration date, and remaining balance. To claim a credit, click the "Claim" button next to the credit.
Once claimed, the credit will be automatically applied to your eligible AWS charges until it's exhausted.
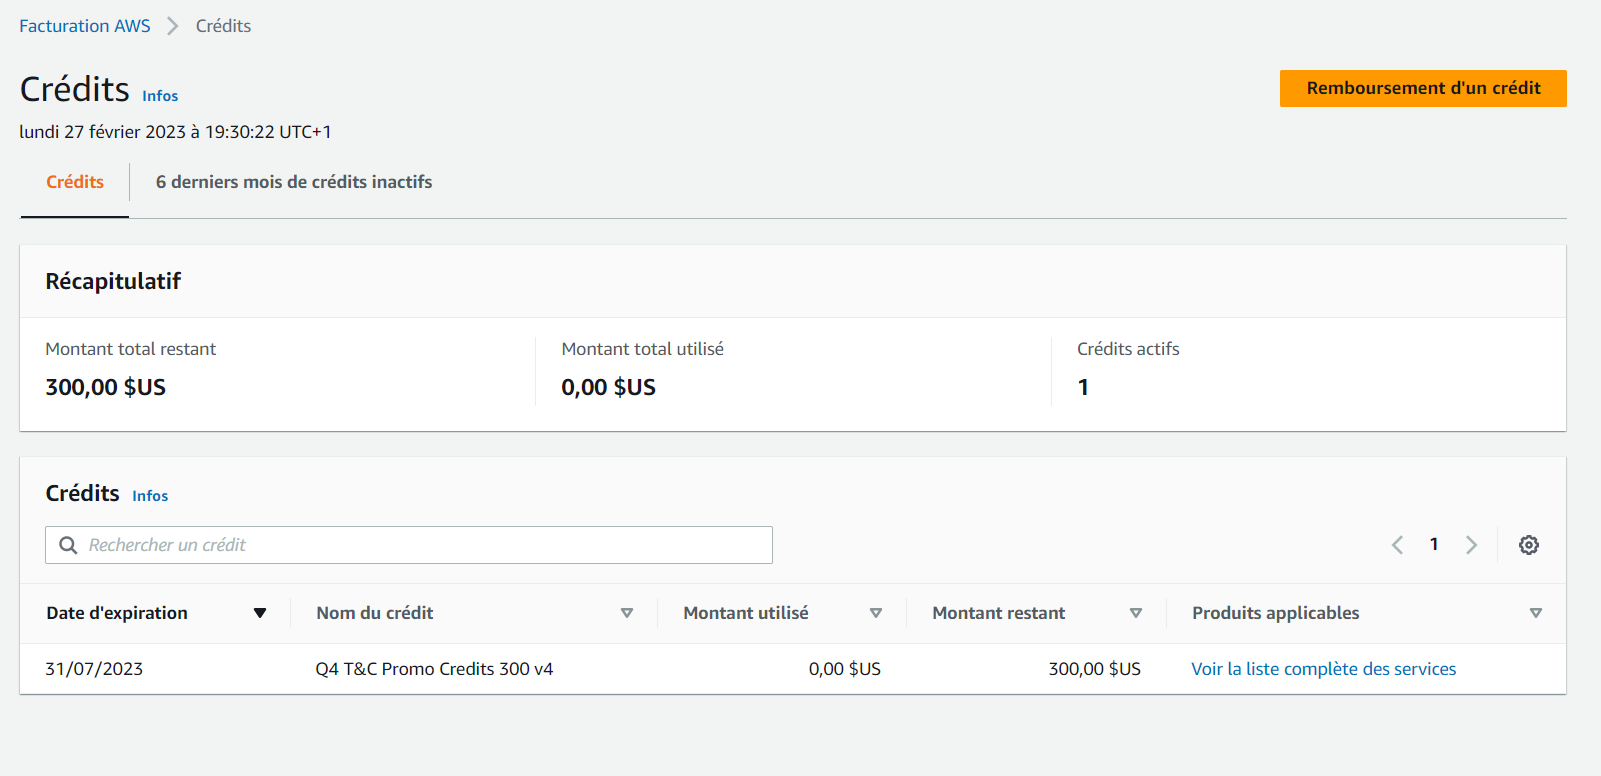
Note: Some credits may only be applicable to specific services.
Welcome To AWS Free Tier
The AWS Free Tier is an excellent opportunity to explore AWS services without incurring costs. It offers a variety of services, each with different types of free options.

For detailed information about the AWS Free Tier, visit the AWS Free Tier website (opens in a new tab).
Benefits of using the AWS Free Tier:
- Try out AWS services at no cost
- Learn how to use AWS services without committing to a paid plan
- Build and test applications using Free Tier resources
Limitations of the AWS Free Tier:
- Limited to certain services and usage levels
- Not all AWS services are included
- Not available to all customers
Tips for using the AWS Free Tier:
- Choose the right services: Select services most relevant to your needs from those available in the Free Tier
- Track your usage: Monitor your usage to avoid exceeding Free Tier limits
- Plan for the future: Develop a strategy for transitioning to paid services when the Free Tier expires
Command-Line Interface In The Console
AWS CloudShell is a browser-based shell that allows you to interact with AWS services directly from your browser. It comes pre-configured with the AWS CLI and other tools, enabling you to start using AWS services immediately.
To use AWS CloudShell:
- Navigate to the AWS CloudShell console (opens in a new tab)
- Click the "Launch CloudShell" button
- A new tab will open in your browser with a pre-configured shell
- Type the following command to check your AWS identity:
aws sts get-caller-identityThis command performs an implicit authentication check.
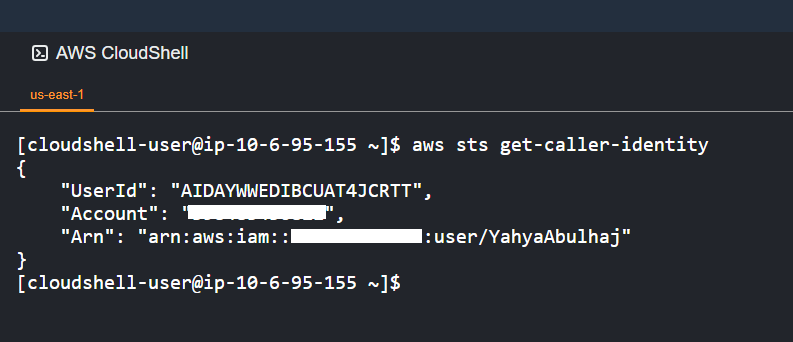
Note: The shell is running in the us-east-1 region.
Empower Your Favorite IDE with AWS CLI
Whether you're using Codespaces, Gitpod, your own hosted IDE on a VM, or an on-premises setup, let me guide you through the steps to set up the AWS Command Line Interface.
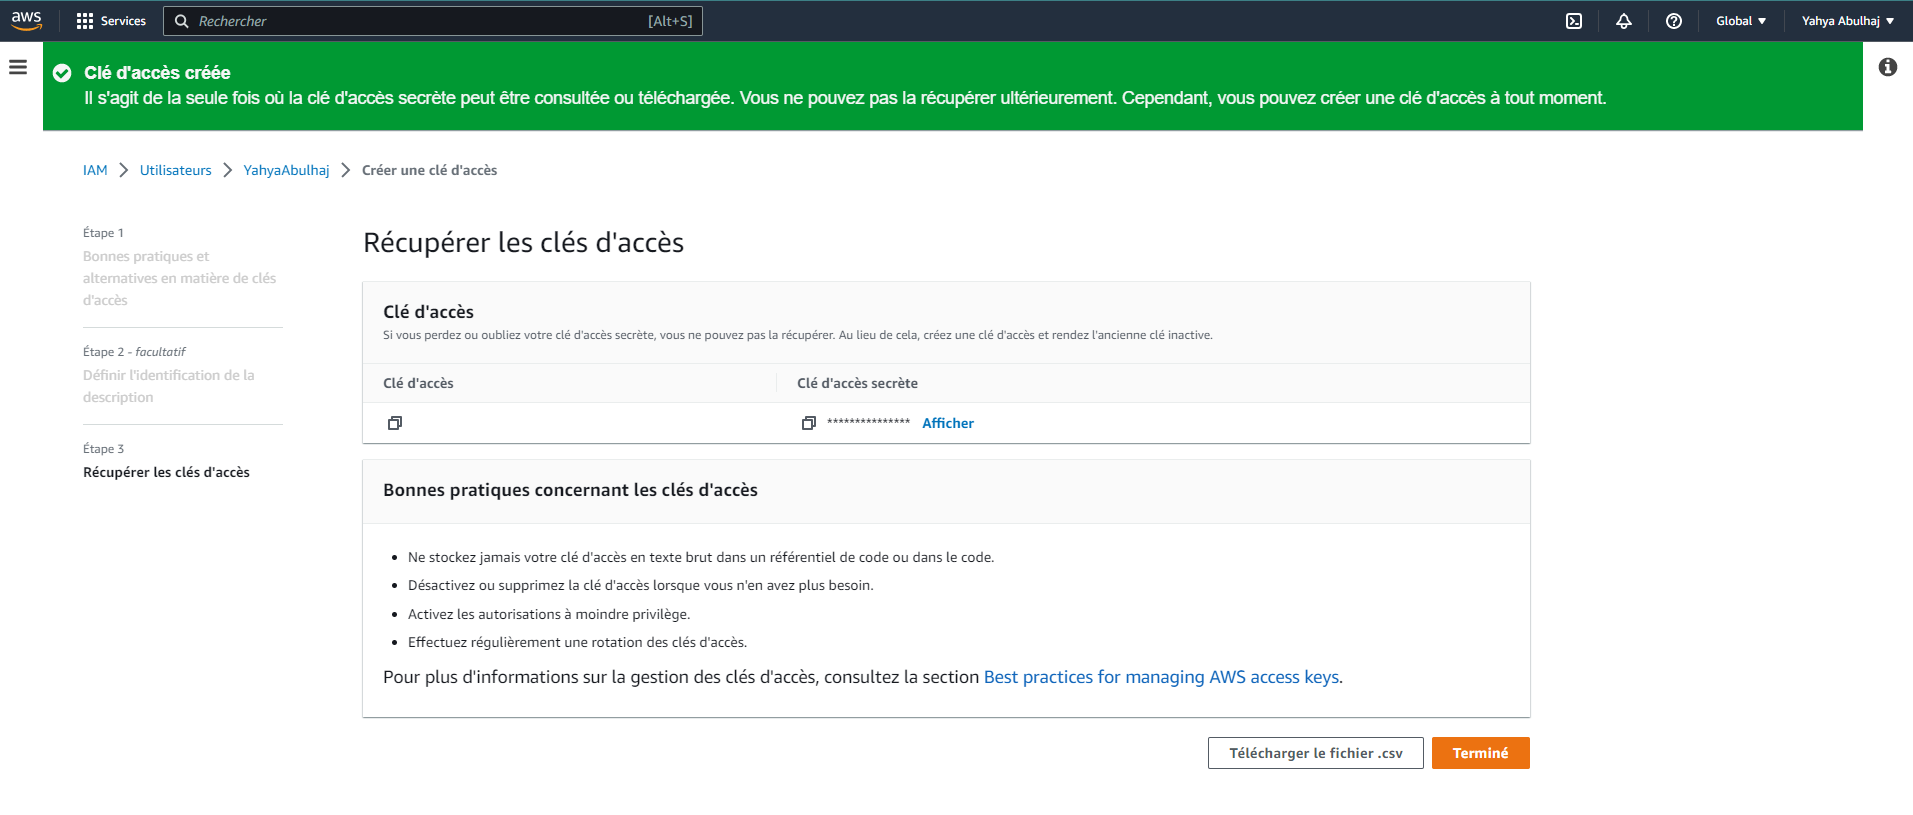
Generate AWS credentials
To begin authenticating your AWS account with any IDE, you need to first generate the necessary credentials from your AWS console.
- In the AWS CloudShell, click the Profile icon in the top right corner.
- Click the Credentials tab.
- Click the Create New Profile button.
- In the Profile Name field, enter a name for your profile.
- In the Access Key ID and Secret Access Key fields, enter your AWS credentials.
- Click the Create Profile button.
Go to Your Favorite IDE
Setting Environment Variables
- In its terminal, run the following commands:
export AWS_ID=your_aws_id
export AWS_ACCESS_KEY_ID=your_access_key_id
export AWS_SECRET_ACCESS_KEY=your_secret_access_key- E.g. you can persist environment variables by using the command
gp envafter rerunning the above commands.
gp env AWS_ID=your_aws_id
gp env AWS_ACCESS_KEY_ID=your_access_key_id
gp env AWS_SECRET_ACCESS_KEY=your_secret_access_key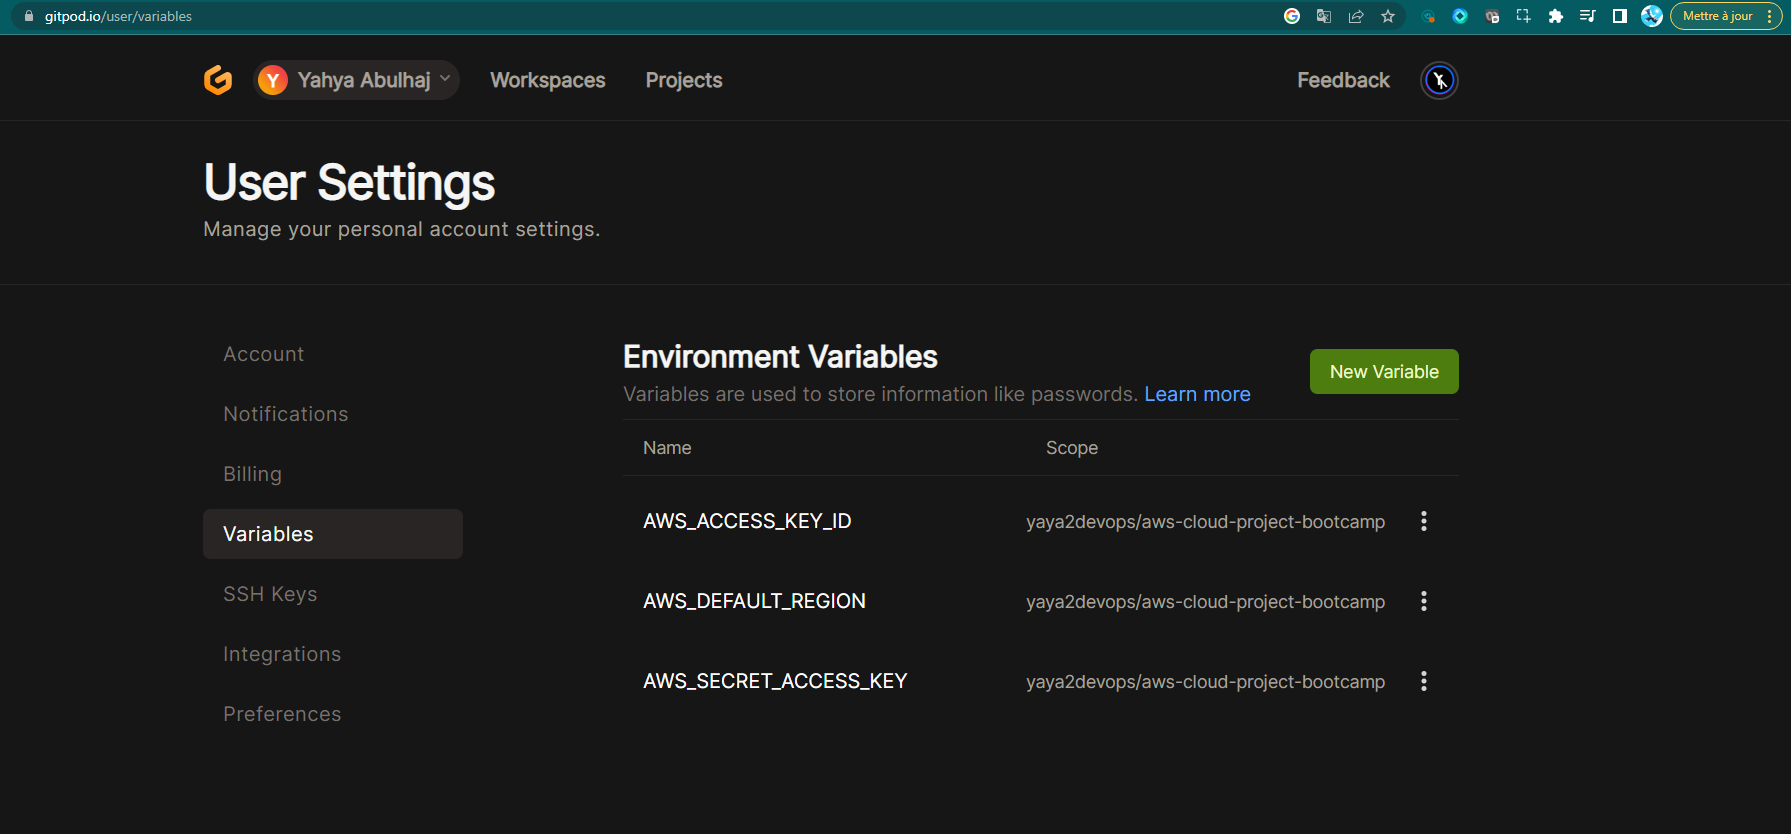
- Once you have set the environment variables, you can start onboarding the AWS CLI in Gitpod.
Install AWS Command-Line Tool
The AWS CLI is a command-line tool that allows you to interact with AWS services. It is a powerful tool that can be used to automate tasks, manage resources, and troubleshoot problems.
To install the AWS CLI, you can follow these steps:
- Download the AWS CLI package from the AWS website (opens in a new tab).
curl "https://awscli.amazonaws.com/awscli-exe-linux-x86_64.zip" -o "awscliv2.zip"- Unzip the package.
unzip awscliv2.zip- Run the
installscript.
sudo ./aws/installOnce you have installed the AWS CLI, you can verify that it is installed by running the following command:
aws --versionThis will print the version of the AWS CLI that is installed.
Checking AWS Connections with Console
Once you have installed the AWS CLI, you can check that you are connected to AWS by running the following command:
aws sts get-caller-identityIf you are pondering!
This command will return your AWS account ID, your AWS Region and your Arn.
You can also get your AWS account ID by running the following command:
export AWS_ACCOUNT_ID=$(aws sts get-caller-identity --query Account --output text)This command will export the AWS account ID to the environment variable AWS_ACCOUNT_ID. You can then use this variable in other AWS CLI commands.
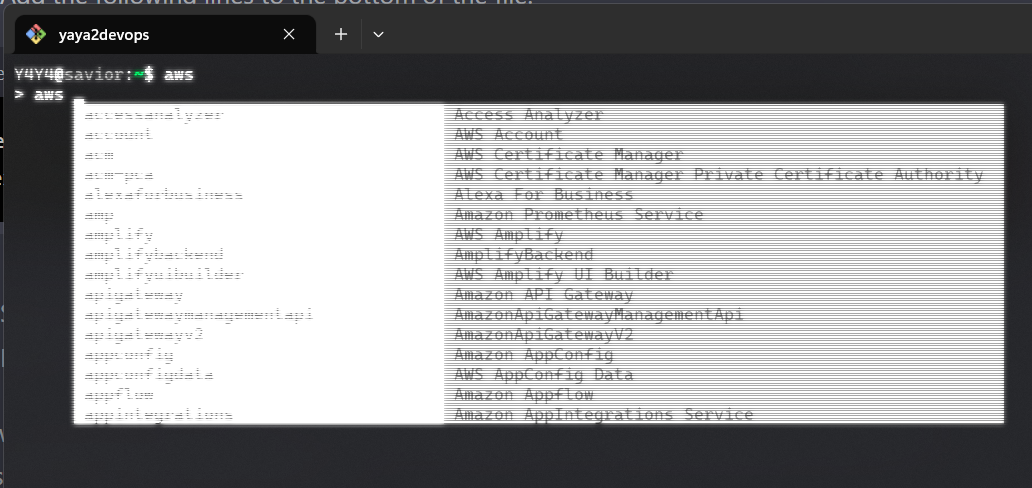
AWS CLI auto-prompt
The AWS CLI auto-prompt is a feature that allows you to use the Enter key to complete commands. This can save you time and effort when you are using the AWS CLI.
Git Bash
- To enable the AWS CLI auto-prompt, you need to add the following lines to your
.bashrcfile
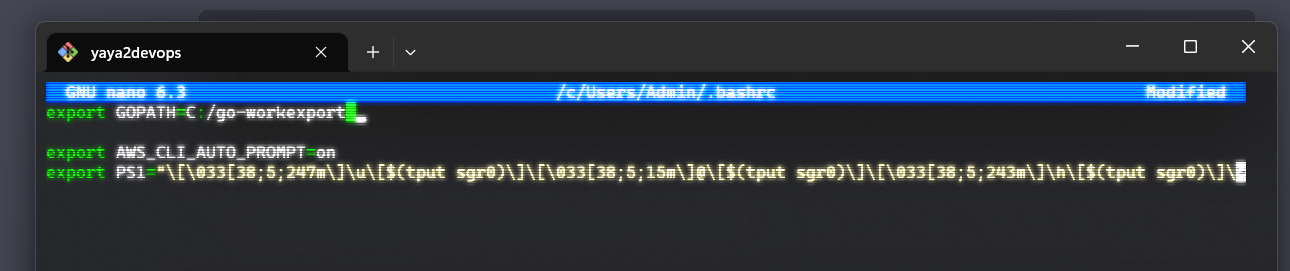
export AWS_CLI_AUTO_PROMPT=on
export PS1="\[\033[38;5;247m\]\u\[$(tput sgr0)\]\[\033[38;5;15m\]@\[$(tput sgr0)\]\[\033[38;5;243m\]\h\[$(tput sgr0)\]\[\033[38;5;15m\]:\[$(tput sgr0)\]\[\033[38;5;47m\]\w\[$(tput sgr0)\]\[\033[38;5;15m\]\\$ \[$(tput sgr0)\]"
Once you have enabled the AWS CLI auto-prompt, you can start using it by typing the first few characters of a command and then pressing the Enter key. The AWS CLI will complete the command for you.
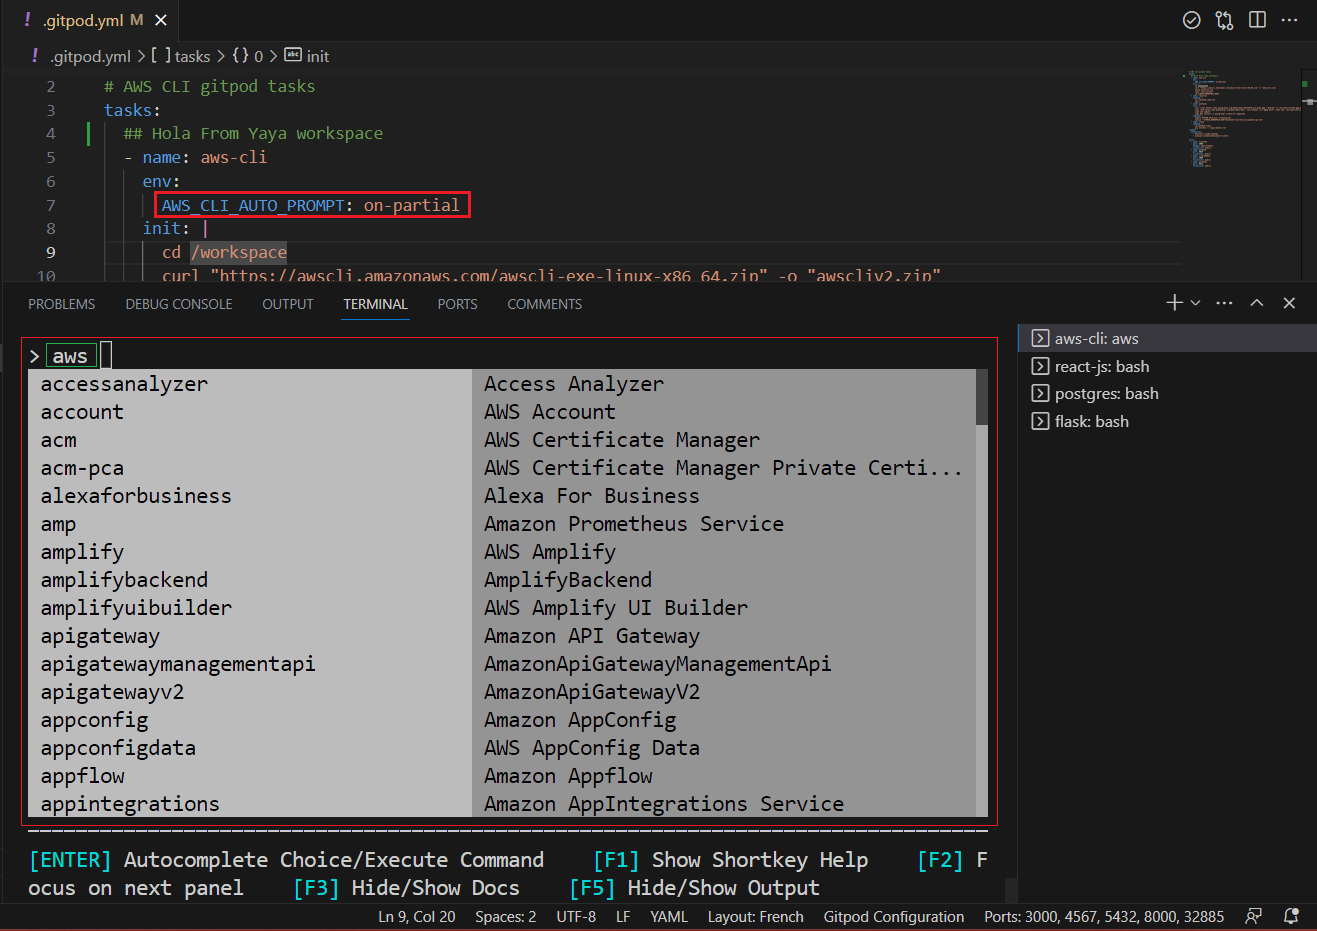
Gitpod
To easily enable AWS CLI auto-prompt in your Gitpod environment for the AWS CLI, follow these instructions:
- Open your
.gitpod.ymlfile in your Gitpod workspace. - Include the
envsection within thetaskssection related to the CLI phase. - Assign it the following value.
env:
AWS_CLI_AUTO_PROMPT: on_partial- Save the
.gitpod.yml.
Go to Gitpod Terminal and try it!
Create AWS Budget Using the CLI
We did create the budget above using clickops. But now you possess the cli skills. Let's try the real magic :)
Again, an AWS Budget is a way to track your AWS costs and set alerts when your costs exceed a certain threshold.
To create an AWS Budget, you can follow these steps:
- Create a budget JSON file.
- Create a notifications JSON file.
- Configure your budget as code.
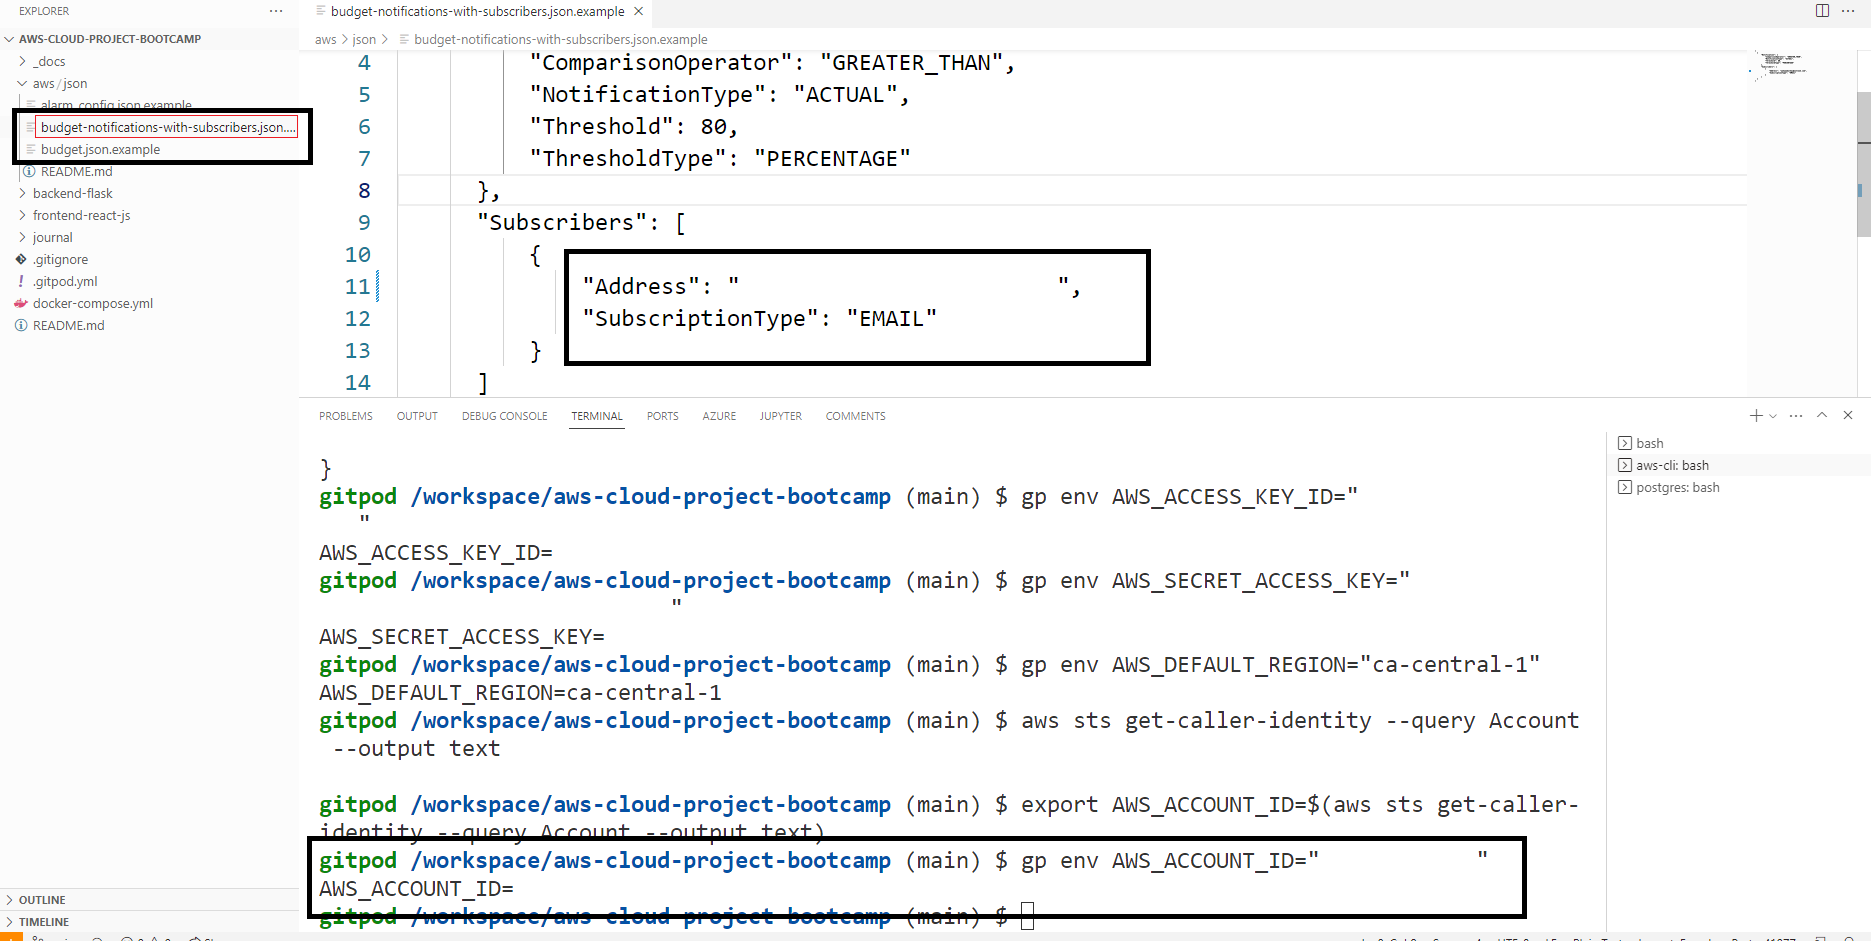
- Run the
aws budgets create-budgetcommand.
aws budgets create-budget \
    --account-id $AWS_ACCOUNT_ID \
    --budget file://aws/json/budget.json \
--notifications-with-subscribers file://aws/json/budget-notifications-with-subscribers.json- The budget JSON file specifies the budget settings, such as the budget name, the budget type, the budget amount, and the budget notifications.
- The notifications JSON file specifies the notification settings, such as the notification topic ARN, the notification protocol.
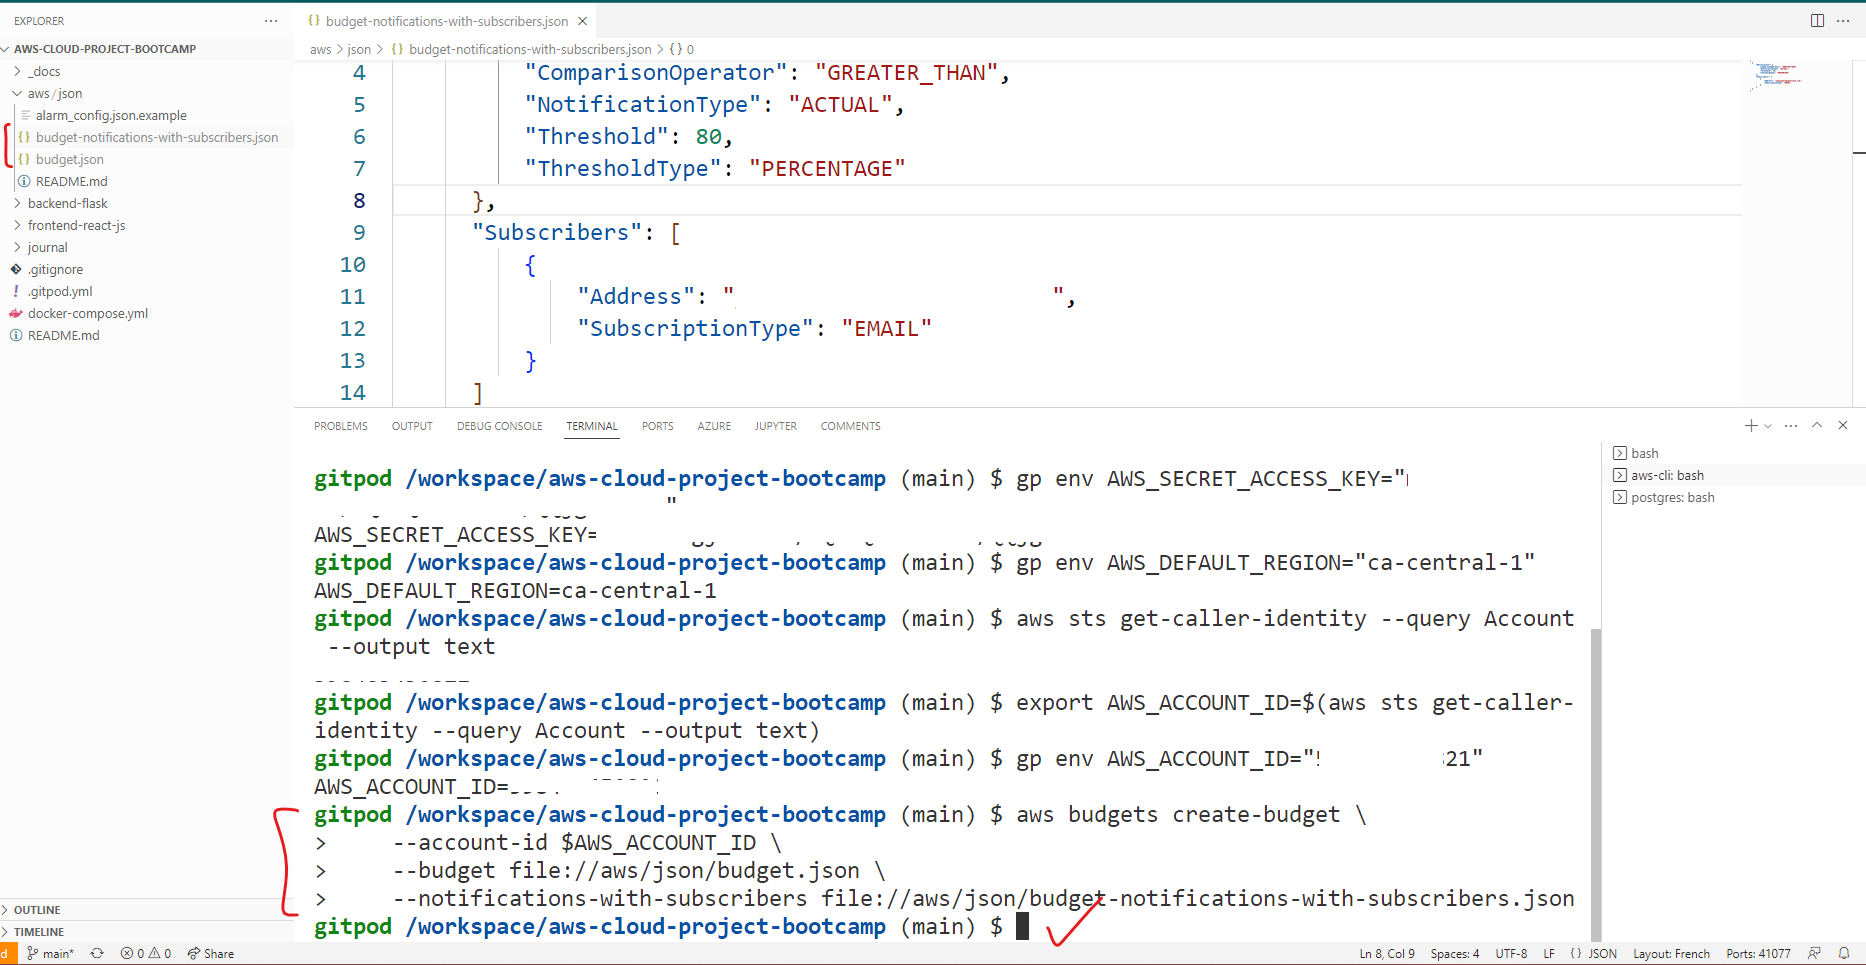
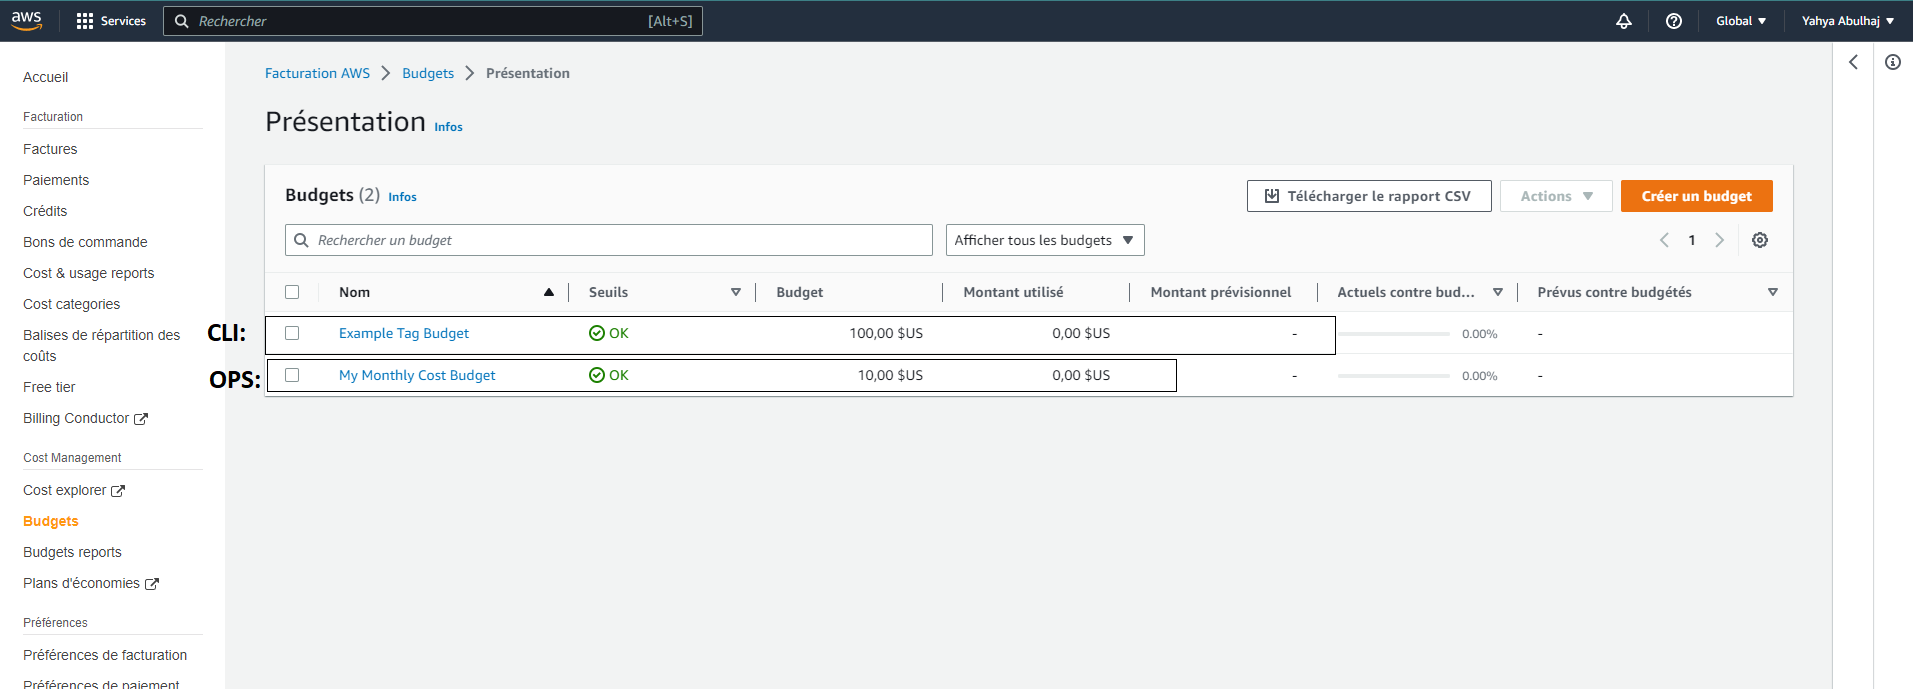
By checking the console, you will notice that there are now two budgets available.
- The first budget, "clickops," was created earlier.
- The other from the terminal. Bringing the total number of budgets to two.
Reference (opens in a new tab)
Real-time Messaging and Notification
SNS is a service that allows you to send and receive notifications. You can use SNS to send notifications to email addresses, phone numbers, and other endpoints.
To set up SNS for your budget, you can follow these steps:
- Create a SNS topic.
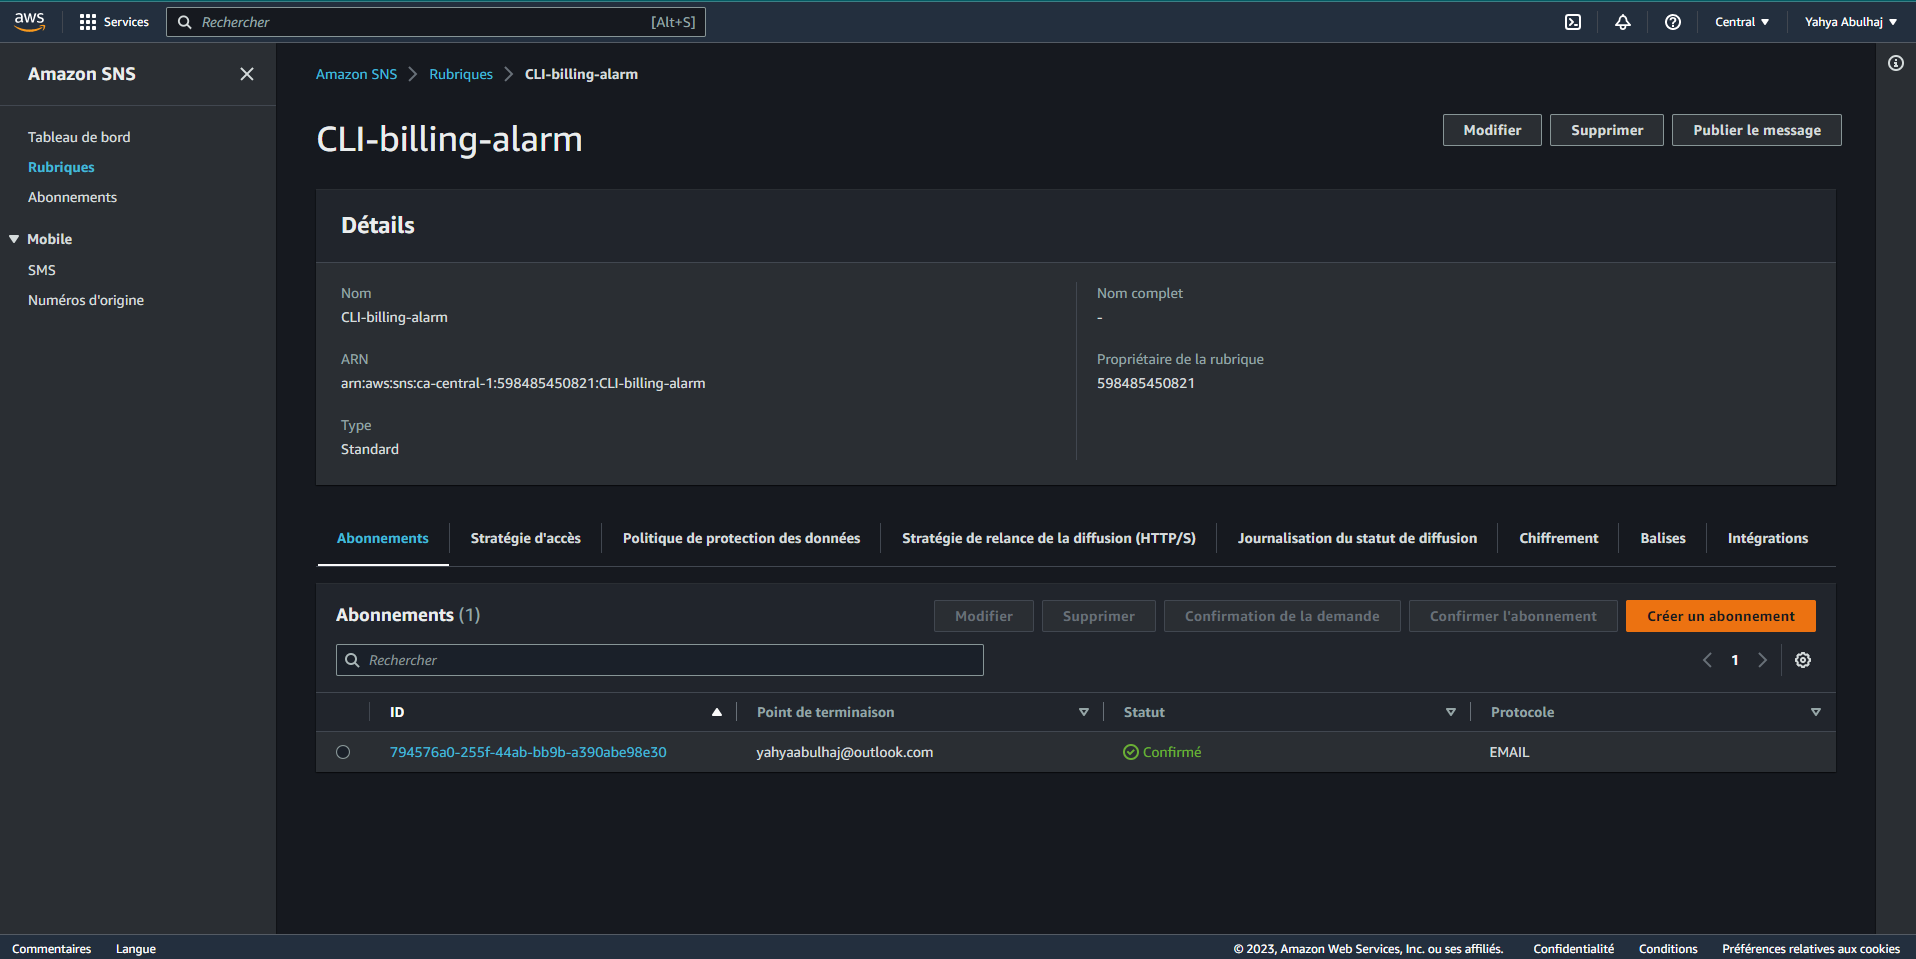
aws sns create-topic --name CLI-billing-alarm
- Subscribe to the topic.
The SNS topic will be used to send notifications when your budget is exceeded. You can subscribe to the topic using email, SMS, or other protocols.
Once you have created the SNS topic and subscribed to the topic, you can start receiving notifications when your budget is exceeded.
aws sns subscribe \
    --topic-arn="arn:aws:sns:ca-central-1:<aws-id>:CLI-billing-alarm" \
    --protocol=email \
    --notification-endpoint <email>
- Go to the console and check if the changes took effect
Serverless Notification API
A serverless notification API is a serverless application that uses AWS Lambda and Amazon SNS to send email notifications to subscribers.
The API works by first creating a Lambda function that accepts POST requests with a name and message. The Lambda function then publishes an SNS message with the name and message to a topic. The SNS topic is configured to send email notifications to subscribers.

Here is a comprehensive and detailed representation that I have prepared for your reference.
       API Request (POST)       Lambda Function      SNS Topic             Email Subscribers
      +------------------>   +----------------->  +-------------------->  +-----------------+
  H   |                      |                    |                    |  | List of EMAILs; | Y
  E   |    {                 |   {                |   {                |  |                 | A
  L   |   "name": "Yaya",    |   "name": "Yaya",  |   "name": "Yaya",  |  |                 | Y
  L   |   "message": "Hey"   |  "message": "Hey"  |   "message": "Hey" |  |      e.g.       | A
  O   |    }                 |   }                |   }                |  |                 | 2
      |                      |                    |                    |  |   Yaya Email    | D
  T   +<------------------   +<-----------------  +<-----------------  |  |   Yours, etc.   | E
  H   |    HTTP Response     |    Publish SNS     |    Send Email      |  |                 | V
  E   |                      |    Message         |    Notifications   |  |                 | O
  R   |     Status 200       |    with            |    to Subscribers  |  |                 | P
  E   |                      |    name & message  |                    |  |                 | S
+----------------------+--------------------+--------------------+ +-----------------+ - An API receives a POST request with a JSON payload containing a
nameandmessage. - The Lambda function processes the request and extracts the
nameandmessagefrom the payload. - The Lambda function publishes an SNS message with the extracted
nameandmessageto a pre-configured SNS topic. - The SNS topic is configured to send email notifications to its subscribers.
- Email subscribers receive notifications containing the
nameandmessagepublished by the Lambda function.
Setting up Post Notification
- Create a new SNS topic and subscribe to it using the following aws command:
aws sns create-topic --name <topic-name>After creating the topic, copy the SNS Topic Amazon Resource Name or ARN for later use e.g. output:
{
    "TopicArn": "arn:aws:sns:<region>:<aws-id>:<topic-name>"
}- Subscribe to the newly created SNS topic using the aws command below. Replace
<region>with yourAWS region,<account-id>with your AWS account ID, and<email>with the email address you want to use for receiving notifications:
aws sns subscribe \
--topic-arn arn:aws:sns:<region>:<account-id>:<topic-name> \
--protocol email \
--notification-endpoint <email>- Confirm your subscription to the topic.
Create Lambda
- Create a Lambda function with Python
3.9runtime. - Enable the function URL in the Lambda function configuration
- Check box none to auth or leave both steps for later.
- Add the following code to your lambda
import json
import boto3

def lambda_handler(event, context):

    client = boto3.client('sns')
    snsArn = 'arn:aws:sns:<REGION>:<ACCOUNT ID>:<topic-name>'

    body = json.loads(event.get("body"))


    response = client.publish(
        TopicArn = snsArn,
        Message = body.get("message"),
        Subject= f"Hello {body['name']}"
    )

    return {
      'statusCode': 200,
      'body': json.dumps(response)
}- Assign the sns arn.
- Deploy the Lambda function.
Granting SNS Access to the Lambda Function
You need to enable SNS access to the Lambda function,
- Go to the Lambda Function in the AWS Management Console.
- Click on the Configuration tab.
- In the Permissions section, click on the link for the Role name associated with the Lambda function.
- Under Permissions, click on Add Permission.
- Now, choose Attach Policies to proceed.
- Filter the policy list and search for AmazonSNSFullAccess.
- Select AmazonSNSFullAccess and attach it to the Lambda function's role.

Assign URL for Lambda
You have to generate a URL to make use of in our post request.
- Open the
configuration pane. - In the left pane, navigate to the
function URLsection. - Generate a new URL and select the
No Authorizationoption (Auth Type; NONE). - Observe the policy statements you have just made.
{
  "Version": "2012-10-17",
  "Statement": [
    {
      "StatementId": "FunctionURLAllowPublicAccess",
      "Effect": "Allow",
      "Principal": "*",
      "Action": "lambda:InvokeFunctionUrl",
      "Resource": "arn:aws:lambda:<region>:<aws-id>:function:postapi",
      "Condition": {
        "StringEquals": {
          "lambda:FunctionUrlAuthType": "NONE"
        }
      }
    }
  ]
}- Verify the modifications if you haven't performed the aforementioned actions during the initial setup.
Test Post Endpoint
- Open Thunder Client. You can install its extension from VS Code or any other API testing tool.
Next, you have to send a post request to the Lambda function URL with a name and message.
- Use the following curl command to send a POST request to the Lambda function URL.
curl --request POST \
  --url 'https://yours.lambda-url.<region>.on.aws/' \
  --header 'Content-Type: application/json' \
  --data '{"name": "yaya2devops", "message": "NOTIFIED: Lambda Post Triggered"}'
Replace https://yours.lambda-url.<region>.on.aws/ with the actual Lambda function URL.
-
Check your API tool returning 200 OK on success.
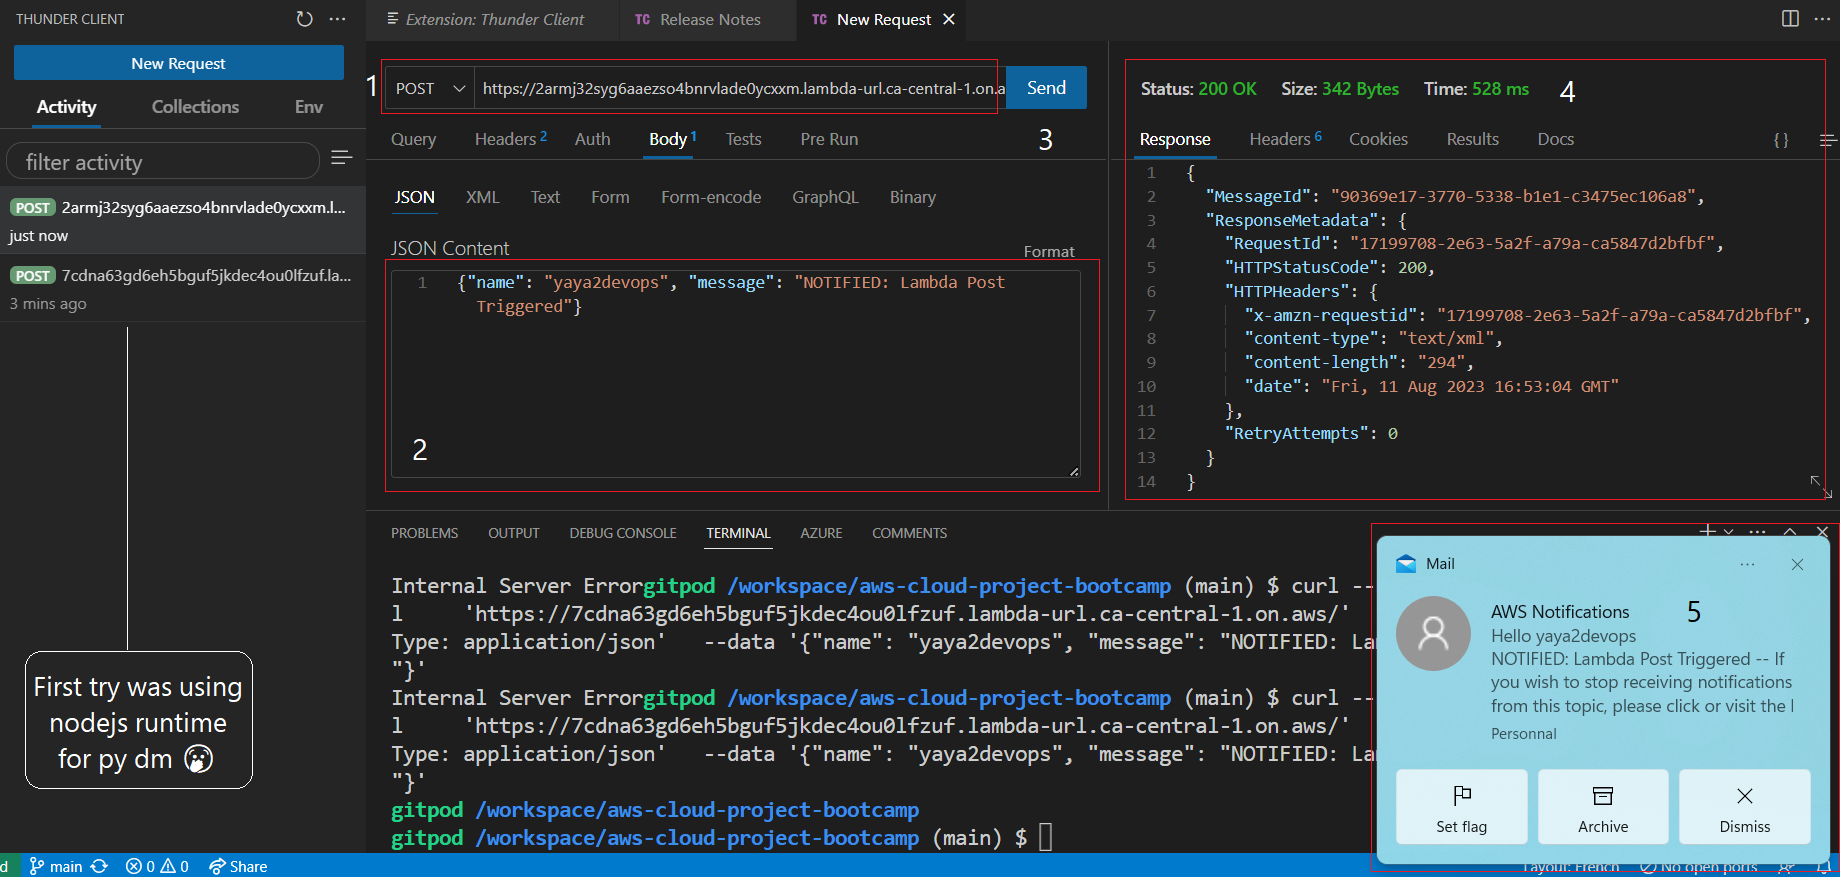
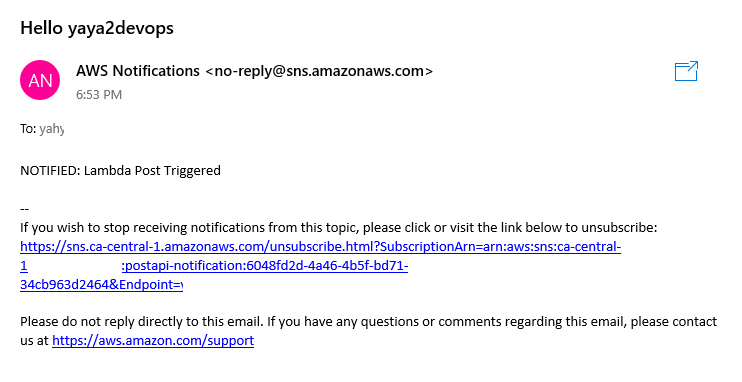
-
Check your subscribed email for the post notif.
Creating a CloudWatch Alarm
A CloudWatch alarm is a way to monitor your AWS resources and take action when they exceed a certain threshold. Alarms can be used to help you avoid overspending on AWS resources and to troubleshoot problems.
To create a CloudWatch alarm, you can follow these steps:
- Create a CloudWatch alarm JSON file.
- Run the
aws cloudwatch put-metric-alarmcommand.
aws cloudwatch put-metric-alarm --cli-input-json file://aws/json/alarm_config.json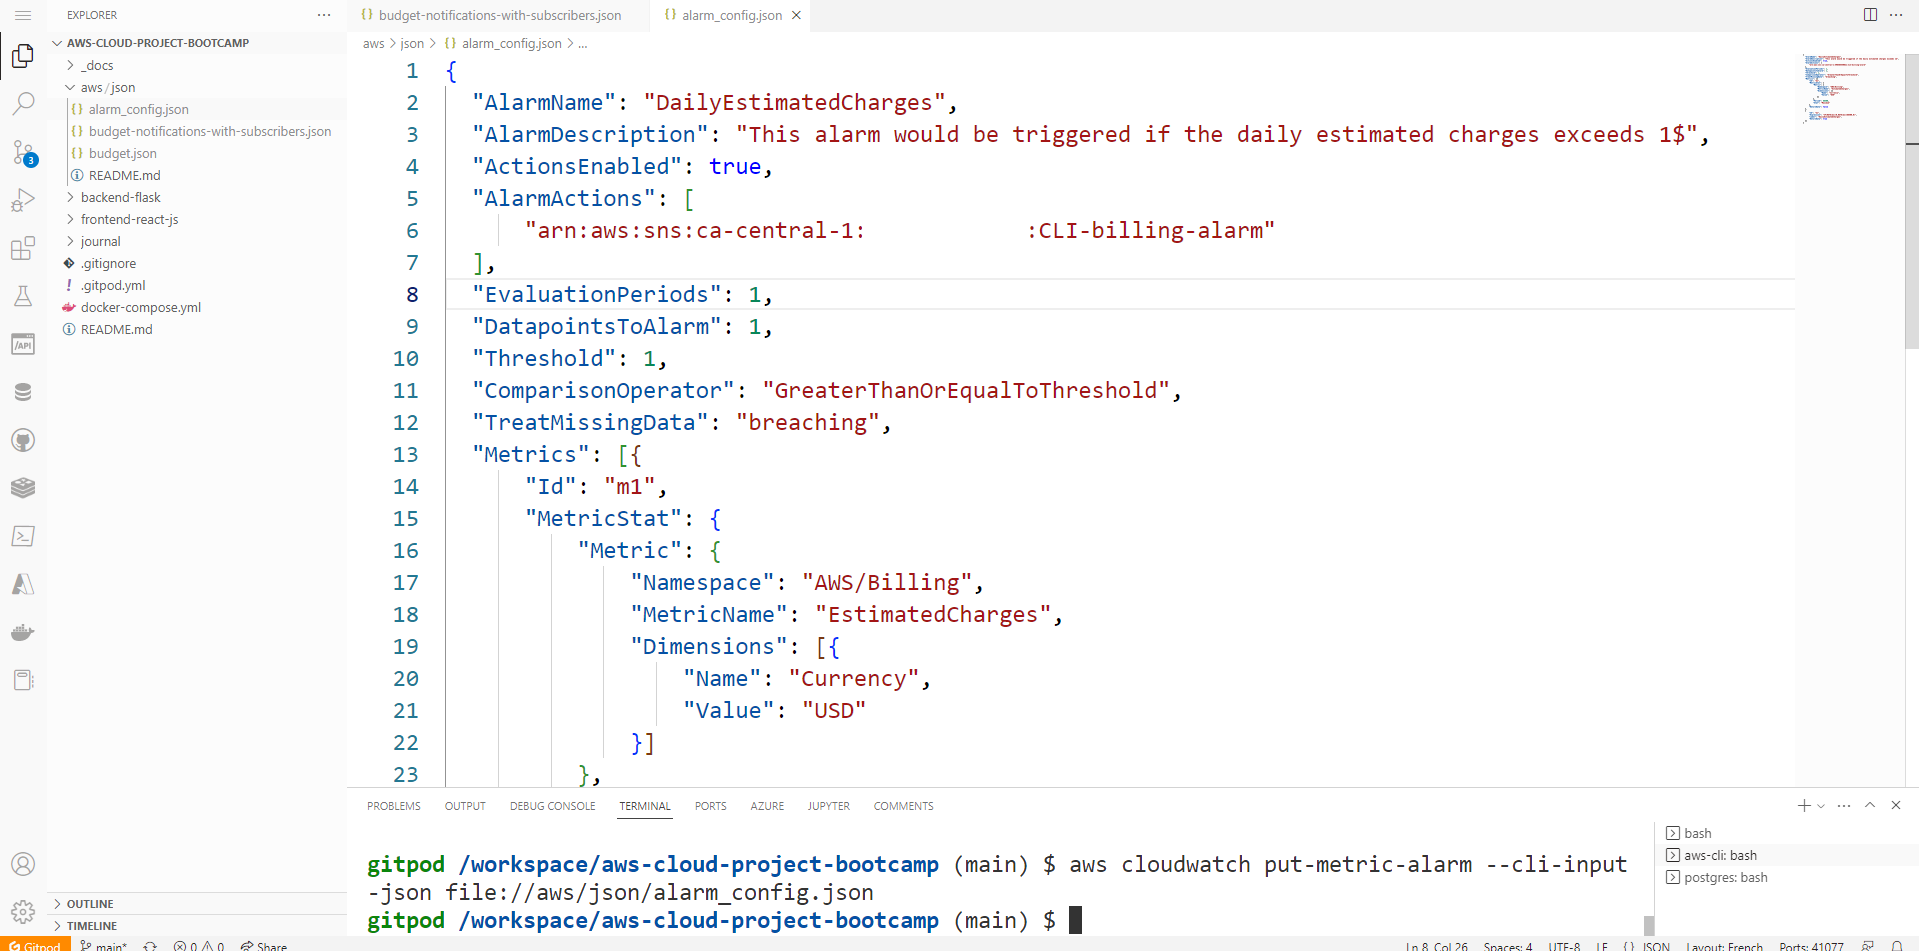
The CloudWatch alarm JSON file specifies the alarm settings, such as the alarm name, the metric to monitor, the threshold, and the alarm actions.
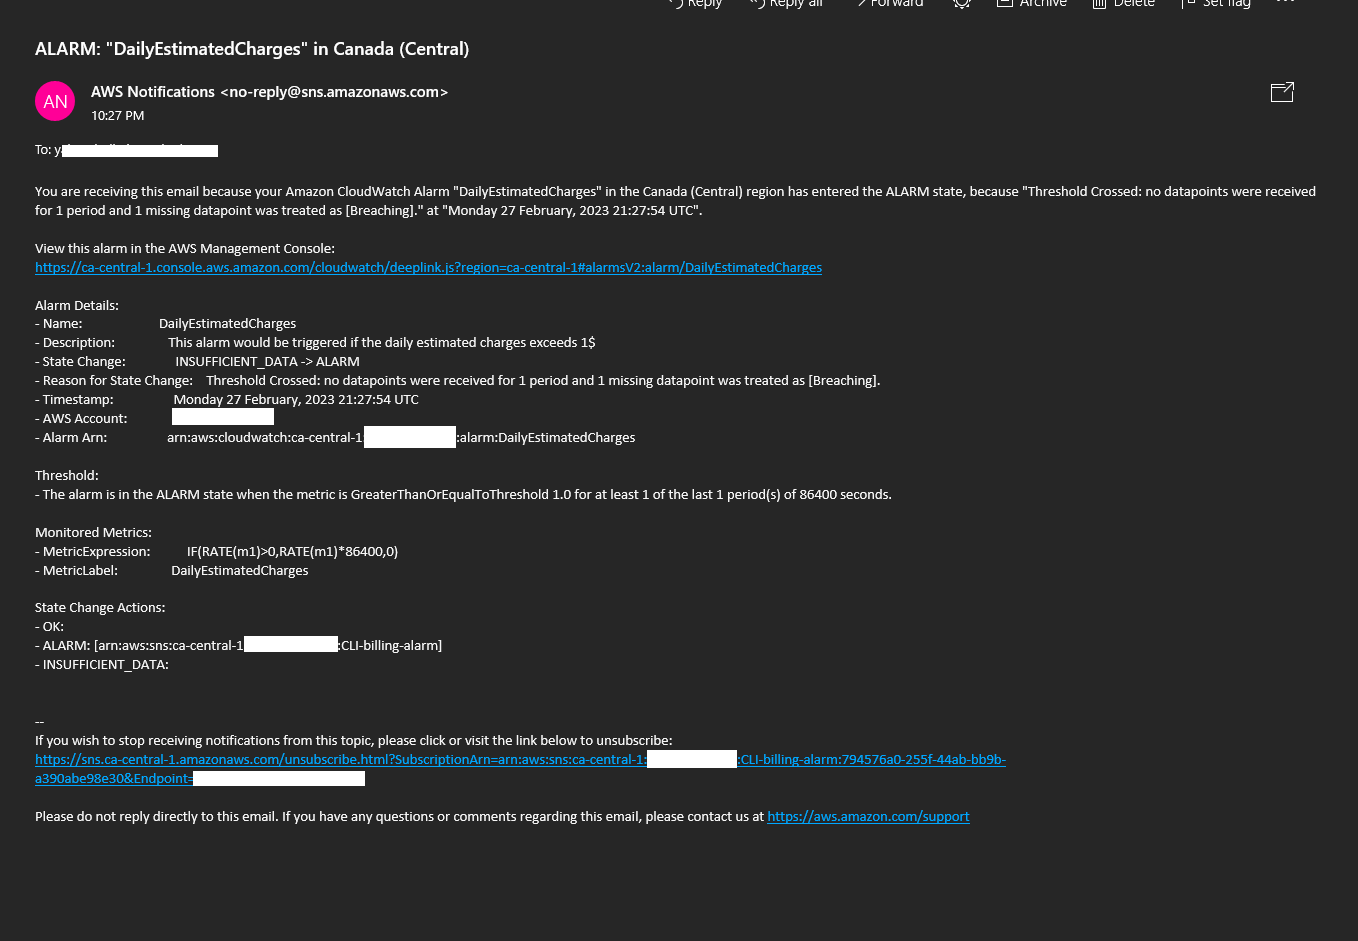
Once you have created the CloudWatch alarm JSON file, and ran the aws cloudwatch put-metric-alarm command to create the alarm. You will see an alarm on daily estimated charges to verify.
Open Support ticket
The AWS Support Center is a way to get help from AWS support engineers. You can open a support ticket to request help with a problem you are having with AWS services.
To open a support ticket, you can follow these steps:
Request Service Limit (opens in a new tab)
- Navigate to the AWS Support Center (Link Above)
- On the left side menu, select "Create Case"
- Select "Looking for service limit increase?" from the link in the center right
- Specify the limit or feature that you need
- Click on "Create Case"
- Verify that the ticket you opened reflects the necessary details
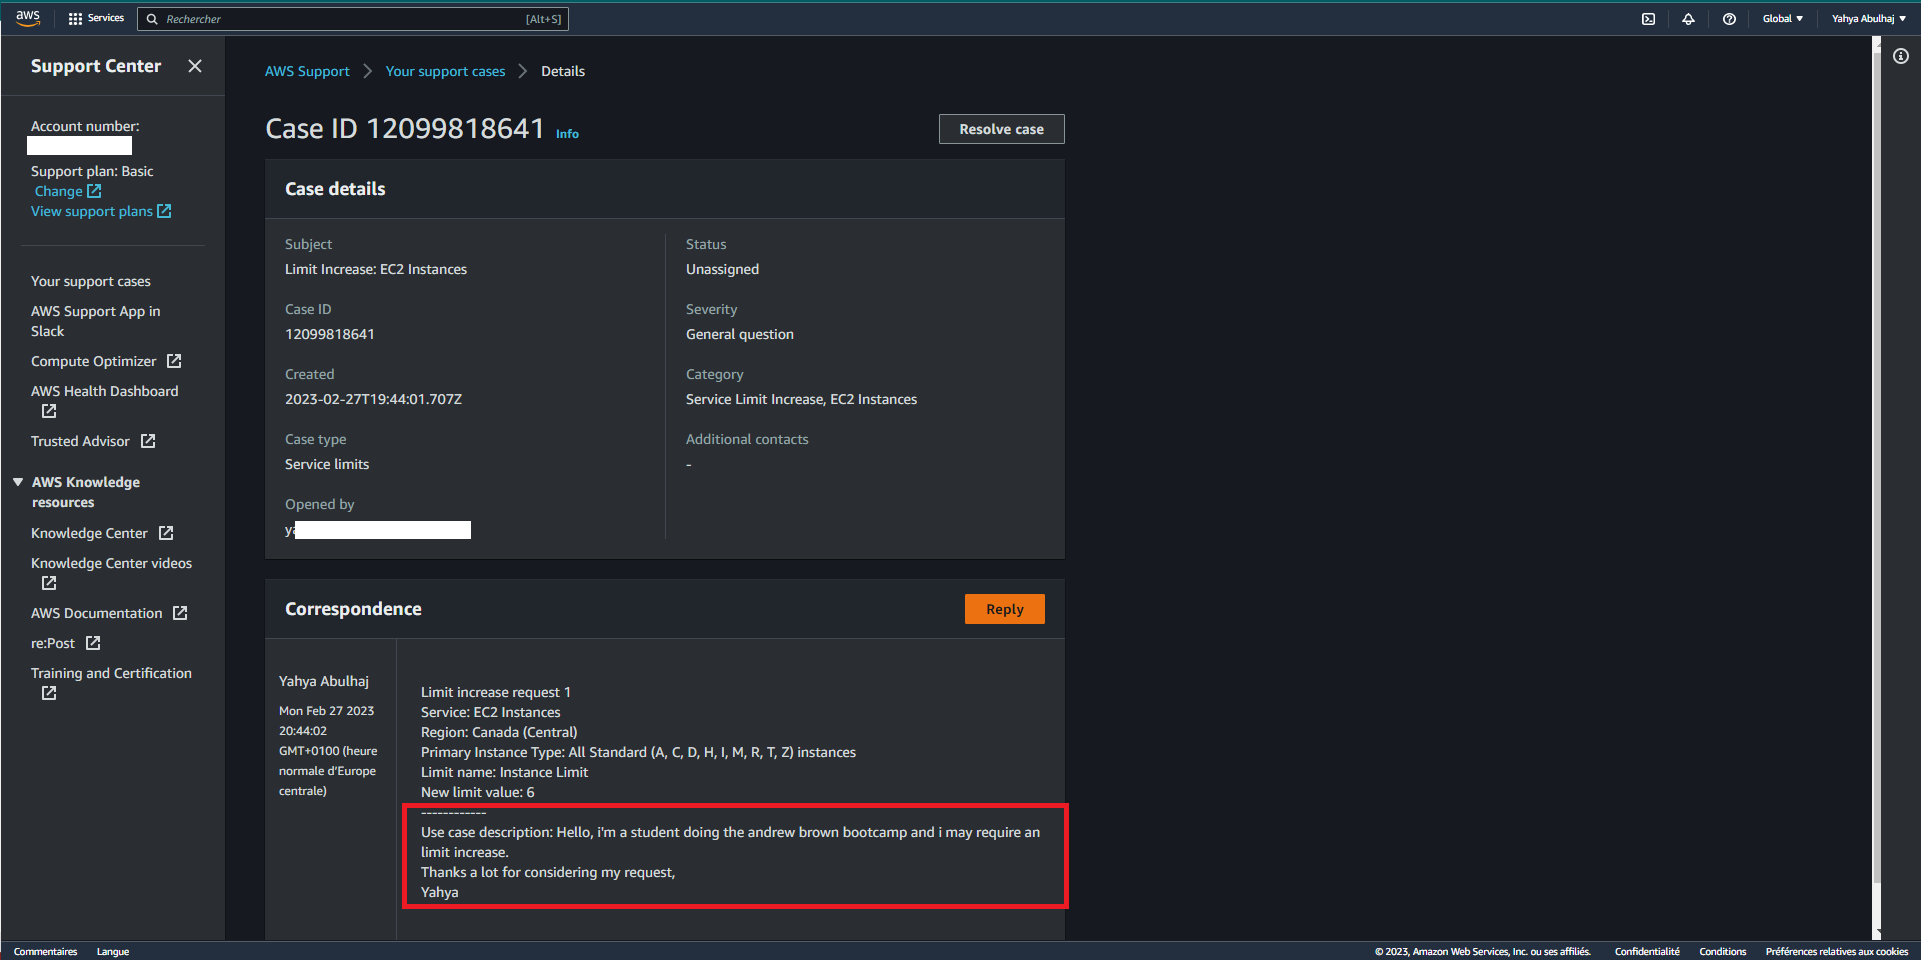
Once you have opened a support ticket, you will receive an email confirmation with the ticket number.
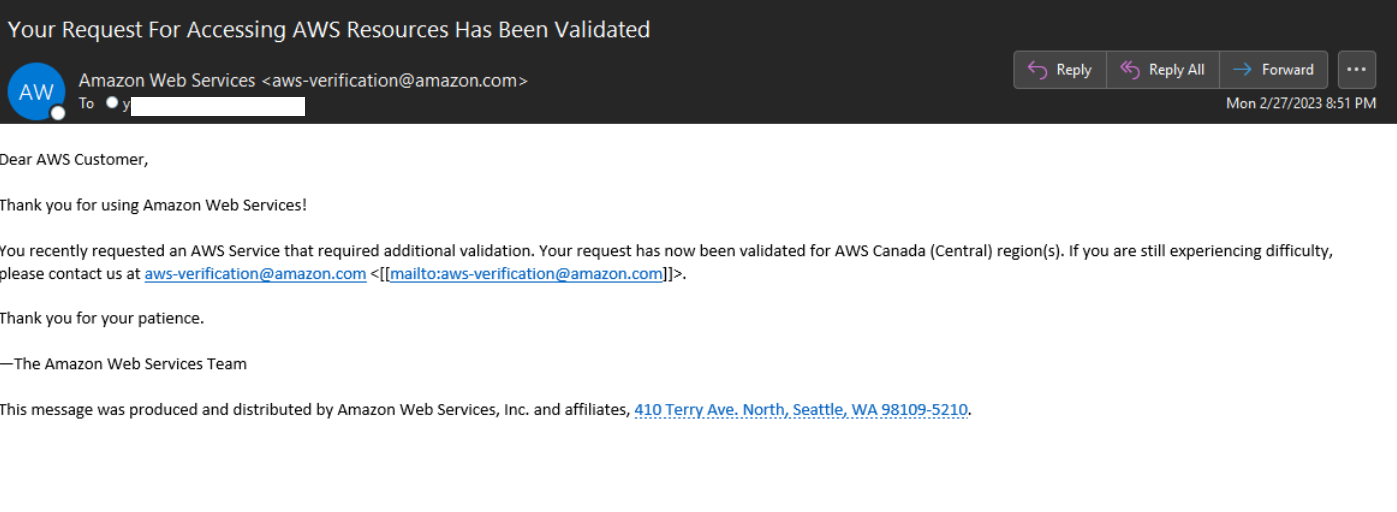
You can use the ticket number to track the status of your ticket.