Serverless Image Processing
During this week, we employed the AWS CDK to define and deploy the necessary resources for image processing. Our chosen programming language for the infrastructure development was the powerful and cool TypeScript (opens in a new tab).
![]()
Get the design in PNG (opens in a new tab) or an Editable (opens in a new tab) Format.
Main Week Eight Tasks
This week, I must say it reaches its peak with this particular meme (opens in a new tab).
- Realtime Notes Taking
- Implement CDK Stack
- Upload and Clear Assets Scripts
- Serve Avatars via CloudFront
- Implement Users Profile Page
- Base Path for Imports in ReactJS
- Implement Backend Migrations
- Presigned URL generation via Ruby Lambda
- HTTP API Gateway with Lambda Authorizer
- Create JWT Lambda Layer https
- Render Avatars in App via CloudFront
AWS Cloud Development Kit
AWS CDK is an open-source software development framework that enables you to define cloud infrastructure in code and provision it using AWS CloudFormation.
XXL Asset (opens in a new tab)
Let's discuss how CDK actually works:
- Define infrastructure using AWS CDK: Write code using your preferred programming language to define AWS resources such as EC2 instances, S3 buckets, Lambda functions, etc.
- Synthesize CDK app: Use the CDK toolkit to synthesize the AWS CloudFormation templates from your CDK app code. This step generates the CloudFormation templates that will be used for deployment.
- Deploy using AWS CloudFormation: Deploy the synthesized CloudFormation templates using AWS CloudFormation. CDK leverages CloudFormation's capabilities for provisioning and managing infrastructure resources.
Find more about CDK Dev
| Feature | Description |
|---|---|
| Familiar Prog. languages | supports popular programming languages like TypeScript, Python, Java, and more. |
| Declarative infrastructure | Infrastructure resources can be defined in a declarative manner using code. |
| AWS CloudFormation | provisions infrastructure resources using AWS CloudFormation under the hood. |
| Construct library | offers a construct library with pre-built components for AWS resources and patterns. |
| Stacks and environments | allows you to define multiple stacks and environments for organizing your infrastructure. |
Benefits of Using CDK include the following.
- Reduced complexity: simplifies the process of defining infrastructure as code
- Improved productivity: you can automate the provisioning and management of resources
- Greater flexibility: flexibility to design and deploy complex architectures
- Ecosystem integration: with other AWS services and tools, such as AWS CodePipeline and AWS CodeDeploy, enabling seamless CI/CD pipelines.
Code Quickstart
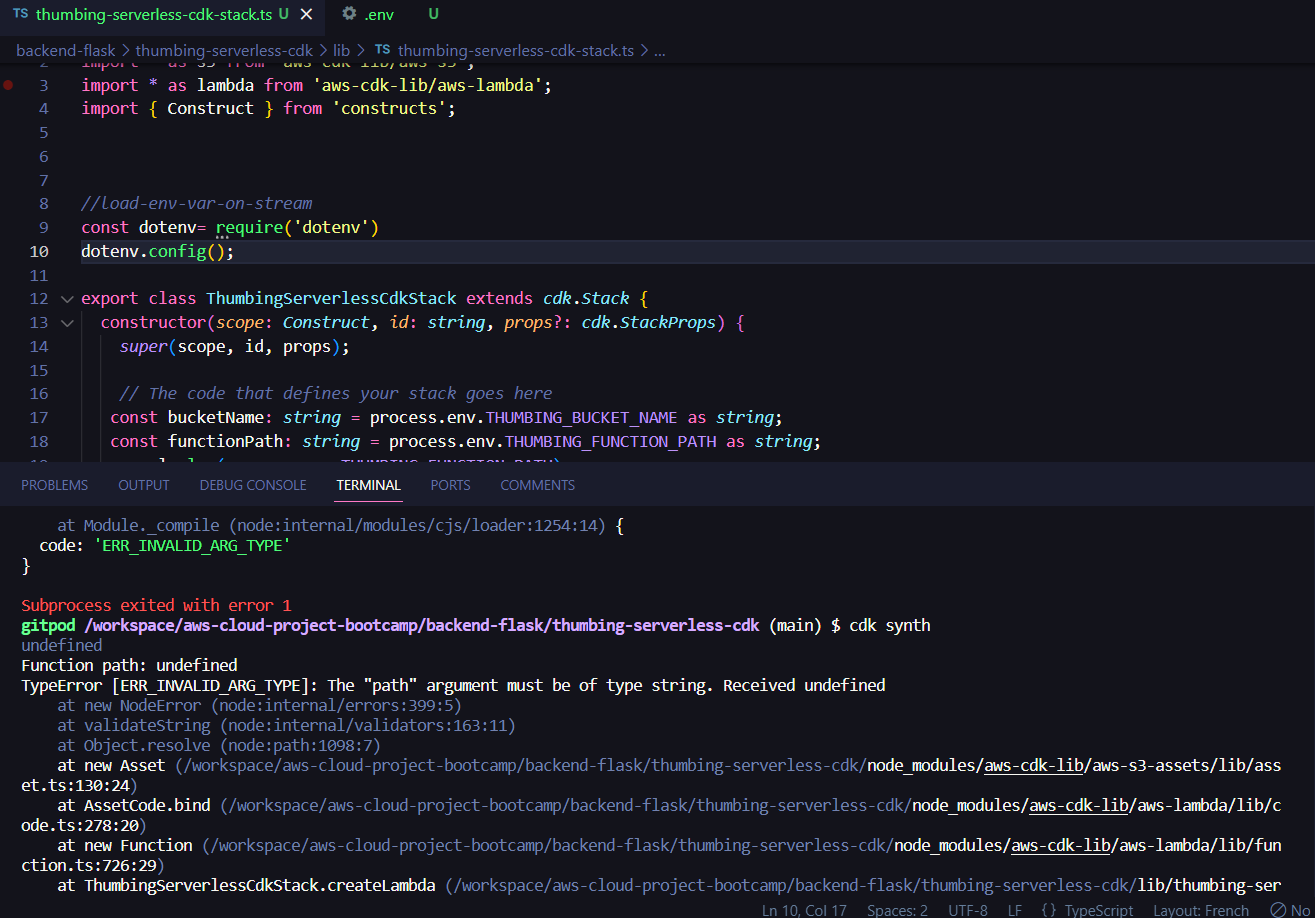
I created 2 functions within thumbing-serverless-cdk-stack.ts in real time.
You can find my +20 in the comments at 1:12:41 (opens in a new tab).
- Created Bucket
  createBucket(bucketName: string): s3.IBucket{
    const bucket =  new s3.Bucket(this, 'ThumbingBucket', {
    bucketName: bucketName,
    removalPolicy: cdk.RemovalPolicy.DESTROY,
    });
    return bucket;
}- Generates a CloudFormation template for an AWS CDK app
cdk synthOutput:
Resources:
  # --This was manually inserted --
  ThumbingBucket715A2537:
    Type: AWS::S3::Bucket
    UpdateReplacePolicy: Delete
    DeletionPolicy: Delete
    Metadata:
      aws:cdk:path: ThumbingServerlessCdkStack/ThumbingBucket/Resource
  CDKMetadata:
    Type: AWS::CDK::Metadata
    Properties:
      Analytics: v2:deflate64:H4sIAAAAAAAA/zPSMzfWM1BMLC/WTU7J1s3JTNKrDi5JTM7WAQrFFxvrVTuVJmenlug4p+VBWLUgZlBqcX5pUXIqiO2cn5eSWZKZn1erk5efkqqXVaxfZmihZ2gKNDerODNTt6g0ryQzN1UvCEIDAFohbiRzAAAA
    Metadata:
      aws:cdk:path: ThumbingServerlessCdkStack/CDKMetadata/Default
    Condition: CDKMetadataAvailable
Conditions:
  CDKMetadataAvailable:
    Fn::Or:
      - Fn::Or:
          - Fn::Equals:
              - Ref: AWS::Region
              - af-south-1
          - Fn::Equals:
              - Ref: AWS::Region
              - ap-east-1
          - Fn::Equals:
              - Ref: AWS::Region
              - ap-northeast-1
          - Fn::Equals:
              - Ref: AWS::Region
              - ap-northeast-2
          - Fn::Equals:
              - Ref: AWS::Region
              - ap-south-1
          - Fn::Equals:
              - Ref: AWS::Region
              - ap-southeast-1
          - Fn::Equals:
              - Ref: AWS::Region
              - ap-southeast-2
          - Fn::Equals:
              - Ref: AWS::Region
              - ca-central-1
          - Fn::Equals:
              - Ref: AWS::Region
              - cn-north-1
          - Fn::Equals:
              - Ref: AWS::Region
              - cn-northwest-1
      - Fn::Or:
          - Fn::Equals:
              - Ref: AWS::Region
              - eu-central-1
          - Fn::Equals:
              - Ref: AWS::Region
              - eu-north-1
          - Fn::Equals:
              - Ref: AWS::Region
              - eu-south-1
          - Fn::Equals:
              - Ref: AWS::Region
              - eu-west-1
          - Fn::Equals:
              - Ref: AWS::Region
              - eu-west-2
          - Fn::Equals:
              - Ref: AWS::Region
              - eu-west-3
          - Fn::Equals:
              - Ref: AWS::Region
              - me-south-1
          - Fn::Equals:
              - Ref: AWS::Region
              - sa-east-1
          - Fn::Equals:
              - Ref: AWS::Region
              - us-east-1
          - Fn::Equals:
              - Ref: AWS::Region
              - us-east-2
      - Fn::Or:
          - Fn::Equals:
              - Ref: AWS::Region
              - us-west-1
          - Fn::Equals:
              - Ref: AWS::Region
              - us-west-2
Parameters:
  BootstrapVersion:
    Type: AWS::SSM::Parameter::Value<String>
    Default: /cdk-bootstrap/hnb659fds/version
    Description: Version of the CDK Bootstrap resources in this environment, automatically retrieved from SSM Parameter Store. [cdk:skip]
Rules:
  CheckBootstrapVersion:
    Assertions:
      - Assert:
          Fn::Not:
            - Fn::Contains:
                - - "1"
                  - "2"
                  - "3"
                  - "4"
                  - "5"
                - Ref: BootstrapVersion
AssertDescription: CDK bootstrap stack version 6 required. Please run 'cdk bootstrap' with a recent version of the CDK CLI.- Get ready to deploy
From what I understood this command creates an S3 bucket to store the deployment artifacts, DynamoDB table to store CDK toolkit metadata, and an IAM role to grant CDK permissions to your AWS account.
cdk bootstrap "aws://<awsid>/<region>"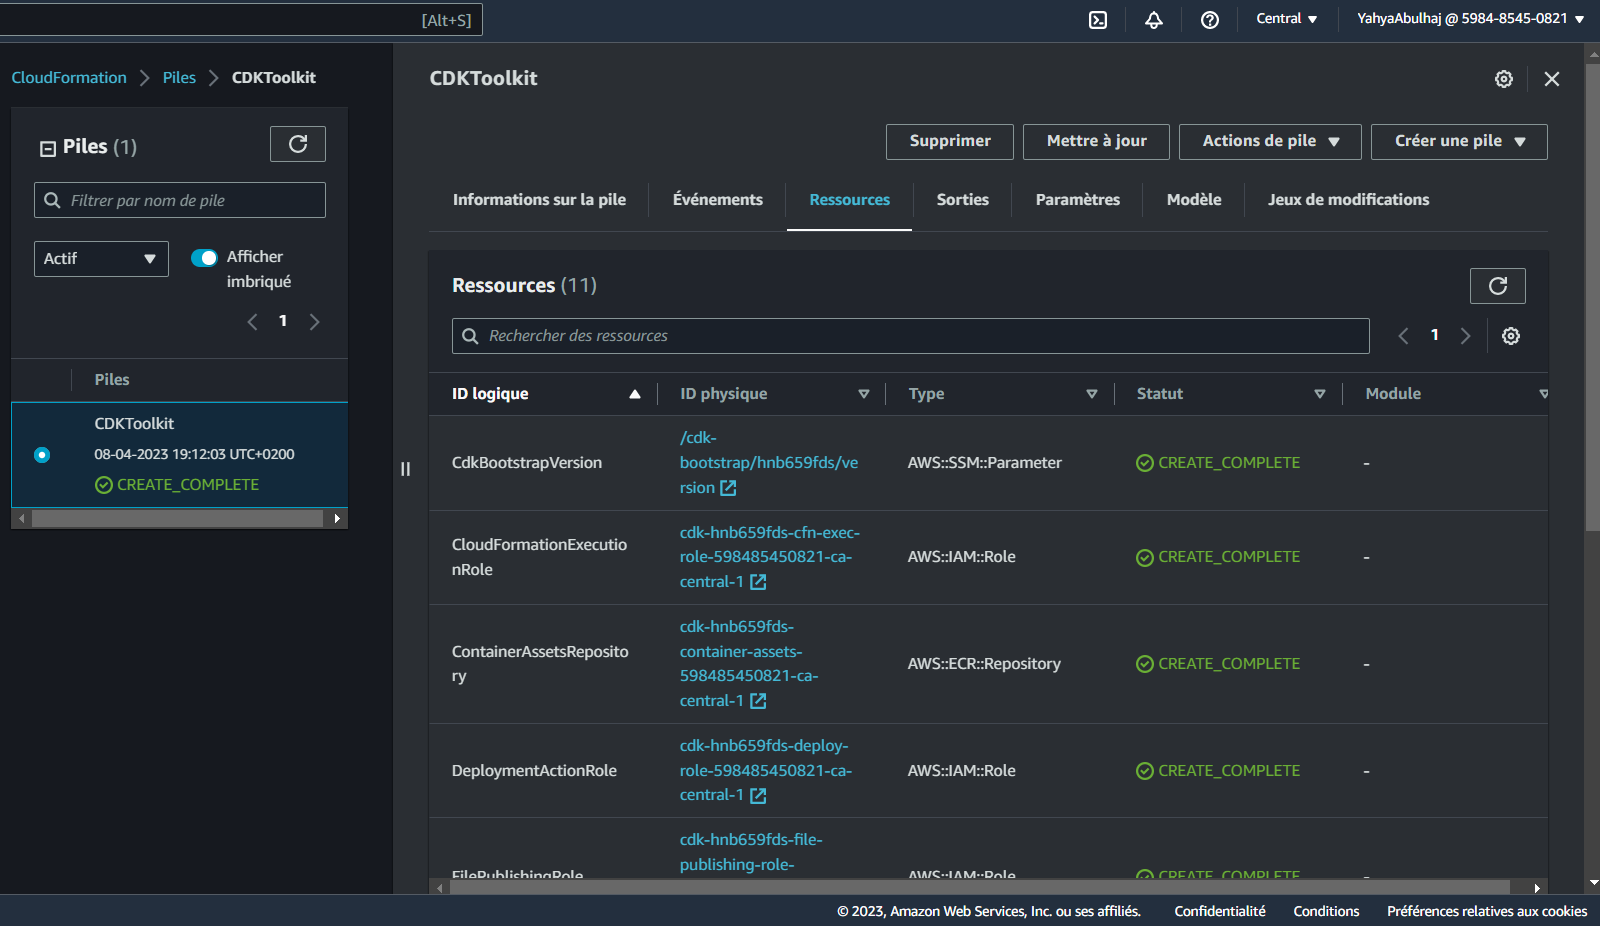
- package and deploy AWS resources
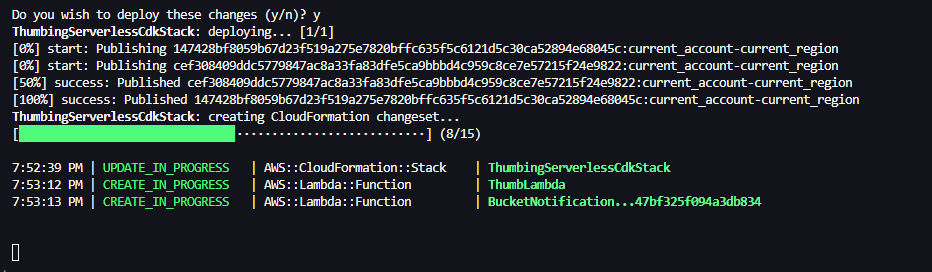
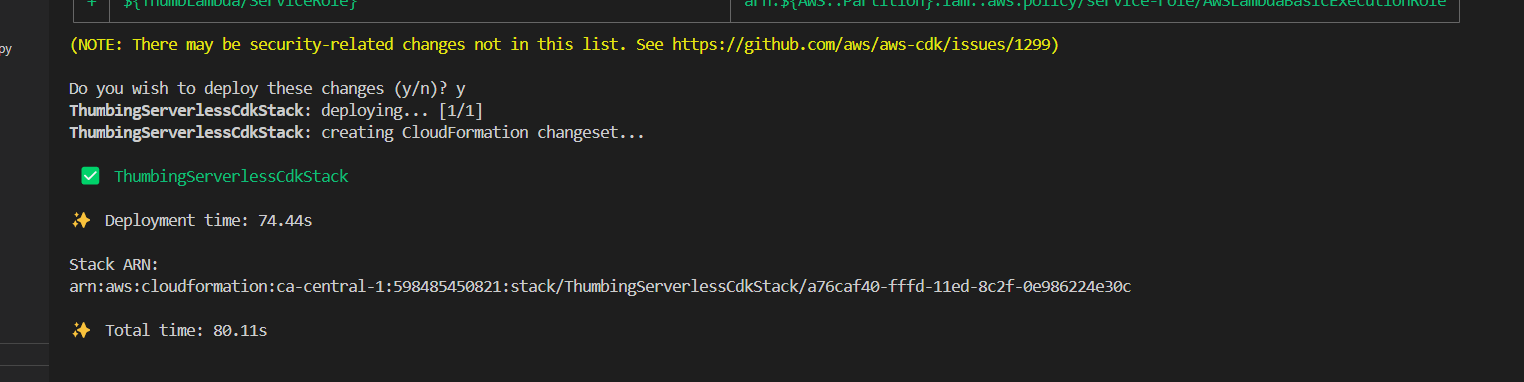
cdk deploy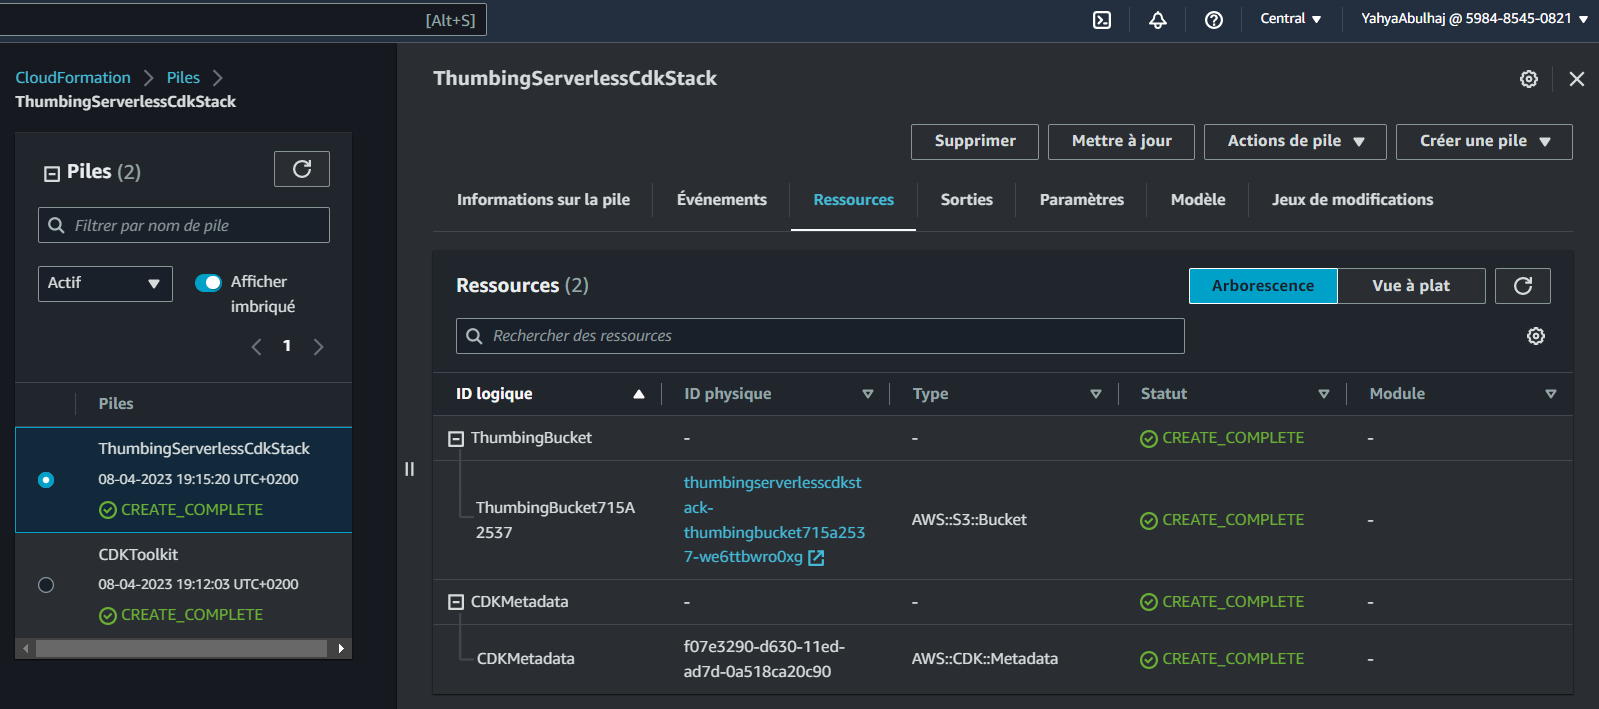
- created Lambda
  createLambda(functionPath: string): lambda.IFunction {
    const lambdaFunction = new lambda.Function(this, 'ThumbLambda', {
      runtime: lambda.Runtime.NODEJS_14_X,
      handler: 'index.handler',
      code: lambda.Code.fromAsset(functionPath)
    });
    return lambdaFunction;
}- created .env to include the env var under the cdk
thumbing-serverless-cdkdir
THUMBING_BUCKET_NAME="cruddur-thumbs-buck"
THUMBING_FUNCTION_PATH="/workspace/aws-cloud-project-bootcamp/aws/lambdas"
Returning Error:
Solution:
added this lines to our thumbing-serverless-cdk-stack.ts file:
const dotenv= require('dotenv')
dotenv.config();- Install "dotenv":
npm i dotenv- Synthesize:
cdk synth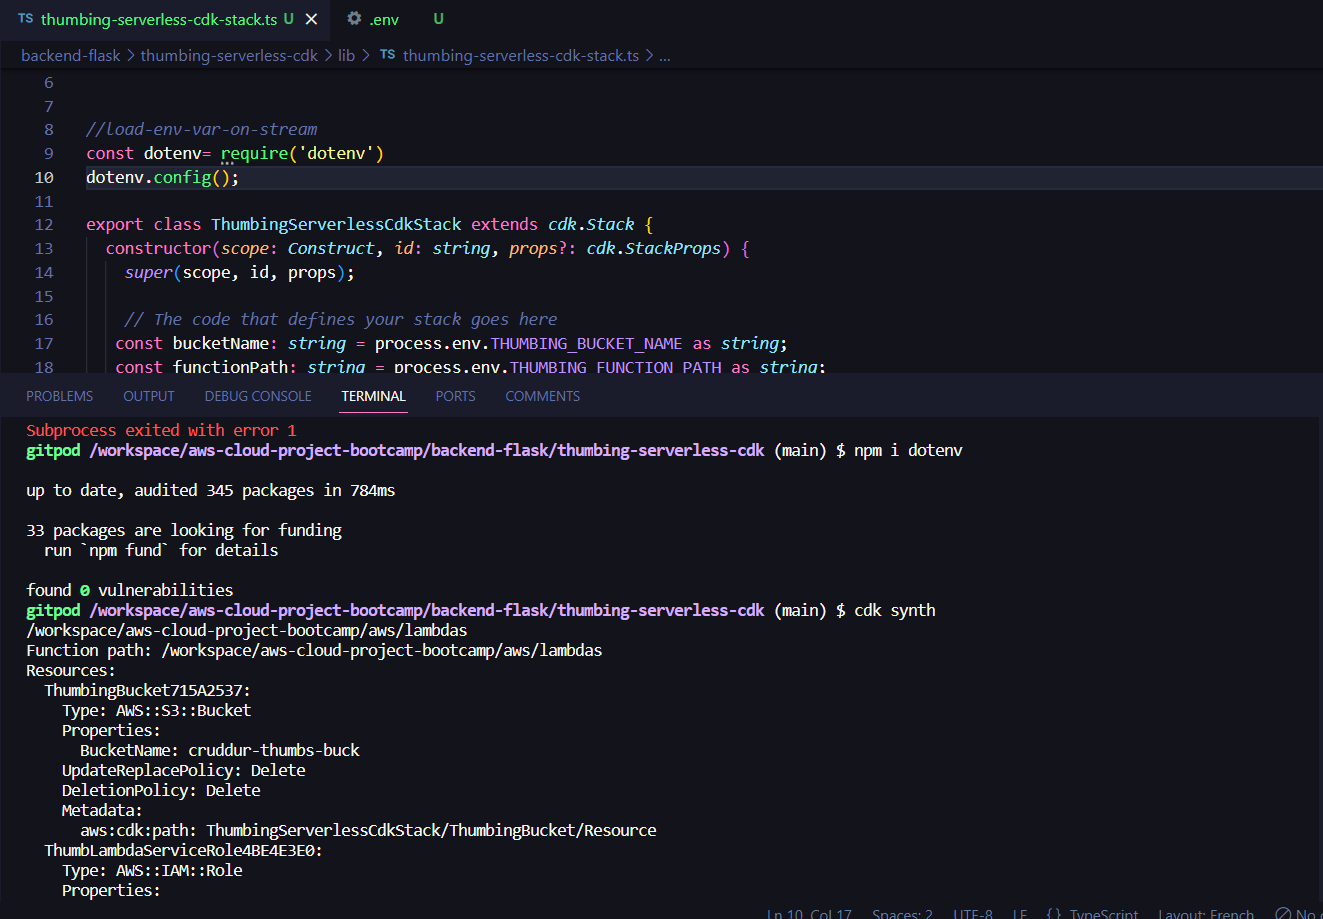
- Adding environement variable to our lambda functions
createLambda(bucketName: string, folderInput: string, folderOutput: string )created this env within the func:
      environment: {
        DEST_BUCKET_NAME: bucketName,
        FOLDER_INPUT: folderInput,
        FOLDER_OUTPUT: folderOutput,
        PROCESS_WIDTH:  '512',
        PROCECSS_HEIGHT: '512'
    }
Initialized 'folderInput' and 'folderOutput' with S3 input and output folders retrieved from environment variables,
   const folderInput: string = process.env.THUMBING_S3_FOLDER_INPUT as string;
const folderOutput: string = process.env.THUMBING_S3_FOLDER_OUTPUT as string;- passed them as parameters to the 'createLambda' method to instantiate the Lambda function.
const lambdaFunction = this.createLambda(functionPath, bucketName, folderInput, folderOutput);- defined S3 input and output folders for the Thumbing Lambda function in the .env file
THUMBING_S3_FOLDER_INPUT="avatar/original"
THUMBING_S3_FOLDER_INPUT="avatar/processed"
Implement Image Process Stack with CDK (REWORK)
Create The S3 bucket
The following steps will guide you through setting up an S3 bucket for serverless avatar image processing using the AWS CDK:
- Create a new directory and initialize a new CDK app using the following commands:
mkdir thumbing-serverless-cdk
cd thumbing-serverless-cdk
npm install aws-cdk -g
cdk init app --language typescript- In the
lib/thumbing-serverless-cdk-stack.tsfile, define the following S3 bucket creation code:
import * as cdk from "aws-cdk-lib";
import { Construct } from "constructs";
import * as s3 from "aws-cdk-lib/aws-s3";

export class ThumbingServerlessCdkStack extends cdk.Stack {
  constructor(scope: Construct, id: string, props?: cdk.StackProps) {
    super(scope, id, props);

    // The code that defines your stack goes here
    const bucketName: string = process.env.THUMBING_BUCKET_NAME as string;
    const bucket = this.createBucket(bucketName);
  }

  createBucket(bucketName: string): s3.IBucket {
    const bucket = new s3.Bucket(this, "ThumbingBucket", {
      bucketName: bucketName,
      removalPolicy: cdk.RemovalPolicy.DESTROY,
    });
    return bucket;
  }
}- Run the following command to deploy the infrastructure
cdk deploy
Implement Lambda
- Update the
thumbing-serverless-cdk-stack.tswith lambda typescript code
import * as lambda from 'aws-cdk-lib/aws-lambda';

{
  const bucketName: string = process.env.THUMBING_BUCKET_NAME as string;
  const folderInput: string = process.env.THUMBING_S3_FOLDER_INPUT as string;
  const folderOutput: string = process.env.THUMBING_S3_FOLDER_OUTPUT as string;
  const webhookUrl: string = process.env.THUMBING_WEBHOOK_URL as string;
  const topicName: string = process.env.THUMBING_TOPIC_NAME as string;
  const functionPath: string = process.env.THUMBING_FUNCTION_PATH as string;

  const bucket = this.createBucket(bucketName);
  const lambda = this.createLambda(functionPath, bucketName, folderInput, folderOutput);
}

createLambda(functionPath:string, bucketName:string, folderInput:string, folderOutput:string): lambda.IFunction {

  const lambdaFunction = new lambda.Function(this, 'ThumbLambda', {
    runtime: lambda.Runtime.NODEJS_18_X,
    handler: 'index.handler',
    code: lambda.Code.fromAsset(functionPath),
    environment: {
      DEST_BUCKET_NAME: bucketName,
      FOLDER_INPUT: folderInput,
      FOLDER_OUTPUT: folderOutput,
      PROCESS_WIDTH: '512',
      PROCESS_HEIGHT: '512'
    }
  });
  return lambdaFunction;
}- Add the env var
THUMBING_BUCKET_NAME="assets.yacrud.me"
THUMBING_S3_FOLDER_INPUT="avatars/original/"
THUMBING_S3_FOLDER_OUTPUT="avatars/processed/"
THUMBING_WEBHOOK_URL="https://api.yacrud.me/webhooks/avatar"
THUMBING_TOPIC_NAME="cruddur-assets"
THUMBING_FUNCTION_PATH="<ur-path>/aws/lambdas/process-images"-
From S3 manually create a bucket and name it
assets.<your-domain> -
Create two dir in
assets.<your-domain>with the nameavatar/originalandavatar/processed -
Run the
cdk synthcommand to check the CloudFormation errors. -
Run
cdk deploy
Upload Asset Script
Include the S3 Policy to your Stack
- Add the below to your
thumbing-serverless-cdk/lib/thumbing-serverless-cdk-stack.tsstack
import * as iam from 'aws-cdk-lib/aws-iam';

const s3ReadWritePolicy = this.createPolicyBucketAccess(bucket.bucketArn)
lambda.addToRolePolicy(s3ReadWritePolicy);

createPolicyBucketAccess(bucketArn: string){
    const s3ReadWritePolicy = new iam.PolicyStatement({
      actions: [
        's3:GetObject',
        's3:PutObject',
      ],
      resources: [
        `${bucketArn}/*`,
      ]
    });
    return s3ReadWritePolicy;
}- Create an avatar dir under our great bin and name this one
upload
#! /usr/bin/bash

# set the absolute path to the file
abs_filepath="$ABS_PATH/bin/serverless/files/data.jpg"

# get the relative path to the file from the current directory
FilePath=$(realpath --relative-base="$PWD" "$abs_filepath")

aws s3 cp "$FilePath" "s3://assets.$DOMAIN_NAME/avatars/original/data.jpg"- Upload an image dot jpg to your workspace path
bin/serverless/files/data.jpgand run the script to ship straight to your S3.
Delete Asset Script
- Create another script for clearing assets and name this one
clear
#! /usr/bin/bash

aws s3 rm "s3://assets.$DOMAIN_NAME/avatars/original/data.jpg"
aws s3 rm "s3://assets.$DOMAIN_NAME/avatars/processed/data.jpg"- Use the above script to remove the just uploaded asset.
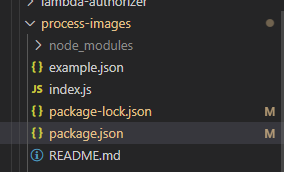
Implement Process Images Lambda Function
- Save the requirements in your code base.
mkdir -p aws/lambdas/process-images
cd aws/lambdas/process-images
touch index.js s3-image-processing.js test.js  example.json
npm init -y
npm install sharp @aws-sdk/client-s3
This will create the process image dir and its required files, the index.js, test.js. Then we created an empty node package that we filled step by step using sharp package and then s3client package specifically from aws cdk.
- Run
cdk deployto update the infrastructure
Sharp Package Script
- Create
bin/serverless/build
#! /usr/bin/bash

# set the absolute path to the file
abs_filepath="$ABS_PATH/thumbing-serverless-cdk"

# get the relative path to the file from the current directory
FilePath=$(realpath --relative-base="$PWD" "$abs_filepath")

cd $FilePath

npm install
rm -rf node_modules/sharp
SHARP_IGNORE_GLOBAL_LIBVIPS=1 npm install --arch=x64 --platform=linux --libc=glibc sharp
Run this script whenever you require sharp in thumbing-serverless-cdk project.
Implement S3 Event Notification Handle
- Add the following code snippet to our stack defined in
thumbing-serverless-cdk/lib/thumbing-serverless-cdk-stack.ts
import * as s3n from 'aws-cdk-lib/aws-s3-notifications';

this.createS3NotifyToLambda(folderInput, lambda, bucket);

createS3NotifyToLambda(prefix: string, lambda: lambda.IFunction, bucket: s3.IBucket): void {
  const destination = new s3n.LambdaDestination(lambda);
  bucket.addEventNotification(
    s3.EventType.OBJECT_CREATED_PUT,
    destination,
    { prefix: prefix } // folder to contain the original image
  );
}- Run
cdk synthto check for errors, if the yaml is returned go aheadcdk deploy
- Head over AWS Lambda and you should find the S3 trigger attached.
CloudFront - Serve Avatars
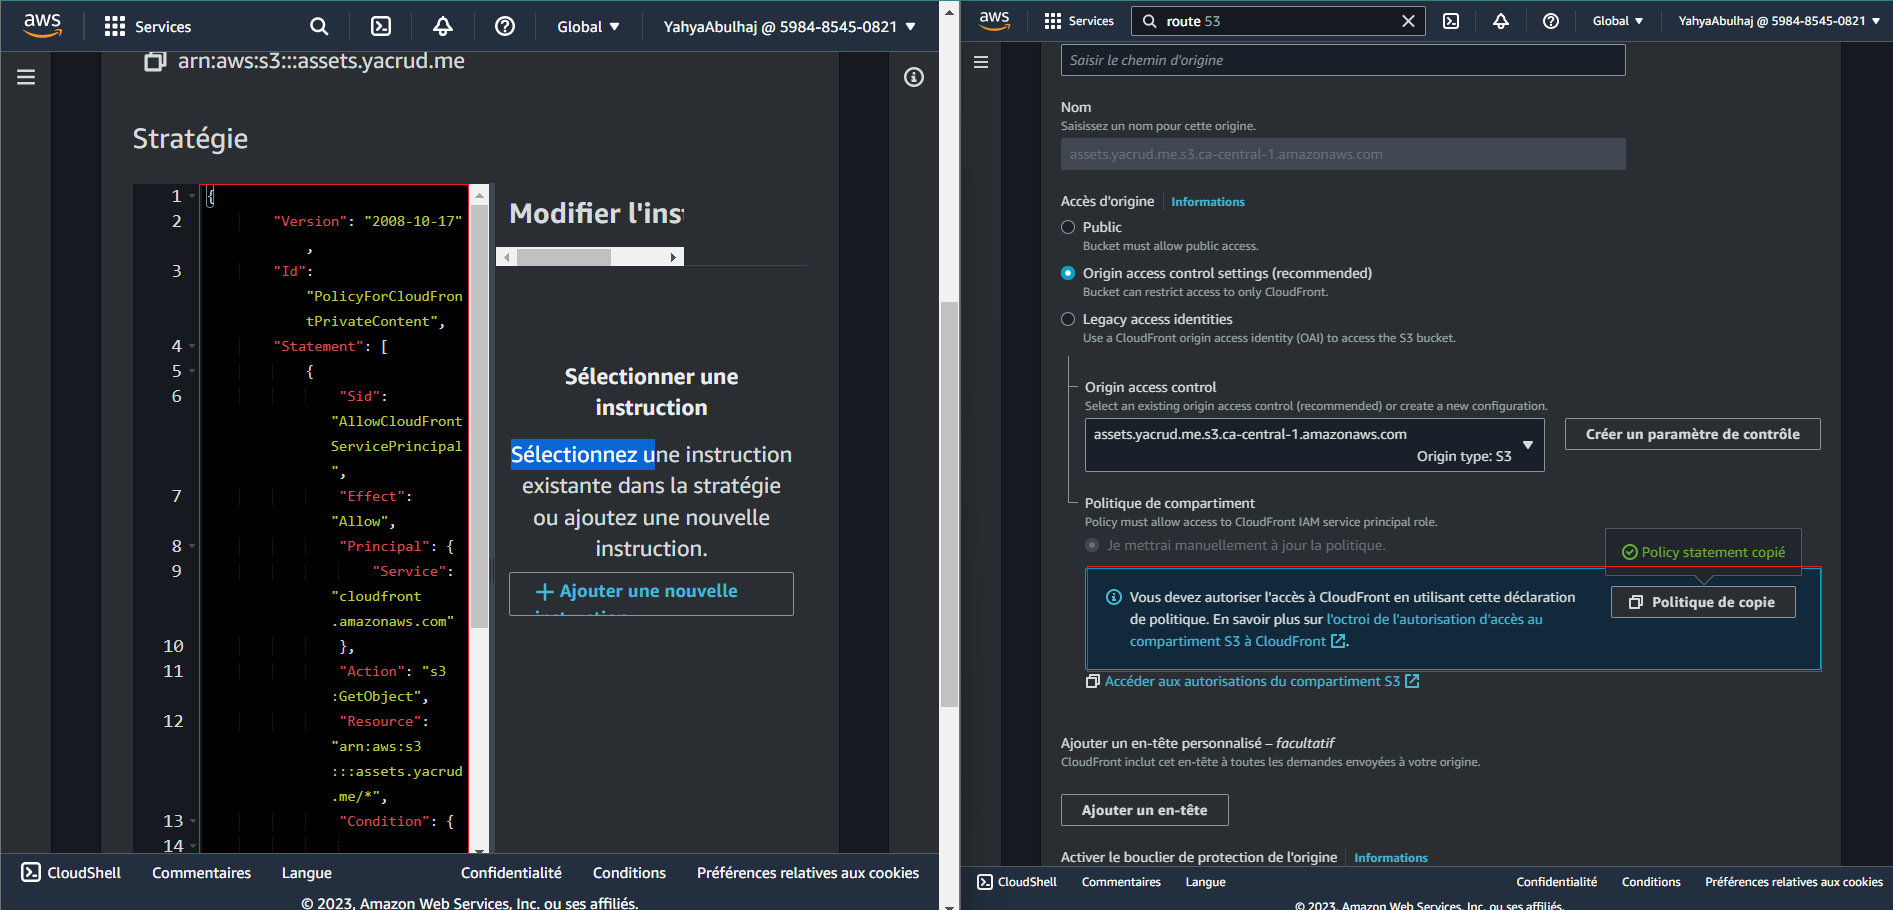
- Navigate to the CloudFront console and create a new distribution.
- Set the Origin domain to point to the
assets.<domain>S3 bucket. - Choose Origin access control settings (recommended) and create a control setting.
- For the viewer protocol policy, select Redirect HTTP to HTTPS.
- Choose CORS-CustomOrigin for the optional Origin request policy.
- Select SimpleCORS for the optional Response headers policy.
- Set the Alternate domain name (CNAME) to
assets.<domain>.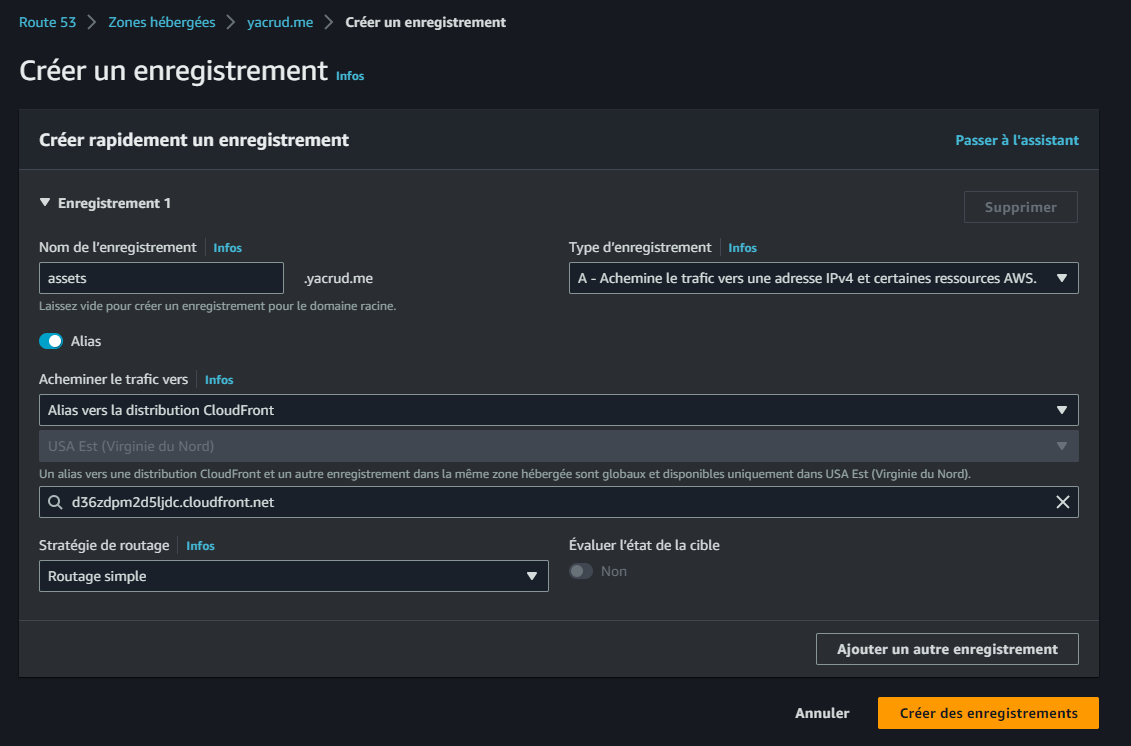
- Assign the ACM for the Custom SSL certificate.
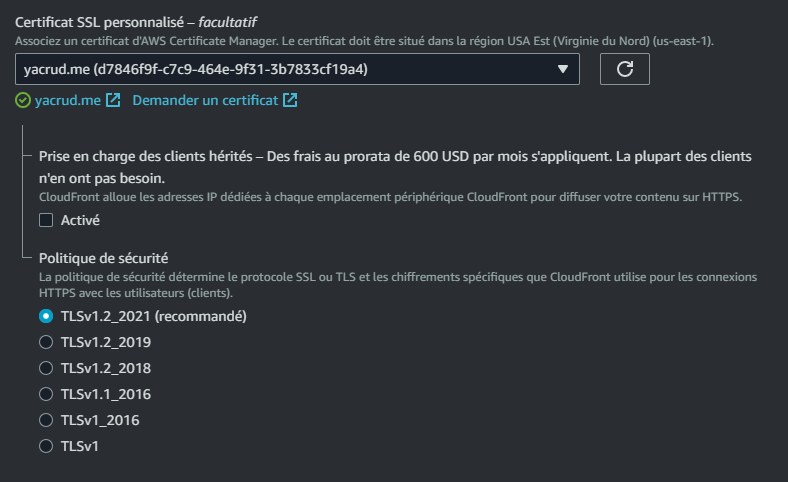
- Provide a description and click Create.
- Copy the S3 policy and access the S3 bucket using the provided link.
- Paste the policy there.
- To view the processed image, go to
https://<Distribution-domain-name>/avatars/processed/data.jpg. - For accessing the image on the
assets.<your-domain>, navigate to Route53 and select the Hosted Zone. - Create a new record with the record name set to
assets.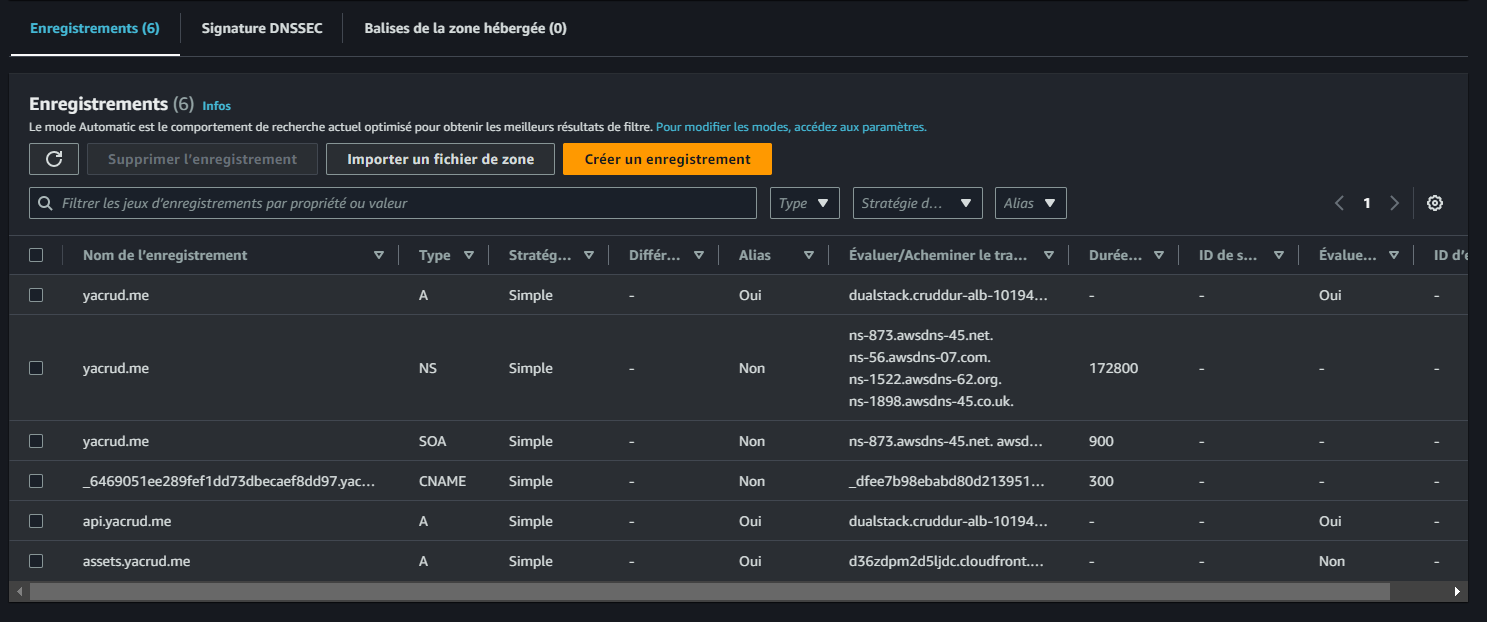
- Enable Alias and choose Alias to CloudFront distribution from the dropdown. Select our distribution.

- Now you can Upload Assets to your S3 and Access it via the domain.
Related Commit (opens in a new tab) — Access (opens in a new tab) My Asset
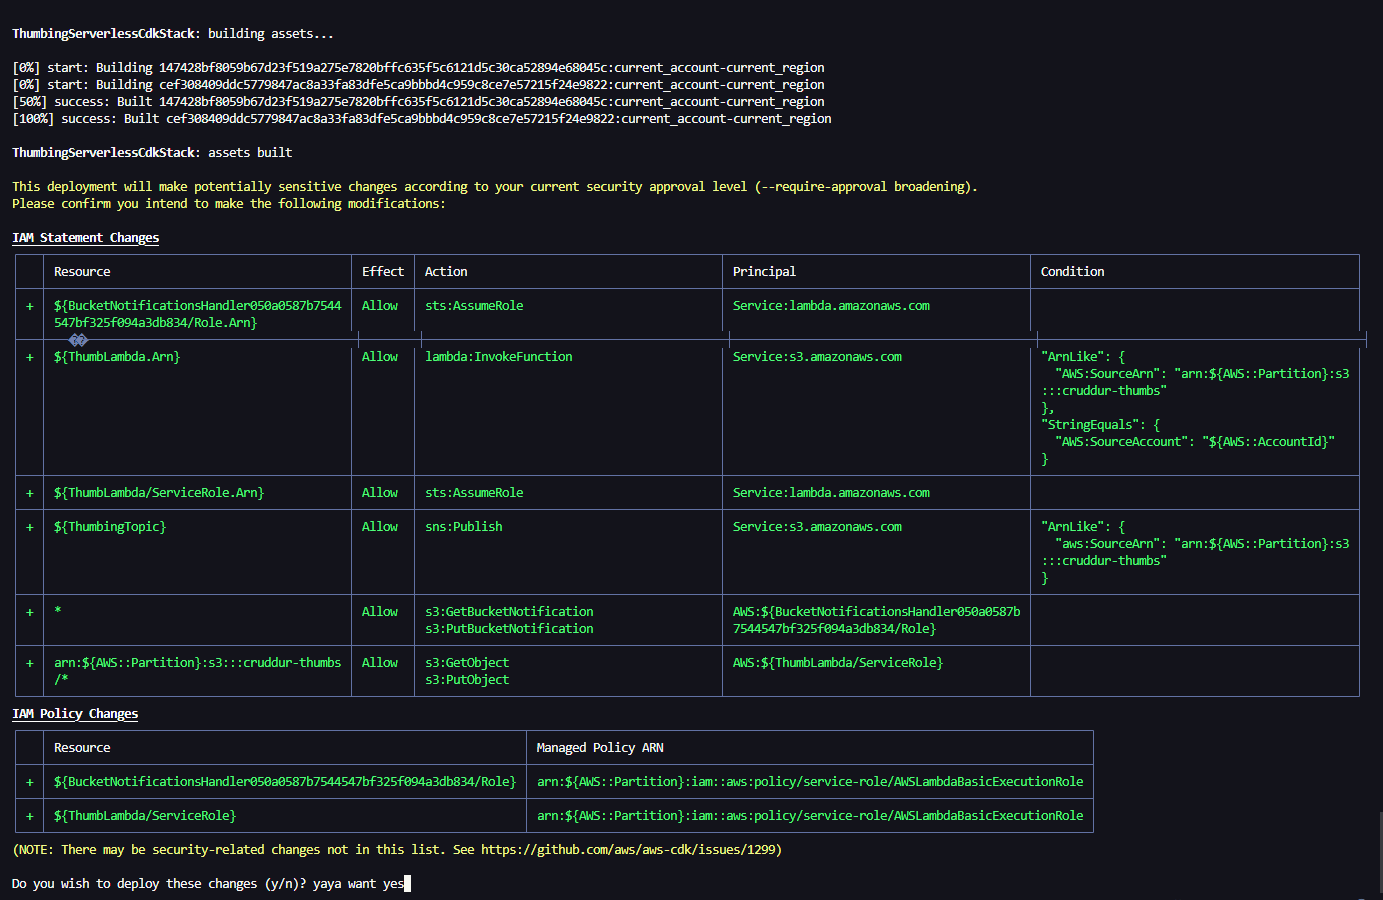
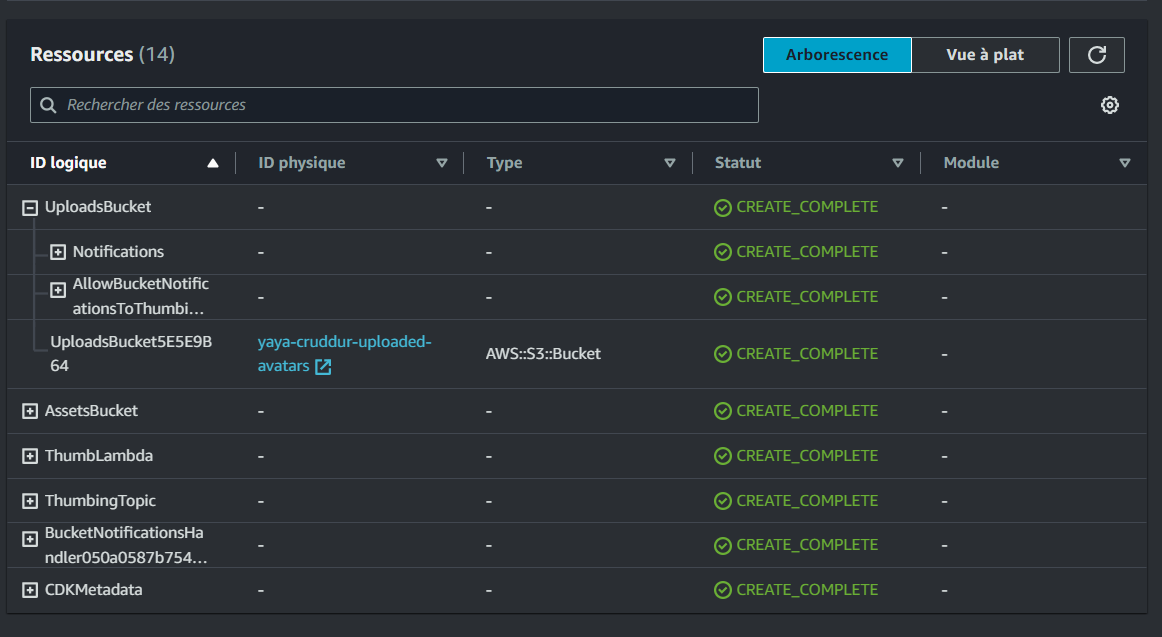
Configuring Bucket for Uploading and Bucket for Serving
To implement this, follow the steps below:
- Update the
.envfile with the following changes:
UPLOADS_BUCKET_NAME="<something-unique>-cruddur-uploaded-avatars"
ASSETS_BUCKET_NAME="assets.<ur-domain>"
THUMBING_S3_FOLDER_INPUT=""
THUMBING_S3_FOLDER_OUTPUT="avatars/"
THUMBING_WEBHOOK_URL="https://api.<ur-domain>/webhooks/avatar"
THUMBING_TOPIC_NAME="cruddur-assets"
THUMBING_FUNCTION_PATH="<ur-path>/aws/lambdas/process-images"- Modify the
thumbing-serverless-cdk/lib/thumbing-serverless-cdk-stack.tsfile as shown:
// The was longer observerd
const uploadsBucketName: string = process.env.UPLOADS_BUCKET_NAME as string;
const assetsBucketName: string = process.env.ASSETS_BUCKET_NAME as string;

const uploadsBucket = this.createBucket(uploadsBucketName);
const assetsBucket = this.importBucket(assetsBucketName) // import existing bucket

createBucket(bucketName: string): s3.IBucket {
  const bucket = new s3.Bucket(this, 'UploadsBucket', {
    bucketName: bucketName,
    removalPolicy: cdk.RemovalPolicy.DESTROY
  });
  return bucket;
}

importBucket(bucketName: string): s3.IBucket {
  const bucket = s3.Bucket.fromBucketName(this, "AssetsBucket", bucketName);
  return bucket
}
We created separate buckets for uploading images and serving processed images for prod-ready implementation on scale and security concerns and a note to consider from this is to never make /original publicly accessible.
- Export an env variable for your domain
export DOMAIN_NAME=<ur-naked-domain>
gp env DOMAIN_NAME=<ur-naked-domain>- And the one with Your Unique bucket name
export UPLOADS_BUCKET_NAME=<something-unique>-cruddur-uploaded-avatars
gp env UPLOADS_BUCKET_NAME=<something-unique>-cruddur-uploaded-avatars
cdk deployand check CFN Stack in the console
Upload and Clear Scripts Changes
- Rename the dir
serverlesstoavatar - Update the upload script to adjust our second bucket
#! /usr/bin/bash

# set the absolute path to the file
abs_filepath="$ABS_PATH/bin/avatar/files/rinzler.jpg"

# get the relative path to the file from the current directory
FilePath=$(realpath --relative-base="$PWD" "$abs_filepath")
aws s3 cp "$FilePath" "s3://yaya-cruddur-uploaded-avatars/data.jpg"- Update the clear script
#! /usr/bin/bash

aws s3 rm "s3://yaya-cruddur-uploaded-avatars/data.jpg"
aws s3 rm "s3://assets.$DOMAIN_NAME/avatars/data.jpg"
Coding Space - Develop User Profile
| Code Creation | Updates |
|---|---|
Create frontend-react-js/src/components/EditProfileButton.js | Update backend-flask/services/user_activities.py |
Create frontend-react-js/src/components/ProfileHeading.css | Update frontend-react-js/src/pages/UserFeedPage.js |
Create frontend-react-js/src/components/ProfileHeading.jsx | Update ActivityFeedJS |
Create new banners/ in assets.<ur-domain> | Update frontend-react-js/src/components/EditProfileButton.css |
- Upload a banner image to
banners/folder inassets.<ur-domain>
Base Path for Imports in ReactJS
- Add
jsconfig.jsonto your ReactJS root e.g.frontend-react-js:
{
  "compilerOptions": {
    "baseUrl": "src"
  },
  "include": ["src"]
}- We are informing the compiler that any import statements starting with "src" should be resolved relative to the
/srcdirectory.
Technically speaking, we can now write import statements like import { Component } from 'src/components' instead of import { Component } from '../../components'
Implement Backend Migrations
Implement Profile Form and Popup
| Code Creation | Updates |
|---|---|
Create frontend-react-js/src/components/ProfileForm.js and frontend-react-js/src/components/ProfileForm.css | Update frontend-react-js/src/pages/UserFeedPage.js |
Create frontend-react-js/src/components/Popup.css | Update app.js with import "./components/Popup.css"; |
Profile Update Endpoint
- Add
from services.update_profile import *toapp.py - Add the
@app.route("/api/profile/update", methods=["POST", "OPTIONS"])endpoint toapp.py - Create backend-flask/services/update_profile.py
- Create
backend-flask/db/sql/users/update.sql.
Document Update API
I have contemplated taking on this additional challenge to further Improve the developer experience and added the update endpoint to OpenAPI.
Step 1: Prepare the Documentation
- You can Update the API Endpoint doc by adding the below snippet to
backend-flask/openapi-3.0.yml
/api/profile/update:
post:
description: 'Updates the user profile information'
tags:
- profile
responses:
'200':
description: 'Returns the updated user profile data'
content:
application/json:
schema:
type: object
properties:
data:
type: object
description: 'The updated user profile data'
errors:
type: array
description: 'The errors, if any'
items:
type: string
example:
data:
bio: 'API documentation is a lot like flossing. everyone knows they should do it, but few actually enjoy the process. But not Yaya! Documenting APIs is his jam! '
display_name: 'Yahya Abulhaj'
errors: null
'401':
description: 'Unauthorized request'
content:
application/json:
schema:
type: object
description: 'Empty response'
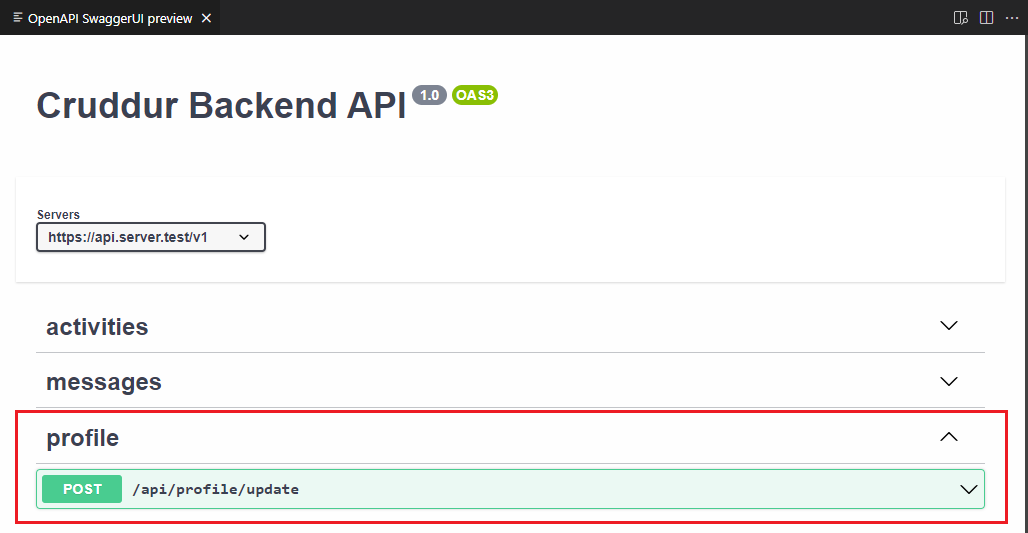
example: {}Step 2: Populate the Documentation
- The generated API Doc is presented as follows

Step 3: Save and Share the API to your fellow developer.
Database Migration
To ensure smooth database migration, follow the instructions below:
-
Create a new
migrationscript within thebin/generatedirectory. -
Preserve the
backend-flask/db/migrations/directory by including a.keepfile within it when pushing to the GitHub repository. -
Generate a migration file inside the
backend-flask/db/migrations/directory using the following command:
./bin/generate/migration add_bio_column- After generating the migration file, update the functions as shown below:
def migrate_sql():
    data = '''
      ALTER TABLE public.users ADD COLUMN bio text;
    '''
    return data

def rollback_sql():
    data = '''
      ALTER TABLE public.users DROP COLUMN;
    '''
return data-
Open the
backend-flask/db/schema.sql -
Add the following SQL code to create
schema_informationtable:
CREATE TABLE IF NOT EXISTS public.schema_information (
  id integer UNIQUE,
  last_successful_run text
);
INSERT INTO public.schema_information (id, last_successful_run)
VALUES(1, '0')
ON CONFLICT (id) DO NOTHING;- Create two new files,
./bin/db/migrateand./bin/db/rollback, within thebin/db.
Implement Application Bio
Conclude the implementation with the below steps
| Step | Bio Wrapping |
|---|---|
| 1 | Modify the query functions in the db.py file to include the verbose argument. |
| 2 | Exclude the verbose argument from the query_wrap functions. |
| 3 | Update the functions to conditionally execute print_sql when verbose is set to True. |
| 4 | Update /components/ProfileHeading.jsx with className="bio" and within div inside it with profile bio |
| 5 | Update the CSS with .profile_heading class selector and its nested .bio |
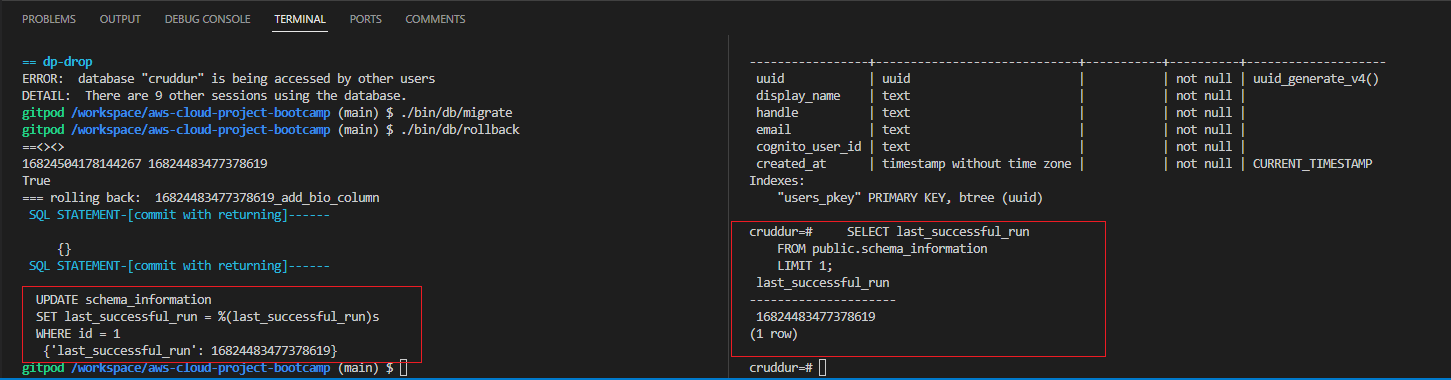
Log to the app, Click Edit Profile write Bio and click Save.
- Verify serving prev implementations Incl. Cloudfront, Edit profile and DB migration
Related Commit (opens in a new tab)
- Observe the Bio inputs from the database
handle : yaya2devops
>>----what's up-----<< ({'profile': {'uuid': '5797710d-123a-4ead-aeec-e8328516a42f', 'handle': 'yaya2devops', 'cognito_user_uuid': 'ef1de525-1b9c-4e4b-b143-a071ed5a43b9', 'display_name': 'Yahya Abulhaj', 'bio': "Hey :) It's me Yaya", 'cruds_count': 2}, 'activities': [{'uuid': 'b685d16e-e860-408e-bfbf-e6fd7ebc1733', 'display_name': 'Yahya Abulhaj', 'handle': 'yaya2devops', 'message': 'Thanks John For The Great Help! #DontWorryJohn', 'created_at': '2023-05-17T11:07:46.223586', 'expires_at': '2023-05-24T11:07:46.223224'}, {'uuid': '43a1539c-2400-4080-bec9-7cac822c039d', 'display_name': 'Yahya Abulhaj', 'handle': 'yaya2devops', 'message': 'This was imported as seed data!', 'created_at': '2023-05-17T10:58:54.110864', 'expires_at': '2023-05-27T10:58:54.110864'}]},)
192.168.85.74 - - [17/May/2023 21:43:58]
"GET /api/activities/@yaya2devops HTTP/1.1" 200 -
Implement Avatar Uploading
Pre-signed URL Lambda
We require pre-signed URL that grants temporary access to perform the upload operations on the S3.
This is a secure way to authorize the upload operation without compromising the overall system's security.
The pre-signed URL is generated by a Lambda function specifically designed for this purpose. To implement this lambda, follow these steps:
- Create a new file named
aws/lambdas/cruddur-upload-avatar/function.rband navigate to the respective folder. - Change the current directory to the
cruddur-upload-avatarfolder and initialize a Gemfile by running the commandbundle init. - Update the Gemfile with the required packages and dependencies, and then install them by executing
bundle install.
# frozen_string_literal: true
source "https://rubygems.org"
# gem "rails"
gem "aws-sdk-s3"
gem "ox"
gem "jwt"
To generate a pre-signed URL, create function.rb
require 'aws-sdk-s3'
require 'json'
require 'aws-sdk-ssm'
require 'jwt'

def handler(event:, context:)
  # Create an AWS SSM client
  ssm_client = Aws::SSM::Client.new
  # Retrieve the value of an environment variable from SSM Parameter Store
  response = ssm_client.get_parameter({
    name: '/cruddur/YacrudAvatarUpload/LAMBDA_FRONTEND',
    with_decryption: true
  })
  # Access the environment variable value
  frontend_url = response.parameter.value
  puts frontend_url

  puts event
  # Return CORS headers for preflight check
  if event['routeKey'] == "OPTIONS /{prefix+}"
    puts({ step: 'preflight', message: 'preflight CORS check' }.to_json)
    {
      headers: {
        "Access-Control-Allow-Headers": "*, Authorization",
        "Access-Control-Allow-Origin": frontend_url,
        "Access-Control-Allow-Methods": "OPTIONS,GET,POST"
      },
      statusCode: 200,
    }
  else
    token = event['headers']['authorization']&.split(' ')&.[](1)
    puts({step: 'presignedurl', access_token: token}.to_json)
    body_hash = JSON.parse(event["body"])
    extension = body_hash["extension"]

    decoded_token = JWT.decode token, nil, false
    puts decoded_token
    cognito_user_uuid = decoded_token[0]['sub']
    s3 = Aws::S3::Resource.new
    bucket_name = ENV["UPLOADS_BUCKET_NAME"]
    object_key = "#{cognito_user_uuid}.#{extension}"

    puts({object_key: object_key}.to_json)

    obj = s3.bucket(bucket_name).object(object_key)
    url = obj.presigned_url(:put, expires_in: 300)
    url # this is the data that will be returned
    body = { url: url }.to_json
    {
      headers: {
        "Access-Control-Allow-Headers": "*, Authorization",
        "Access-Control-Allow-Origin": frontend_url,
        "Access-Control-Allow-Methods": "OPTIONS,GET,POST"
      },
      statusCode: 200,
      body: body
    }
  end
end
run the following command:
bundle exec ruby function.rbI created the frontend_url variable in Para store with /cruddur/YacrudAvatarUpload/LAMBDA_FRONTEND to not have to re insert the current dev url everytime.
Test API Endpoint
Copy the presigned URL and test its endpoint.
- Installing the Thunder Client extension: This step involves installing the Thunder Client extension, which is a tool that allows you to send HTTP requests and test API endpoints directly within Visual Studio Code.
- Opening Thunder Client and pasting the pre-signed URL: After installing the extension, you open Thunder Client and paste the pre-signed URL that was generated for the avatar upload. This URL contains the necessary authorization and authentication information.
- Selecting the binary option and choosing the image file: In the request body, you specify that you will be uploading a binary file (the image file). This ensures that the request is configured correctly to handle binary data.
- Setting the request method to PUT and sending the request: You set the request method to PUT, indicating to upload the image file to the specified URL. Then, you send the request to initiate the upload process.
Upon successfully completing the steps, you should receive a "200 OK" response, indicating that the HTTP request was successful.

Presigned Lambda Console
- Create a new function within the AWS Lambda service
- Select the appropriate runtime, such as Ruby 2.7, for the Lambda function.
- Opt for Create a new role with basic Lambda permissions as the default execution role.
- Create the function.
- Export the
UPLOADS_BUCKET_NAMEenvironment variable.
Apply Code and Permissions
Presigned URL Policy
Create this policy and assigned to your s3.
- Add the code from the
function.rbfile to the Lambda function. - Navigate to the Lambda function's configuration and access the Permissions section.
- Open the settings of the execution role associated with the Lambda function.
- Create an inline policy to define the required permissions.
{
    "Version": "2012-10-17",
    "Statement": [
        {
            "Sid": "VisualEditor0",
            "Effect": "Allow",
            "Action": "s3:PutObject",
            "Resource": "arn:aws:s3:::<unique>-uploaded-avatars/*"
        }
    ]
}- Thoroughly review the policy before finalizing its creation.
- Modify the Lambda runtime handler to
function.handler - Rename the file to
function.rb.
Don't expose the bucket (opens in a new tab) to the public.
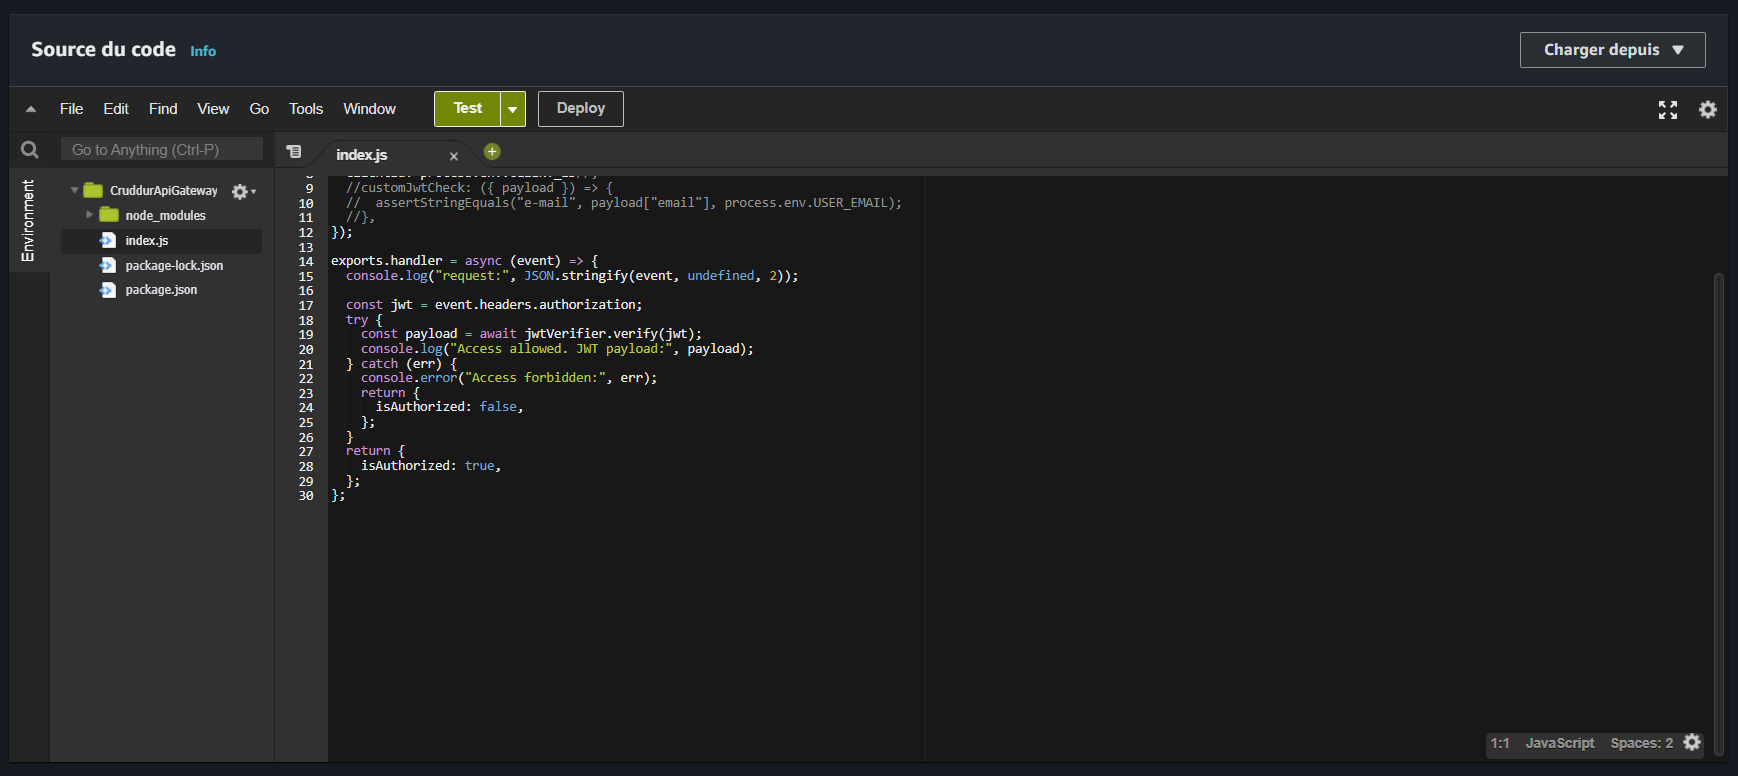
Create cruddurApiGatewayLambdaAuthorizer
The Lambda Authorizer is responsible for authenticating and authorizing requests before they reach the Lambda function responsible for handling the upload.
- In
aws/lambdas/lambda-authorizer/, createindex.jsto authorize API Gateway requests. Run the following command to install the required dependencies:
npm install aws-jwt-verify --save- Zip the contents of the
aws/lambdas/lambda-authorizer/directory into a file namedlambda_authorizer.zipusing the command:
zip -r lambda_authorizer.zip .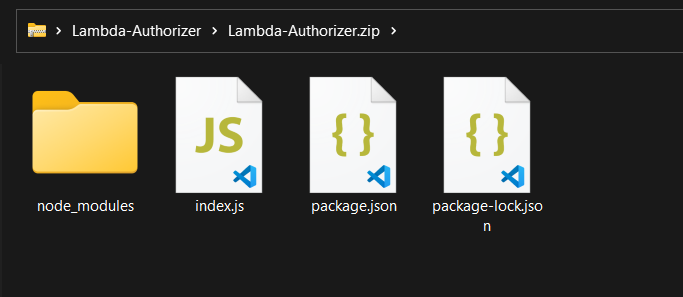
Create a new Lambda function in the console using the Node 18 runtime.
- Upload the previously created zip file.
Cruddur Api Gateway Lambda Authorizer
API Gateway acts as a gateway or entry point for incoming requests and enables you to define routes and integrations and to handle upload avatar requests.
To configure the API Gateway, follow these steps:
- Open the API Gateway console and select HTTP APIs.
- Click on Build.
- Choose Lambda from the Add integration dropdown and select the CruddurUploadAvatar lambda function.
- Enter the API name as
api.<domain_name>. - Click Next.
Create the following two routes:
POST /avatars/key_upload:- Authorizer:
CruddurJWTAuthorizer - Lambda integration:
CruddurAvatarUpload
- Authorizer:
OPTIONS /{proxy+}:- No authorizer
- Lambda integration:
CruddurAvatarUpload
To configure the authorizer:
- Select Authorization from the left pane.
- Go to Manage authorizers and click Create.
- Choose Lambda as the authorizer type, give it a name, and select the lambda authorizer function.
- Turn off Authorizer caching.
- Click Create.
To attach the authorizer to the POST route:
- From the Attach authorizers to routes tab, click on
POST. - Select the lambda authorizer from the "Select existing authorizer" dropdown.
- Click Attach Authorizer.
| Step | Interact with Backend |
|---|---|
| 1 | Update frontend-react-js/src/components/ProfileForm.js with upload onclick |
| 2 | Update S3UploadKey and S3Upload. |
To configure CORS:
- Select CORS from the left pane.
- Choose POST from the Access-Control-Allow-Methods dropdown.
- Set Access-Control-Allow-Origin to
*and click Add. - Set Access-Control-Allow-Headers to
*, authorization.
Refer to this folder (opens in a new tab) for all related API gateway configuration and desired outcome.
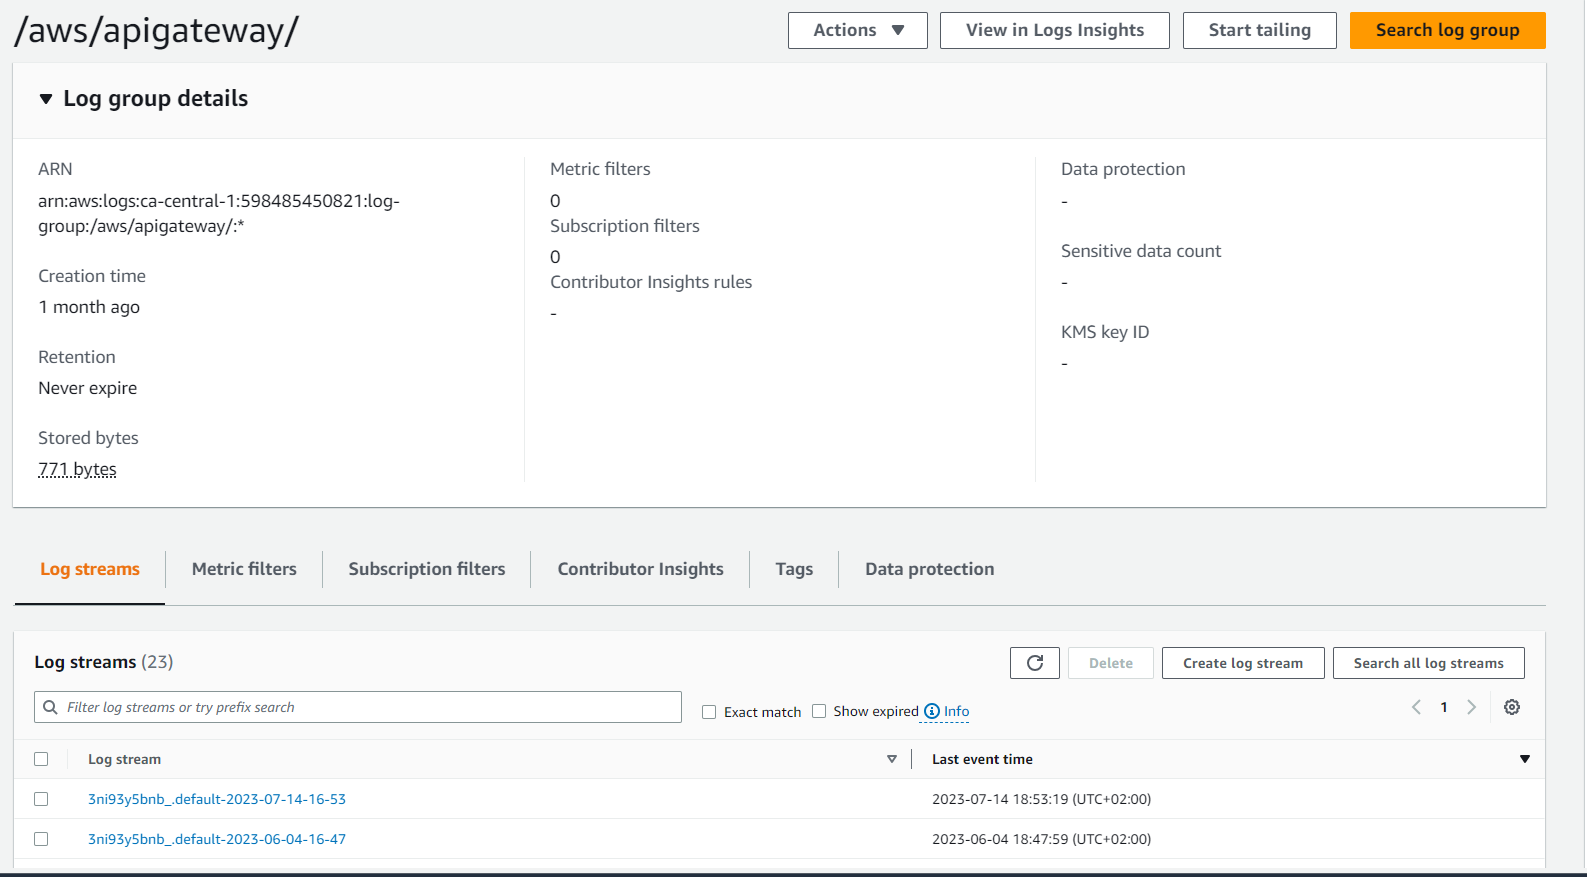
Explicit API Gateway Logs group creation
Logs Lover (opens in a new tab)
In addition to debugging with docker logs, the 3 lambdas cloudwatch logs, I created a log group explicitly for API gateway to further investigate and troubleshoot the auth process.
To do so, you can follow the instructions below.
- Open the AWS Management Console.
- Navigate to the CloudWatch service.
- In the left navigation pane, choose "Logs".
- Click on "Create log group".
- Provide a unique name for the log group and click on "Create".
- Now, navigate to the API Gateway service.
- Select your desired API Gateway instance or create a new one.
- In the left navigation pane, choose "Settings".
- Under "Settings", choose "Logs/Tracing".
- In the "Access logging" section, click on "Edit".
- Choose the previously created CloudWatch Logs group from the dropdown menu.
- Configure the log format and the log level as per your requirements.
- Click on "Save" to create the API Gateway Logs Group.
When done, go to Cloudwatch logs => Log groups and start your troubleshooting process.
Setting up the JWT Lambda Layer
- Get the JWT (JSON Web Token) from the gem store.
- Zip the JWT.
- Ship the zipped JWT to the console.
You can use the following script to simplify the process:
#! /usr/bin/bash

gem i jwt -Ni /tmp/lambda-layers/ruby-jwt/ruby/gems/2.7.0
cd /tmp/lambda-layers/ruby-jwt

zip -r lambda-layers . -x ".*" -x "*/.*"
zipinfo -t lambda-layers

aws lambda publish-layer-version \
  --layer-name jwt \
  --description "Lambda Layer for JWT" \
  --license-info "MIT" \
  --zip-file fileb://lambda-layers.zip \
  --compatible-runtimes ruby2.7
Once layer shipped, navigate to your Lambda function configuration:
- Go to the AWS Management Console.
- Open the Lambda service.
- Select
Layersfrom the left-hand menu. - Locate and choose the
jwtlayer.
![]()
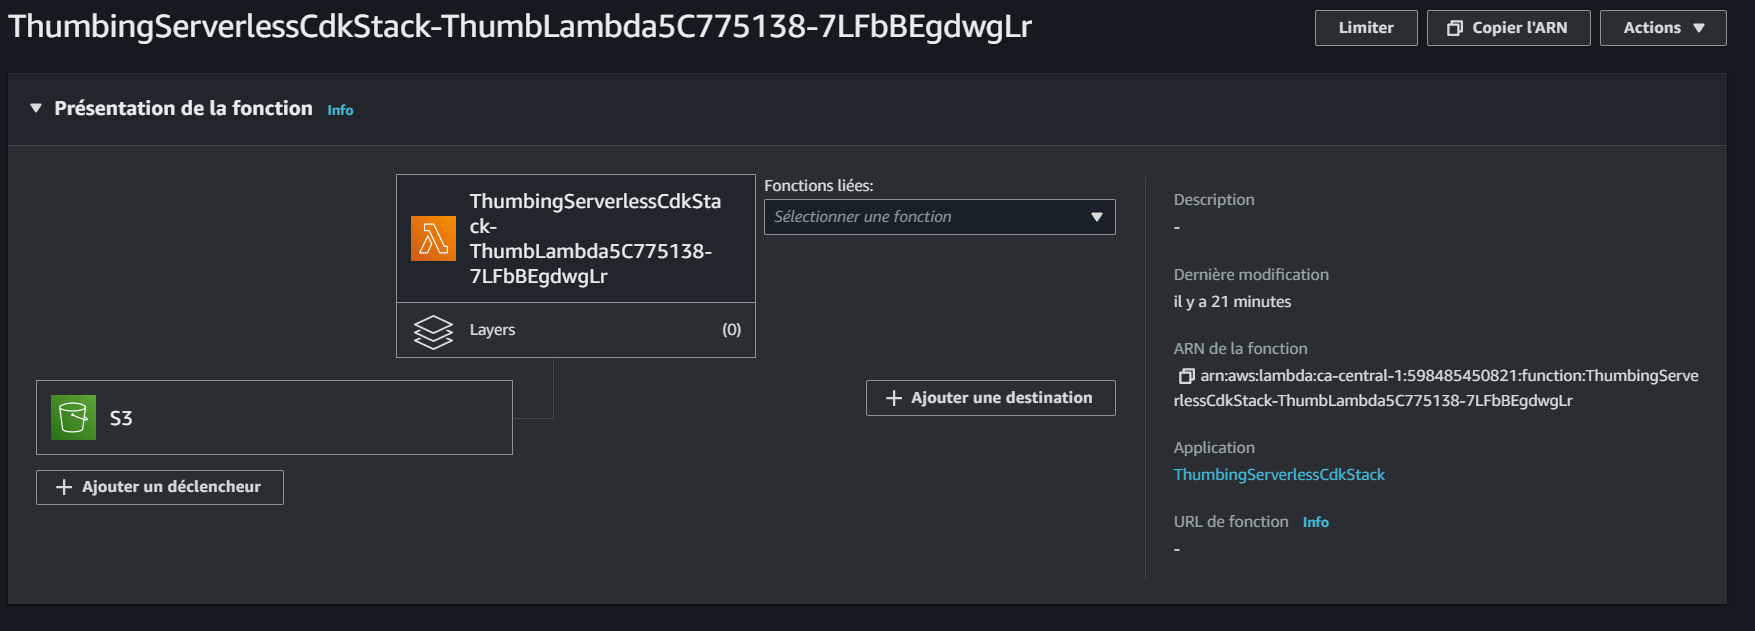
Series of processes are set in motion to ensure the seamless transfer and storage of the corresponding assets.
- The platform diligently directs the newly uploaded avatar assets to the specifically chosen bucket with the user uuid.
![]()
Required Environment Variables
| Source | Env Var | Value |
|---|---|---|
| CruddurAvatarUpload | UPLOADS_BUCKET_NAME | ur-bucket-name |
| Lambda Authorizer | CLIENT_ID | cognito |
| USER_POOL_ID | cognito | |
| Developer workspace | REACT_APP_API_GATEWAY_ENDPOINT_URL | ur-api-gateway-invoke-url |
| cognito_user_id or cognito_user_uuid | specify-which-is-right-for-you |
Render Avatar from CloudFront
Render and display your avatar image or profile picture in your application by serving it directly from the CloudFront content delivery network (CDN).
- Create a new file named
frontend-react-js/src/components/ProfileAvatar.jsin your project directory. This file will serve as the component responsible for rendering the avatar. - Incorporate the
setUserstate within theCheckAuthfunction. This will enable the functionality to set the user state and ensure seamless avatar rendering. - As part of the avatar rendering process, generate two essential files:
frontend-react-js/src/components/ProfileAvatar.jsandProfileAvatar.css. These files will facilitate the customized styling of the avatar component. - Integrate the
ProfileAvatarcomponent intofrontend-react-js/src/components/ProfileInfo.jsby importing it and updating the corresponding<ProfileAvatar>tag. By doing so, you will seamlessly incorporate the avatar into the profile information section of your application. - Elevate the visual appeal of the profile heading section by adding the
<ProfileAvatar>tag tofrontend-react-js/src/components/ProfileHeading.jsx. This will prominently display the avatar within the profile heading, creating a visually engaging user interface. - In the
show.sqlfile, ensure the modification ofusers.cognito_user_idtocognito_user_uuid. This adjustment guarantees the proper retrieval and utilization of thecognito_user_uuidas part of the avatar rendering process. - Tailor the CSS styles to perfection in the
frontend-react-js/src/components/ProfileHeading.cssfile. Utilize this opportunity to customize the appearance of various profile components such as.profile_heading,.bio,.profile-avatar,.banner,.cruds_count,.info,.info .id,.info .id .display_name, and.info .id .handle.
Cruds employed (opens in a new tab)
![]()
AWS CDK Resources
I have considered the examination of these references to confidently affirm my conviction using CDK.
| Resource | Description |
|---|---|
| What is the AWS CDK? (opens in a new tab) | Official documentation providing an overview and guide for AWS CDK. |
| AWS CDK Official Website (opens in a new tab) | The official website for AWS CDK, containing additional information and resources. |
| CDK S3 Class Construct (opens in a new tab) | Documentation for the CDK S3 Class Construct, specifically for creating S3 buckets. |
| CDK Removal Policy (opens in a new tab) | Documentation explaining the CDK Removal Policy, used for defining the behavior of AWS resources when they are removed. |
| API Reference for CDK (opens in a new tab) | Detailed API reference documentation for the AWS CDK. |
| AWS CDK Patterns (opens in a new tab) | A collection of AWS CDK patterns and examples to help you build applications and infrastructure. |
| The CDK Book (opens in a new tab) | An extensive guidebook covering AWS CDK concepts and usage. |
| Event: CDK Day (opens in a new tab) | An event dedicated to AWS CDK, featuring talks and presentations. |
| TypescriptLang (opens in a new tab) | Ready to code Typescript Environnement. |
And indeed, I do so with utmost certainty.