App Containerization 🐳
Step aboard as I transport you to an extraordinary adventure through the fascinating universe of containers, Docker, and the ever-evolving frontiers of the future. This week was jam-packed of learning experiences.
Week One Main Tasks
- Technical Essentials
- Getting Started Before Docker
- Adopting Docker for Streamlined Development
- Containerizing a Flask Application
- Extending to a React.js Application
- Effective Debugging with Docker
- Understanding the Open Container Initiative
- Exploring Docker Alternatives
- Adding Notification Endpoint and React.js Page
- Introduction to OpenAPI
- Implementing an OpenAPI Endpoint
- Defining Endpoints in a Flask Application
- Designing the React.js Notifications Webpage
- Utilizing External CMD Scripts
- Managing Containers on Docker Desktop
- Deploying Docker Containers on EC2
- Implementing Flask Health Checks
- Container Management and Scaling Strategies
- Quickstart Guide to Running Two Containers
- Database Containers Overview
- Setting Up a DynamoDB Container
- Setting Up a PostgreSQL Container
- Maximizing Database Capabilities
- Working with DynamoDB in Containers
- Working with PostgreSQL in Containers
- Exploring Data with Data Explorer
- Optimizing Multi-Stage Containerization
- Publishing Images on DockerHub
- Security Best Practices for Docker
- Cost Considerations for Docker Usage
Containerize Application
Containerization has literally revolutionized the software development landscape, enabling developers like yourself to package applications and their dependencies into lightweight and portable containers.
Check my insights while planning for this.
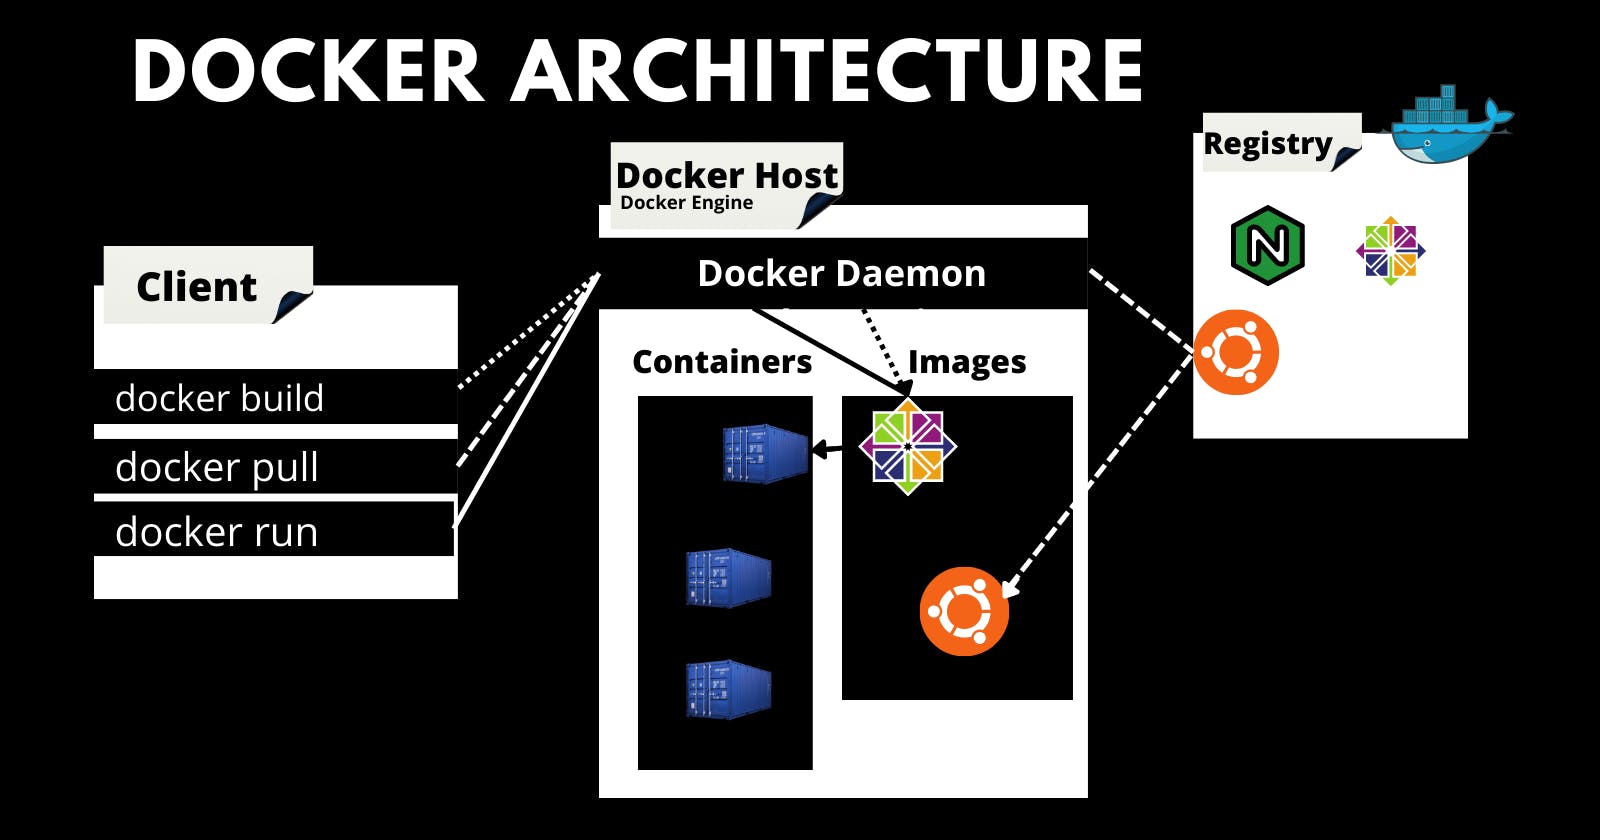
Docker has emerged as the de facto standard for containerization. The tech follows a client-server architecture and comprises various components that work together seamlessly.
- Docker Engine The core runtime that creates and manages containers.
- Docker Images Self-contained snapshots of applications and their dependencies e.g Frontend.
- Docker Containers Runnable instances of Docker images that encapsulate the application and its runtime environment.
- Docker Registry A centralized repository for storing and sharing Docker images e.g. Dockerhub or ECR.
Technical Essentials
These are the 2 key components and utilities that you should be familiar with
Dockerfileis a text file that contains instructions for building Docker images. It specifies the base image, adds dependencies, configures the environment, and defines runtime commands.Docker Composesimplifies managing multi-container applications. With a YAML file, it defines services, their configurations, and relationships between them.
For interacting with containers Docker provides a set of command-line utilities
| Command | Description |
|---|---|
docker build | Builds an image from a Dockerfile. |
docker run | Runs a container based on an image. |
docker stop | Stops a running container. |
docker ps -a | Lists all containers, including stopped ones. |
docker images | Lists all available Docker images. |
docker logs | Displays logs of a running container. |
docker exec | Executes a command in container shell. |
docker-compose arg | Starts services with up and stop with down as arg |
Docker provides a powerful set of commands and tools that streamline the process of containerization and orchestration. Analyze the following synthesis carefully.
Before Docker
Imagine having a powerful backend application constructed using Flask, a popular Python web framework known for its simplicity and flexibility.
📁 backend-flask
├── 📄 app.py
├── 📁 bin
│   └── 🛠️ health-check
├── 📄 buildspec.yml
├── 📁 db
│   ├── 📄 kill-all-connections.sql
│   ├── 📁 migrations
│   │   ├── 📄 16824548085333924_add_bio_column.py
│   │   └── 📄 README.md
│   ├── 📄 schema.sql
│   ├── 📄 seed.sql
│   └── 📁 sql
│       ├── 📁 activities
│       │   ├── 📄 create.sql
│       │   ├── 📄 home.sql
│       │   └── 📄 object.sql
│       └── 📁 users
│           ├── 📄 create_message_users.sql
│           ├── 📄 short.sql
│           ├── 📄 show.sql
│           ├── 📄 update.sql
│           └── 📄 uuid_from_cognito_user_id.sql
├── 🐳 Dockerfile
├── 🐳 Dockerfile.prod
├── 🐳 Dockerfile.stage
├── 📜 external-script.sh
├── 📁 lib
│   ├── 📄 cognito_jwt_token.py
│   ├── 📄 db.py
│   ├── 📄 ddb.py
│   └── 📄 middleware.py
├── 📄 openapi-3.0.yml
├── 📄 README.md
├── 📄 requirements.txt
├── 📁 services
│   ├── 📄 create_activity.py
│   ├── 📄 create_message.py
│   ├── 📄 create_reply.py
│   ├── 📄 home_activities.py
│   ├── 📄 message_groups.py
│   ├── 📄 messages.py
│   ├── 📄 notifications_activities.py
│   ├── 📁 __pycache__
│   │   ├── 📄 create_activity.cpython-38.pyc
│   │   ├── 📄 create_message.cpython-38.pyc
│   │   ├── 📄 home_activities.cpython-38.pyc
│   │   ├── 📄 message_groups.cpython-38.pyc
│   │   ├── 📄 messages.cpython-38.pyc
│   │   ├── 📄 search_activities.cpython-38.pyc
│   │   └── 📄 user_activities.cpython-38.pyc
│   ├── 📄 search_activities.py
│   ├── 📄 show_activity.py
│   ├── 📄 update_profile.py
│   ├── 📄 user_activities.py
│   └── 📄 users_short.py
├── 📄 test-buildspec.yml
└── 📄 yaya_tree.md
Prior to proceeding further, we ensure that our package manager is updated to the latest version.
sudo apt-get updateSubsequently, we move forward with the installation of indispensable Python dependencies.
sudo apt-get install python3-setuptools python3-dev build-essentialAssuming the dependencies availability in pip (opens in a new tab) and a flask app.
curl https://bootstrap.pypa.io/get-pip.py -o get-pip.py

sudo python3 get-pip.py
And then,
Each time you want to install the dependencies for this application, you will need to follow these steps:
pip3 install dependency1
pip3 install dependency2
pip3 install dependency3
pip3 install dependency4
.
.
pip3 install dependencyn
Alternatively, you have the option to include all the dependencies in a requirements.txt like this
dependency1
dependency2
dependency3
dependency4
.
.
dependencyn
For example, the dependencies of this project...
I completed each dep one by one, ensuring a smooth and satisfactory experience. Find more here (opens in a new tab)
flask
flask-cors
opentelemetry-api
opentelemetry-sdk
opentelemetry-exporter-otlp-proto-http
opentelemetry-instrumentation-flask
opentelemetry-instrumentation-requests
aws-xray-sdk
watchtower
blinker
rollbar
Flask-AWSCognito
psycopg[binary]
psycopg[pool]
boto3
And then install them all with a single command.
pip3 install -r requirements.txtThis allows for a more streamlined installation process.
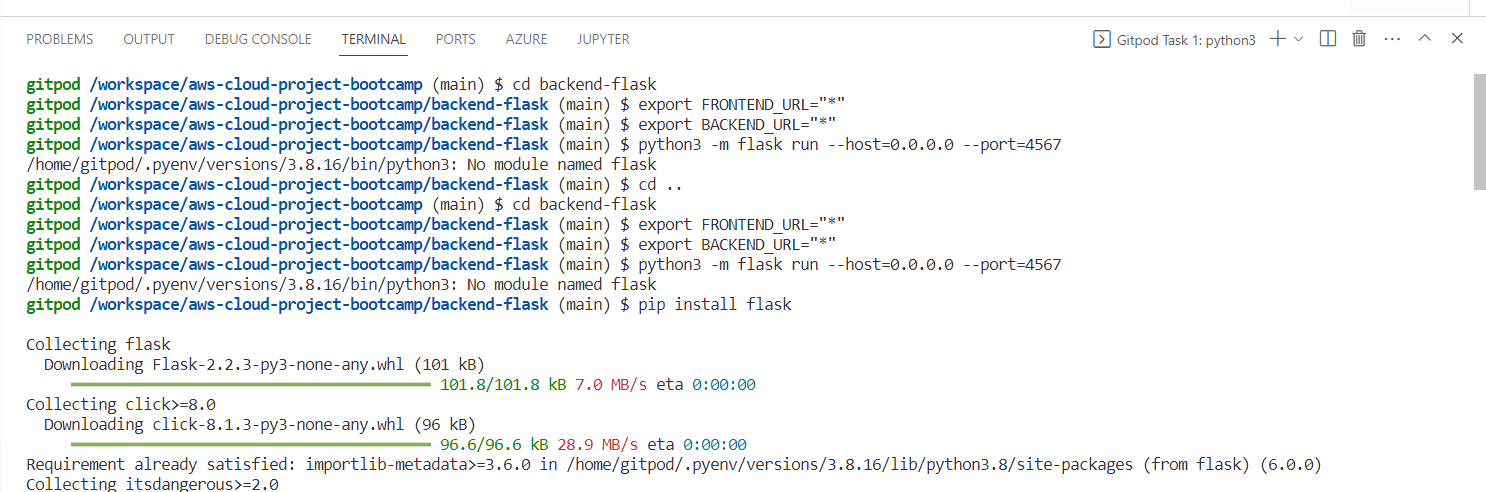
However, you still need to take these steps to run the application.
cd /workspace/aws-cloud-project-bootcamp/backend-flask
pip3 install -r requirements.txt
export FRONTEND_URL="*"
export BACKEND_URL="*"
python3 -m flask run --host=0.0.0.0 --port=4567
Refer to the Initial version, the first damn steps (opens in a new tab).
As you can observe, there are several tasks that need to be explicitly performed in this process.
After Docker
Let's set you up with Docker to ensure your Flask app runs smoothly as intended.
- Get to a root of directory that you want containerize its project
- Create a file and call it
Dockerfile - Add this content and follow up
FROM <base_image>
RUN <command>
COPY <source> <destination>
WORKDIR <directory>
EXPOSE <port>
These instructions collectively define the build process and you can make most Dockerfiles with its combination.
- FROM: Specifies the base image to use as the starting point.
- RUN: Executes a command during the image build process.
- COPY or ADD: Copies files and directories from the build context into the image.
- WORKDIR: Sets the working directory for subsequent instructions.
- EXPOSE: Exposes a specific port to allow communication with the container.
- CMD: Sets the default command to run when the container starts.
- ENV: Sets environment variables inside the container.
We created this after some time spent designing to containerize that flask application;
let's talk about it below.
FROM python:3.10-slim-buster

WORKDIR /backend-flask

COPY requirements.txt requirements.txt

RUN pip3 install -r requirements.txt

COPY . .

EXPOSE ${PORT}

ENV PYTHONUNBUFFERED=1

CMD [ "python3", "-m" , "flask", "run", "--host=0.0.0.0", "--port=4567", "--debug"]
FROM python:3.10-slim-buster: This instruction sets the base image aspython:3.10-slim-buster, which is a slim version of Python 3.10 based on Debian Buster.WORKDIR /backend-flask: Sets the working directory inside the container to/backend-flask.COPY requirements.txt requirements.txt: Copies therequirements.txtfile from the build context into the container's/backend-flaskdirectory.RUN pip3 install -r requirements.txt: Runs the commandpip3 install -r requirements.txtinside the container to install the Python dependencies specified in therequirements.txtfile.COPY . .: Copies the remaining files and directories from the build context into the container's/backend-flaskdirectory.EXPOSE ${PORT}: Exposes the port specified by the${PORT}environment variable, allowing communication with the container.ENV PYTHONUNBUFFERED=1: Sets thePYTHONUNBUFFEREDenvironment variable to1, which ensures that Python output is not buffered.CMD [ "python3", "-m" , "flask", "run", "--host=0.0.0.0", "--port=4567", "--debug"]: Sets the default command to run when the container starts. In this case, it runs the Flask application using thepython3 -m flask runcommand, specifying the host as0.0.0.0and the port as4567, with the--debugoption enabled.
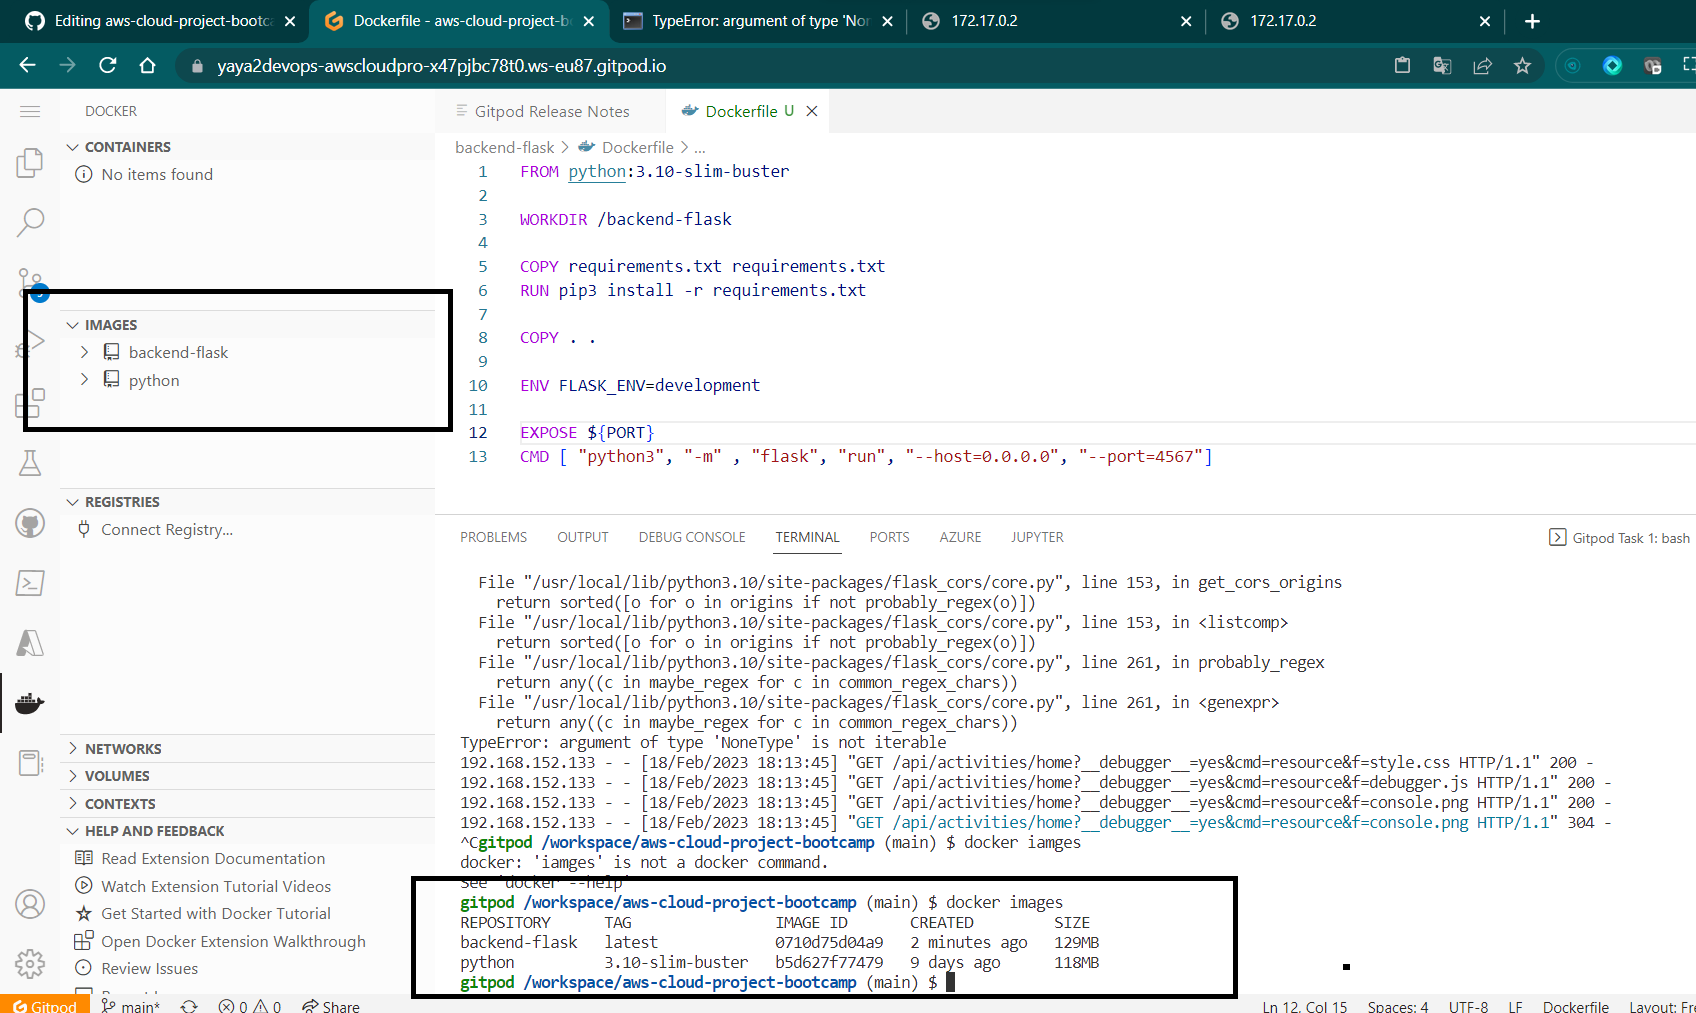
Containerize Flask App
- Build the Dockerfile aka the container:
docker build -t backend-flask ./backend-flask-t backend-flask: Sets the tag name for the Docker image as "backend-flask"../backend-flask: Specifies the build context, indicating the location of the Dockerfile and any necessary files or directories required for the build.
- Run the Dockerfile aka the container
docker run --rm -p 4567:4567 -it -e FRONTEND_URL='*' -e BACKEND_URL='*' backend-flask--rm: Automatically removes the container and its file system after it exits.-p 4567:4567: Maps port 4567 of the host to port 4567 inside the container, allowing external access to the containerized application.-it: Provides an interactive terminal for the container.-e FRONTEND_URL='*' -e BACKEND_URL='*': Sets environment variables inside the container, with values assigned toFRONTEND_URLandBACKEND_URL.backend-flask: Specifies the name of the Docker image to run.
Better right? it will be even better when we make use of the docker compose.
3.1. You can use the host url to test a backend endpoint from the browser.
http://4567:workspace-url/api/activities/home

3.2 Alternatively, start acting essentially and use curl.
curl -X GET http://<workspace-url>:4567/api/activities/home -H "Accept: application/json" -H "Content-Type: application/json"It will reply the response from the browser but json in the cli.
Continue To Reactjs App
Typically, to set up the frontend, we need first to install the Node Package Manager.
cd frontend-react-js
npm i
Once the dependencies are installed, you can run the ReactJS app on port
npm start -- --port=3000By integrating both the backend and frontend processes, we can now get access to the app.
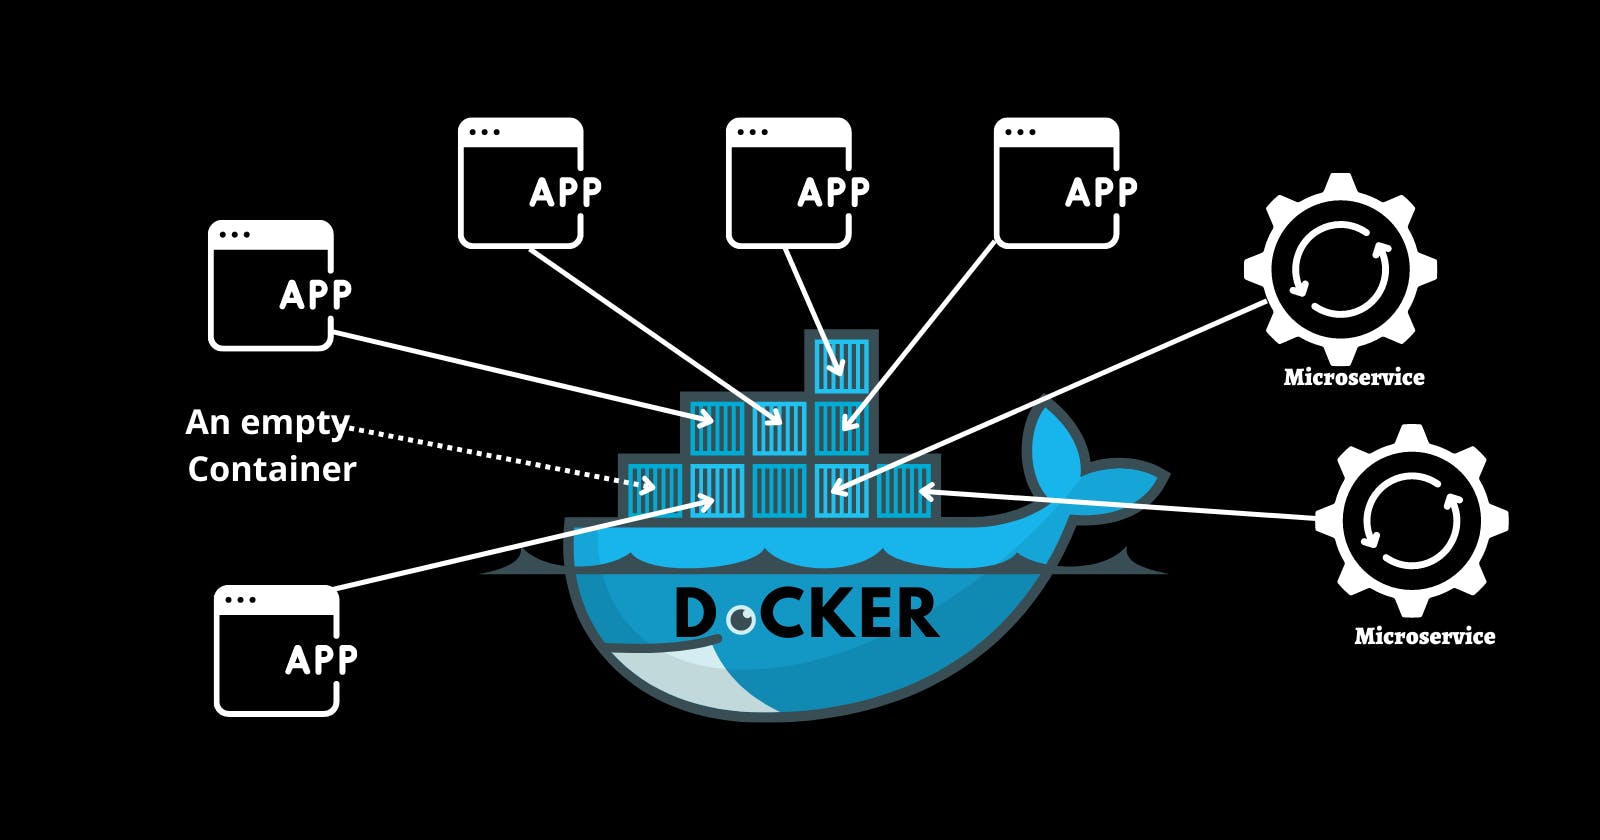
You probably got the the point of using Docker. It allows us to specify all tasks for each container in a single file, making them implicit.
In our current scenario, we only have two containers. Imagine a business app with µservices architectures where it's common to have around "guess" features each have its own container and dependencies.
💡 Google has announced its open sourcing of Kubernetes, revealing that the company successfully manages an impressive 4 billion containers to handle the demands of global scale.
Containerize Reactjs
Create Dockerfile for frontend
FROM node:16.18

ENV PORT=3000

COPY . /frontend-react-js

WORKDIR /frontend-react-js

RUN npm install

EXPOSE ${PORT}

CMD ["npm", "start"]- Build the Frontend container
docker build -t frontend-react-js ./frontend-react-js-t frontend-react-js: Sets the tag name for the Docker image as "frontend-react-js"../frontend-react-js: Denotes the build context directory containing the Dockerfile and associated resources.
- Run Frontend container
docker run --rm -p 3000:3000 -d frontend-react-js--rm: Automatically removes the container and its file system after it exits.-p 3000:3000: Maps port 3000 of the host to port 3000 inside the container, enabling access to the containerized application from the host machine.-d: Runs the container in detached mode, allowing it to run in the background without blocking the terminal.frontend-react-js: Refers to the name of the Docker image to run.- check the status of both containers at this point

Access the application on https://3000-workspace-url.
Still time consuming right? Refer to Container Management and Scaling
Open Container Initiative (opens in a new tab)
![]()
The OCI is an open governance structure and specification for container formats and runtime. It was established in 2015 by industry leaders, including Docker, CoreOS with the aim of creating open standards for containerization technologies.
OCI has developed two main specifications:
- Image Specification: This specification defines the format and structure of container images. It specifies the layout and contents of an OCI-compliant container image, including layers, metadata, and configuration.
- Runtime Specification: This specification defines the runtime environment for executing OCI-compliant container images. It describes the execution environment, lifecycle management, and interactions between the container runtime and the underlying host system.
Whether you know it or not, It plays a crucial role in driving the evolution of container technologies today and tomorrow providing open standards that promote collaboration, innovation, and choice in the container ecosystem.
Considering Alternatives to Docker?
If you're considering alternatives to Docker for containerization, worry not! OCI and the runc project have got you covered. Runc serves as a reference implementation of the OCI runtime specification
It is already natively integrated with tools like Docker.
If you consider exploring other tools you may consider deploying it.
You will have first to build runc to make use of it by creating the OCI Bundle and then building your container image following the specification.
Add notification endpoint and Reactjs page
To implement the notification, We will do the following
- Document the endpoint using OpenAPI specs
- Code a Flask notification endpoint
- Build React.js page for users to interact with
The files that will be affected are listed below.
| Frontend | Backend |
|---|---|
frontend-react-js/src/App.js | backend-flask/openapi-3.0.yml |
frontend-react-js/src/pages/NotificationsFeedPage.js | backend-flask/app.py |
frontend-react-js/src/pages/NotificationsFeedPage.css | backend-flask/services/notifications_activities.py |
OpenAPI
OpenAPI, formerly known as Swagger, is a specification that provides a machine-readable format for defining and documenting RESTful APIs. At its core, OpenAPI provides a comprehensive and user-friendly framework to help innovators visualize and share their vision.
![]()
Developers can create detailed documentation that precisely outlines the structure, endpoints, request/response formats, and even authentication requirements of their APIs.
Here's a sample OpenAPI specification template
openapi: 3.0.3
info:
  title: Document Your First API
  description: This is a sample OpenAPI specification.
  version: 1.0.0
servers:
  - url: https://api.example.com/v1
    description: Production server
paths:
  /users:
    get:
      summary: Get all users
      description: Retrieves a list of all users.
      responses:
        '200':
          description: Successful response
          content:
            application/json:
              schema:
                type: array
                items:
                  $ref: '#/components/schemas/User'
    post:
      summary: Create a new user
      description: Creates a new user.
      requestBody:
        required: true
        content:
          application/json:
            schema:
              $ref: '#/components/schemas/User'
      responses:
        '201':
          description: User created successfully
components:
  schemas:
    User:
      type: object
      properties:
        id:
          type: integer
          format: int64
          description: User ID
        name:
          type: string
          description: User's name
        email:
          type: string
          format: email
description: User's email addressopenapi: Specifies the version of the OpenAPI specification being used. In this case, it's set to version 3.0.3.info: Provides general information about the API, including its title, description, and version.servers: Defines the server(s) where the API is hosted. In this example, there is one production server specified with its URL and description.paths: Contains the API endpoints and their associated operations (e.g., GET, POST) and responses./users: Represents the/usersendpoint.get: Describes the GET operation for retrieving all users. It includes a summary, description, and the expected response.post: Describes the POST operation for creating a new user. It specifies a summary, description, the expected request body, and the possible responses.
responses: Defines the possible responses that an API operation can return. In this example,200and201are the HTTP status codes representing successful responses.components: Contains reusable components used throughout the specification.schemas: Defines data models or schemas used in the API. In this case, there is aUserschema with properties such asid,name, andemail.
This spec demonstrates the basic structure of an API definition. Let's head over Cruddur API.
Adding OpenAPI endpoint
To experience the power of OpenAPI in this project open the openapi-3.0.yml file and explore its contents.
- Start by creating a new path in your OpenAPI specification.
You can do this by adding the following
paths:
  /api/activities/notifications:
Once you've created the new path
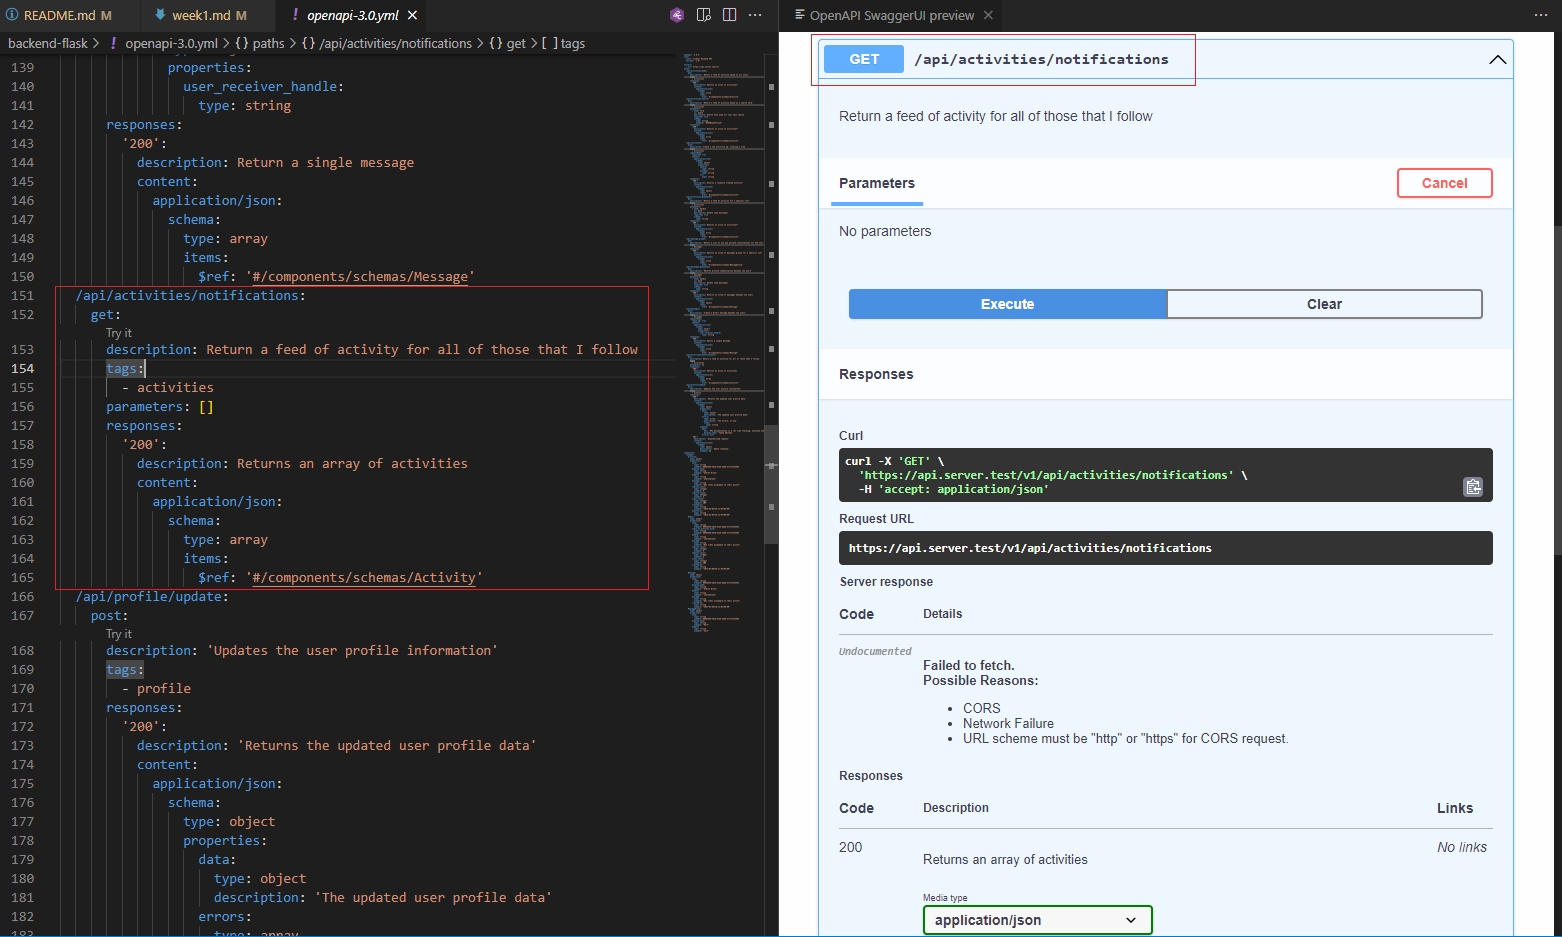
- It's time to edit it to define the behavior of the notification endpoint. For this, I suggest you refer to the OpenAPI specs (opens in a new tab).
/api/activities/notifications:
    get:
      description: 'Return a feed of activity for all of those that I interact with'
      tags:
        - activities
      parameters: []
      responses:
        '200':
          description: Return an array of activities
          content:
            application/json:
              schema:
                type: array
                items:
                  $ref: '#/components/schemas/Activity'
We defined the path /api/activities/notifications, which represents the endpoint for retrieving activity notifications. The get keyword indicates that this path supports the HTTP GET method.
- description: This field provides a brief description of the endpoint's purpose, which in this case is to return a feed of activity for all the users that the current user follows.
- tags: Tags are used to categorize endpoints. In this case, the endpoint is tagged with
activities. - parameters: This section specifies any parameters required by the endpoint. In the given code snippet, there are no parameters defined ([] empty array).
- responses: Here, we define the responses that the endpoint can return. In this case, there is a single response with the status code
200(indicating a successful response).- description: This field provides a brief description of the response, stating that it returns an array of activities.
- content: Describes the content type of the response. In this case, it is
application/json, indicating that the response will be in JSON format.- schema: Defines the structure of the response data. Here, it specifies that the response is an array (
type: array) of items that follow the schema defined in#/components/schemas/Activity.
- schema: Defines the structure of the response data. Here, it specifies that the response is an array (
The provided code is a simplified example of an OpenAPI specification for the /api/activities/notifications endpoint, outlining its purpose, parameters, and response structure. Let go code it.
Define Endpoint Flask App
- Define the endpoint route in
app.py
@app.route("/api/activities/notifications", methods=['GET'])
def data_notification():
  data = NotificationActivities.run()
return data, 200- Create a file called
services/notification_activities.pywithin thebackend-flaskdirectory and add the code below.
from datetime import datetime, timedelta, timezone

class NotificationActivities:
  def run():
    now = datetime.now(timezone.utc).astimezone()
    results = [{
      'uuid': '68f126b0-1ceb-4a33-88be-d90fa7109eee',
      'handle':  'Tron',
      'message': 'I am a character in a movie where human gets inside game.',
      'created_at': (now - timedelta(days=2)).isoformat(),
      'expires_at': (now + timedelta(days=5)).isoformat(),
      'likes_count': 5,
      'replies_count': 1,
      'reposts_count': 0,
      'replies': [{
        'uuid': '26e12864-1c26-5c3a-9658-97a10f8fea67',
        'reply_to_activity_uuid': '68f126b0-1ceb-4a33-88be-d90fa7109eee',
        'handle':  'Worf',
        'message': 'This post has no honor!',
        'likes_count': 0,
        'replies_count': 0,
        'reposts_count': 0,
        'created_at': (now - timedelta(days=2)).isoformat()
      }],
    }
    ]
return results-
Incorporate the
notification_activities.pyfile into theapp.pyfile and import it at the top level. -
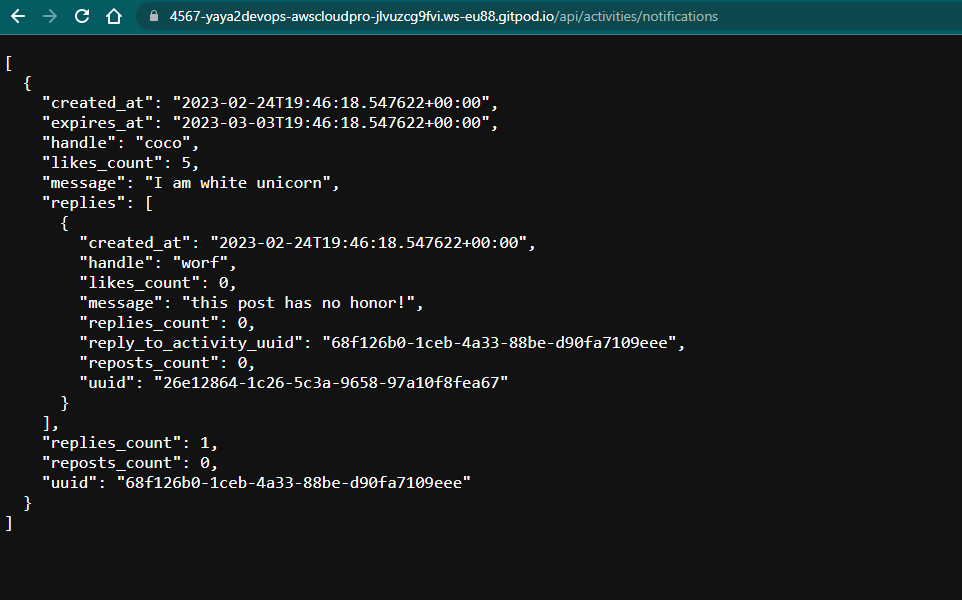
Curl the backend with the new endpoint
api/activities/notifications
curl -X GET http://<workspace-url>:4567/api/activities/notifications -H "Accept: application/json" -H "Content-Type: application/json"You can also access it via the browser. But you need the curl skills.
Design Reactjs Notifications Webpage
- Create a
frontend-react-js/src/pages/NotificationsFeedPage.jsand paste the code below
import './NotificationsFeedPage.css';
import React from "react";

import DesktopNavigation  from '../components/DesktopNavigation';
import DesktopSidebar     from '../components/DesktopSidebar';
import ActivityFeed from '../components/ActivityFeed';
import ActivityForm from '../components/ActivityForm';
import ReplyForm from '../components/ReplyForm';

// [TODO] Authenication
import Cookies from 'js-cookie'

export default function NotificationsFeedPage() {
  const [activities, setActivities] = React.useState([]);
  const [popped, setPopped] = React.useState(false);
  const [poppedReply, setPoppedReply] = React.useState(false);
  const [replyActivity, setReplyActivity] = React.useState({});
  const [user, setUser] = React.useState(null);
  const dataFetchedRef = React.useRef(false);

  const loadData = async () => {
    try {
      const backend_url = `${process.env.REACT_APP_BACKEND_URL}/api/activities/notifications`
      const res = await fetch(backend_url, {
        method: "GET"
      });
      let resJson = await res.json();
      if (res.status === 200) {
        setActivities(resJson)
      } else {
        console.log(res)
      }
    } catch (err) {
      console.log(err);
    }
  };

  const checkAuth = async () => {
    console.log('checkAuth')
    // [TODO] Authenication
    if (Cookies.get('user.logged_in')) {
      setUser({
        display_name: Cookies.get('user.name'),
        handle: Cookies.get('user.username')
      })
    }
  };

  React.useEffect(()=>{
    //prevents double call
    if (dataFetchedRef.current) return;
    dataFetchedRef.current = true;

    loadData();
    checkAuth();
  }, [])

  return (
    <article>
      <DesktopNavigation user={user} active={'notifications'} setPopped={setPopped} />
      <div className='content'>
        <ActivityForm
          popped={popped}
          setPopped={setPopped}
          setActivities={setActivities}
        />
        <ReplyForm
          activity={replyActivity}
          popped={poppedReply}
          setPopped={setPoppedReply}
          setActivities={setActivities}
          activities={activities}
        />
        <div className='activity_feed'>
          <div className='activity_feed_heading'>
            <div className='title'>Notifications</div>
          </div>
          <ActivityFeed
            setReplyActivity={setReplyActivity}
            setPopped={setPoppedReply}
            activities={activities}
          />
        </div>
      </div>
      <DesktopSidebar user={user} />
    </article>
  );
}- Create a
NotificationsFeedPage.cssin the same dir to apply styling - In the
App.jsfile, include the following import statement
import NotificationsFeedPage from './pages/NotificationsFeedPage';- Below in
app.pywhere the endpoints are declared add the following
{
  path: "/notifications",
  element: <NotificationsFeedPage />
},
Running Multiple Containers
Docker Compose is a tool for defining and running multi-container as services by designing a single YAML file and with a single command, you create and start all the services from your configuration.
Compose will allows us to manage these containers in one go enabling seamless interconnection.
Two Containers Quickstart
In our current setup, we have successfully containerized the frontend and backend components left is to compose them.
Lets go over the sample compose and discuss its content.
- create a
docker-compose.ymland paste the following
version: "3.9"

services:
  backend:
    build:
      context: ./backend-flask
      dockerfile: Dockerfile
    ports:
      - "4567:4567"
    environment:
    volumes:
      - <host_path>:<container_path>
  frontend:
    build:
      context: ./frontend-react-js
      dockerfile: Dockerfile
    ports:
      - 3000:3000
    environment:
    depends_on:
      - backend
version: "3.9": Specifies the version of the Docker Compose file format we are using. You can adjust the version according to your requirements.services:This section defines the services (containers) that will be created.backend:Defines the backend service. You can customize the service name as per your application's needs.build:Specifies the build context for the backend service. This is the directory containing the Dockerfile for the backend container. Adjust the context path to match the location of your Dockerfile.dockerfile: Dockerfile:Indicates the name of the Dockerfile to use for building the backend container. If your Dockerfile has a different name, update it accordingly.
ports:Specifies the port mapping for the backend container. In this example, port 8000 on the host machine is mapped to port 8000 in the backend container.environment:Sets the environment variables for the backend container. You can add or modify environment variables based on your application's requirements.volumesconfig allows you to define shared data volumes between the host machine and the containers.
frontend:Defines the frontend service. Customize the service name if needed.build:Specifies the build context for the frontend service. Update the context path to match the location of the Dockerfile for the frontend container.dockerfile: Dockerfile:Indicates the name of the Dockerfile to use for building the frontend container. Modify it if your Dockerfile has a different name.
ports:Specifies the port mapping for the frontend container. In this example, port 3000 on the host machine is mapped to port 3000 in the frontend container.depends_on:Specifies the dependency of the frontend service on the backend service. The frontend container will start only after the backend container is up and running.
Backend Environments
To establish a connection between the frontend and backend workspaces in different developer environments, you can follow these general guidelines.
Lets discuss how in three leading developer environments (CDE).
Codespaces
If you are using Codespaces, you can easily establish the connection between them by adding the following
    environment:
      FRONTEND_URL: "https://${CODESPACE_NAME}-3000.${GITHUB_CODESPACES_PORT_FORWARDING_DOMAIN}"
      BACKEND_URL: "https://${CODESPACE_NAME}-4567.${GITHUB_CODESPACES_PORT_FORWARDING_DOMAIN}"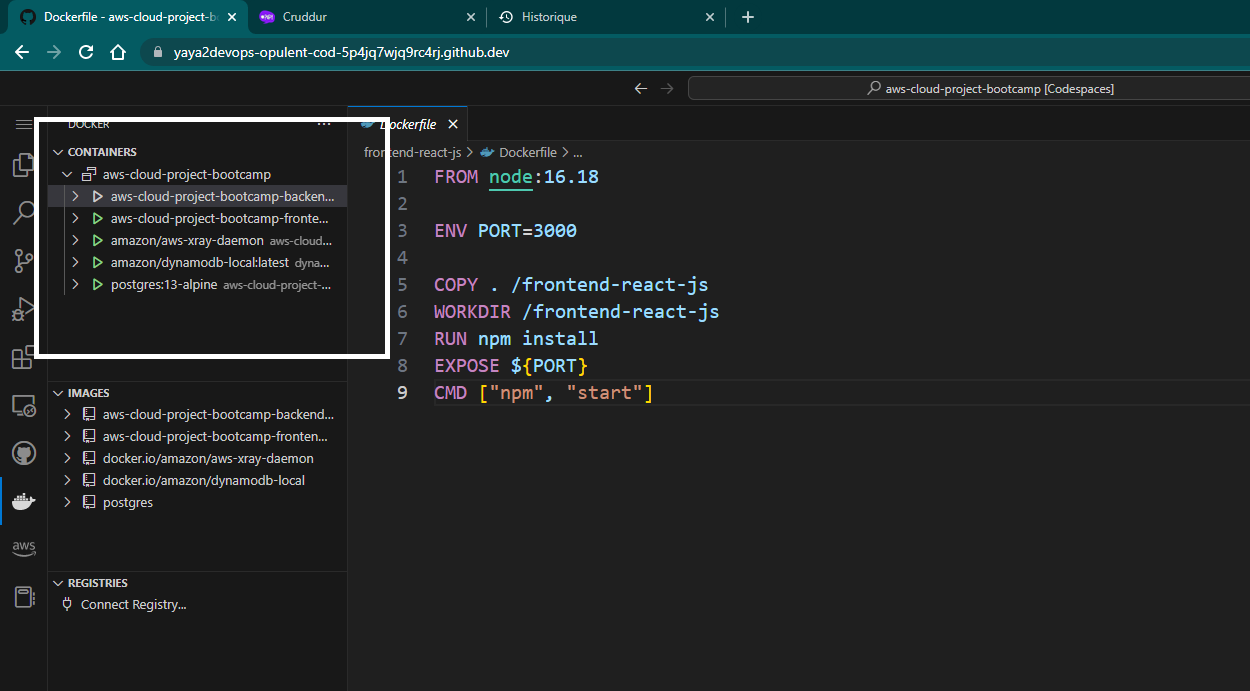
This asset serves as demonstration of my exp with Codespaces. I'm multi cloud development environment developer.
Gitpod
If you are using Gitpod, you can establish the connection as shown below.
    environment:
      FRONTEND_URL: "https://3000-${GITPOD_WORKSPACE_ID}.${GITPOD_WORKSPACE_CLUSTER_HOST}"
      BACKEND_URL: "https://4567-${GITPOD_WORKSPACE_ID}.${GITPOD_WORKSPACE_CLUSTER_HOST}"
VScode
If you are working locally, specifically with Visual Studio Code, you can establish the connection.
    environment:
      FRONTEND_URL: "http://localhost:3000"
      BACKEND_URL: "http://localhost:4567"
Frontend Environments
We only need the URL for the frontend service. The connection will be established through the backend service to establish the relationship with the frontend, as illustrated above.
Codespaces
If you are in Codespaces, you can add the following to establish the connection.
    environment:
      REACT_APP_BACKEND_URL: "https://${CODESPACE_NAME}-4567.${GITHUB_CODESPACES_PORT_FORWARDING_DOMAIN}"
Gitpod
If you are in Gitpod, you can add the following to establish the connection.
    environment:
      REACT_APP_BACKEND_URL: "https://4567-${GITPOD_WORKSPACE_ID}.${GITPOD_WORKSPACE_CLUSTER_HOST}"
VScode
If you are working on your local machine, for example using Visual Studio Code, you can add the following.
    environment:
      REACT_APP_BACKEND_URL: "https://localhost:4567"
After configuring Gitpod and making the necessary adjustments, our composition will be composed as follows.
version: "3.8"
services:
  backend-flask:
    environment:
      FRONTEND_URL: "https://3000-${GITPOD_WORKSPACE_ID}.${GITPOD_WORKSPACE_CLUSTER_HOST}"
      BACKEND_URL: "https://4567-${GITPOD_WORKSPACE_ID}.${GITPOD_WORKSPACE_CLUSTER_HOST}"
      BACKEND_URL: "https://4567-${GITPOD_WORKSPACE_ID}.${GITPOD_WORKSPACE_CLUSTER_HOST}"
    build: ./backend-flask
    ports:
      - "4567:4567"
    volumes:
      - ./backend-flask:/backend-flask
  frontend-react-js:
    environment:
      REACT_APP_BACKEND_URL: "https://4567-${GITPOD_WORKSPACE_ID}.${GITPOD_WORKSPACE_CLUSTER_HOST}"
    build: ./frontend-react-js
    ports:
      - "3000:3000"
    volumes:
- ./frontend-react-js:/frontend-react-js- Execute the command
docker compose upto start the services within thedocker-compose.yml.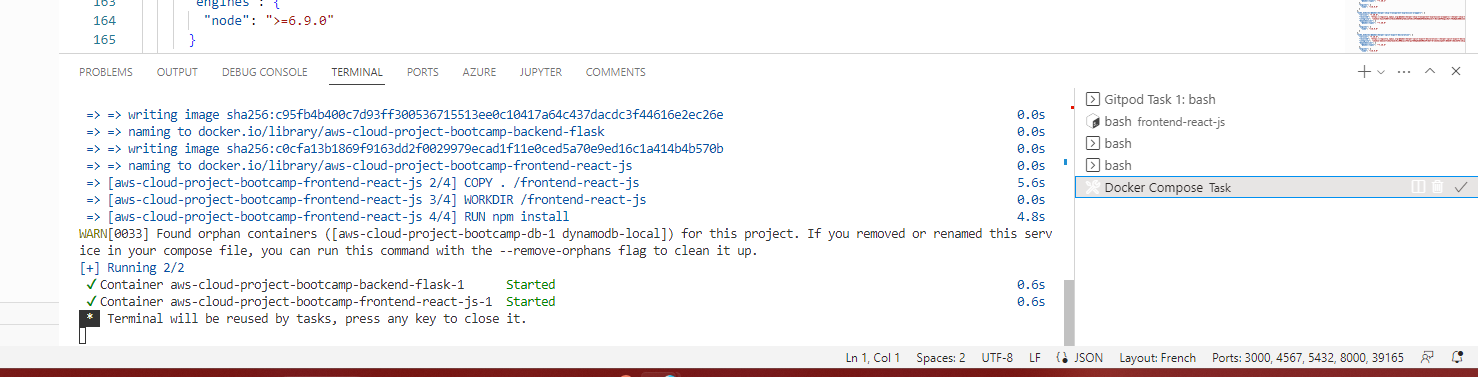
The port in the tab just besides the terminal.
-
Ensure that the ports
3000and4567are accessible and not blocked by Gitpod. -
Open your preferred web browser.
-
In the browser's address bar, enter the URL associated with port
3000.
This will lead you to the application's homepage.
Configuration as Service
As we expand our services and integrate with other software, we diligently configure the application.
For seamless integration with AWS Cognito, we incorporated the necessary environment settings into both our frontend and backend to enable UI authentication.
  frontend-react-js:
    environment:
      REACT_APP_AWS_COGNITO_REGION: "${AWS_DEFAULT_REGION}"
      REACT_APP_AWS_USER_POOLS_ID: "${AWS_USER_POOLS_ID}"
      REACT_APP_CLIENT_ID: "${APP_CLIENT_ID}"
To ensure secure authentication with AWS services, we seamlessly integrated our backend by generating a secret key from the platform. This key, along with the region and ID, was then passed to the compose for further utilization.
  backend-flask:
    environment:
      AWS_DEFAULT_REGION: "${AWS_DEFAULT_REGION}"
      AWS_ACCESS_KEY_ID: "${AWS_ACCESS_KEY_ID}"
      AWS_SECRET_ACCESS_KEY: "${AWS_SECRET_ACCESS_KEY}"
In the second week, we efficiently utilized distributed tracing tools such as X-Ray, OpenTelemetry (OTel), and Rollbar to aid in debugging and troubleshooting.
  backend-flask:
    environment:
      ROLLBAR_ACCESS_TOKEN: "${ROLLBAR_ACCESS_TOKEN}"
      OTEL_SERVICE_NAME: "backend-flask"
      OTEL_EXPORTER_OTLP_ENDPOINT: "https://api.honeycomb.io"
      OTEL_EXPORTER_OTLP_HEADERS: "x-honeycomb-team=${HONEYCOMB_API_KEY}"
      AWS_XRAY_URL: "*4567-${GITPOD_WORKSPACE_ID}.${GITPOD_WORKSPACE_CLUSTER_HOST}*"
      AWS_XRAY_DAEMON_ADDRESS: "xray-daemon:2000"
      ROLLBAR_ACCESS_TOKEN: "${ROLLBAR_ACCESS_TOKEN}"
Exact.
We tailor our configurations according to our unique needs and align them with our overall vision while integrating with other software solutions.
Databases As Containers
To further enhance the app's functionality and ensure data persistence, we need to incorporate databases.
We will make use of DynamoDB, a fully managed NoSQL database service provided by AWS and PostgreSQL. The first was used for week 5 to send messages and the second was used in week 4 to post cruds.
DynamoDB Container
Included DynamoDB setup instructions in the docker-compose.yml file. IMG (opens in a new tab)
dynamodb-local:
    user: root
    command: "-jar DynamoDBLocal.jar -sharedDb -dbPath ./data"
    image: "amazon/dynamodb-local:latest"
    container_name: dynamodb-local
    ports:
      - "8000:8000"
    volumes:
      - "./docker/dynamodb:/home/dynamodblocal/data"
    working_dir: /home/dynamodblocal
dynamodb-local is the name given to this specific section.
user: rootspecifies the user for running the DynamoDB Local container.command: "-jar DynamoDBLocal.jar -sharedDb -dbPath ./data"provides the command to be executed inside the container, launching DynamoDB Local with specific options. This includes using a shared database (-sharedDb) and specifying the database path (-dbPath) as "./data".image: "amazon/dynamodb-local:latest"refers to the Docker image used for the DynamoDB Local container. In this case, it uses the latest version of the "amazon/dynamodb-local" image.container_name: dynamodb-localassigns the name "dynamodb-local" to the container.ports: - "8000:8000"maps the container's port 8000 to the host machine's port 8000, allowing access to the DynamoDB Local service.volumes: - "./docker/dynamodb:/home/dynamodblocal/data"creates a volume mapping between the local directory "./docker/dynamodb" and the container's "/home/dynamodblocal/data" directory. This ensures that data persists between container restarts.working_dir: /home/dynamodblocalsets the working directory inside the container to "/home/dynamodblocal".
We strategically incorporated DynamoDB into our architecture to enable seamless message sending within our platform and efficiently store the associated data.
PostgreSQL Container
Included PostgreSQL setup instructions in the docker-compose.yml file.
db:
    image: postgres:13-alpine
    restart: always
    environment:
      - POSTGRES_USER=postgres
      - POSTGRES_PASSWORD=password
    ports:
      - '5432:5432'
    volumes:
      - db:/var/lib/postgresql/data
Add volumes to docker-compose.yml file at the very end.
volumes:
  db:
    driver: local
The db section defines a service named "db" in the Docker Compose file.
image: postgres:13-alpinespecifies the Docker image to be used, which is the PostgreSQL version 13 with the Alpine Linux distribution.restart: alwaysensures that the container automatically restarts if it stops unexpectedly.environmentsets the environment variables required for the PostgreSQL container. In this case:POSTGRES_USER=postgresspecifies the username for the PostgreSQL database as "postgres".POSTGRES_PASSWORD=passwordsets the password for the "postgres" user.
portsmaps the container's port 5432 to the host machine's port 5432, allowing access to the PostgreSQL database service.volumescreates a named volume named "db" and mounts it to the "/var/lib/postgresql/data" directory inside the container. This ensures that the database data persists even if the container is restarted or recreated.
During week 4, we made use of psql to enable CRUD operations.
Executing the command docker compose up will initiate the launch sequence of the Frontend, Backend, DynamoDB and PostgreSQL services, getting them to run with one command within your environment.
| CONTAINER ID | IMAGE | COMMAND | CREATED | STATUS | PORTS | NAMES |
|---|---|---|---|---|---|---|
| 61ab34832d8a | aws-cloud-project-bootcamp-frontend-react-js | "docker-entrypoint.s…" | 18 minutes ago | Up 18 minutes | 0.0.0.0:3000->3000/tcp, :::3000->3000/tcp | aws-cloud-project-bootcamp-frontend-react-js-1 |
| 3ed9dff36c1e | aws-cloud-project-bootcamp-backend-flask | "python3 -m flask ru…" | 18 minutes ago | Up 18 minutes | 0.0.0.0:4567->4567/tcp, :::4567->4567/tcp | aws-cloud-project-bootcamp-backend-flask-1 |
| 6da1651b38c0 | postgres:13-alpine | "docker-entrypoint.s…" | 4 hours ago | Up 4 hours (healthy) | 0.0.0.0:5432->5432/tcp, :::5432->5432/tcp | aws-cloud-project-bootcamp-db-1 |
| cd062d6c1188 | amazon/dynamodb-local:latest | "java -jar DynamoDBL…" | 4 hours ago | Up 4 hours | 0.0.0.0:8000->8000/tcp, :::8000->8000/tcp | dynamodb-local |
Leveraging the Power of Databases
Once your Docker Compose environment is up and running, encompassing the essential database configurations mentioned earlier, you can begin harnessing the full potential of these powerful tools to extract maximum value from your application.
Working with DynamoDB
- To create a table in DynamoDB, you can run these commands:
aws dynamodb create-table \
    --endpoint-url http://localhost:8000 \
  --table-name Music \
    --attribute-definitions \
        AttributeName=Artist,AttributeType=S \
        AttributeName=SongTitle,AttributeType=S \
    --key-schema AttributeName=Artist,KeyType=HASH AttributeName=SongTitle,KeyType=RANGE \
    --provisioned-throughput ReadCapacityUnits=1,WriteCapacityUnits=1 \
    --table-class STANDARD
aws dynamodb create-table: This is the AWS CLI command to create a table in DynamoDB.--endpoint-url http://localhost:8000: Specifies the endpoint URL to connect to the local instance of DynamoDB running on port 8000. This is useful for local development and testing.--table-name Music: Sets the name of the table to "Music".--attribute-definitions: Defines the attribute definitions for the table.AttributeName=Artist,AttributeType=S: Specifies an attribute named "Artist" with a type of "String".AttributeName=SongTitle,AttributeType=S: Specifies an attribute named "SongTitle" with a type of "String".
--key-schema AttributeName=Artist,KeyType=HASH AttributeName=SongTitle,KeyType=RANGE: Sets the key schema for the table. In this case, the "Artist" attribute is set as the hash key (partition key) and the "SongTitle" attribute is set as the range key (sort key).--provisioned-throughput ReadCapacityUnits=1,WriteCapacityUnits=1: Specifies the provisioned throughput for the table. In this case, the read capacity is set to 1 unit and the write capacity is set to 1 unit.--table-class STANDARD: Specifies the table class as "STANDARD". This is the default table class.
- To create an item in DynamoDB run the command
aws dynamodb put-item \
    --endpoint-url http://localhost:8000 \
    --table-name Music \
    --item \
        '{"Artist": {"S": "No One You Know"}, "SongTitle": {"S": "Call Me Today"}, "AlbumTitle": {"S": "Somewhat Famous"}}' \
    --return-consumed-capacity TOTAL
aws dynamodb put-item: This is the AWS CLI command to put an item (create an item) in DynamoDB.--endpoint-url http://localhost:8000: Specifies the endpoint URL to connect to the local instance of DynamoDB running on port 8000. This is useful for local development and testing.--table-name Music: Specifies the name of the table where the item will be created, in this case, "Music"--item: Defines the item to be created with its attribute values. The attribute values are specified using JSON format.{"Artist": {"S": "No One You Know"}, "SongTitle": {"S": "Call Me Today"}, "AlbumTitle": {"S": "Somewhat Famous"}}: This JSON object represents the attributes and their values for the item. Each attribute is specified with its data type (such as "S" for string).
--return-consumed-capacity TOTAL: Specifies the type of consumed capacity information to be returned after the operation. In this case, it is set to "TOTAL".
- To list tables in DynamoDB
aws dynamodb list-tables --endpoint-url http://localhost:8000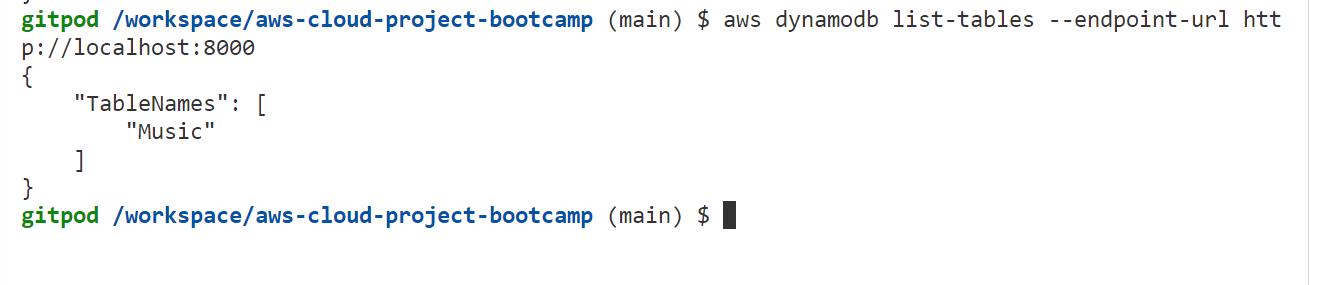
aws dynamodb list-tables: This is the AWS CLI command to list the tables in DynamoDB.--endpoint-url http://localhost:8000: Specifies the endpoint URL to connect to the local instance of DynamoDB running on port 8000. This is useful for local development and testing.
- The following command is used to get data from DynamoDB:
aws dynamodb scan --table-name Music --query "Items" --endpoint-url http://localhost:8000aws dynamodb scan: This is the AWS CLI command to scan (retrieve) data from a DynamoDB table.--table-name Music: Specifies the name of the table from which you want to retrieve data, in this case, "Music".--query "Items": Specifies the query expression to retrieve the items from the table. In this case, it retrieves all the items.--endpoint-url http://localhost:8000: Specifies the endpoint URL to connect to the local instance of DynamoDB running on port 8000. This is useful for local development and testing.
Working with PostgreSQL
- Install the client library in yourd developer environment.
      curl -fsSL https://www.postgresql.org/media/keys/ACCC4CF8.asc|sudo gpg --dearmor -o /etc/apt/trusted.gpg.d/postgresql.gpg
      echo "deb http://apt.postgresql.org/pub/repos/apt/ `lsb_release -cs`-pgdg main" |sudo tee  /etc/apt/sources.list.d/pgdg.list
      sudo apt update
      sudo apt install -y postgresql-client-13 libpq-dev
curl -fsSL https://www.postgresql.org/media/keys/ACCC4CF8.asc|sudo gpg --dearmor -o /etc/apt/trusted.gpg.d/postgresql.gpg: Downloads the PostgreSQL GPG key and saves it to the trusted GPG key location.echo "deb http://apt.postgresql.org/pub/repos/apt/lsb_release -cs-pgdg main" |sudo tee /etc/apt/sources.list.d/pgdg.list: Adds the PostgreSQL repository to the apt sources list based on the current system release.sudo apt update: Updates the package lists from the repositories.sudo apt install -y postgresql-client-13 libpq-dev: Installs the PostgreSQL client and the libpq development package.
If you are using Gitpod, you have the ability to automate the process effortlessly.
- name: postgres
    init: |
       <paste the commands at this level of identation>
name: postgres: Specifies the name of the component or package to be installed, in this case, "postgres".init:: Indicates the initialization section where the necessary commands for installation are defined.
If you have an interest in automation and aren't using Gitpod, you can still benefit from my implementation of dev containers found here.
Execute to connect the postgres server that's already running at port 5432
psql -U postgres --host localhostpsql: This is the command to launch the psql tool, which allows you to interact with PostgreSQL databases.-U postgres: Specifies the username to connect to the PostgreSQL database as "postgres". This assumes that there is a PostgreSQL user named "postgres" with the necessary privileges.--host localhost: Specifies the hostname or IP address of the PostgreSQL server. In this case, it is set to "localhost" to connect to the PostgreSQL server running on the local machine.
Make use of the password "password" for the connection.

To exit or quit the psql command-line tool, simply enter \q.
Data Explorer
Data explorer allows us to conveniently view and interact with the PostgreSQL database and provides a great interaction where we can explore the data stored in psql tables.
Let's briefly explore its core features for, us, developers.
| Features | Description |
|---|---|
| User-friendly interface | Offers a visually intuitive and user-friendly interface |
| Convenient data exploration | Allows easy viewing and exploration of data |
| Interactive functionality | Provides interactive capabilities to query, filter, and sort data |
| Table visualization | Presents data in a structured tabular format |
| Data export | Options for exporting query results or selected data |
Data Explorer is a valuable tool for working with databases.
Cruddur on Dockerhub (opens in a new tab)
To start the process, you need to build, tag, and push the image to Docker Hub.
docker build -t dockerhub-username/cruddur-backend:a-good-tag .
docker push dockerhub-username/cruddur-backend:a-good-tag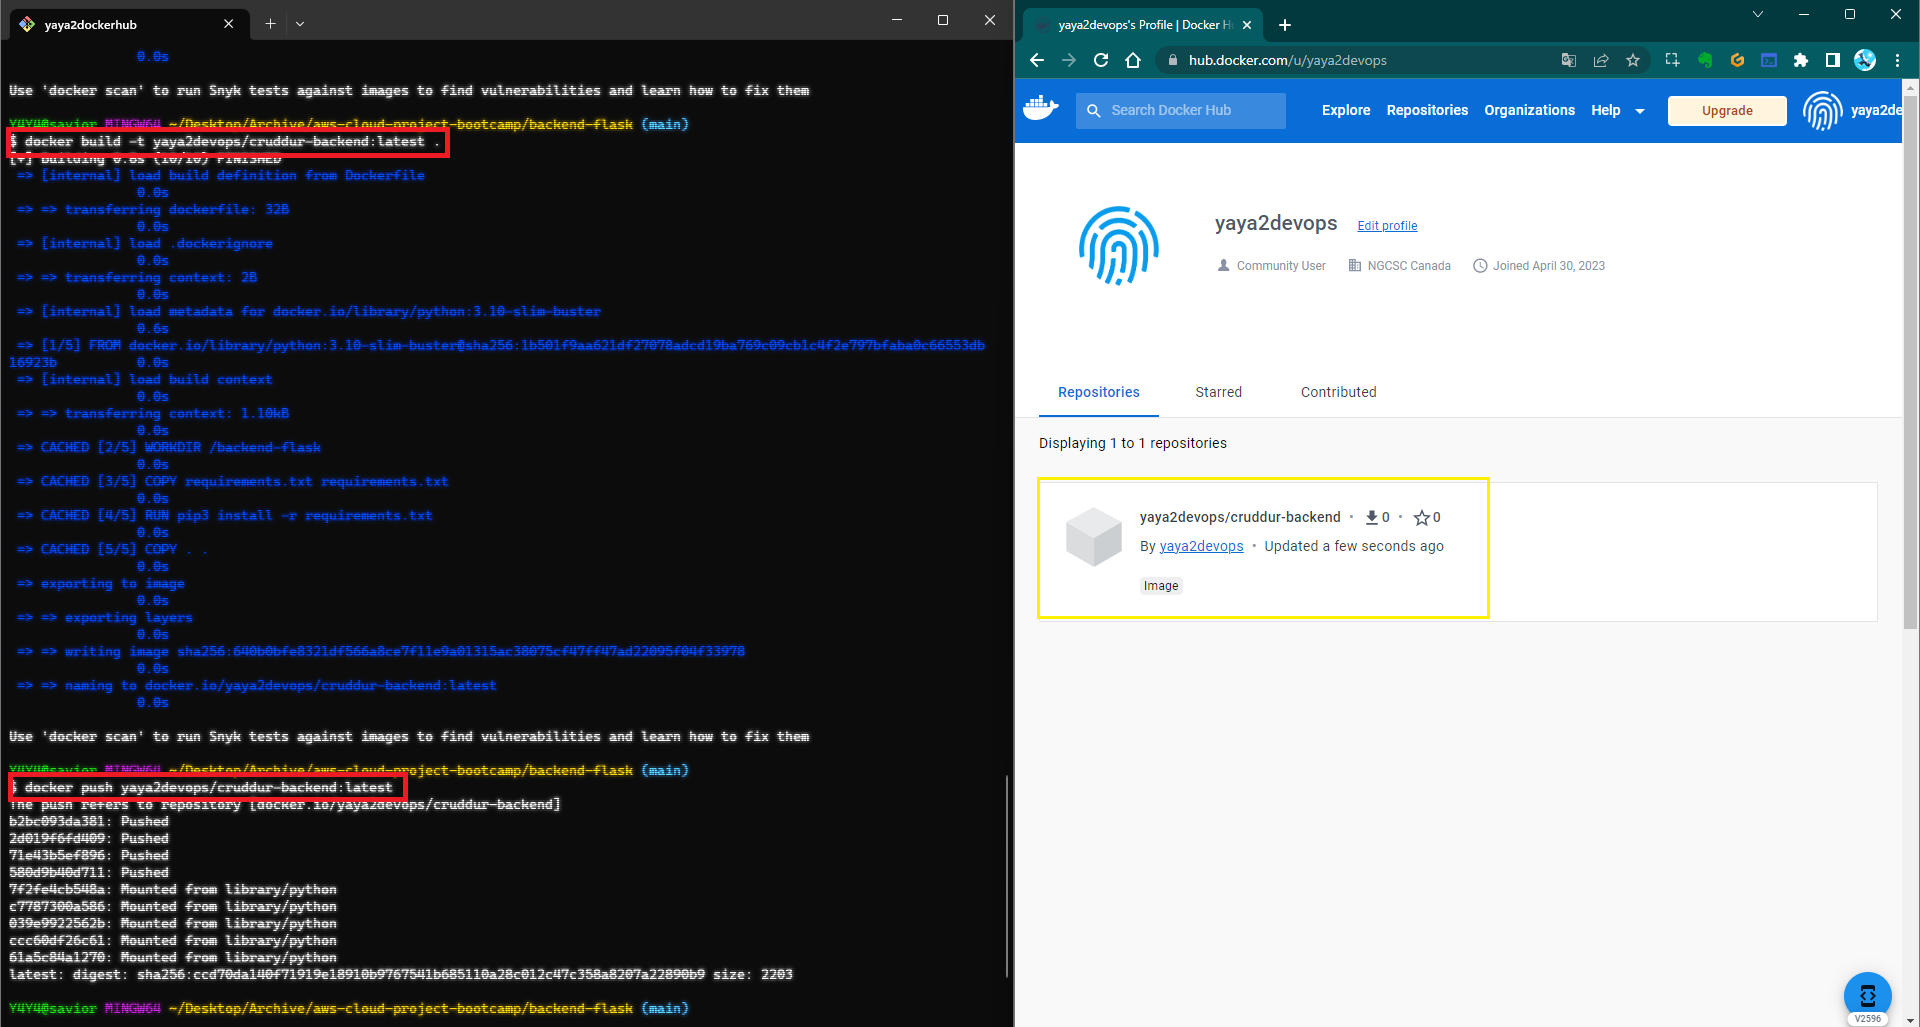
Once done, you can now visit Docker Hub and refer to the existing images that you have uploaded.

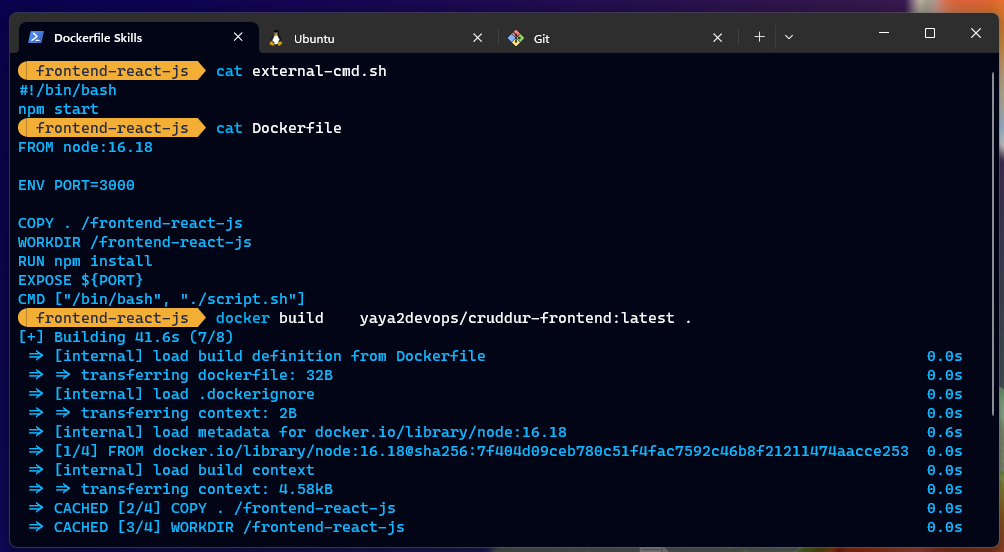
Same applies to the frontend container, you need to build, tag, and push the image
docker build -t dockerhub-username/cruddur-frontend:a-good-tag .
docker push dockerhub-username/cruddur-frontend:latest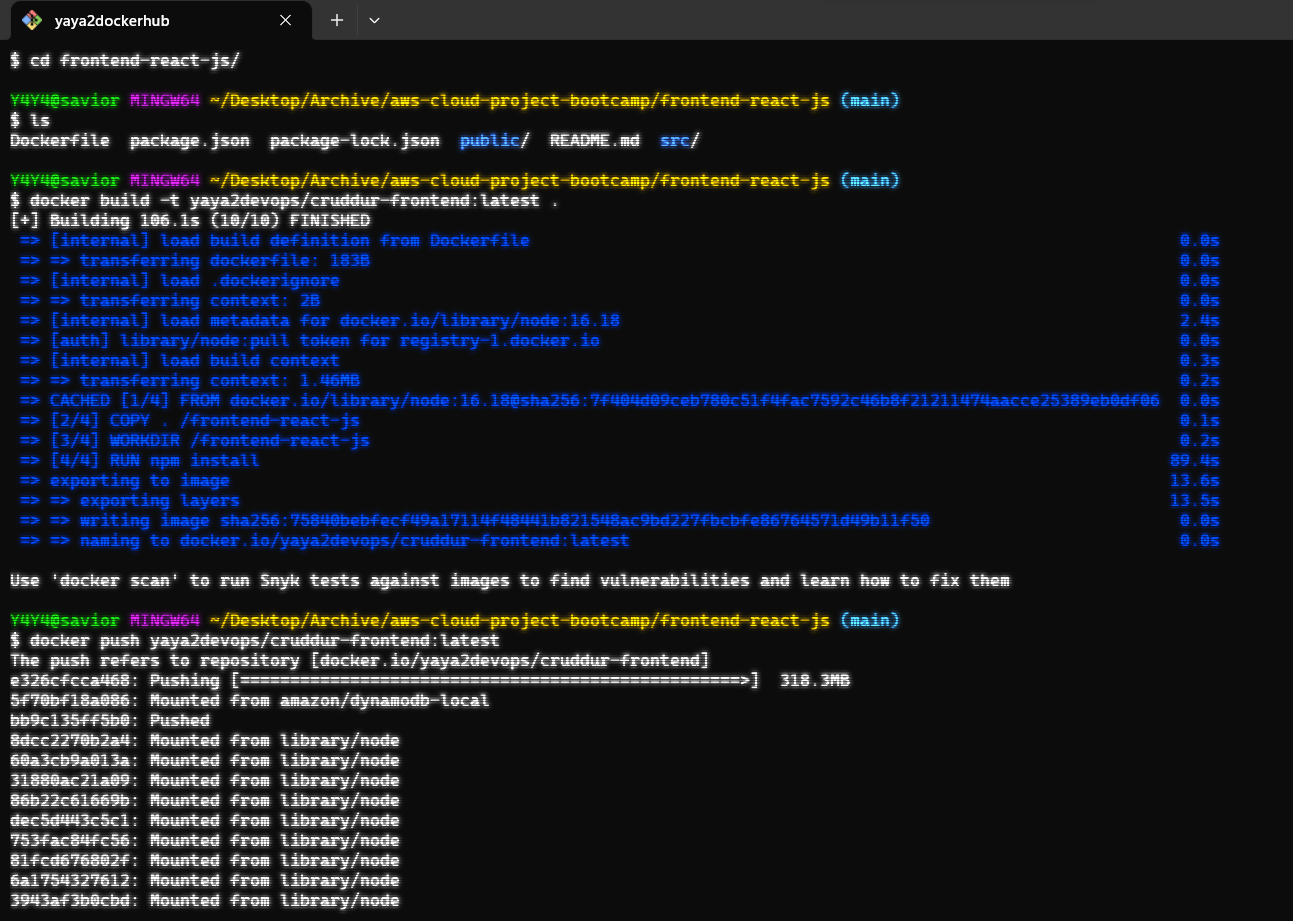
If you wish to push a newer image, you can follow these steps to ensure your updates are reflected:
docker tag my_username/my_image_name:a-good-tag my_username/my_image_name:latest
docker push my_username/my_image_name:latest
External CMD Script
Frontend
For the frontend script add the CMD below
FROM node:16.18

ENV PORT=3000

COPY . /frontend-react-js
WORKDIR /frontend-react-js
RUN npm install
EXPOSE ${PORT}
CMD ["/bin/bash", "./script.sh"]
Create the external script (opens in a new tab)
#!/bin/bash
npm start
Build and run the image to test the CMD function
Backend
For backend, i thought to add ENTRYPOINT. These cannot be overwritten, while we could use cmd but we could change e.g. in this case another script.
I added this ENTRYPOINT [""] and directed my external-script.sh path
FROM python:3.10-slim-buster

WORKDIR /backend-flask

COPY requirements.txt requirements.txt

RUN pip3 install -r requirements.txt

COPY . .

EXPOSE ${PORT}

ENV PYTHONUNBUFFERED=1
cd de
ENTRYPOINT ["/backend-flask/external-script.sh"]
external-script.sh (opens in a new tab)
#!/bin/bash
python3 -m flask run --host=0.0.0.0 --port=${PORT:-4567} --debug
Docker Container on EC2
- Create an Amazon Elastic Compute Cloud instance from the console
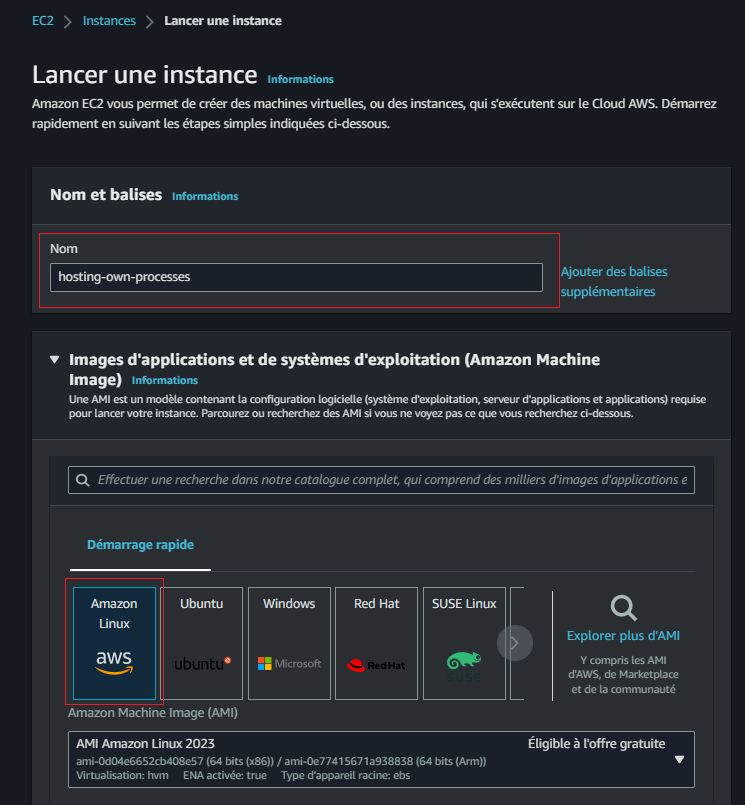
- Integrate a pivotal key-pair

- allow ssh and HTTPS from internet
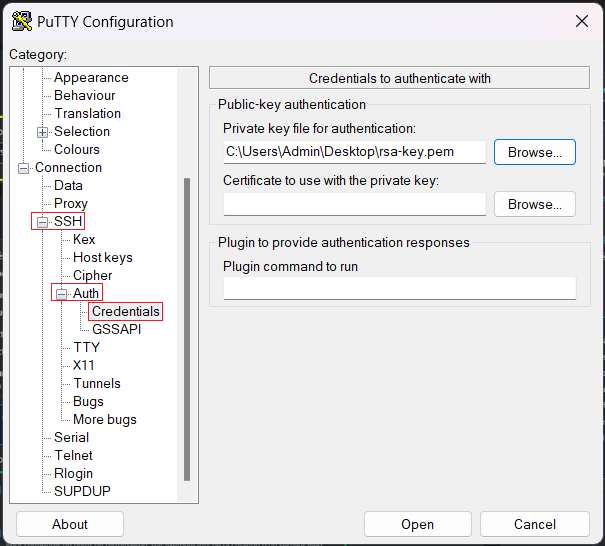
SSH Using PuTTy
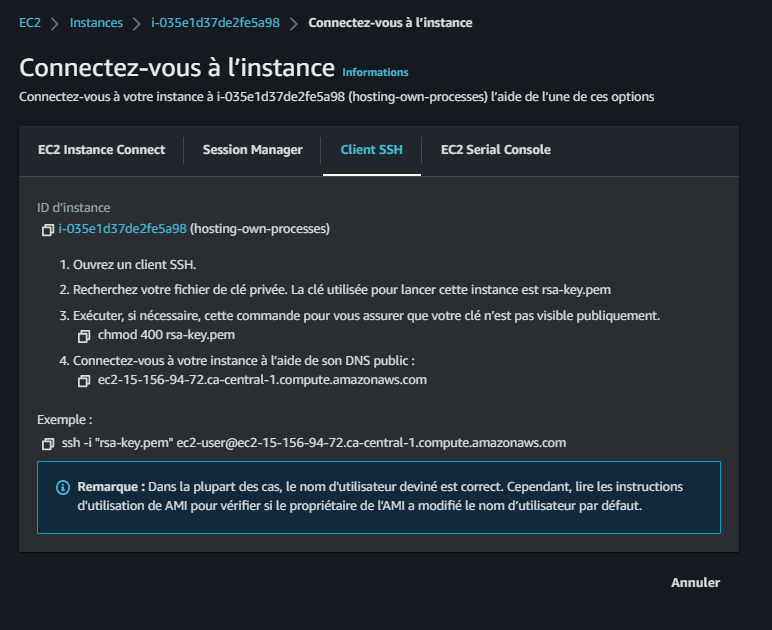
- Add public IP,
- leave port 22, its standard for ssh
- Expand on SSH -> Auth -> Credentials: Browse your .pem SK and add it
- Click Open, ec2 will open
Related Lab Helped (opens in a new tab)
make sure the you chmod 600 or 400 ur "rsa-key.pem"
SSH using AWS EC2 Connect
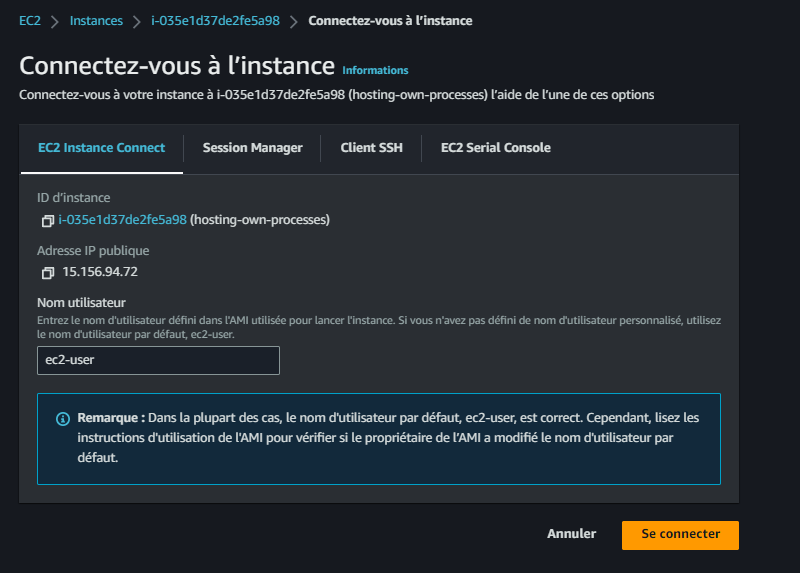
- Connect
- Update yum:
sudo yum update - Get git with:
sudo yum install git - Clone Project repo

Although Dockerhub is available, I started with this approach for various reasons. Lol.
Backend on EC2
Install Docker to be able to pull the img
sudo yum install docker- Pulling the image from dockerhb to EC2:
sudo docker pull yaya2devops/cruddur-backend:latest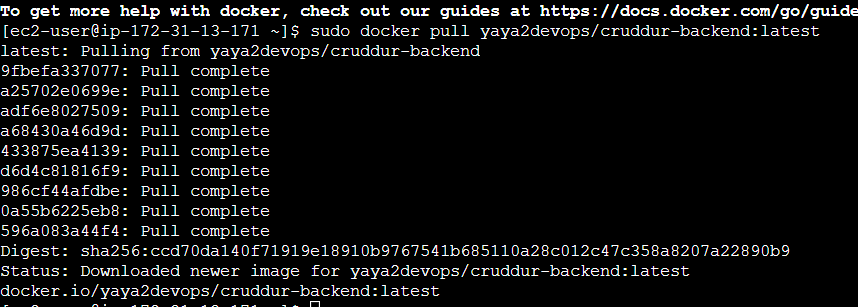
- Run the container from EC2
sudo docker run -p 4567:4567 yaya2devops/cruddur-backend:latest
Nav to backend using ec2-public-ip:port/endpoints
Frontend on EC2
- Pull frontend Image
- Install Docker Compose
Run both on Docker compose
version: "3.8"
services:
  backend-flask:
    environment:
      FRONTEND_URL: "http://IP:3000"
      BACKEND_URL: "http://IP:4567"
    image: yaya2devops/backend-flask:1.0
    ports:
      - "4567:4567"
  frontend-react-js:
    environment:
      REACT_APP_BACKEND_URL: "http://IP:4567"
    image: yaya2devops/frontend-react-js:1.0
    ports:
      - "3000:3000"
networks:
  internal-network:
    driver: bridge
    name: cruddur
Flask Health check
- Added a new endpoint in
app.py
@app.route("/api/health-check", methods=["GET"])
def health_check():
return {'success': True, 'ver': 1}, 200- Config docker compose
healthcheck:
  test: curl --fail http://<URL>:4567/api/health || exit 1
  interval: 10s
  timeout: 10s
  start_period: 10s
  retries: 3
Multi-Stage Containerization
- building the application with multistaged dockerfile:
gitpod /workspace/aws-cloud-project-bootcamp/backend-flask (main) $ docker build -t backend -f Dockerfile.stage .
[+] Building 33.1s (15/15) FINISHED
 => [internal] load .dockerignore                                                                                      0.0s
 => => transferring context: 44B                                                                                       0.0s
 => [internal] load build definition from Dockerfile.stage                                                             0.0s
 => => transferring dockerfile: 862B                                                                                   0.0s
 => [internal] load metadata for docker.io/library/python:3.10-slim-buster                                             0.7s
 => [internal] load build context                                                                                      0.0s
 => => transferring context: 96.01kB                                                                                   0.0s
 => CACHED [build 1/7] FROM docker.io/library/python:3.10-slim-buster@sha256:02874255d484428c9412db98923b387ac73822cb  0.0s
 => CACHED [stage-1 2/4] WORKDIR /backend-flask                                                                        0.0s
 => [build 2/7] RUN apt update                                                                                         2.7s
 => [build 3/7] RUN apt install -y --no-install-recommends     build-essential gcc                                     9.4s
 => [build 4/7] WORKDIR /backend-flask                                                                                 0.0s
 => [build 5/7] RUN python3 -m venv /backend-flask/venv                                                                4.5s
 => [build 6/7] COPY requirements.txt .                                                                                0.0s
 => [build 7/7] RUN pip3 install -r requirements.txt                                                                  10.6s
 => [stage-1 3/4] COPY --from=build /backend-flask/venv ./venv                                                         0.6s
 => [stage-1 4/4] COPY . .                                                                                             0.0s
 => exporting to image                                                                                                 3.9s
 => => exporting layers                                                                                                3.9s
 => => writing image sha256:4af2988118c434aea7ecf21dd750de0fec67442e83c35e6f63071c12eaa98cd1                           0.0s
=> => naming to docker.io/library/backend - Make use of our Health check to "check" app running
Containers on Docker Desktop
In this scenario, we will use Docker Desktop to execute the containers on a local environment.
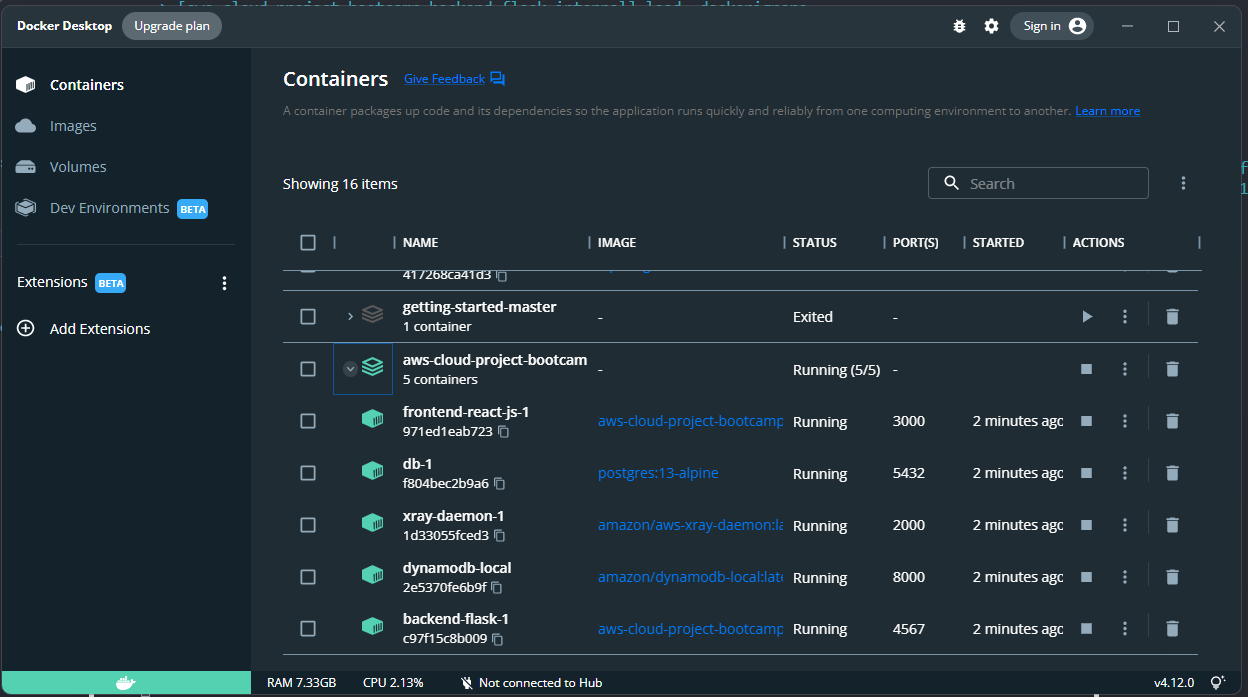
Once you have successfully executed the Docker Compose, navigate to the localhost address in your web browser to access and examine the app.
we back to the latest error we had before changing env.png)
Security Best Practices
Containers have the remarkable ability to encapsulate and run virtually anything, making them incredibly versatile and adaptable. So doing them right is a must.
- Web Servers: hosting websites or web applications using servers like Apache or Nginx.
- Database Systems: running database systems like MySQL, PostgreSQL, or MongoDB.
- µservices: individual components of an application, enabling scalability and independent updates.
- API Services: hosting RESTful APIs or GraphQL servers, facilitating standardized communication.
- Data Processing Workflows: reproducible data processing workflows, including data ingestion, transformation, and analysis.
- ML Models: packaging machine learning models and their dependencies for easy deployment and inference.
- CI/CD Tools: integrating and deploying applications with tools like Jenkins or GitLab CI.
- IoT Edge Computing: deploying applications on IoT devices or gateways, enabling edge processing and analysis.
To help ensure the integrity and protection of containerized environments, implementing container security best practices is crucial.
- Image Integrity: Use trusted and verified container images from reputable sources. Regularly update and patch these images to address any known vulnerabilities.
- Container Isolation: Isolate containers from each other and the host system using appropriate containerization technologies.
- Secure Configuration: Follow secure configuration practices Inc. minimizing the number of running processes disabling unnecessary services.
- Vulnerability Scanning: Regularly scan container images and the underlying host system for known vulnerabilities.
Particularly when it comes to managing configuration files
| Dockerfiles | Docker Compose |
|---|---|
| Use official base images | Limit exposed ports |
| Update regularly | Restrict container privileges |
| Minimize image layers | Implement resource limits |
| Remove unnecessary dependencies | Use secure environment variables |
| Run containers with non-root users | Separate sensitive data |
Get Container Synked
Synk is an open-source security platform specifically designed to detect security vulnerabilities Incl those in Docker containers.
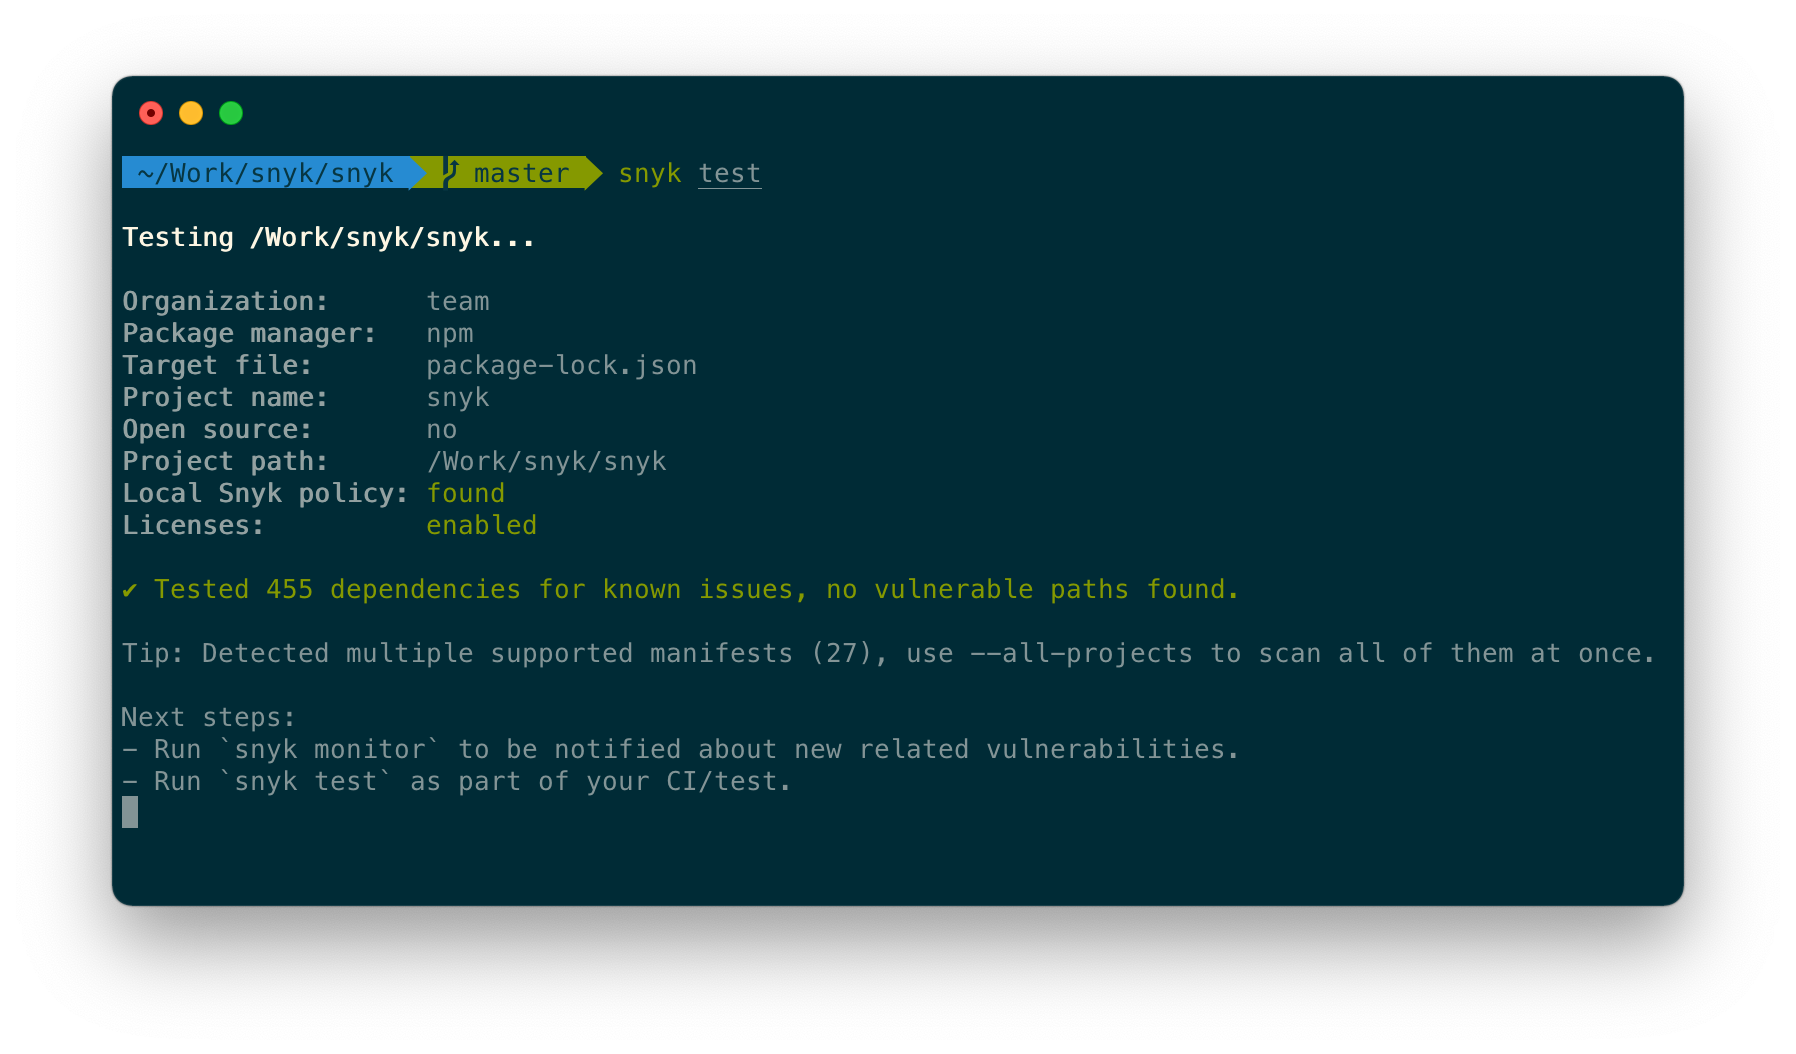
To get Sec Synked, you can start by installing its CLI
npm install snyk@latest -gAuthenticate with Synk CLI using this command
snyk authYou can now start scanning ubunto image with Synk
snyk container test ubuntu:latestScanning your container with Synk
snyk container test <img-name>For more, refer to Synk Containers (opens in a new tab) & Synk Org (opens in a new tab)
Secret Managers
Always play it right and safeguard your most sensitive information by adopting secure practices and leveraging robust secret managers to store your invaluable secrets with utmost confidentiality.
Among the plethora of available options, I have personally found AWS Secret Manager, Parameter Store, and Azure Key Vault to be exceptionally valuable tools.
My go-to choice is always to utilize the secret manager service offered by the provider.
In this project, I primarily used the AWS Parameter Store for managing my secrets.
Debugging with Docker
In this section, I will outline the utilities I employed to effectively address Docker-related challenges.
Docker Logs
To inspect the log records of a container, employ the docker logs [container_id] command. Should you desire to actively monitor the log output in real-time while the container is operational, include the -f flag.
docker logs -f [container_id](Command Output) Server running at http://0.0.0.0:80/
Docker inspect
To examine the metadata of a container in Docker, the docker inspect command can be utilized.
docker inspect [container_id]Utilize--format to selectively examine specific fields from the JSON output returned by the command. For instance:
docker inspect --format='{{range .NetworkSettings.Networks}}{{.IPAddress}}{{end}}' [container_id]

# Output
192.168.9.3
Docker Exec
Occasionally, there may be a need to initiate an interactive Bash session within a running container. This can be accomplished using the docker exec command.
This will grant an interactive shell session within the container, allowing for effective debugging and troubleshooting.
To proceed execute the following command:
docker exec -it [container_id] bashBy including the -it flags, you enable interactive communication with a container by allocating a pseudo-tty and keeping the standard input (stdin) open.
(Command Output)
root@xxxxxxxxxxxx:/app#

#Look into the container
ls
Notably, the Bash shell was launched within the designated WORKDIR directory (/app), as defined in the Dockerfile.
Costs Considerations
When using Docker, take into account various cost considerations to ensure efficient resource allocation and manage expenses.
- Container Lifespan: Consider how long you need ur container running that require continuous resource allocation.
- Container Sizing: Optimize container sizes based on your application's resource requirements
- Image Versioning: Implement versioning strategies for container images to manage costs.
- Docker Registry: Consider the cost implications of where to store ur images and the costs if its in private cloud.
Below, we outline additional critical cost considerations to keep in mind when working with Docker.
| Consideration | Description |
|---|---|
| Container Images | Optimize container images to minimize disk space and transfer time, reducing storage and network costs. |
| Persistent Storage | Choose a storage provider based on pricing models, data transfer costs, and backup/storage replication costs. |
| Networking | Understand networking architecture and data transfer patterns to estimate and optimize networking costs. |
| Orchestration and Management | Consider infrastructure requirements, licensing fees, and operational overhead of container orchestration tools. |
| Monitoring and Logging | Define a monitoring strategy that balances detail with associated storage and data transfer costs. |
| Scaling and High Availability | Assess costs associated with scaling containers and ensuring high availability through redundancy. |
A wrapping factor is to adhere with compliance and licensing for the software and dependencies included in your container images.
Violations can lead to legal and financial consequences.
A Good Guide (opens in a new tab) to GDPR Compliance for Containers and the Cloud
Taking up what I mentioned, you can maximize the value derived from your Docker deployments while keeping costs under control.
You can also refer to some images registries pricing e.g. Dockerhub (opens in a new tab) and ECR (opens in a new tab)
Plus Reference
- 11 Container Security Scanners to find Vulnerabilities
- Docker Compose Configuration (opens in a new tab)
- Open Container Initiative Org (opens in a new tab)
- Synk Containers Security (opens in a new tab)
- Extending FastAPI (opens in a new tab)
- Container and Kubernetes compliance considerations (opens in a new tab)
- Everything at Google Runs in Containers (opens in a new tab)