Revolutionizing Your Application
In this, we will continue from last week by focusing on maintaining equilibrium. We'll elevate our application architecture by implementing Cross-Origin Resource Sharing (CORS) and setting up a robust Load Balancer. This ensures seamless communication between application components while efficiently distributing traffic.
Initial Release (opens in a new tab)

Get it. Change it (opens in a new tab)
Our technical responsibility for the week involves provisioning and operating containers to execute load balancing tasks, configuring our custom domain and mapping it to the load balancer's URL for seamless functionality.
Our technical missions for this week include:
- Orchestrating containers for advanced load balancing
- Enhancing security with JWT token refresh implementation
- Seamlessly integrating our custom domain with the load balancer's URL (opens in a new tab)
- Optimizing our project structure through bin directory refactoring
- Elevating Docker networking capabilities
Our domain, on the other hand, will be fully onboarded to route53 and will be issued the necessary SSL certificate from AWS Certificate Manager.
We'll also tackle technical tasks like refreshing that token from week 3, remaking the scripts and my design skills among others. Partway through, I took you on a tour of my primary domain and showed you the projects hosted there that could be beneficial to you.
Main Week Seven Tasks
- Provision and configure Application Load Balancer along with target groups
- Manage your domain using Route53 via hosted zone
- Create an SSL certificate via ACM
- Fargate Technical Questions
- Setup a record set for naked domain to point to frontend-react-js
- Setup a record set for api subdomain to point to the backend-flask
- Configure CORS to only permit traffic from our domain
- Secure Flask by not running in debug mode
- Implement Refresh Token for Amazon Cognito
- Refactor bin directory to be top level
- Configure task definitions to contain x-ray and turn on Container Insights
- Change Docker Compose to explicitly use a user-defined network
- Scripting Relative Path
- Create Dockerfile specifically for production use case
- Fargate Service Scripts
- Using ruby generate out env dot files for docker using erb templates
- Host a website with AWS CloudFront
- Brainstorming Notes
- Containers Security Practices in AWS
Let's dive deep into each of these critical tasks.
Crafting a Resilient Load Balancer
Navigate to EC2 → Load Balancers in the AWS Console to begin this crucial setup:
- Initiate an Application Load Balancer named "cruddur-alb"
- Strategically select 3 subnets for maximum availability
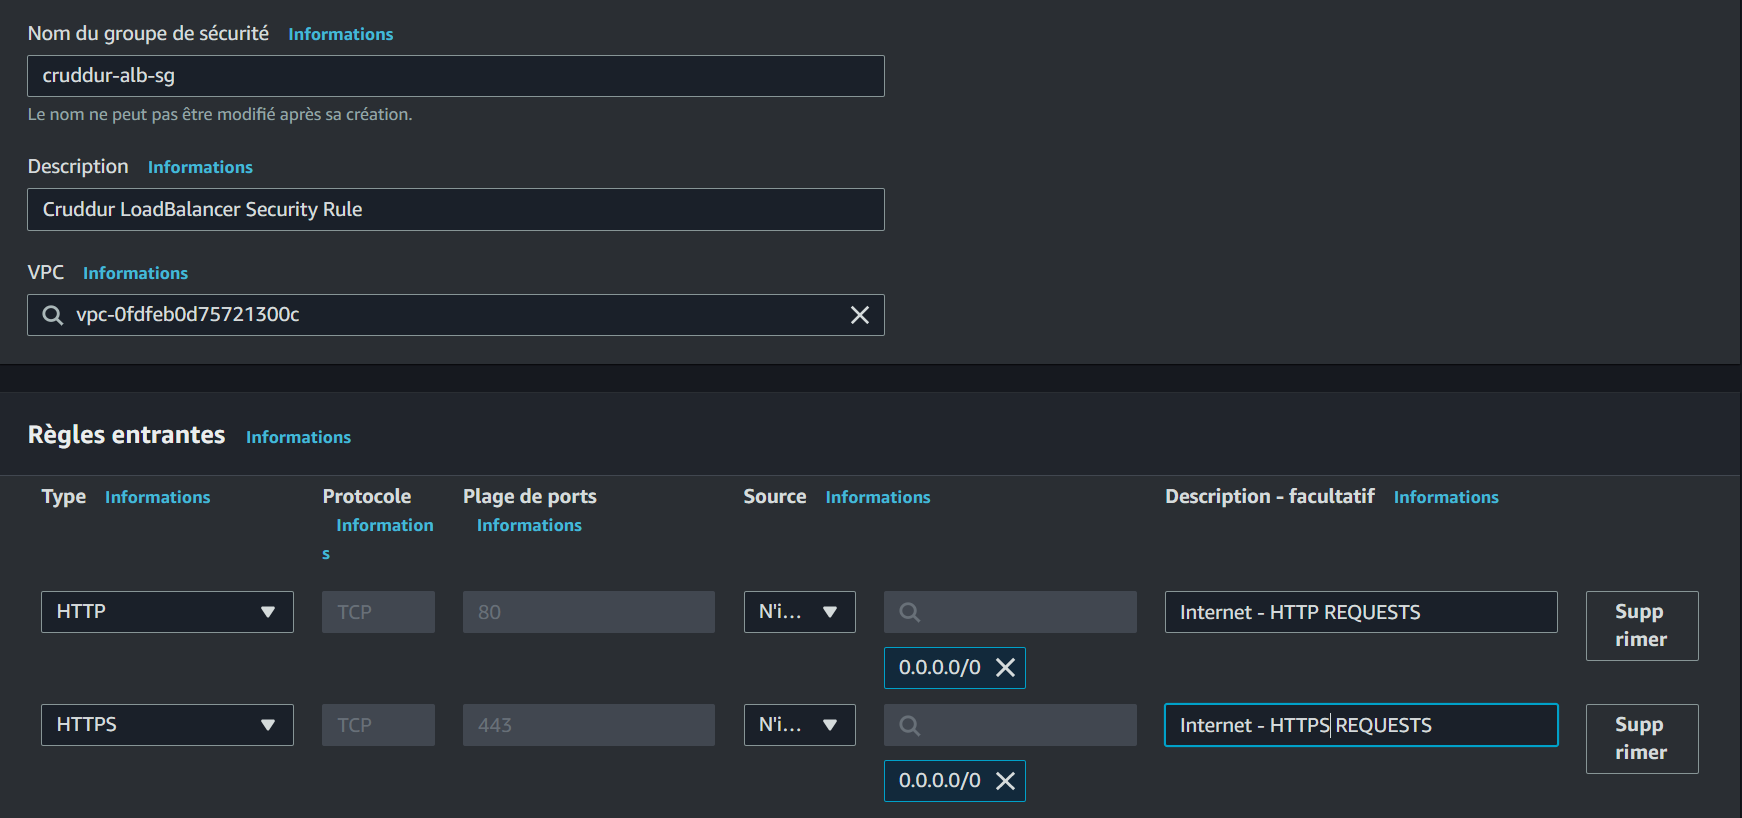
- Engineer a new Security Group: "cruddur-alb-sg"
- Implement inbound rules for HTTP and HTTPS from any source
Create a visual representation of your security group configuration here:
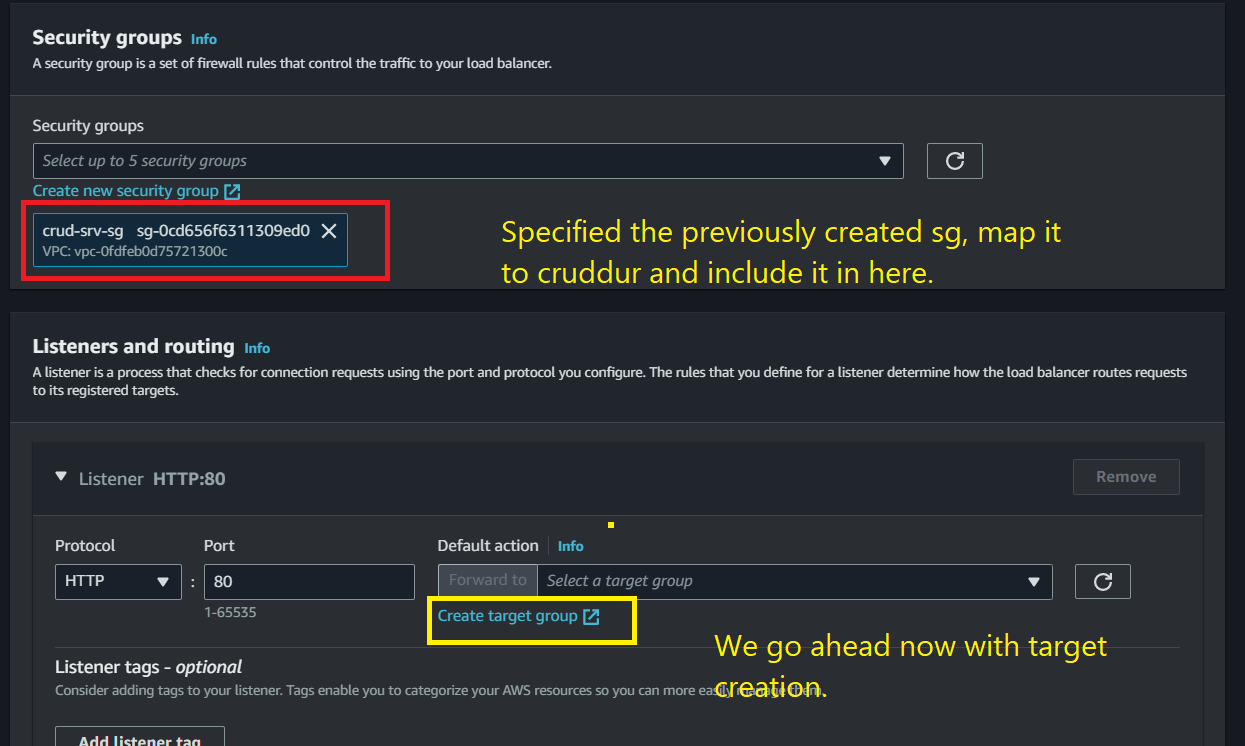
Next, configure listeners and routing:
- Establish a target group for the backend
- Craft a target group for the frontend
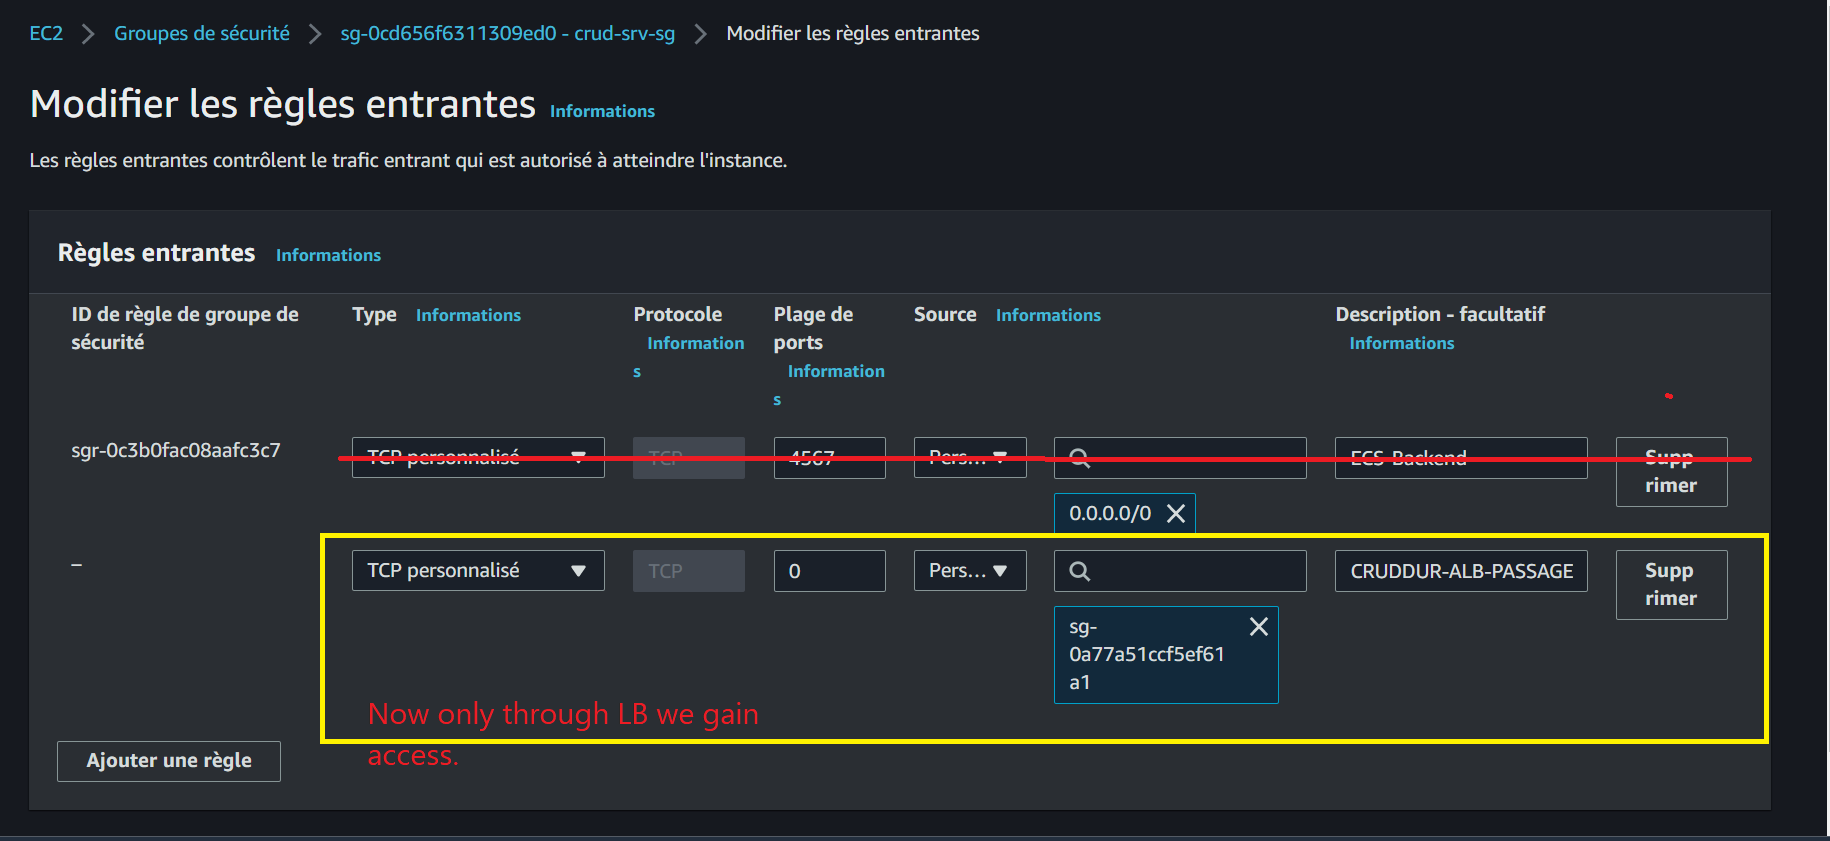
Enhance backend security with these rules:
- Modify the "crud-srv-sg" security group
- Introduce a new inbound rule permitting traffic from "cruddur-alb-sg" on port 4567
- Eliminate the outdated rule that allowed direct backend access
Visualize your load balancer setup:
Architecting Robust Target Groups
For the backend:
- Choose IP addresses as the target type
- Designate "cruddur-backend-flask-tg" as the target group name
- Configure port 4567 and set "/api/health-check" as the health check path
- Optimize by setting the healthy threshold to 3 in Advanced Health Check Settings
For the frontend:
- Select IP addresses for the target type
- Name the target group "cruddur-frontend-react-js"
- Set up port 3000
- Fine-tune by setting the healthy threshold to 3 in Advanced Health Check Settings
Harmonize your load balancer for peak performance:
- Remove the default security group
- Apply "cruddur-alb-sg" as the security group
- Set the default action to utilize "cruddur-backend-flask-tg" on port 4567
- Implement a listener for port 3000, leveraging the "cruddur-frontend-react-js" target group
Capture your target group configuration:
Integrating ECS with Load Balancer
Enhance your backend service JSON file with this load balancer configuration:
"loadBalancers": [
  {
    "targetGroupArn": "<yacrud-backend-flask-target-group-ARN>",
    "containerName": "backend-flask",
    "containerPort": 4567
  }
]
Recreate your Fargate service with this advanced setup:
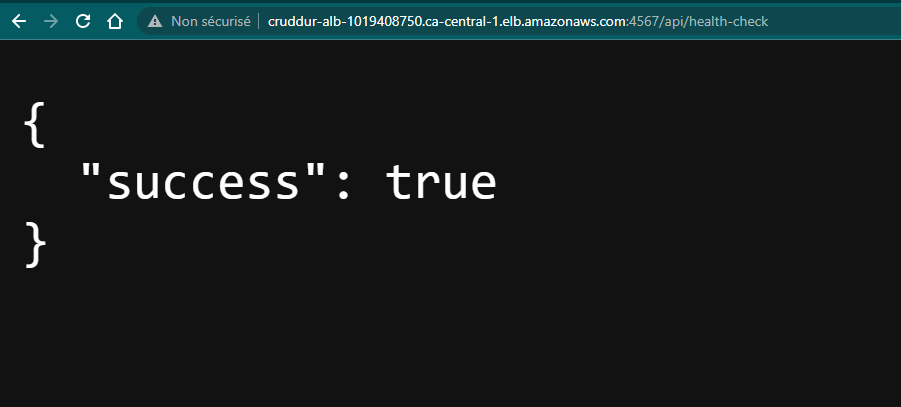
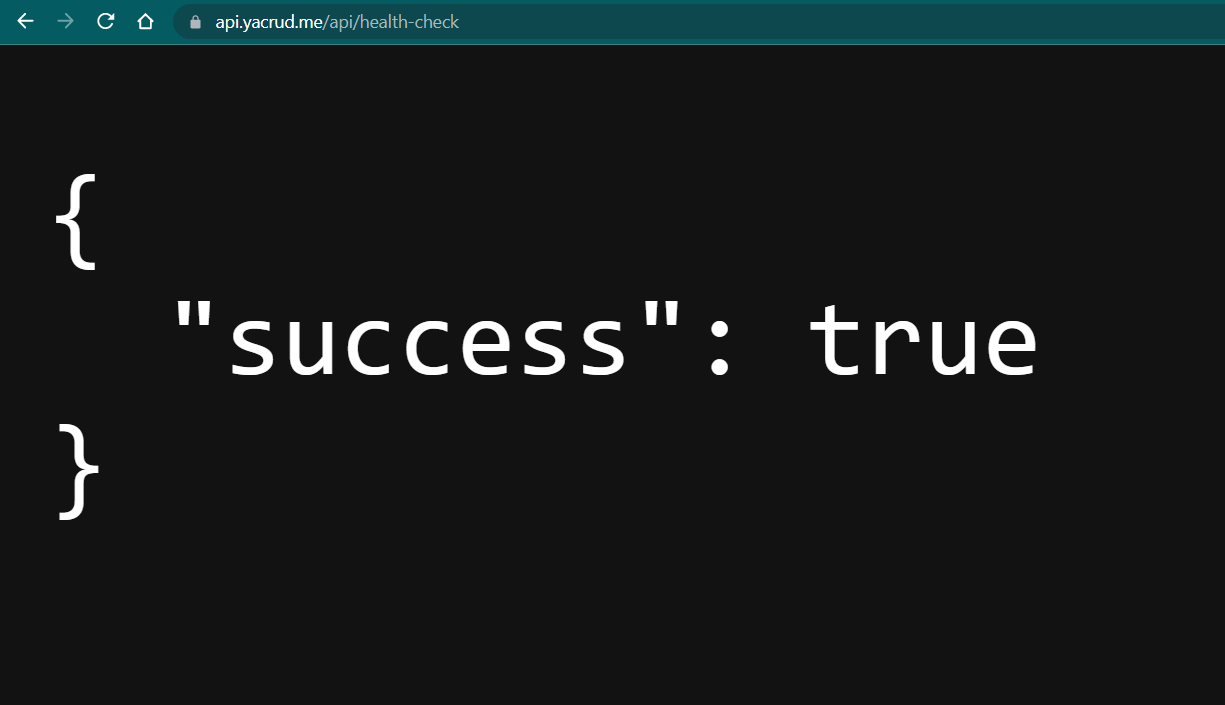
aws ecs create-service --cli-input-json file://aws/json/service-backend-flask.jsonVerify your configuration by accessing:
:4567/api/health-checkA successful JSON response should look like this:
{ "success": true }Mastering Route 53 with Porkbun Domain Provider
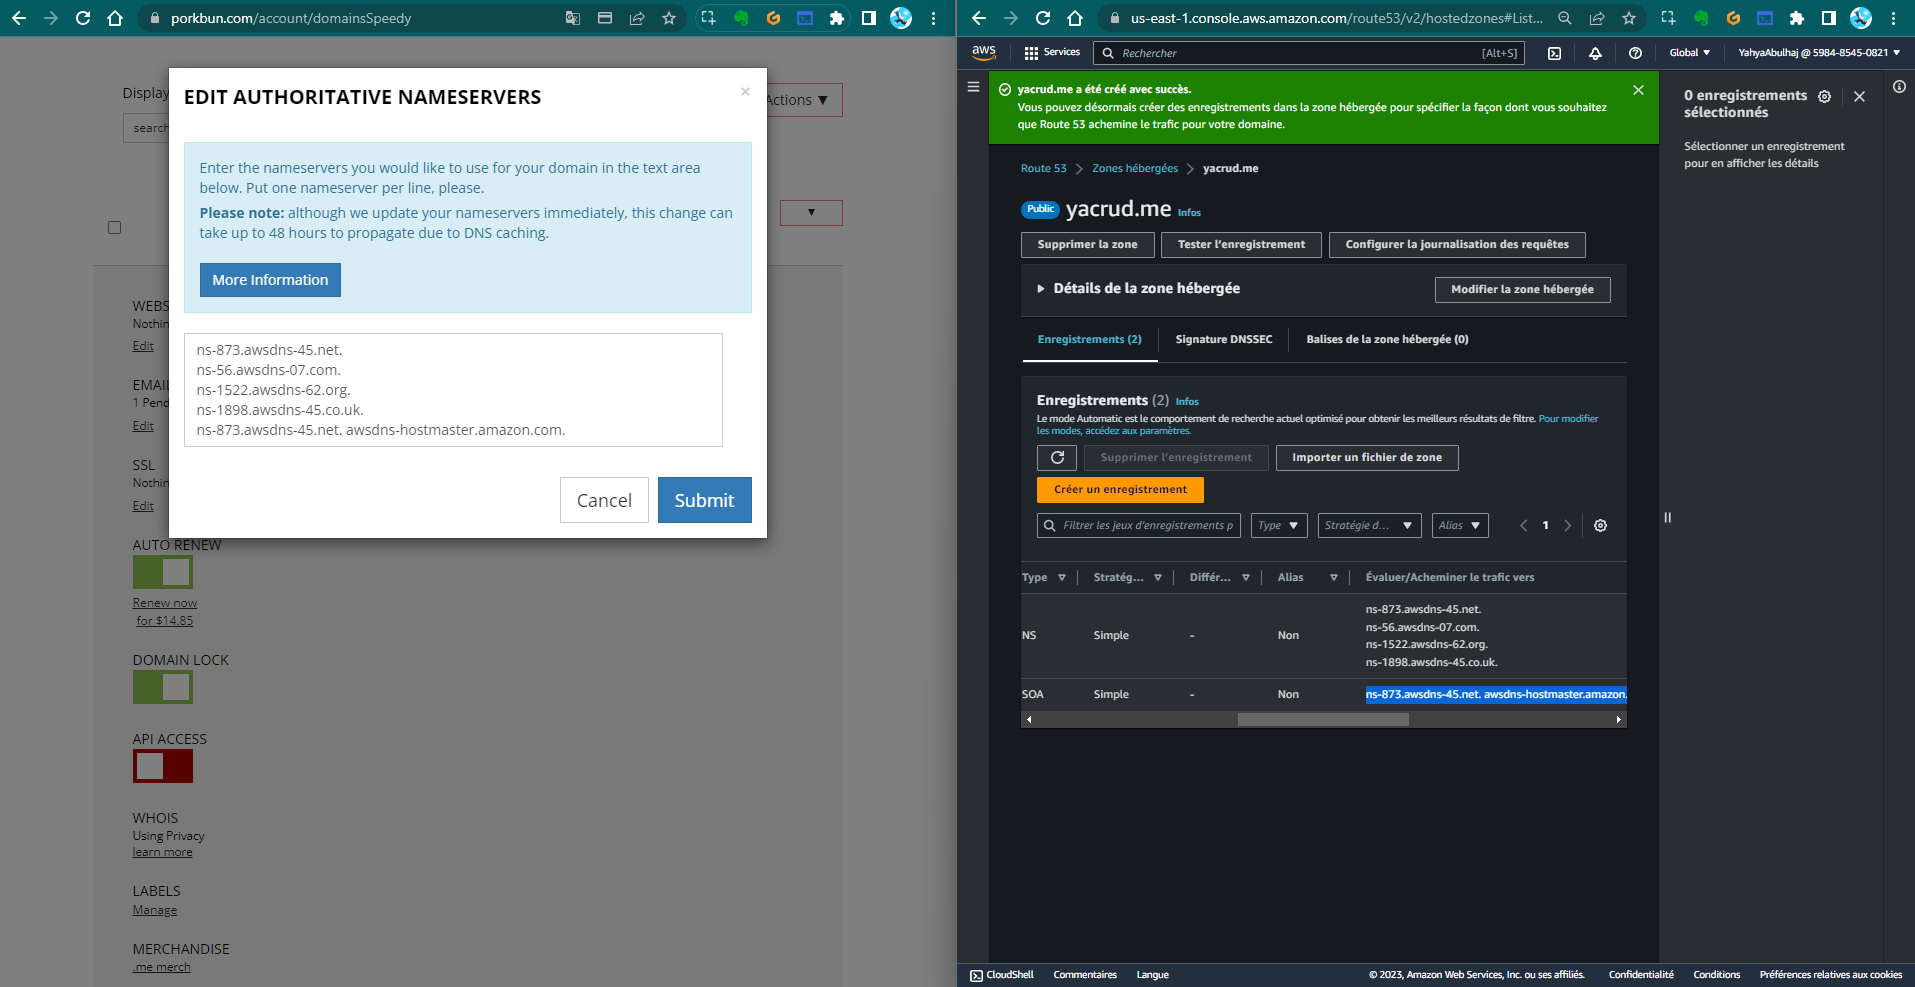
Let's elevate our DNS game using Amazon Route 53:
Porkbun Overview
- Access the Amazon Route 53 console
- Navigate to "Hosted zones" and select your domain
- Initiate "Create record", choosing "NS" and "SOA" as record types
- Replicate the NS and SOA values
- In your Porkbun account, update the nameservers with AWS-provided ones
Visualize your Route 53 configuration:
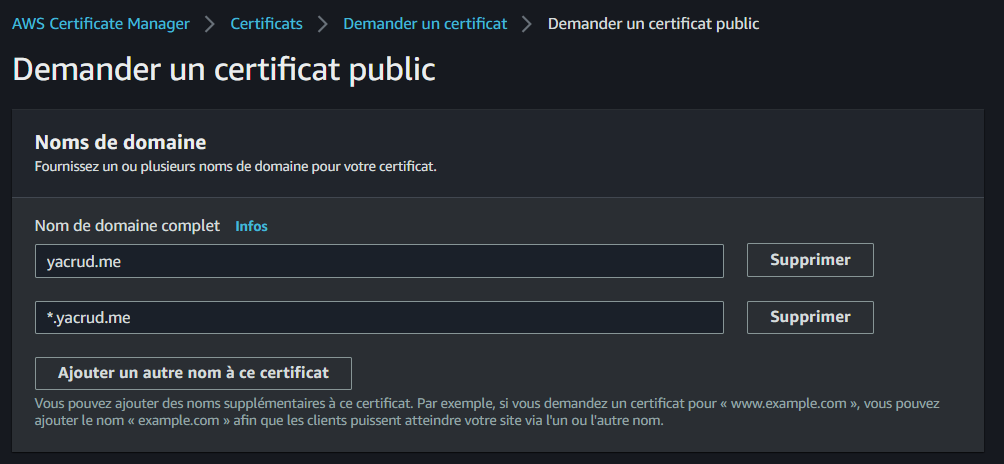
Securing Your Domain with AWS Certificate Manager
Integrate Route 53 with ACM for robust TLS:
- Navigate to the AWS Certificate Manager (ACM) console
- Initiate the "Request a certificate" process
- Input your domain details:
- For Fully qualified domain name, enter
yacrud.me - Add
*.yacrud.meas an additional name
- For Fully qualified domain name, enter
- Proceed with the "Request" action
Complete the domain validation process and verify the required CNAME in Route 53:
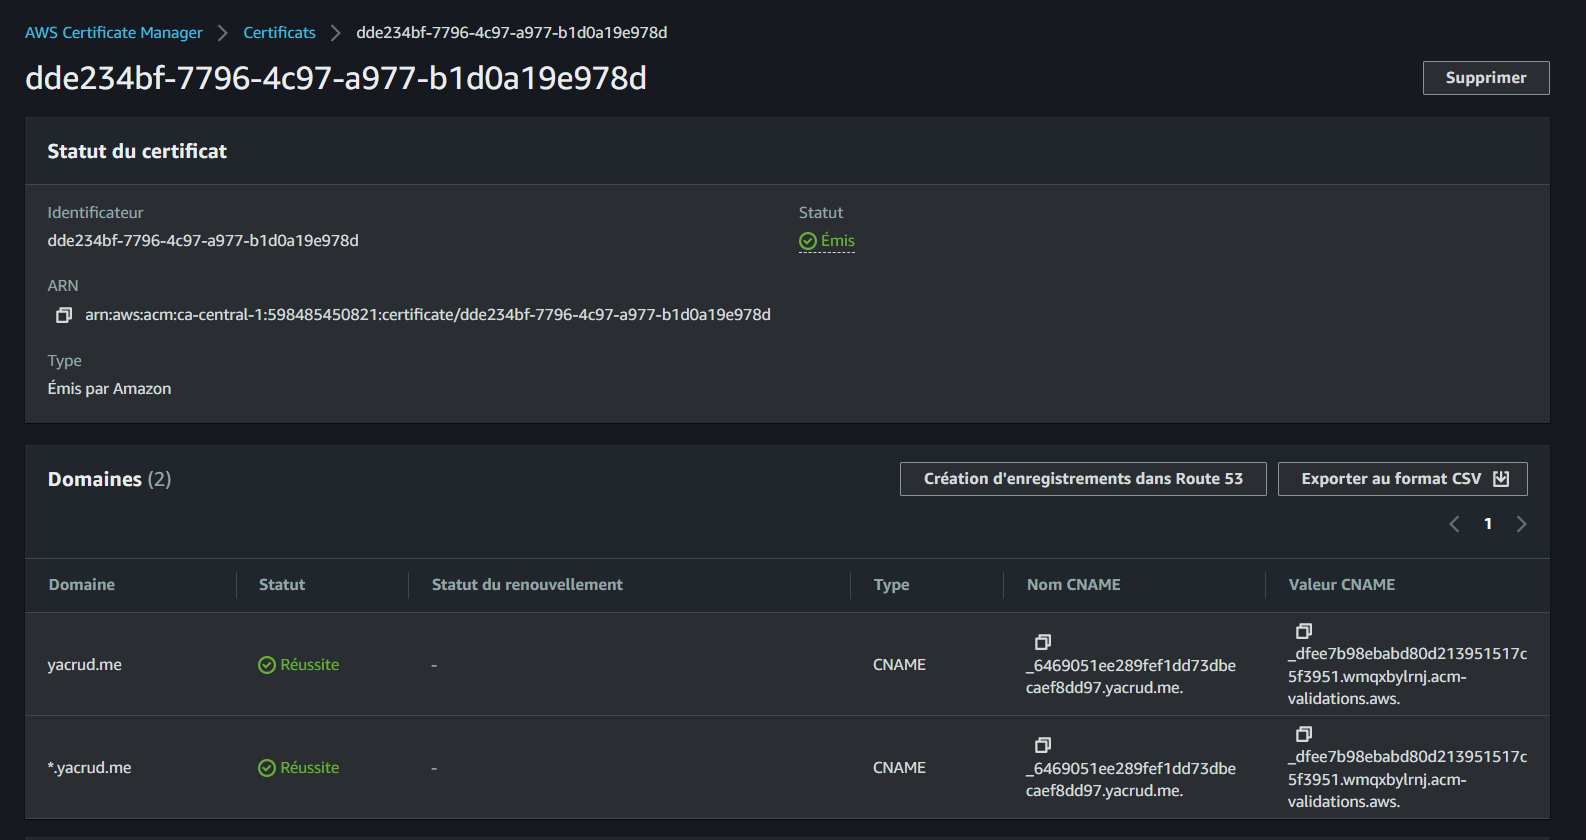
Your SSL certificate is now ready for use with Route 53.
Optimizing ALB Listeners and Routing for Seamless Frontend and API Integration
- Access the EC2 Load Balancer console and select "cruddur-alb"
- In the "Listeners" tab, add a new listener
- Configure "Default actions" to "Redirect" and set "Port" to "443"
- Add another listener with "HTTPS" protocol on port "443"
- Set "Default actions" to "Forward" and select the "frontend-react-js" target group
- Assign your previously created SSL/TLS certificate
- Remove "HTTP:3000" and "HTTP:4567" listeners
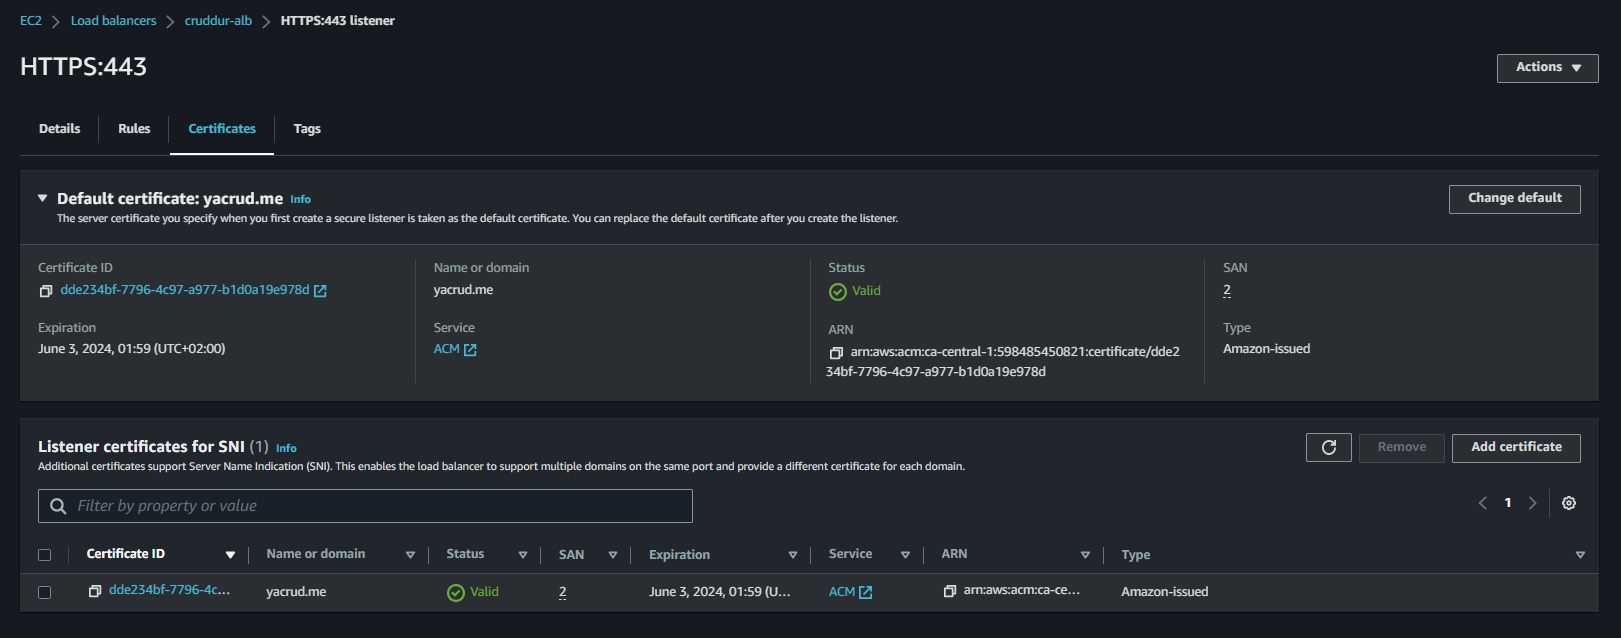
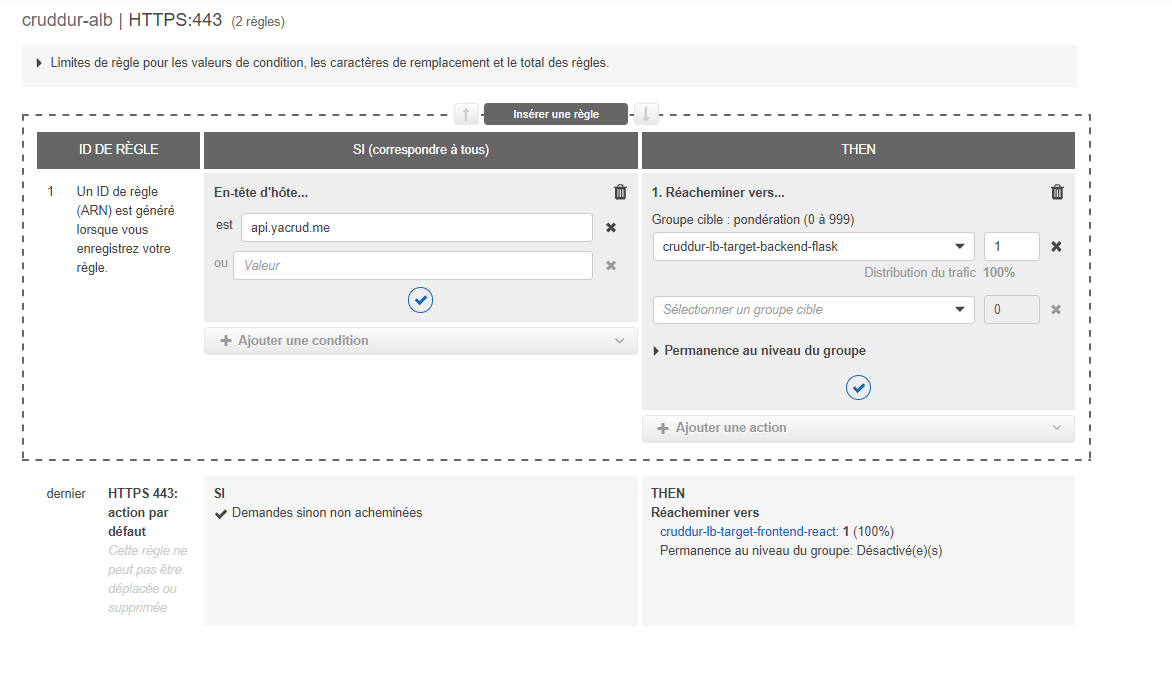
- For "HTTPS:443", click "Manage Rules"
- Insert a new rule with "Host Header" condition set to "api.yacrud.me"
- Set the action to forward to the "backend-flask" target group
Your backend API is now accessible via "api.yacrud.me":
Connecting DNS to ALB
Connecting your Domain Name System (DNS) to an Application Load Balancer (ALB) is a crucial step in making your application accessible to users. Let's walk through this process with detailed explanations and visual aids.
- First, we need to verify that our application is properly configured on the Load Balancer. This step ensures that traffic is being correctly routed to our application instances.
In this image, we can see the Load Balancer rules. The rule is set to forward traffic to our target group, which contains our application instances. This configuration is essential for proper traffic routing.
-
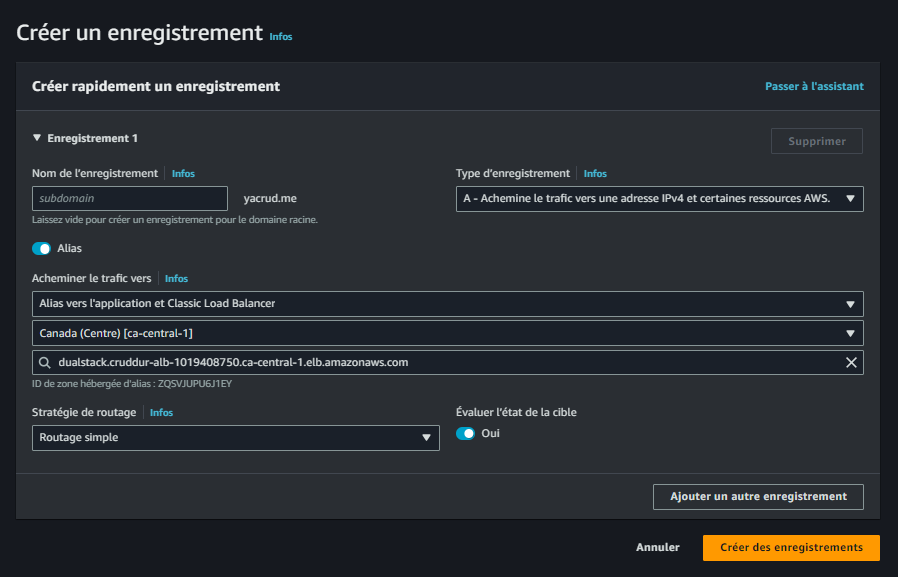
Next, we'll create a new record in Route53. This step involves linking our domain name to the ALB.
-
When creating the record, we choose "Alias" and specifically "Alias to Application and Classic Load Balancer". This option allows us to directly map our domain to the ALB without needing to know its IP address.
-
We then select the "ca-central-1" region and our specific ALB. It's crucial to choose the correct region and ALB to ensure traffic is routed to the right place.
-
After configuring these settings, we create the route. Here's what this process looks like in the AWS console:
This image shows the configuration panel for creating an alias record in Route53. Note how we've selected the A record type and chosen to route traffic to an Application Load Balancer.
-
For the API subdomain, we repeat this process, creating another record with "api" as the name. This allows us to have separate routing for our API, typically pointing to our backend services.
-
We use the same ALB target for both the main domain and the API subdomain, as our ALB is configured to route traffic based on the incoming request's host header.
After completing these steps, your Route53 records should look something like this:
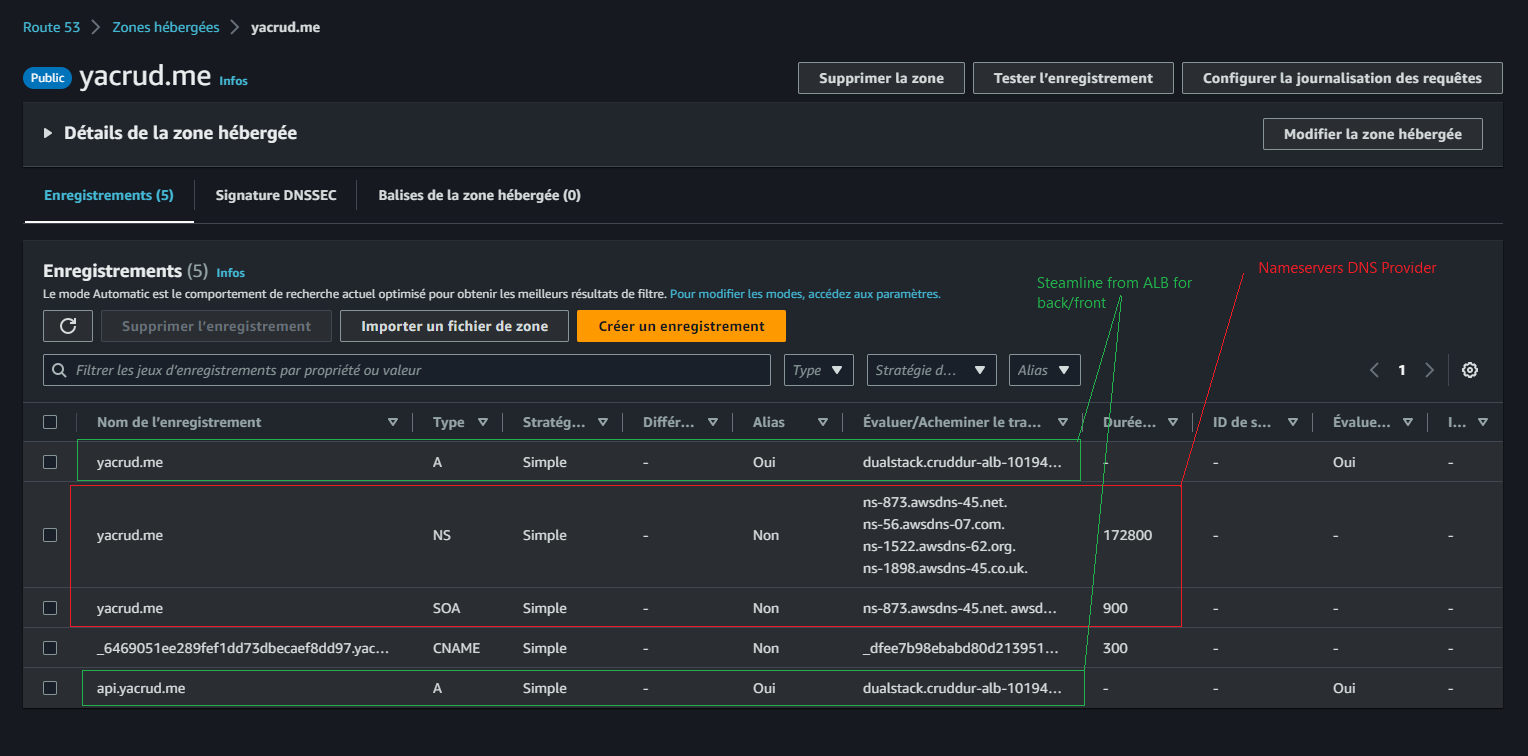
This image provides an overview of the final Route53 configuration. We can see both the main domain and the API subdomain records pointing to the ALB.
Now comes the exciting part - verifying that everything is working as expected! After DNS propagation (which can take up to 48 hours, but often happens much faster), we can check our frontend:
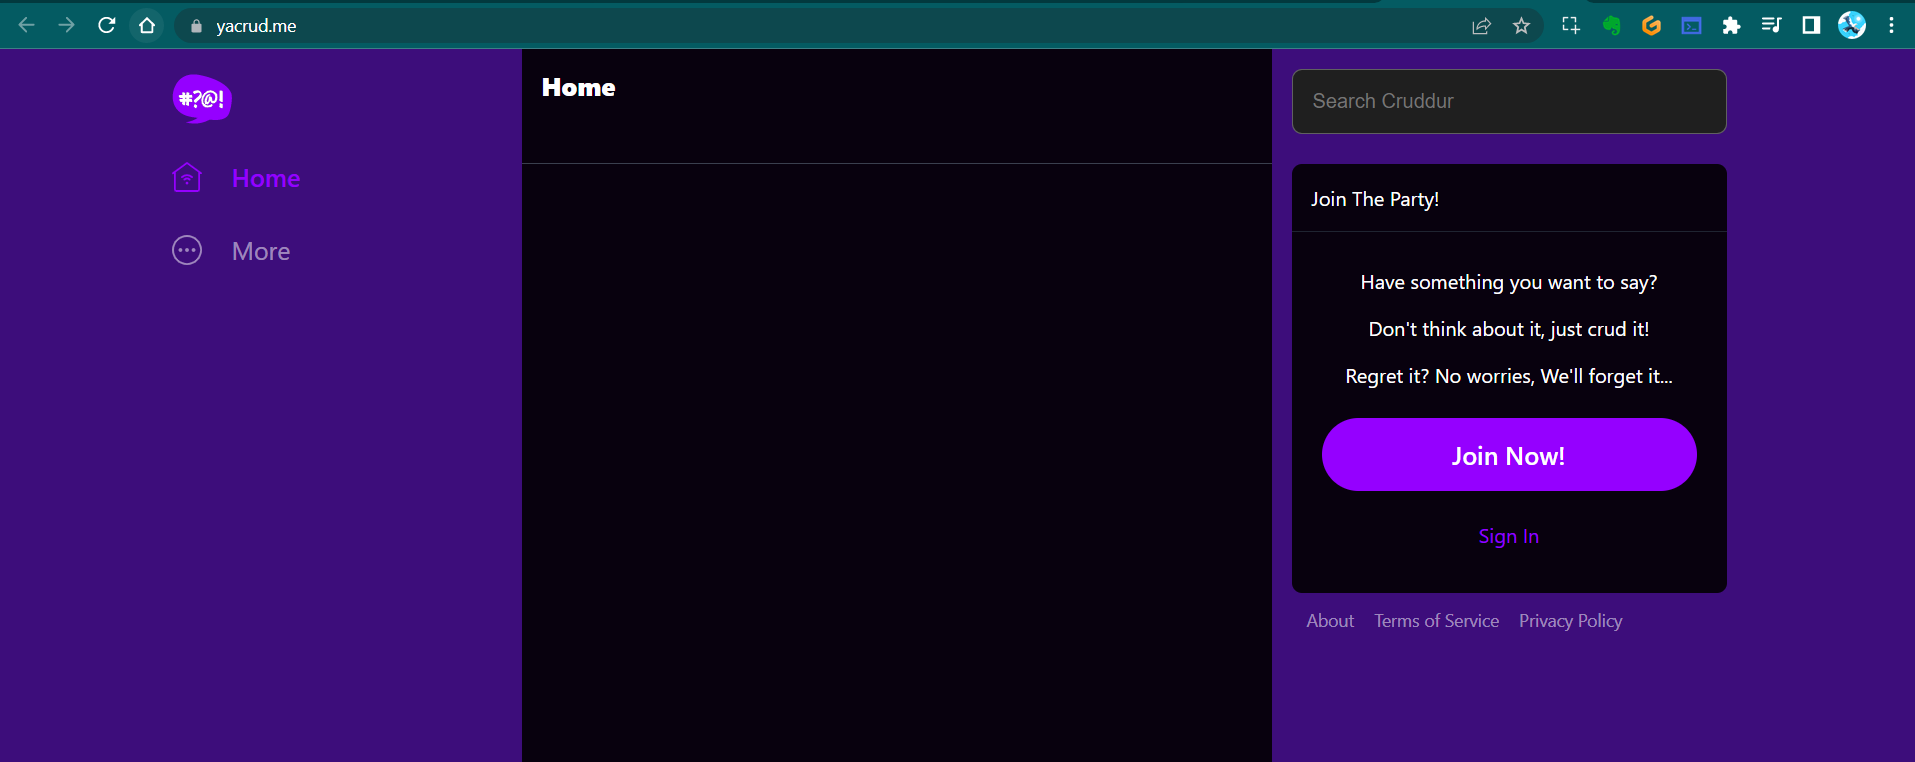
This screenshot shows our frontend application successfully loading through our custom domain. This confirms that our DNS and ALB configuration for the frontend is correct.
For a thorough verification, we should also test the backend. We can do this via the command line interface (CLI):

This CLI output demonstrates a successful connection to our backend API through the configured subdomain.
We can also verify the backend in a web browser:
This browser screenshot shows a successful response from our backend API, confirming that our API subdomain is correctly configured.
To ensure full functionality, we should verify data access:
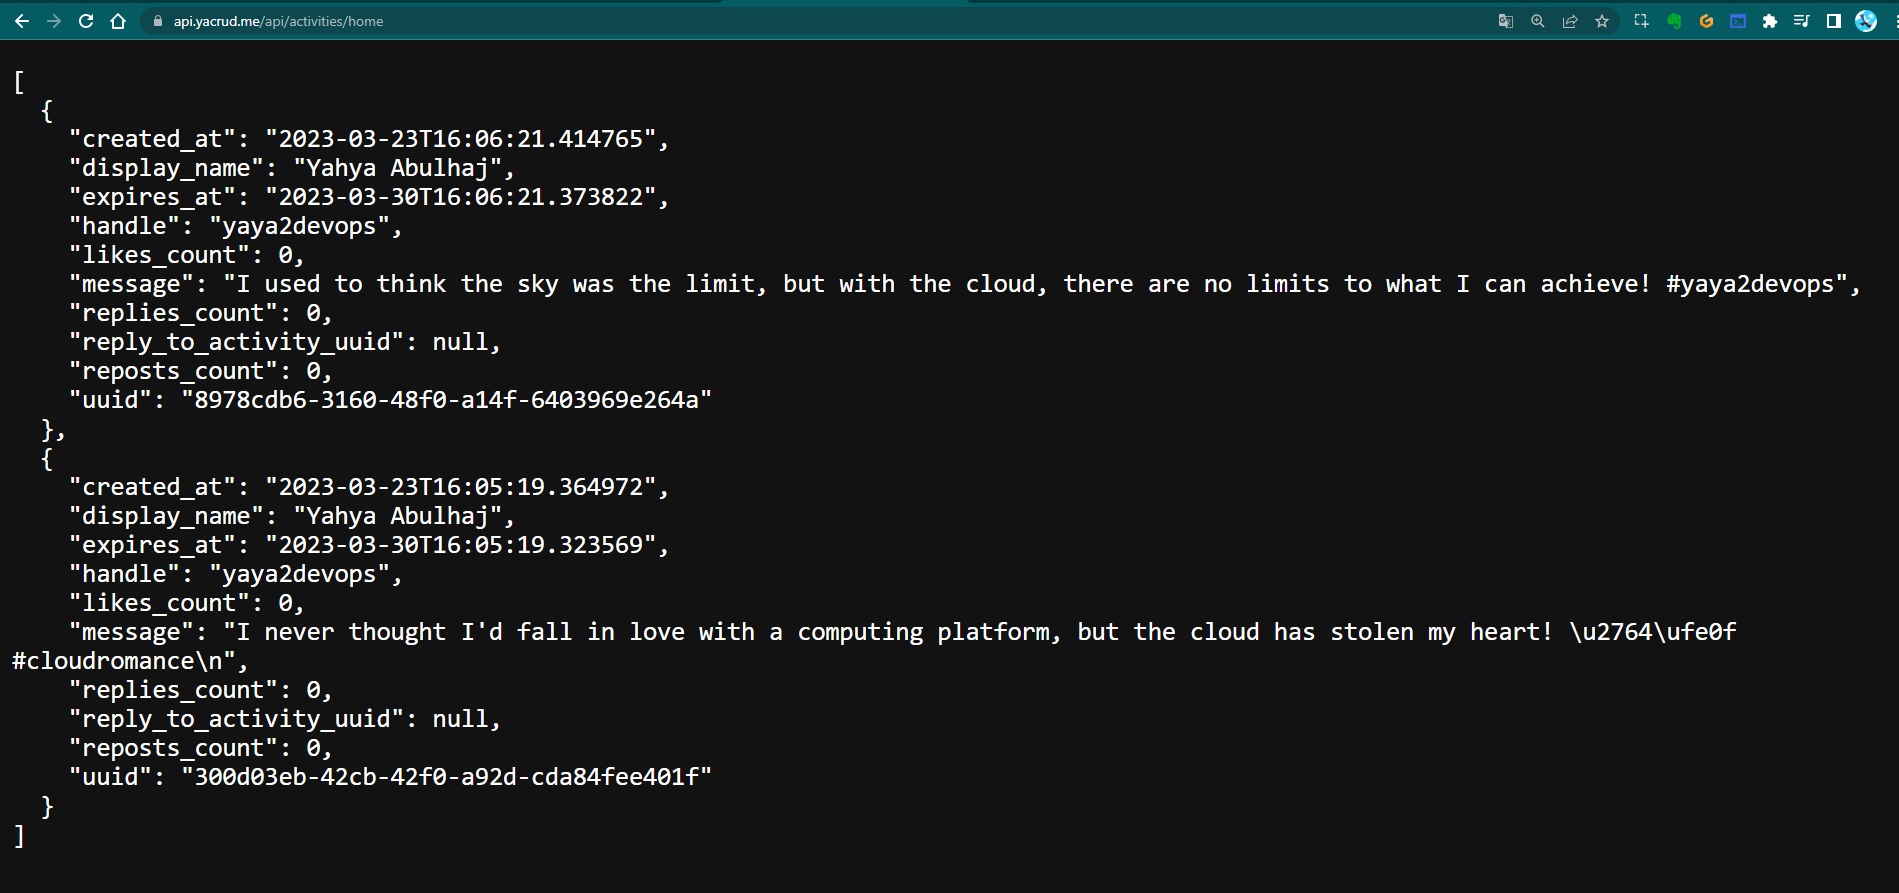
This image shows a successful data retrieval from our backend, indicating that not only is our API accessible, but it's also correctly interacting with our database.
Finally, we can confirm full application functionality, including interaction with our RDS (Relational Database Service) in production:
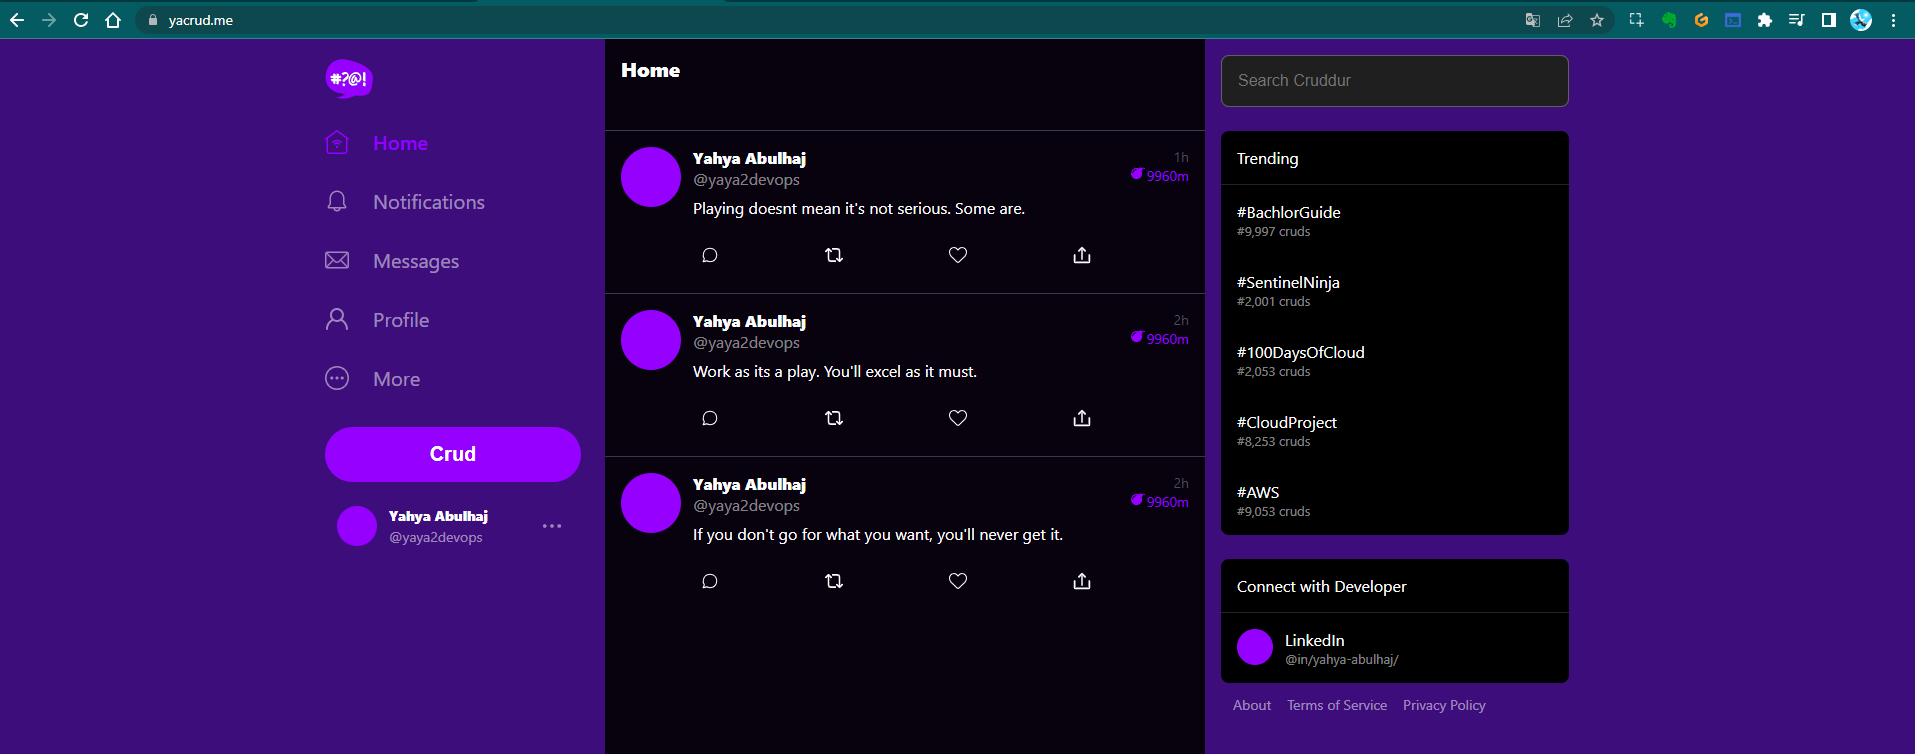
This final screenshot showcases our fully functional application, complete with data retrieved from our production RDS instance. This comprehensive test confirms that all components - frontend, backend, DNS, ALB, and database - are working together seamlessly.
By following these steps and verifying each component, we've successfully connected our DNS to our ALB, making our application accessible and functional through our custom domain. This setup provides a robust, scalable foundation for our web application.
Advanced Cross-Origin Resource Sharing (CORS) Configuration
CORS is a crucial security feature that controls how web applications running at one origin can request resources from a different origin. In our setup, we need to configure CORS to allow our frontend to communicate with our backend securely.
Updating Backend Task Definition
-
Navigate to your project directory and locate the file
aws/task-definitions/backend-flask.json. -
Open this file and update the environment variables section with the following:
{"name": "FRONTEND_URL", "value": "https://<domain>"},
{"name": "BACKEND_URL", "value": "https://api.<domain>"},
Replace <domain> with your actual domain name. This step ensures that your backend knows the correct URLs for the frontend and API.
- After making these changes, apply them to your ECS task definition using the AWS CLI:
aws ecs register-task-definition --cli-input-json file://aws/task-definitions/backend-flask.jsonThis command registers a new revision of your task definition with the updated CORS settings.
Optimizing Frontend Docker Build for Production
When preparing your frontend for production, it's crucial to build the Docker image with the correct environment variables and optimizations.
Execute the following enhanced build command from your frontend folder:
docker build \
--build-arg REACT_APP_BACKEND_URL="https://api.yacrud.me" \
--build-arg REACT_APP_FRONTEND_URL="https://yacrud.me" \
--build-arg REACT_APP_AWS_PROJECT_REGION="$AWS_DEFAULT_REGION" \
--build-arg REACT_APP_AWS_COGNITO_REGION="$AWS_DEFAULT_REGION" \
--build-arg REACT_APP_AWS_USER_POOLS_ID="" \
--build-arg REACT_APP_CLIENT_ID="" \
-t frontend-react-js \
-f Dockerfile.prod .
Let's break down this command:
- Each
--build-argsets an environment variable during the build process. - The URLs should be updated to match your domain.
$AWS_DEFAULT_REGIONis used to set the AWS region dynamically.- The User Pools ID and Client ID should be filled with your Cognito details.
-t frontend-react-jstags the image for easy reference.-f Dockerfile.prodspecifies the production Dockerfile to use.
Streamlining ECS Services for Full-Stack App Deployment
Efficient deployment of your full-stack application involves updating both your frontend and backend services in Amazon ECS.
-
Access the Amazon ECS console in your AWS account.
-
Locate and select the
backend-flaskservice. -
Click on the "Update" button to modify the service:
- Check the box for "Force new deployment". This ensures that ECS creates new tasks even if the task definition hasn't changed.
- In the "Revision" dropdown, select the latest revision of your task definition.
-
Apply the changes and wait for the service to update.
-
Repeat steps 2-4 for the
frontendservice. -
After both services have been updated, verify that both the frontend and backend URLs are operational:
- Open your frontend URL in a web browser and ensure the application loads correctly.
- Test API endpoints using tools like curl or Postman to verify backend functionality.
Enhancing Flask Security: IP-based Access Restriction
Restricting access to your application based on IP addresses adds an extra layer of security.
-
Open the EC2 console in your AWS account.
-
In the navigation pane, select "Security Groups".
-
Find and select the security group named "cruddur-alb-sg".
-
Click on the "Edit inbound rules" button.
-
Remove any existing rules for ports 4567 and 3000. These were likely used for direct access during development.
-
For the remaining rules (typically HTTP and HTTPS):
- Change the "Source" type to "My IP".
- This automatically populates with your current IP address.
-
Save the changes.
This configuration ensures that only requests from your specified IP address can access the application load balancer, significantly enhancing security.
Optimizing for Production: Disabling Debug Mode
When moving to production, it's crucial to disable Flask's debug mode for security and performance reasons.
-
Create a new file named
Dockerfile.prodin yourbackend-flaskdirectory. -
Add the following command to this file:
CMD [ "python3", "-m" , "flask", "run", "--host=0.0.0.0", "--port=4567", "--no-debug","--no-debugger", "--no-reload" ]This command starts Flask without debug mode, debugger, or auto-reloading, which is suitable for production.
-
In your original
Dockerfile, remove the lineENV FLASK_DEBUG=1if it exists. -
Update the CMD in the original
Dockerfileto include the--debugflag:
CMD [ "python3", "-m" , "flask", "run", "--host=0.0.0.0", "--port=4567", "--debug"]This maintains debug mode for development purposes in the original Dockerfile.
- Build your production container:
docker build -f Dockerfile.prod -t backend-flask-prod .This creates a production-ready Docker image for your backend.
By following these enhanced instructions, you'll have a more secure, optimized, and production-ready application deployment. Remember to test thoroughly after making these changes to ensure everything works as expected in your production environment.
Streamlining ECR Sign-in Process
Amazon Elastic Container Registry (ECR) is a fully managed container registry that makes it easy to store, manage, and deploy Docker container images. To interact with ECR, you need to authenticate your Docker client. Let's streamline this process with a script.
- Create a new file named
sign-inin thebackend-flask/bin/ecr/directory:
mkdir -p backend-flask/bin/ecr
touch backend-flask/bin/ecr/sign-in- Open the
sign-infile and add the following content:
#!/usr/bin/env bash

aws ecr get-login-password --region $AWS_DEFAULT_REGION | docker login --username AWS --password-stdin "$AWS_ACCOUNT_ID.dkr.ecr.$AWS_DEFAULT_REGION.amazonaws.com"
Let's break down this script:
#!/usr/bin/env bashensures the script runs with bash.aws ecr get-login-passwordretrieves an authentication token from ECR.- The
|(pipe) symbol passes this token to thedocker logincommand. --username AWSspecifies AWS as the username for ECR.--password-stdintells Docker to read the password (authentication token) from standard input.- The ECR registry URL is constructed using environment variables.
- Make the script executable:
chmod +x backend-flask/bin/ecr/sign-in- To use this script in your Gitpod environment, add the following line to your
.gitpod.ymlfile:
tasks:
  - name: AWS ECR Login
    command: |
      source backend-flask/bin/ecr/sign-in
This automation ensures that every time you start a new Gitpod workspace, you're automatically authenticated with ECR.
Mastering Docker Images for Production Environments
When preparing for production, it's crucial to have separate Docker images optimized for the production environment. Let's set up build processes for both backend and frontend.
Optimizing Backend Build Process
- Create a new file for the backend production build:
mkdir -p backend-flask/bin/docker/build
touch backend-flask/bin/docker/build/backend-flask-prod- Add the following content to
backend-flask-prod:
#!/usr/bin/env bash

docker build -f backend-flask/Dockerfile.prod -t backend-flask-prod ./backend-flask
This script builds a Docker image using the production Dockerfile we created earlier.
- Make the script executable:
chmod +x backend-flask/bin/docker/build/backend-flask-prodStreamlining Frontend Build
- Create a new file for the frontend production build:
touch backend-flask/bin/docker/build/frontend-react-js-prod- Add the following content:
#!/usr/bin/env bash

docker build \
    --build-arg REACT_APP_BACKEND_URL="https://api.yacrud.me" \
    --build-arg REACT_APP_FRONTEND_URL="https://yacrud.me" \
    --build-arg REACT_APP_AWS_PROJECT_REGION="$AWS_DEFAULT_REGION" \
    --build-arg REACT_APP_AWS_COGNITO_REGION="$AWS_DEFAULT_REGION" \
    --build-arg REACT_APP_AWS_USER_POOLS_ID="$AWS_USER_POOLS_ID" \
    --build-arg REACT_APP_CLIENT_ID="$CLIENT_ID" \
    -t frontend-react-js-prod \
    -f frontend-react-js/Dockerfile.prod ./frontend-react-js
This script builds the frontend Docker image with production-specific environment variables.
- Make the script executable:
chmod +x backend-flask/bin/docker/build/frontend-react-js-prodEfficient Image Tagging and Pushing
To streamline the process of tagging and pushing your Docker images to ECR, we'll create separate scripts for backend and frontend.
- For the backend, create a new file:
mkdir -p backend-flask/bin/docker/push
touch backend-flask/bin/docker/push/backend-flask-prod- Add the following content:
#!/usr/bin/env bash

ECR_BACKEND_FLASK_URL="$AWS_ACCOUNT_ID.dkr.ecr.$AWS_DEFAULT_REGION.amazonaws.com/backend-flask"
docker tag backend-flask-prod:latest $ECR_BACKEND_FLASK_URL
docker push $ECR_BACKEND_FLASK_URL- For the frontend, create another file:
touch backend-flask/bin/docker/push/frontend-react-js-prod- Add the following content:
#!/usr/bin/env bash

ECR_FRONTEND_REACT_URL="$AWS_ACCOUNT_ID.dkr.ecr.$AWS_DEFAULT_REGION.amazonaws.com/frontend-react-js"
docker tag frontend-react-js-prod:latest $ECR_FRONTEND_REACT_URL
docker push $ECR_FRONTEND_REACT_URL- Make both scripts executable:
chmod +x backend-flask/bin/docker/push/backend-flask-prod
chmod +x backend-flask/bin/docker/push/frontend-react-js-prod
These scripts have been further optimized and moved to bin/frontend/push (opens in a new tab) and bin/backend/push (opens in a new tab) respectively for better organization.
By using these scripts, you can easily build, tag, and push your Docker images to ECR with a single command. This streamlines your deployment process and reduces the chance of errors when preparing your application for production.
Remember to run the ECR sign-in script before pushing images, and always ensure your environment variables (like AWS_ACCOUNT_ID and AWS_DEFAULT_REGION) are correctly set before running these scripts.
Automating Service Deployment
To streamline the process of updating your ECS services with the latest changes, we've created powerful bash scripts:
bin/backend/deploy: Handles backend service deploymentbin/frontend/deploy: Manages frontend service deployment
These scripts leverage the AWS CLI to obtain the latest task definition ARN and force a new deployment of the service. Here's a breakdown of what they do:
- Fetch the latest task definition for the service
- Create a new deployment with the updated task definition
- Force a new deployment to ensure the changes take effect immediately
Remember to use these scripts judiciously, preferably during off-peak hours to minimize impact on your users.
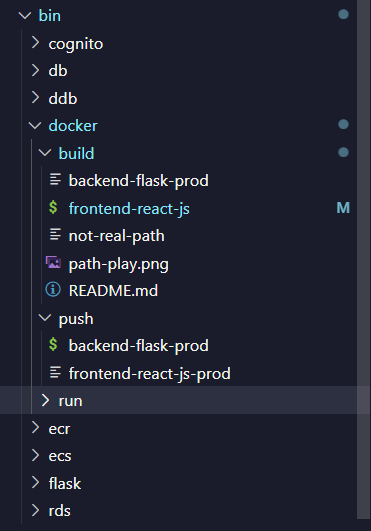
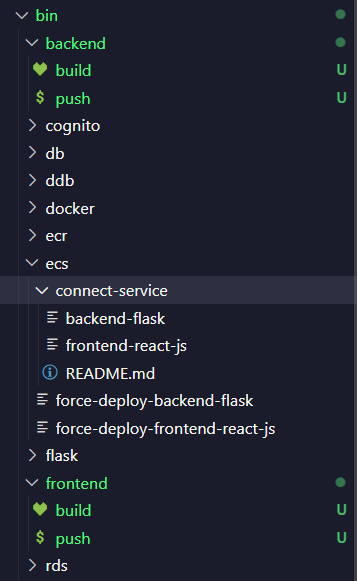
Revolutionizing Project Structure: The Great Bin Refactor
We've undertaken a major restructuring of our project's bin directory to enhance accessibility and execution efficiency. This refactoring process was both challenging and rewarding.
The initial migration was executed using the mv command:
mv bin ..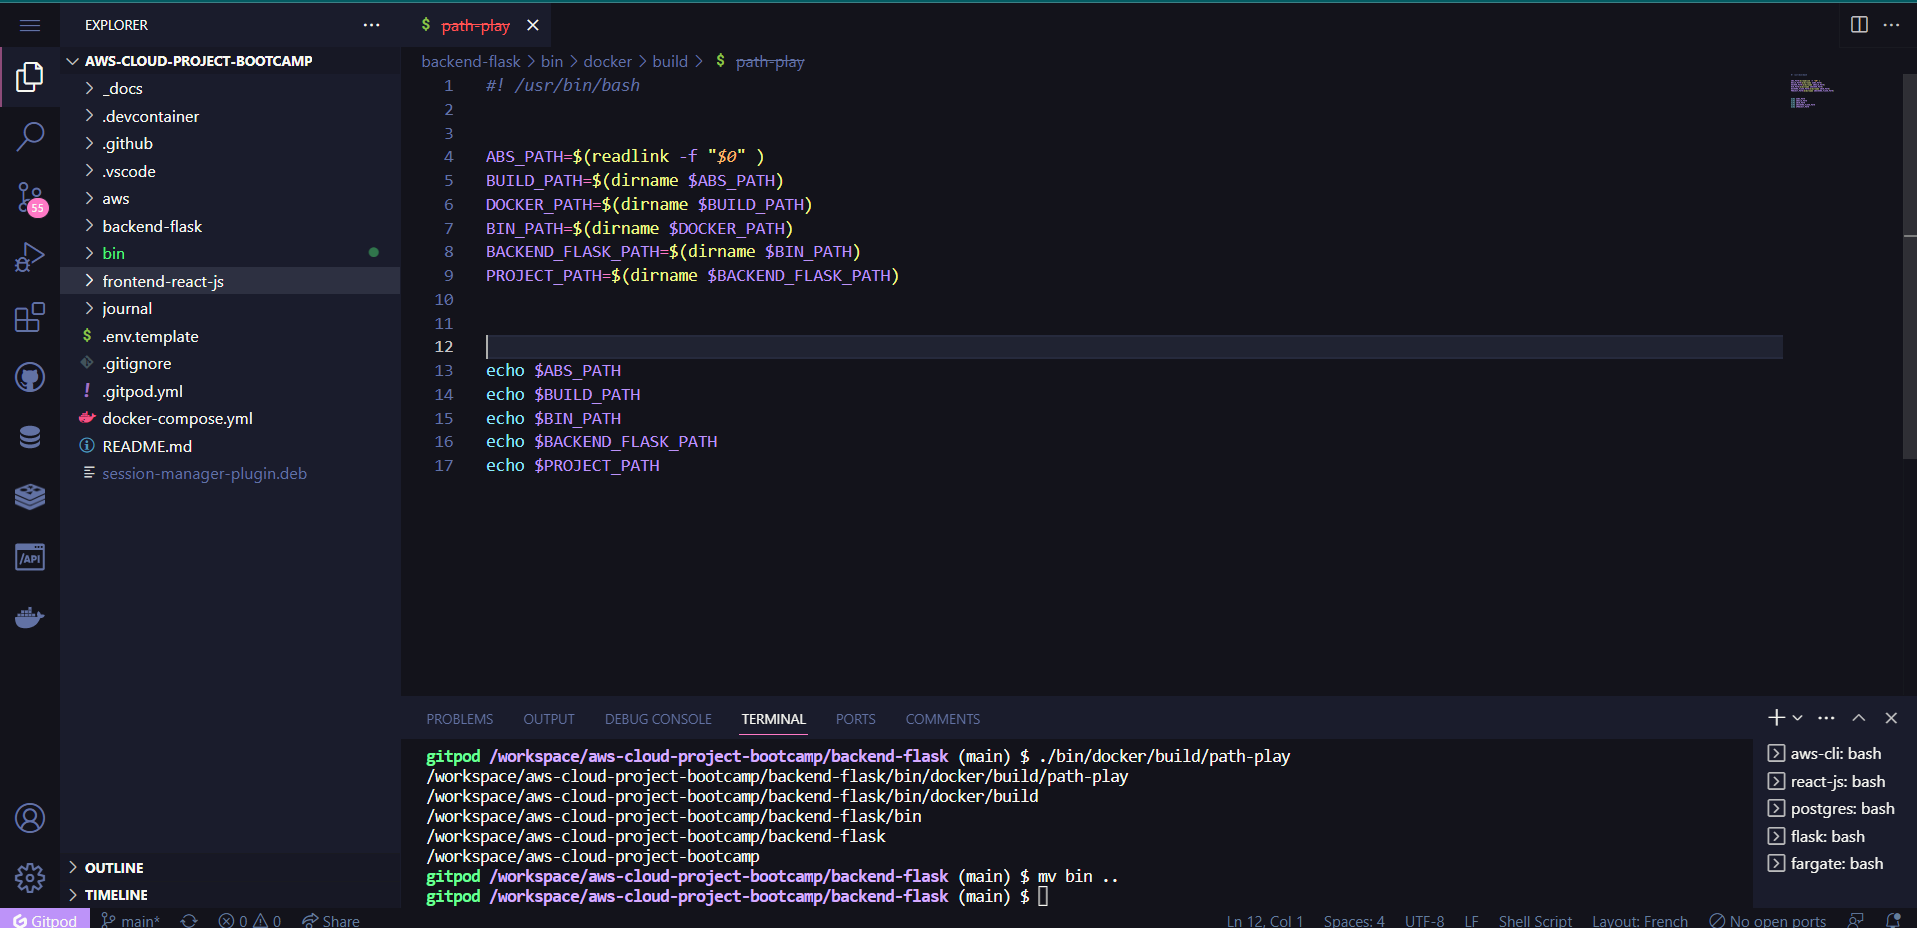
To give you a glimpse of the refactoring process, here are some key steps:
Refactoring Process Details
- Step 1
- Step 2
- Step 3

- Step 4
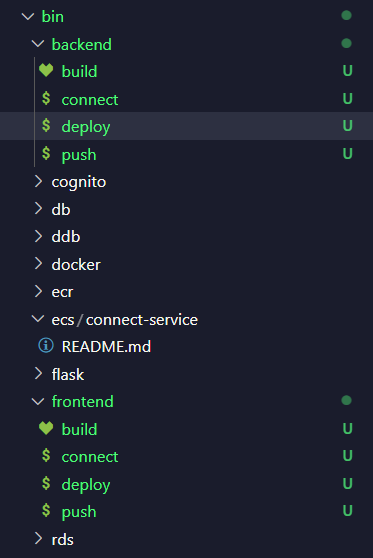
To celebrate this transformation, we've created a sleek BinBanner (opens in a new tab) that's sure to ignite your scripting passion. We've also included the complete bintree for your reference.
For those interested in our progress, here's the previous BinBanner (opens in a new tab):

Mastering Relative Paths: Readlink and Dirname in Action
We've implemented advanced path handling using readlink and dirname. For a detailed explanation of this process, check out our comprehensive guide (opens in a new tab).
Database Management: PSQL Session Kill Command
To enhance our database management capabilities, we've created a script to terminate all active PSQL sessions:
- Create
backend-flask/db/kill-all-connections.sql:
SELECT pg_terminate_backend(pid)
FROM pg_stat_activity
WHERE
  pid <> pg_backend_pid()
  AND datname = 'cruddur';
This SQL query identifies and terminates all active sessions connected to the 'cruddur' database, excluding the current connection.
- Create
bin/db/kill-all:
#! /usr/bin/bash

CYAN='\033[1;36m'
NO_COLOR='\033[0m'
LABEL="db-kill-all"
printf "${CYAN}== ${LABEL}${NO_COLOR}\n"

abs_filepath="$ABS_PATH/backend-flask/db/kill-all-connections.sql"
kill_path=$(realpath --relative-base="$PWD" "$abs_filepath")
psql $CONNECTION_URL cruddur < $kill_path
This script executes the SQL query using psql, providing a visually appealing console output.
Implementing Refresh Token for Amazon Cognito
To enhance our authentication flow, we've updated the Cognito implementation:
- Update
frontend-react-js/src/lib/CheckAuth.js:
import { Auth } from "aws-amplify";

export async function getAccessToken() {
  try {
    const cognitoUserSession = await Auth.currentSession();
    const accessToken = cognitoUserSession.accessToken.jwtToken;
    localStorage.setItem("access_token", accessToken);
  } catch (error) {
    console.log(error);
  }
}

export async function checkAuth(setUser) {
  try {
    const cognitoUser = await Auth.currentAuthenticatedUser({
      bypassCache: false,
    });

    console.log("cognito_user", cognitoUser);
    setUser({
      display_name: cognitoUser.attributes.name,
      handle: cognitoUser.attributes.preferred_username,
    });

    const cognitoUserSession = await Auth.currentSession();
    localStorage.setItem(
      "access_token",
      cognitoUserSession.accessToken.jwtToken
    );
  } catch (error) {
    console.log(error);
  }
}- Update
frontend-react-js/src/pages/HomeFeedPage.js:
import { checkAuth, getAccessToken } from '../lib/CheckAuth';

const backendUrl = `${process.env.REACT_APP_BACKEND_URL}/api/activities/home`;
await getAccessToken();
const accessToken = localStorage.getItem("access_token");
const res = await fetch(backendUrl, {
  headers: {
    'Content-Type': 'application/json',
    'Authorization': `Bearer ${accessToken}`,
  },
});
Refer to the fix commit (opens in a new tab) for further details.
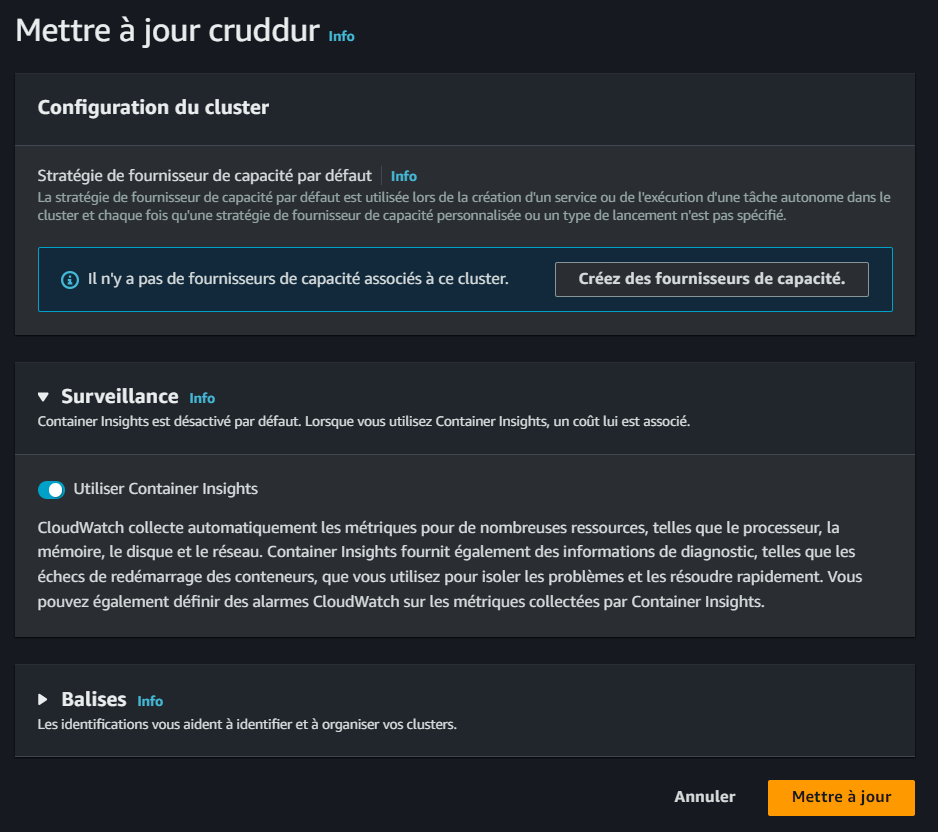
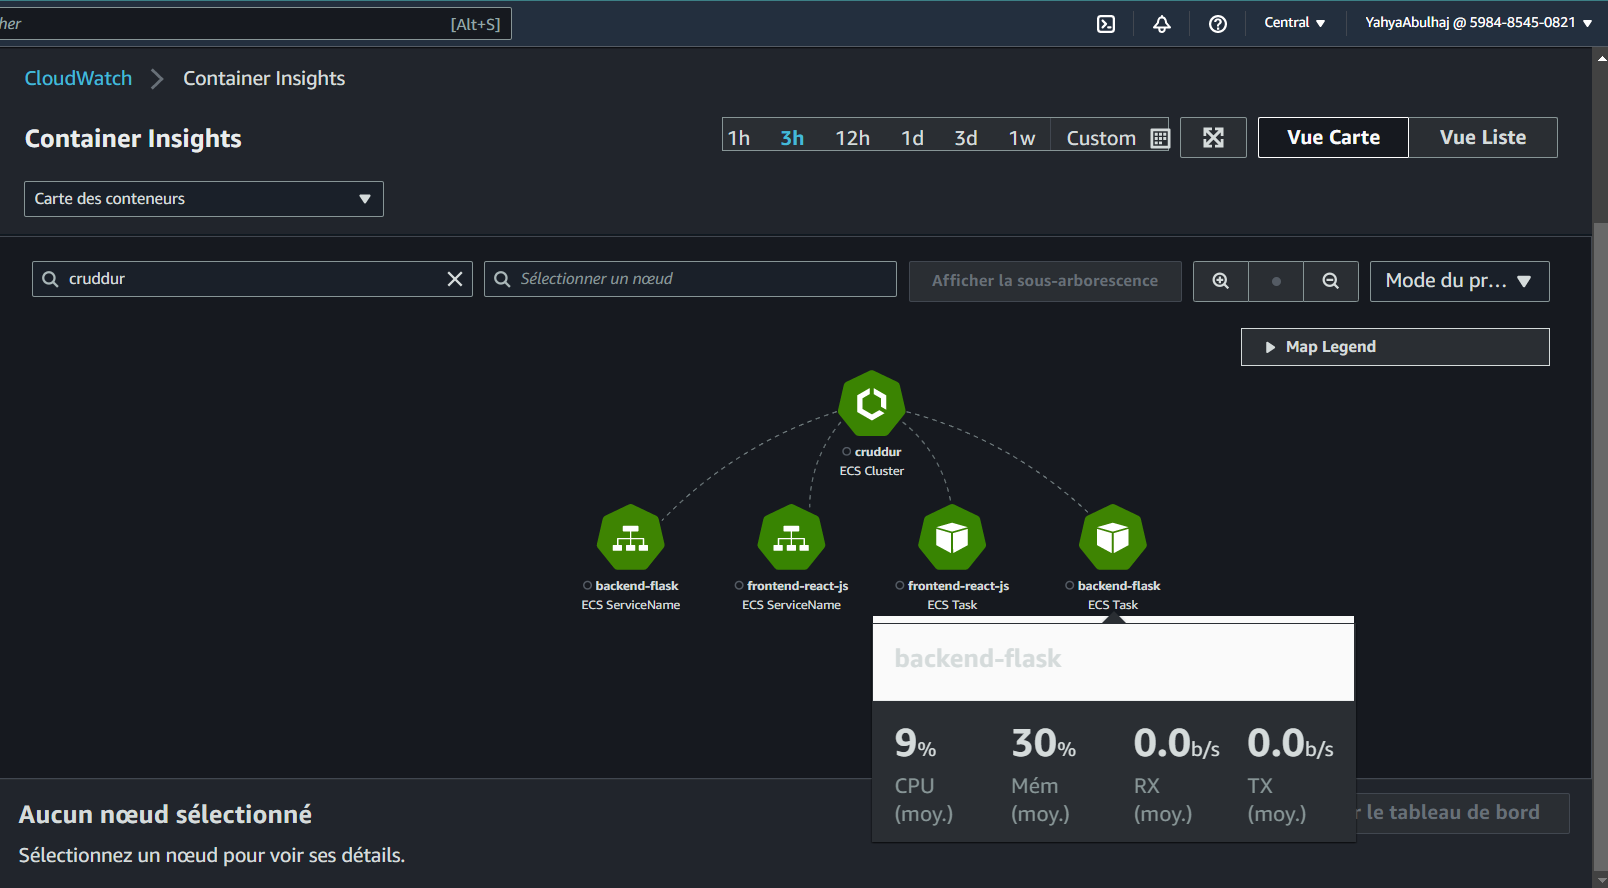
Fargate - Configuring for Container Insights
To enable advanced monitoring and troubleshooting capabilities, we've configured Container Insights:
- Enable Container Insights in the ECS console:
- Add the following configuration to your backend task definition:
{
  "name": "xray",
  "image": "public.ecr.aws/xray/aws-xray-daemon",
  "essential": true,
  "user": "1337",
  "portMappings": [
    {
      "name": "xray",
      "containerPort": 2000,
      "protocol": "udp"
    }
  ]
}-
Run the register script, which can be found here (opens in a new tab).
-
Verify the configuration in Fargate:
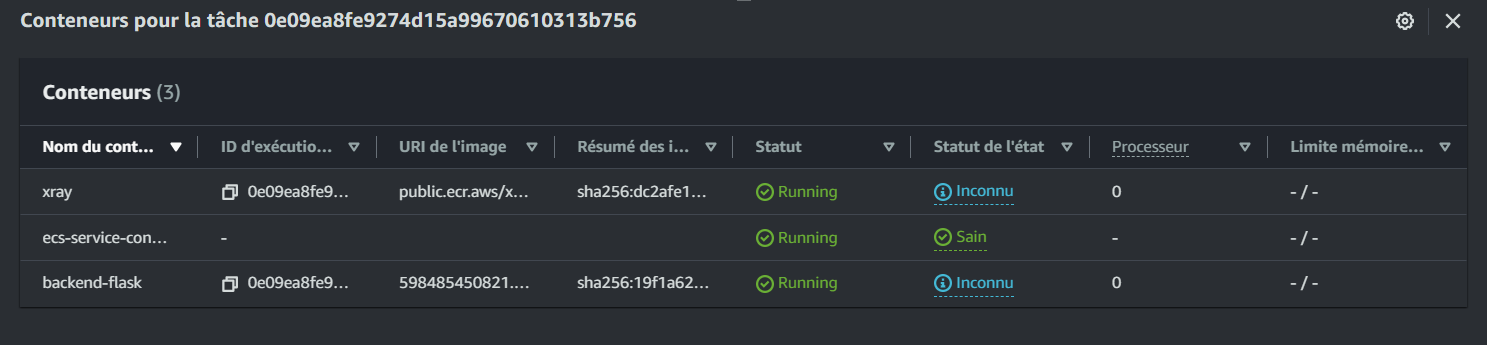
Note: If you encounter health check issues due to directory refactoring, ensure that the health check is properly set up in the backend bin directory before deploying the image.
- Utilize Container Insights for advanced monitoring:
Optimizing Docker Container Networks
To improve our container networking, we've made the following enhancements:
- Add this configuration to
docker-compose.yml:
networks:
  cruddur-net:
    driver: bridge
name: cruddur-net- Add the network attribute to your services:
networks:
  - cruddur-net
Debugging with Busybox
For network debugging, we've created a Busybox script (opens in a new tab). You can use it to list networks:
docker network listEnhanced Debugging with iputils-ping
To further improve our debugging capabilities, we've added iputils-ping to our production Dockerfile:
- Add this line to
Dockerfile.prod:
RUN apt update && apt install -y iputils-ping- We've also redefined the networking in our docker compose file (opens in a new tab) for improved connectivity.
Streamlining Fargate Service Management
To simplify the process of starting and stopping our Fargate services, we've created two powerful scripts:
- Start Service (opens in a new tab): This script creates a new service in Fargate.
- Shut down Service (opens in a new tab): This script forcefully deletes an existing service in Fargate.
These scripts provide a quick and efficient way to manage our services during development and maintenance periods.
Dynamic Environment Variables with Ruby
We've implemented a sophisticated system for managing environment variables using Ruby:
-
Create Ruby scripts to read and map environment variables:
-
Create ERB templates to hold the required environment variables:
-
Update your
docker-compose.ymlto include the new configuration options: -
Generate the environment variables by running the scripts:
./bin/frontend/generate-env
./bin/backend/generate-env- Update your
.gitpod.ymlto automatically generate the environment variables when starting a new workspace:
ruby "./bin/backend/generate-env"
ruby "./bin/frontend/generate-env"
Deploying Frontend Application on CloudFront
To improve the performance and security of our frontend application, we've deployed it using Amazon CloudFront:
- Create an S3 bucket with default settings.
- Create a CloudFront distribution in the AWS console:
- Redirect HTTP to HTTPS
- Set Allowed HTTP methods to GET, HEAD, OPTIONS
- Add the appropriate policy to S3

- Build the frontend application:
npm run build- Sync the built content to S3:
aws s3 sync build s3://<bucket-name>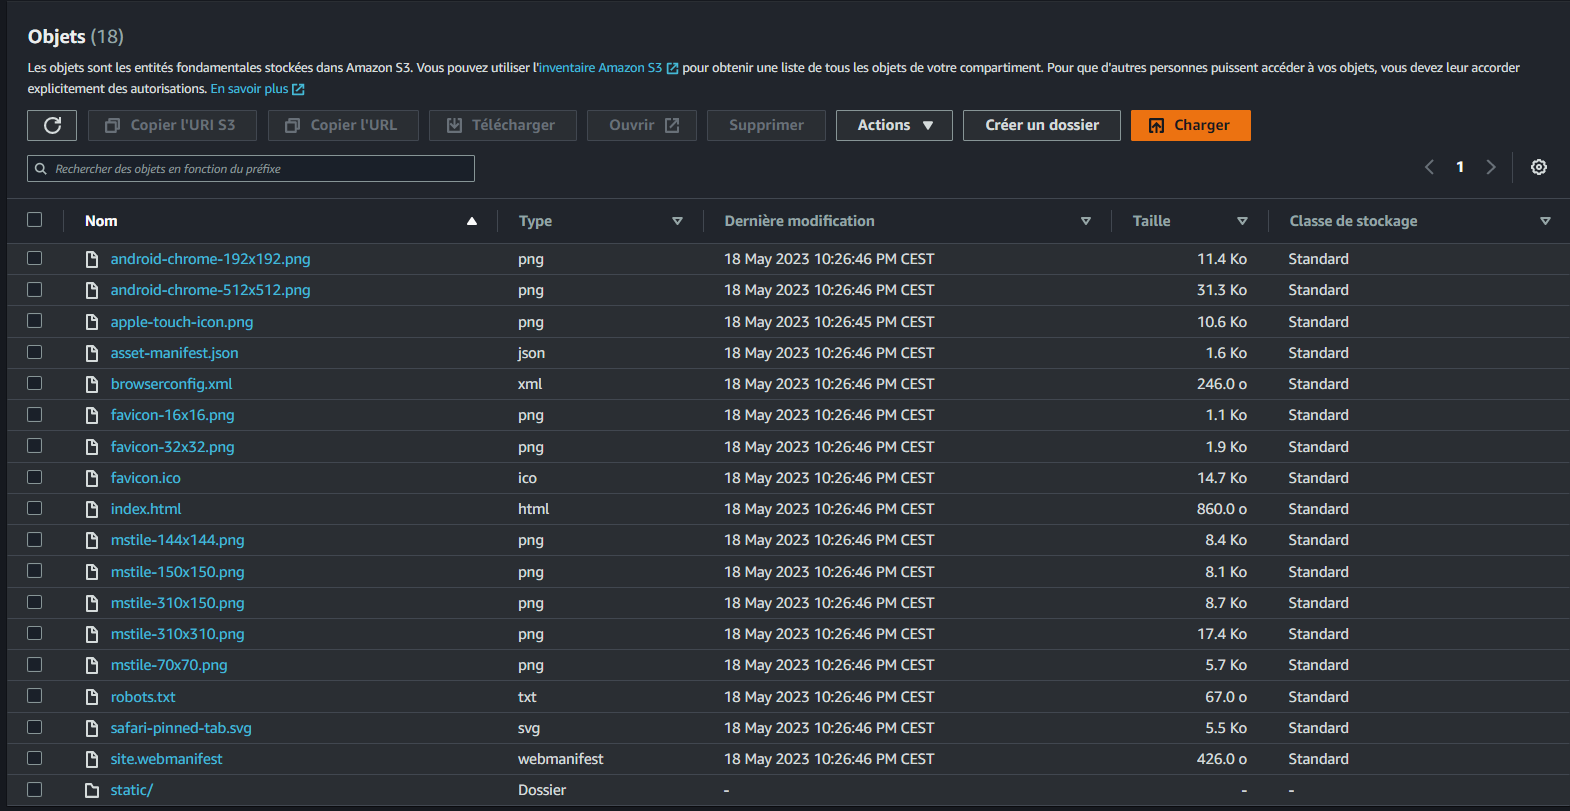
- Verify that the static app is hosted on CloudFront:
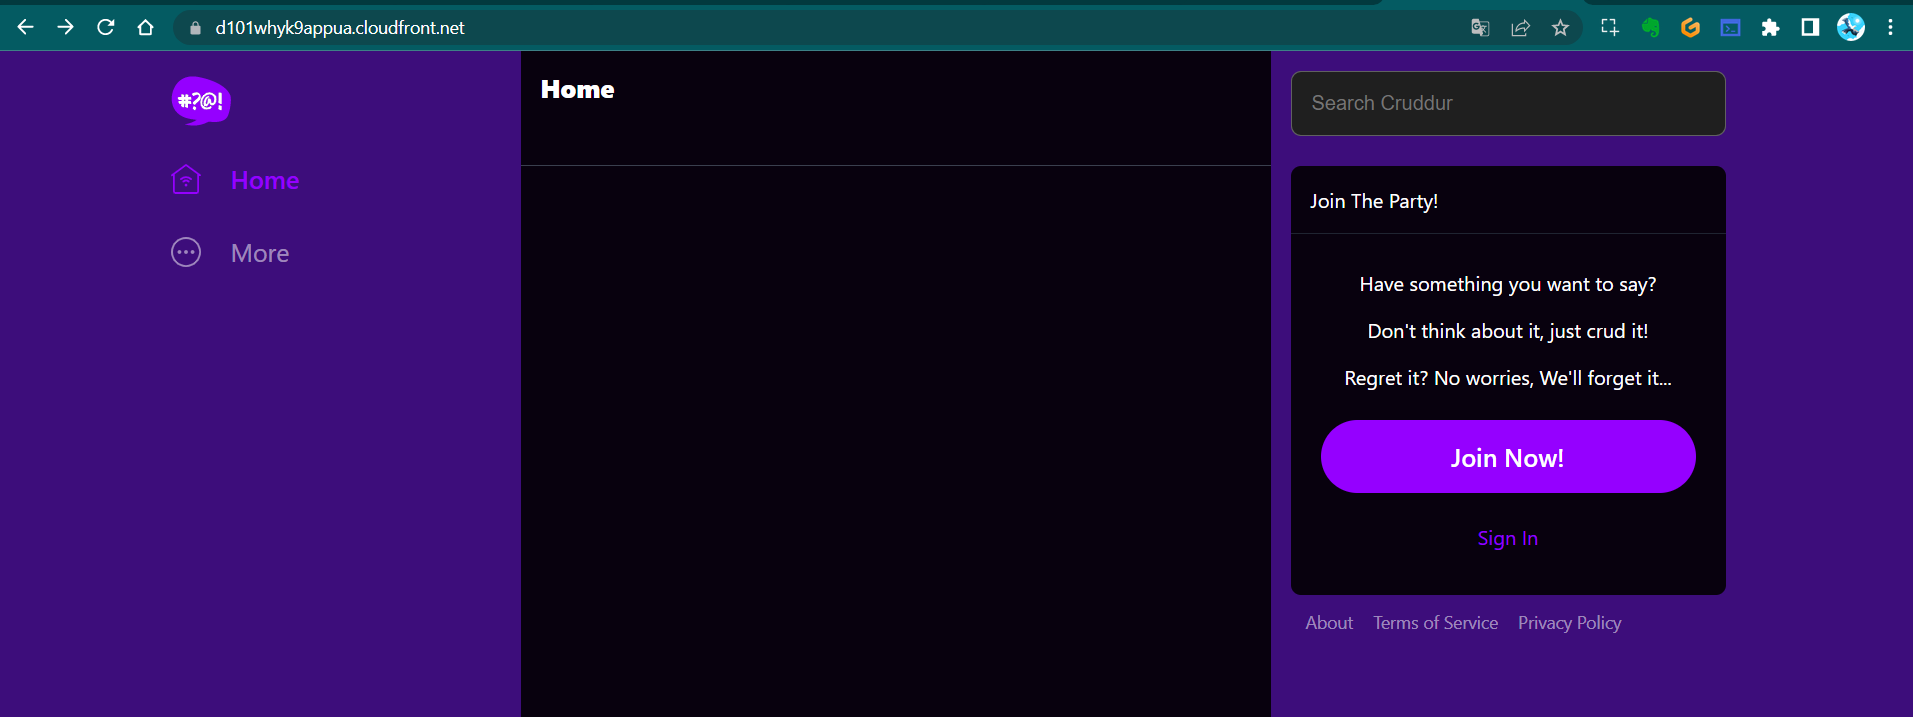
You can access the CloudFront-hosted version of the app at d101whyk9appua.cloudfront.net (opens in a new tab).
Fargate Technical Questions
For a comprehensive understanding of Fargate and its capabilities, we've compiled a set of technical questions and answers. You can find them in two formats:
These resources provide valuable insights into Fargate's features, limitations, and best practices.
Security Best Practices
Deploying and managing containers using AWS Fargate simplifies infrastructure management but introduces specific security concerns. Here are some key areas to focus on:
-
Networking and Security Configuration: Integrate with existing network architectures and incorporate best practices for network isolation and access control.
-
Monitoring and Logging: Configure logging and monitoring solutions to capture container-level metrics, logs, and events. Aggregate and analyze logs from multiple containers, manage log retention, and set up alerts for critical events.
-
Container Orchestration and Scaling: Properly create task definitions, manage task scheduling, and understand container lifecycles. Optimize resource allocation and manage task placement strategies.
Here's a table summarizing security best practices for various AWS services used in this project:
| Service | Security Best Practices |
|---|---|
| Amazon ECR | - Enable image scanning - Implement fine-grained permissions - Regularly update container images - Use secure image repositories - Enable ECR lifecycle policies |
| Amazon ECS | - Implement task role-based access control - Use AWS Fargate for better isolation - Enable VPC networking and security groups - Monitor and log ECS activities - Regularly update ECS components |
| Application Security | - Implement authentication and authorization - Encrypt sensitive data - Use secrets management services - Perform regular security testing - Enable container-level logging |
| Route 53 | - Enable DNSSEC - Implement IAM policies for Route 53 resources - Enable DNS query logging - Implement rate limiting and firewall rules - Regularly review DNS records |
Maintaining security is an ongoing process.
Stay vigilant and keep your knowledge up-to-date with the latest AWS security recommendations.
Additional Resources
Throughout weeks 6 and 7, Yahya compiled various notes and references that you might find helpful:
- Note 1 (opens in a new tab) - Initial project setup and configuration
- Note 2 (opens in a new tab) - Advanced configuration and troubleshooting
- Note 3 (opens in a new tab) - General workflow observations and tips
- Note 4 (opens in a new tab) - DNS configuration and best practices
- Note 5 (opens in a new tab) - AWS JSON configuration guide
- Note 6 (opens in a new tab) - CloudFront setup and optimization
- Note 7 (opens in a new tab) - DNS rollback procedures
These notes provide valuable insights into various aspects of our project development and can serve as quick references for common tasks and configurations.
Additional References
To further enhance your understanding and implementation, consider exploring these resources:
-
CloudFront for Static Website Hosting on Amazon S3 (opens in a new tab)
- Learn how to leverage CloudFront to serve your static website hosted on S3 efficiently.
-
Professional Networking on LinkedIn (opens in a new tab)
- Connect with the author for more insights and professional networking opportunities.
-
BusyBox on Linux: A Comprehensive Guide (opens in a new tab)
- Discover the versatility of BusyBox and how it can streamline your Linux operations.
-
Docker Networking Deep Dive (opens in a new tab)
- Master the intricacies of Docker networking to optimize your container communications.
-
Debian iputils-ping Package Documentation (opens in a new tab)
- Explore the capabilities of the iputils-ping package for enhanced network diagnostics.
-
Mastering Python and Bash for Next-Level Automation (opens in a new tab)
- Elevate your automation skills by combining the power of Python and Bash scripting.
Conclusion
This double-power-bundle of the AWS Cloud Project Bootcamp have been intensively focused on advanced AWS services, containerization, and security best practices. By implementing load balancing, configuring DNS with Route 53, setting up SSL certificates, and optimizing our Docker workflows, we've significantly enhanced the scalability, security, and performance of our application.
Remember that cloud architecture and security are ever-evolving fields. Stay curious, keep learning, and always be ready to adapt to new best practices and technologies. Your journey here with me in mastering AWS and cloud computing is just beginning!
We hope this comprehensive guide serves as a valuable resource in your cloud development journey. Don't hesitate to revisit these notes and references as you continue to build and optimize your cloud-native applications.
This approach is effective regardless of yacrud platform because it allows you to leverage your own idea, On Scale.
Happy coding, and may your clouds always be well-architected!
Gear Up 🚘