Decentralized Authentication
Week three marks the introduction of decentralized authentication, a robust and confidential alternative to the conventional centralized authentication systems that rely on a single point of failure which makes them more vulnerable to cyberattacks.
Decentralized authentication offers a heightened level of security and privacy by eliminating the dependence on a central authority.

By the end of this, users should have complete ownership of their identities and control how they are shared. You can be confident that your digital individuality is safe and that your data is not being shared without your consent with ultimate Protection.
Week Three Main Tasks
We'll be onboarding the app to a decentralized authentication system on the aws platform and we'll show you exactly how.
- Compressing Protocols
- App User Authentication
- Client-Side Integration with Amplify
- Future of Cryptographic Passports
- Improving UI Contrast and Implementing CSS Variables
Table Of Figures
- Figure 1: Cruddur Cognito User Pool
- Figure 2: Cruddur User Sign-In with Handle
- Figure 3: Cruddur Sign Up Page
- Figure 4: Cruddur Confirmation Page POC
- Figure 5: Cruddur SignIn After Recovery
- Figure 6: Cruddur Stale User Interface
- Figure 7: Cruddur CSS Visual Contrast
Compressing Protocols
Authentication protocols are a set of rules that allow two parties to verify each other's identities, ensuring secure online transactions and protecting users' data.

Authentication protocols have evolved over time to address security and usability challenges.
Following SAML in 2005, the W3C introduced the OpenID specification, establishing a standard for decentralized authentication. This specification has gained significant traction and is currently among the most widely embraced approaches for decentralized authentication.
| Protocol | Release | Description |
|---|---|---|
| SAML 1.0 | 2️⃣0️⃣0️⃣2️⃣ | Allows users to be authenticated and authorized across multiple domains. |
| SAML 2.0 | 2️⃣0️⃣0️⃣5️⃣ | A more secure version for exchanging authentication and authorization information. |
| OpenID | 2️⃣0️⃣0️⃣5️⃣ | A simple and easy-to-use protocol for single sign-on. |
| OAuth 1.0 | 2️⃣0️⃣0️⃣7️⃣ | Allowed third-party apps to access protected resources on behalf of users but was complex and less secure. |
| OAuth 2.0 | 2️⃣0️⃣1️⃣2️⃣ | Improved OAuth 1.0 with a simpler and more secure protocol, becoming the most widely used today. |
| OpenID Connect | 2️⃣0️⃣1️⃣5️⃣ | A more advanced protocol that builds on top of OAuth 2.0 to provide SSO and access control. |
Protocols and Use Cases
Below, I will outline major use cases and recommend the suitable for each scenario, with a particular focus on two dominant protocols. OAuth use cases can also be applied with the more preferable OpenID Connect.
OAuth 2.0
- Social Login: Social media platform allows sign-in via Facebook, Google, or Twitter credentials.
- API Access: Cloud storage provider grants third-party app access to APIs without sharing credentials.
- Mobile Apps: Banking app authenticates users using existing bank credentials.
- Web Applications: E-commerce website enables sign-in using credit card credentials.
SAML 2.0
- Single Sign-On: University enables students to log in to websites and apps with university credentials.
- Federation: Company federates security domains with partners, allowing access using their own credentials.
- Authorization: Healthcare organization exchanges authorization info with patients to control access to medical records.
Authentication protocols have come a long way, with OAuth 2.0 as the versatile standard, SAML 2.0 for specialized scenarios, and OIDC extending OAuth with essential authentication features.
- SAML protocl is XML-based.
- OAuth is Restful, JSON protocol.
- OpenID is URI-based, JSON protocol.
OIDC Connect builds on OAuth 2.0 for enhanced authentication and security,
- Userinfo Endpoint: Applications can request user information (name, email, etc.).
- ID Tokens: Signed JSON objects with user info, issuer, and audience.
- JWT: Uses JSON Web Tokens for secure representation of user identity and authorization.
Yacrud User Authentication
OpenID Connect (opens in a new tab) has become the prevailing protocol among leading Fortune companies for internal authorization and authentication including Amazon, Google and Microsoft.
When a user tries to access an OpenID-compliant application
App will redirectthe user to the identity provider'slogin page.- The
identity providerwillauthenticatethe user and return anauthentication tokento the application. - The application can then use the
authenticationtoken to accessprotected resources.
    User                OpenID-Compliant          Identity Provider          Application
     |                       Cruddur                    |                       |
     |------------ Redirect to Login Page ------------->|                       | Y
     |                                                  |                       | A
     |                <------- Login Page --------------|                       | Y
     |                                                  |                       | A
     |----- Redirect with Auth Token (after login)----->|                       | 2
     |                                                  |                       | D
     |                      <------- Auth Token --------|                       | E
     |                                                  |                       | V
     |------------------- Access Protected Resources -------------------------->| O
     |                                                  |                       | P
     |<----- Respond with Protected Resource Data ------|                       | S
     |------------ Sign Out Operation------------------>|                       |
Moreover, OIDC is offered as a service to customers, delivering to you a seamless and dependable authentication solutions of the future.
AWS Decentralized Authentication Solution
AWS Cognito is a fully managed service provided that enables developers to add user sign-up, sign-in, and access control functionalities to their applications.
It offers a scalable and secure solution for handling user authentication and identity management, making it easier to manage user data and access across various devices and platforms.
User --> [AWS Cognito] --(OAuth 2.0, OpenID Connect)--> [Identity Pool] --> [Federated Identities] --> [AWS Services, Yacrud, Products..]We will leverage the power of AWS Cognito to implement the above decentralized authentication processes for our great users.
Create Amazon Cognito User Pool
- aws to the Cognito (opens in a new tab) in the console.
- Click Create a user pool.
- In the Authentication providers section, select Cognito user pool.
- In the Cognito user pool sign-in options section, select Email.
Click Next. - In the Security requirements section, select No MFA.
- In the User account recovery section, leave the default settings.
Click Next. - In the Required attributes section, select name and preferred_username.
Click Next. - In the Email delivery section, select Send email with Cognito.
Click Next. - Enter a User pool name.
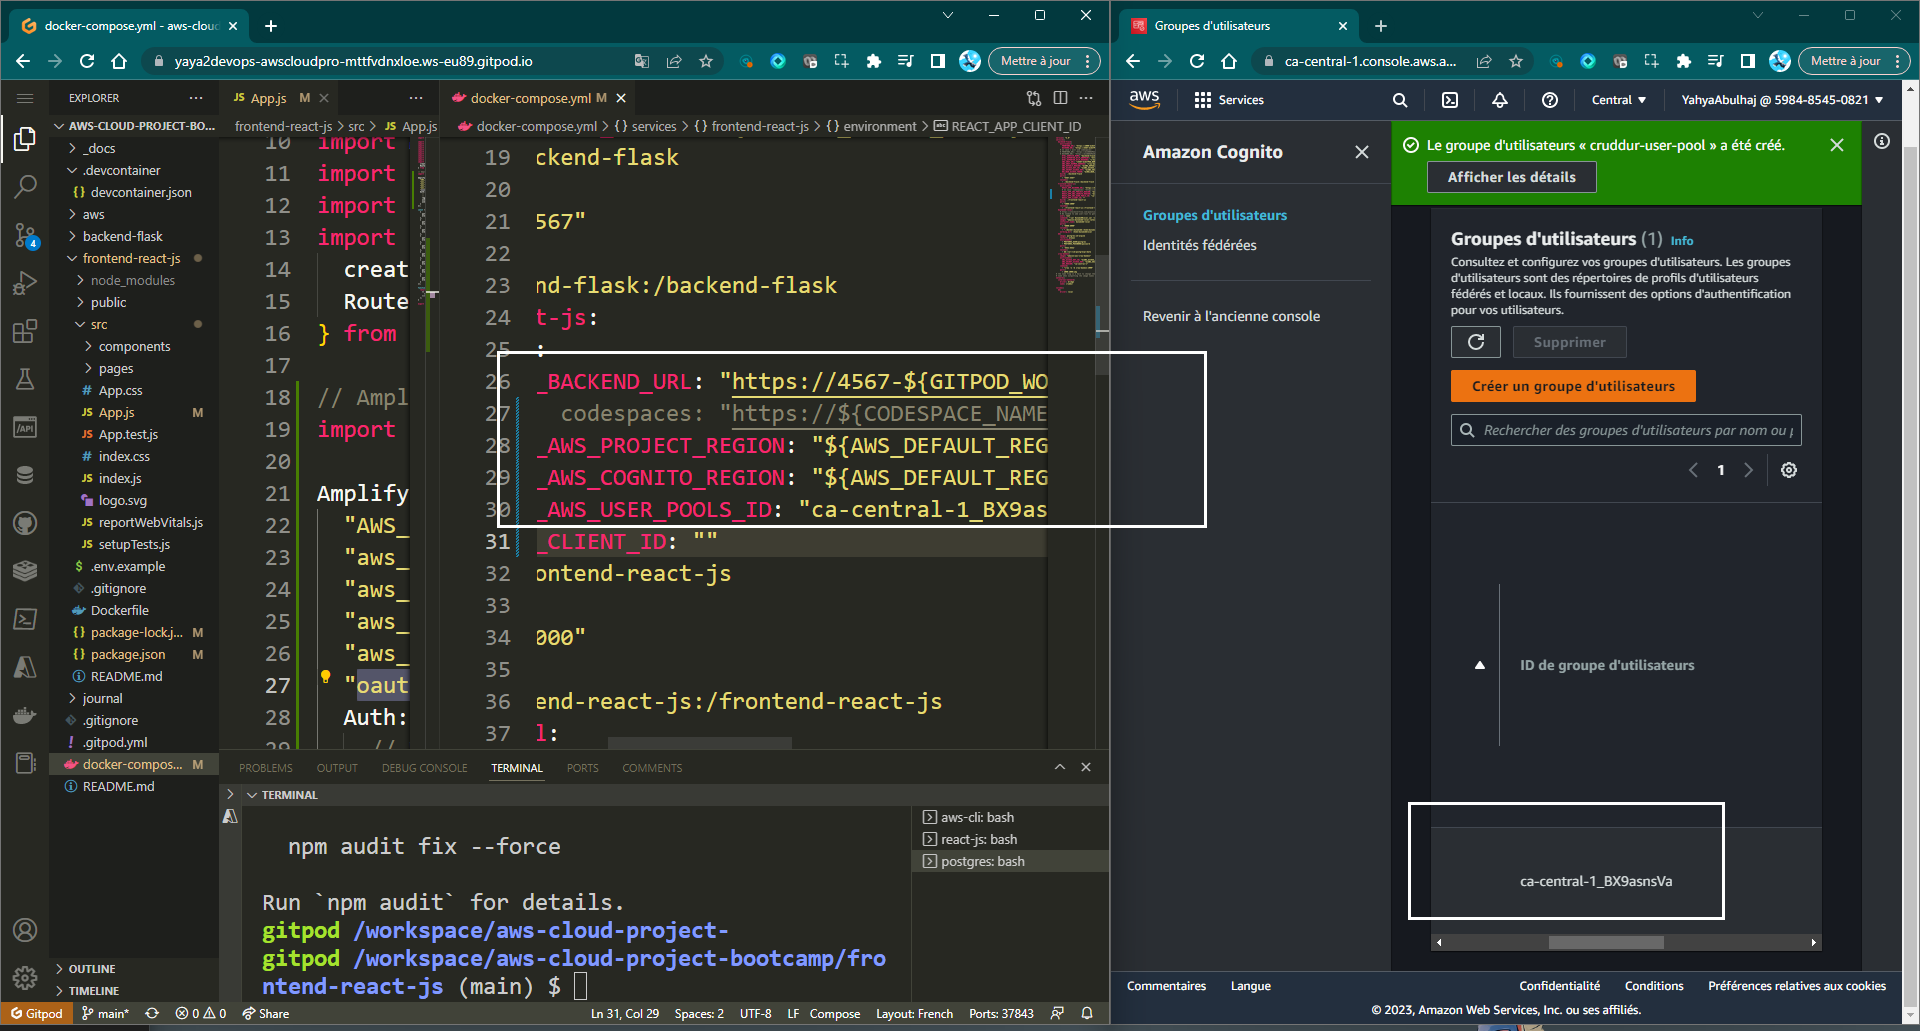
- In the App type section, select Public Client and set a App client name.
Click Next. - Review the settings and click Create User Pool.
The user pool will be created and you will be able to retrieve the user pool ID and app client ID.
Figure 1.0: Cruddur Cognito User Pool
NOTES:
- The
nameandpreferred_usernameattributes cannot be changed after creation. - The
Send email with Cognitooption uses Amazon SNS to send emails. - There is a limit on the number of emails that can be sent for free each month.
- The
Use the Cognito Hosted UIoption should not be used. It is not good looking. - AWS Cognito allows
IdP Integrations. Security requirements with MFAis recommended but cost more.
Client-Side Integration with Amplify
Amplify enables conditional rendering of elements and data based on whether the user is logged in or logged out.
Amplify is employed with Amazon Cognito for client-side authentication and enable API calls for custom login, signup, and recovery functionality.
As we proceed to shape the forthcoming code to meet our authentication requirements,
| Source File | Description |
|---|---|
app.py | Backend configurations for amplify for cognito. |
docker-compose.yml | Cognito Environment variables and app local testing. |
HomeFeedPage.js | Page responsible for displaying the home feed content. |
ProfileInfo.js | Component for displaying user profile information. |
SigninPage.js | Page for user sign-in functionality. |
SignupPage.js | Page for user registration. |
DesktopNavigation.js | Component to conditionally show links based on login status. |
ConfirmationPage.js | Page for confirming user accounts and resending codes. |
RecoverPage.js | Page for user password recovery. |
Leveraging Cognito with Amplify, we can achieve a secure and efficient authentication mechanism for our application.
Step 1: Install and Configure Amplify
- Install Amplify
Run the following command in the frontend-react-js path to install the Amplify client-side library for Amazon Cognito
npm i aws-amplify --saveThis will automatically update package.json and package-lock.json to include the Amplify package.
- Configure Amplify
In
frontend-react-js/src/App.js, add the following import:
import { Amplify } from 'aws-amplify';- Below the import statements, configure Amplify with the necessary environment variables:
Amplify.configure({
  AWS_PROJECT_REGION: process.env.REACT_APP_AWS_PROJECT_REGION,
  aws_cognito_region: process.env.REACT_APP_AWS_COGNITO_REGION,
  aws_user_pools_id: process.env.REACT_APP_AWS_USER_POOLS_ID,
  aws_user_pools_web_client_id: process.env.REACT_APP_CLIENT_ID,
  oauth: {},
  Auth: {
    region: process.env.REACT_APP_AWS_PROJECT_REGION,
    userPoolId: process.env.REACT_APP_AWS_USER_POOLS_ID,
    userPoolWebClientId: process.env.REACT_APP_CLIENT_ID,
  },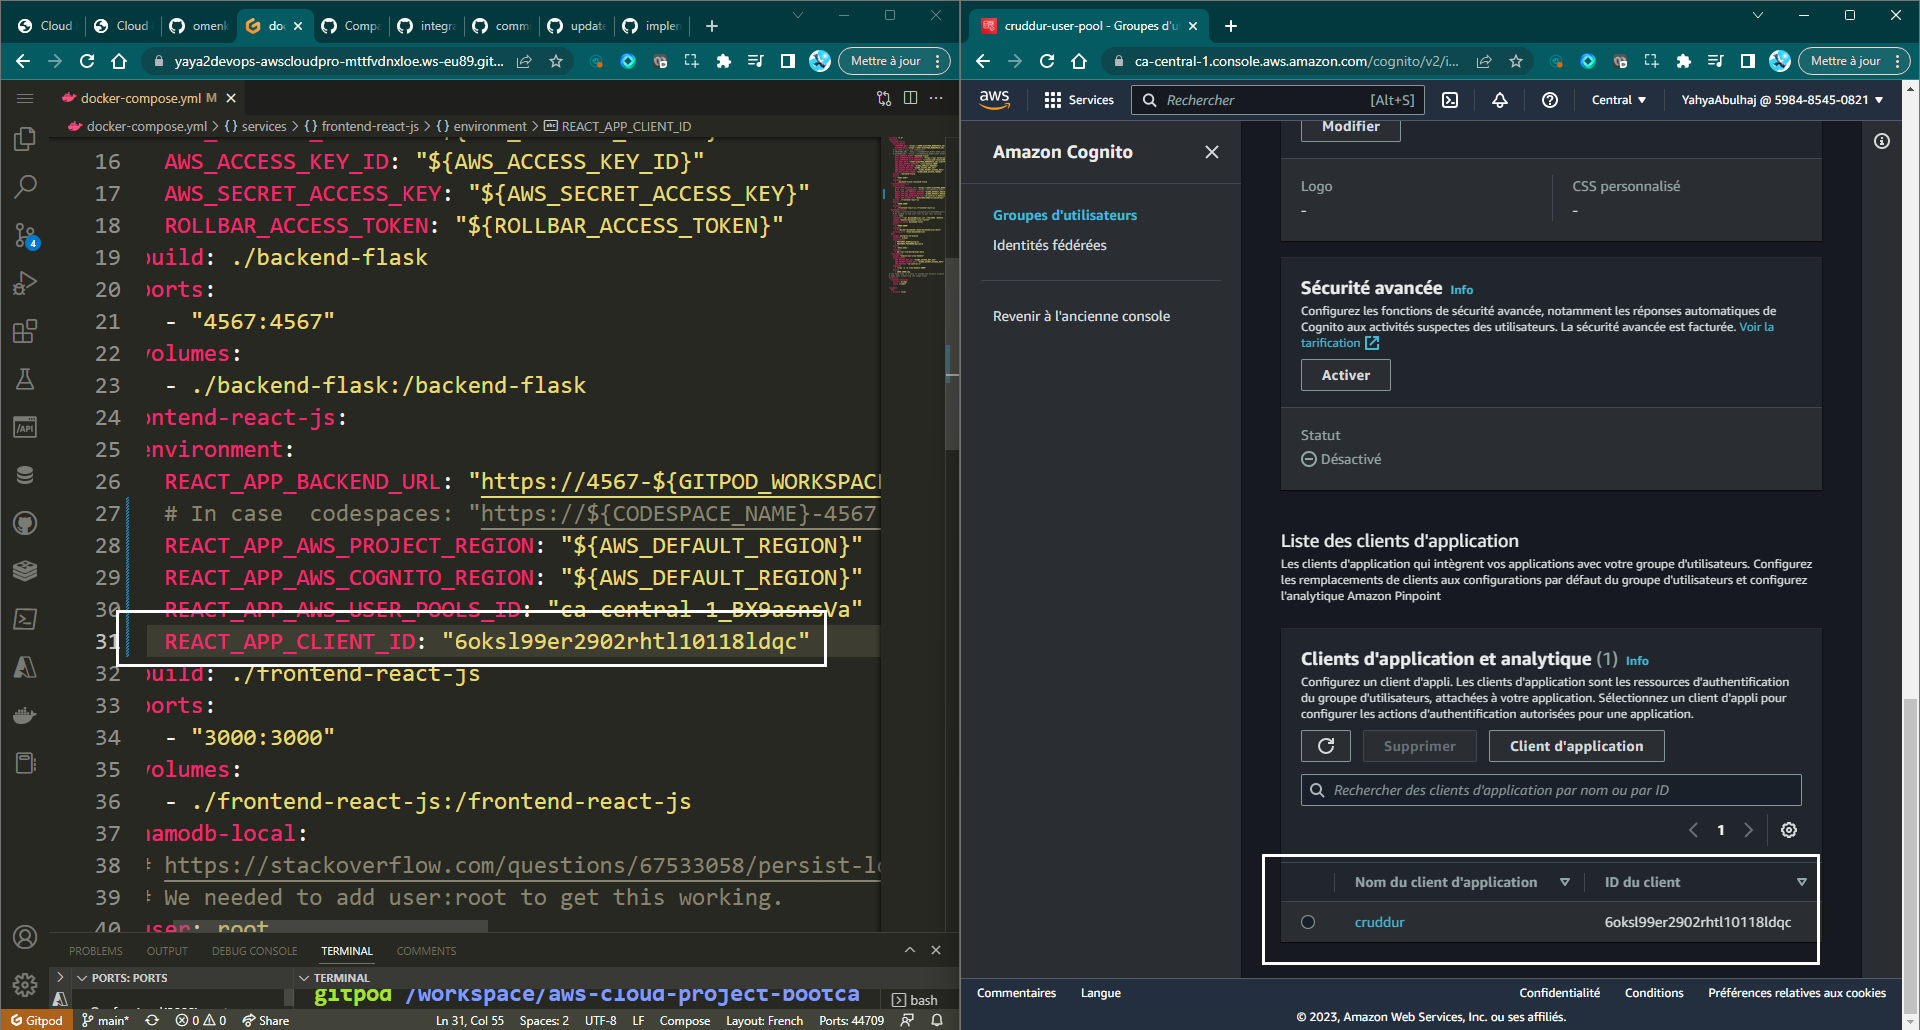
});- Ensure that the necessary environment variables are added to the docker-compose.yml file under the frontend section:
REACT_APP_AWS_PROJECT_REGION: "${AWS_DEFAULT_REGION}"
REACT_APP_AWS_COGNITO_REGION: "${AWS_DEFAULT_REGION}"
REACT_APP_AWS_USER_POOLS_ID: "${AWS_USER_POOLS_ID}"
REACT_APP_CLIENT_ID: "${CLIENT_ID}"- Also, set the user pool ID and app client ID as environment variables using the following commands:
export REACT_APP_AWS_USER_POOLS_ID=<USER_POOLS_ID>
export REACT_APP_CLIENT_ID=<APP_CLIENT_ID>
Step 2: Authentication As Code
Onboarding Cognito to the below web app pages require users to be authenticated.
This provides a more secure and seamless user experience.
HomeFeedPage.jsis the page where users will see their feed of posts.ProfileInfo.jsis the page where users can view their personal profile information and settings.
- Import the
Authmodule fromaws-amplify. This module provides the functionality to interact with Cognito.
import { Auth } from 'aws-amplify';- In the
HomeFeedPage.jsfile, add the following code to check if the user is authenticated:
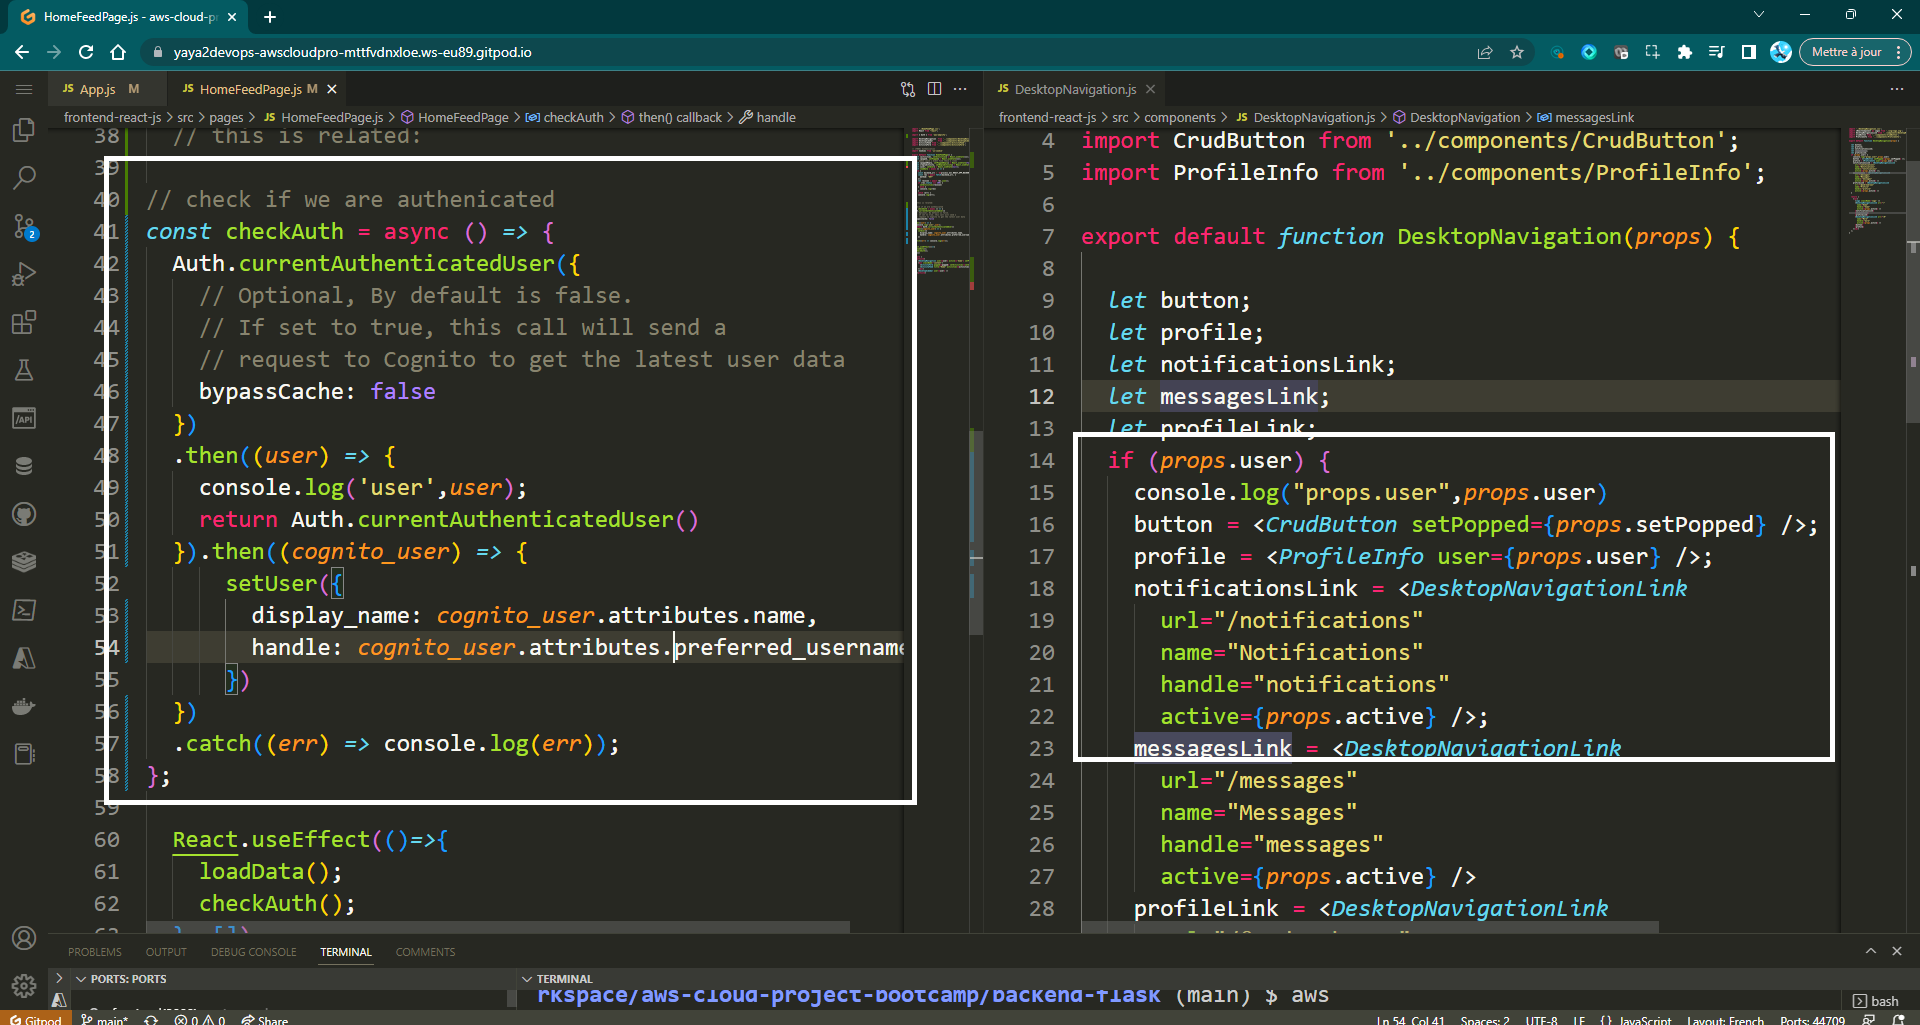
const checkAuth = async () => {
  Auth.currentAuthenticatedUser({
    bypassCache: false,
  })
    .then((user) => {
      console.log("user", user);
      return Auth.currentAuthenticatedUser();
    })
    .then((cognito_user) => {
      setUser({
        display_name: cognito_user.attributes.name,
        handle: cognito_user.attributes.preferred_username,
      });
    })
    .catch((err) => console.log(err));
};
This code will first check if the user is authenticated by calling the currentAuthenticatedUser method. If the user is authenticated, the method will return the user's Cognito user object. The user's name and preferred username will then be set on the setUser function.
- In the
ProfileInfo.jsfile, replace the oldsignOutfunction with the following code:
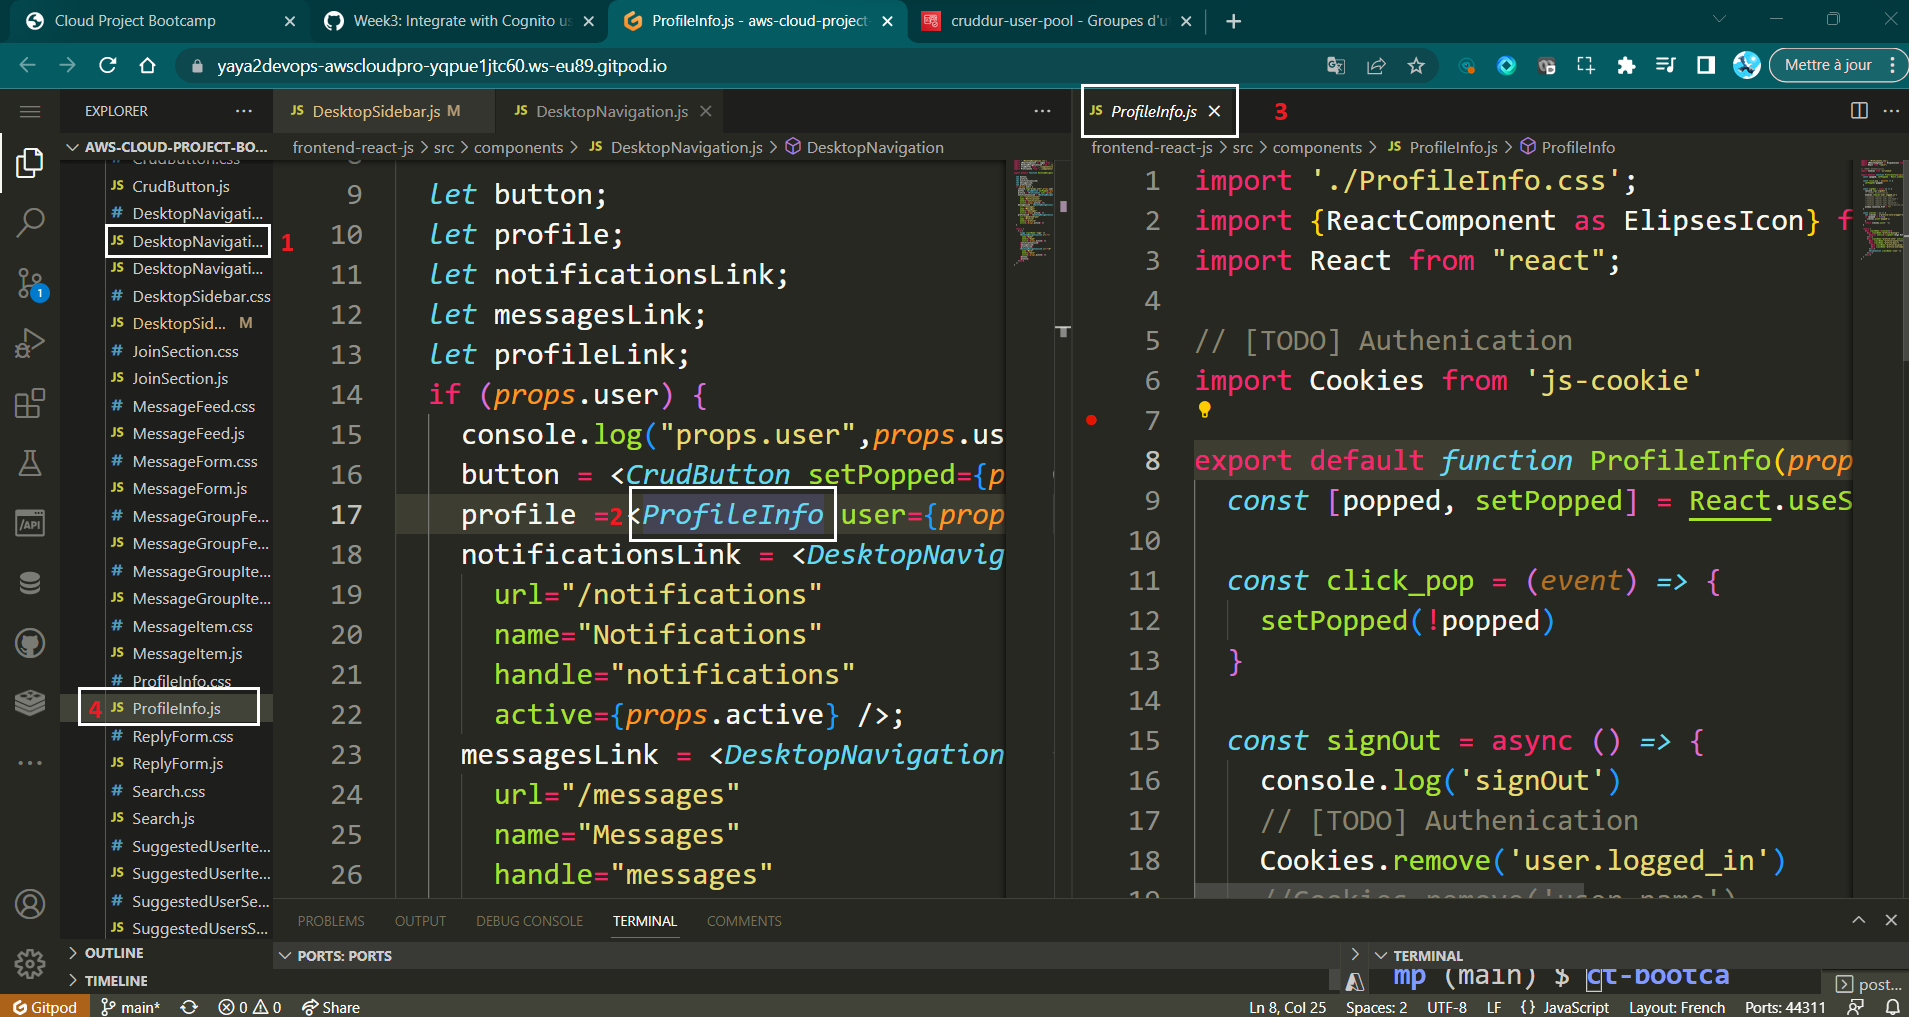
const signOut = async () => {
  try {
    await Auth.signOut({ global: true });
    window.location.href = "/";
  } catch (error) {
    console.log('error signing out: ', error);
  }
};
This will sign the user out of Cognito and redirect them to the home page.
Step 3: Creating a Sign-in Page
Follow these steps to create a sign-in page using the aws-amplify library.
- In the
SignInPage.jsfile, import the Auth class from theaws-amplifypackage located in the pages directory.
import { Auth } from 'aws-amplify';- Clear Previous Errors and Prevent Default Form Submission:
setErrors("");
event.preventDefault();
This part ensures that any previous error messages are cleared, and it prevents the default behavior of form submission, giving you control over the submission process.
const onsubmit = async (event) => {
    setErrors("");
    event.preventDefault();

    // Rest of the code will go here...
};- Attempt User Sign-In and Handle Success:
try {
    // Try user using the provided email and password
    const user = await Auth.signIn(email, password);

    // Store the user's access token securely in the browser
    localStorage.setItem("access_token", user.signInUserSession.accessToken.jwtToken);

    // Redirect the user to the main page after successful sign-in
    window.location.href = "/";
} catch (error) {
    // Errors during sign-in will be handled in the subsequent code block
}- Handle Errors and Redirect for Unconfirmed Users:
} catch (error) {
    // Log the error to the console
    console.log("Error!", error);

    if (error.code === "UserNotConfirmedException") {
        window.location.href = "/confirm";
    }

    // Display the error message to the user
    setErrors(error.message);
}
In case of an error during sign-in, this part logs the error, checks if it's related to an unconfirmed user, and handles the redirection accordingly. It also displays the error message to the user.
- Verify your function looking like this after replacing the
onsubmitfunction to handle the submission of the sign ins data.
// Handle the submission of sign-in data
const onsubmit = async (event) => {
    setErrors("");  // Clear any previous error messages
    event.preventDefault();  // Prevent the default form submission behavior

    try {
        // Attempt to sign in the user using the provided email and password
        const user = await Auth.signIn(email, password);
        localStorage.setItem("access_token", user.signInUserSession.accessToken.jwtToken);

        // Redirect to the home page upon successful sign-in
        window.location.href = "/";
    } catch (error) {
        console.log("Error!", error);

        // Check if the error is due to an unconfirmed user
        if (error.code === "UserNotConfirmedException") {
            // Redirect to the confirmation page for user confirmation
            window.location.href = "/confirm";
        }
        setErrors(error.message);  // Display the error message to the user
    }

    return false;  // Prevent the form from submitting
};
Step 4: Manual Sign-Ins Tests
- Go to the Sign in page of the user pool.
- Enter the user's email address and password.
- Click on the Sign in button.
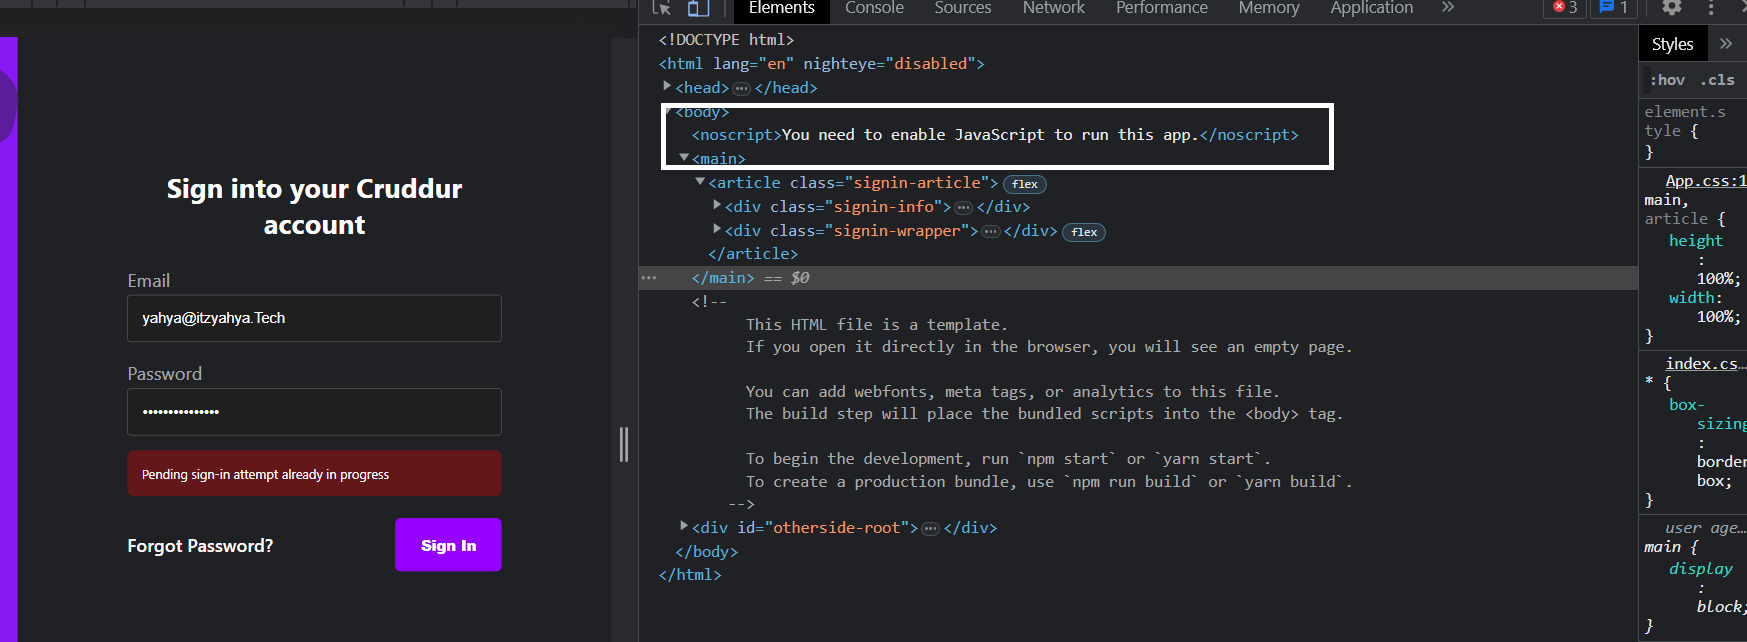
Note: The email address will be used to verify the user's account.
Troubleshooting Above Error
To address the error, follow these steps:
- Open your terminal or command prompt.
- Execute the necessary command to reset the password for a user in AWS Cognito.
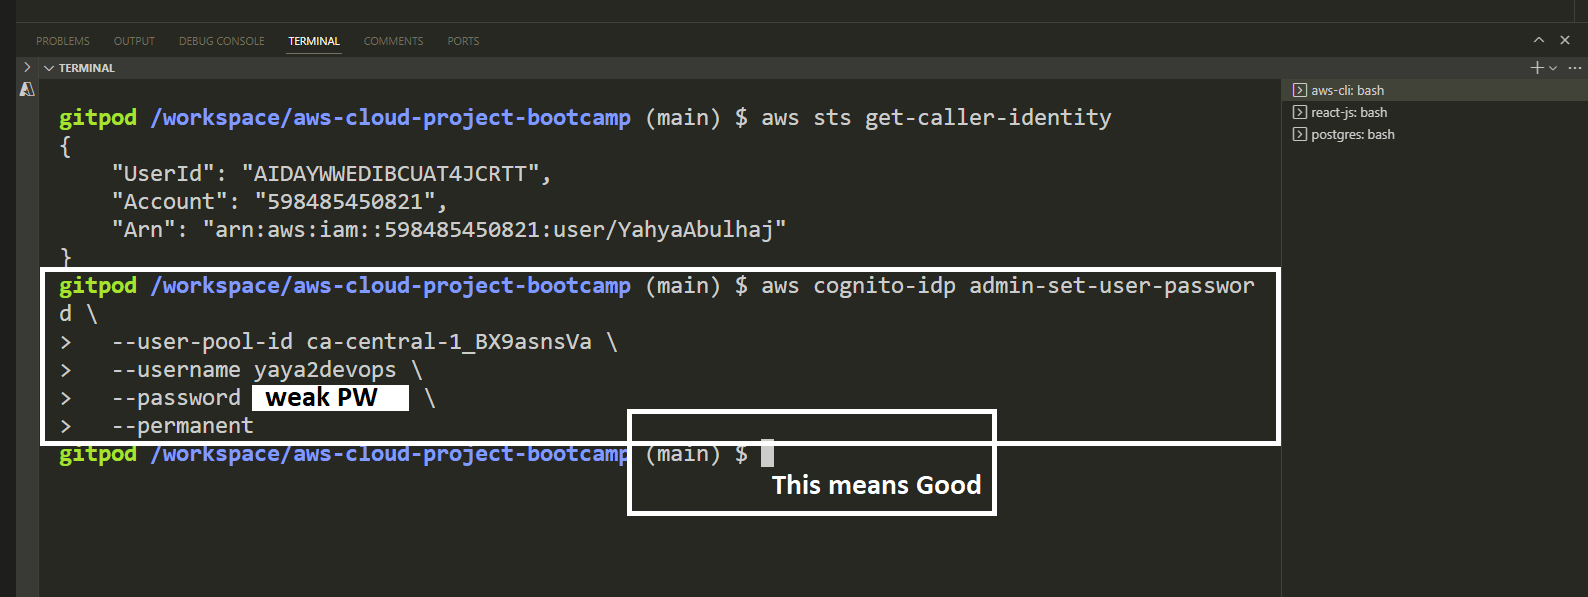
aws cognito-idp admin-set-user-password --username <username> --password <password> --user-pool-id <userpool_id> --permanent- Replace
<username>with the actual username of the user. - Replace
<password>with the desired new password. - Replace
<userpool_id>with the ID of your user pool.
Re-attempt Sign-In
- After resetting the password, attempt to sign in again.
- Go to the console and see the registered user confirmed.

You should now be able to authenticate without encountering any errors.
User Handle Inspection
To effectively inspect user data, follow these steps
Updating User Attributes
- Navigate to the User page.
- Click on
"Edit"under User attributes. - Modify or add information to the Name and Preferred Name fields as required.
- Save your changes.
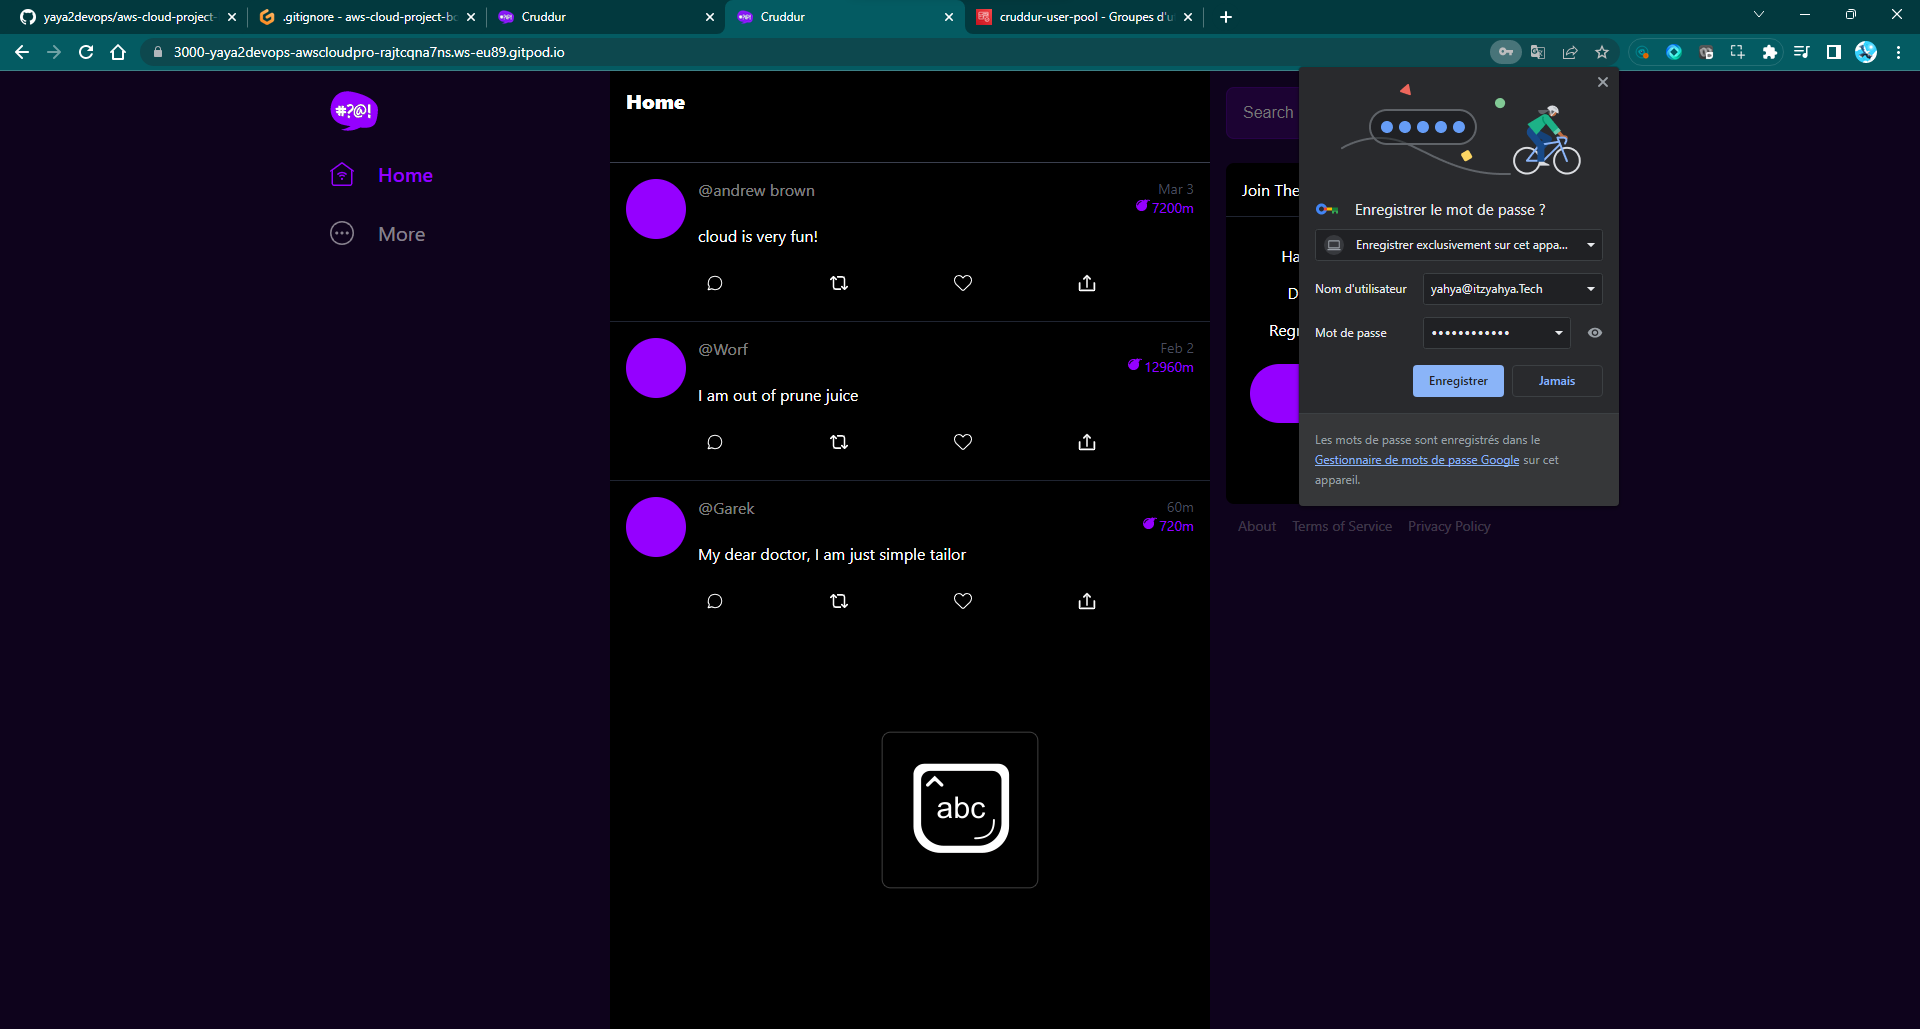
Viewing Name Changes
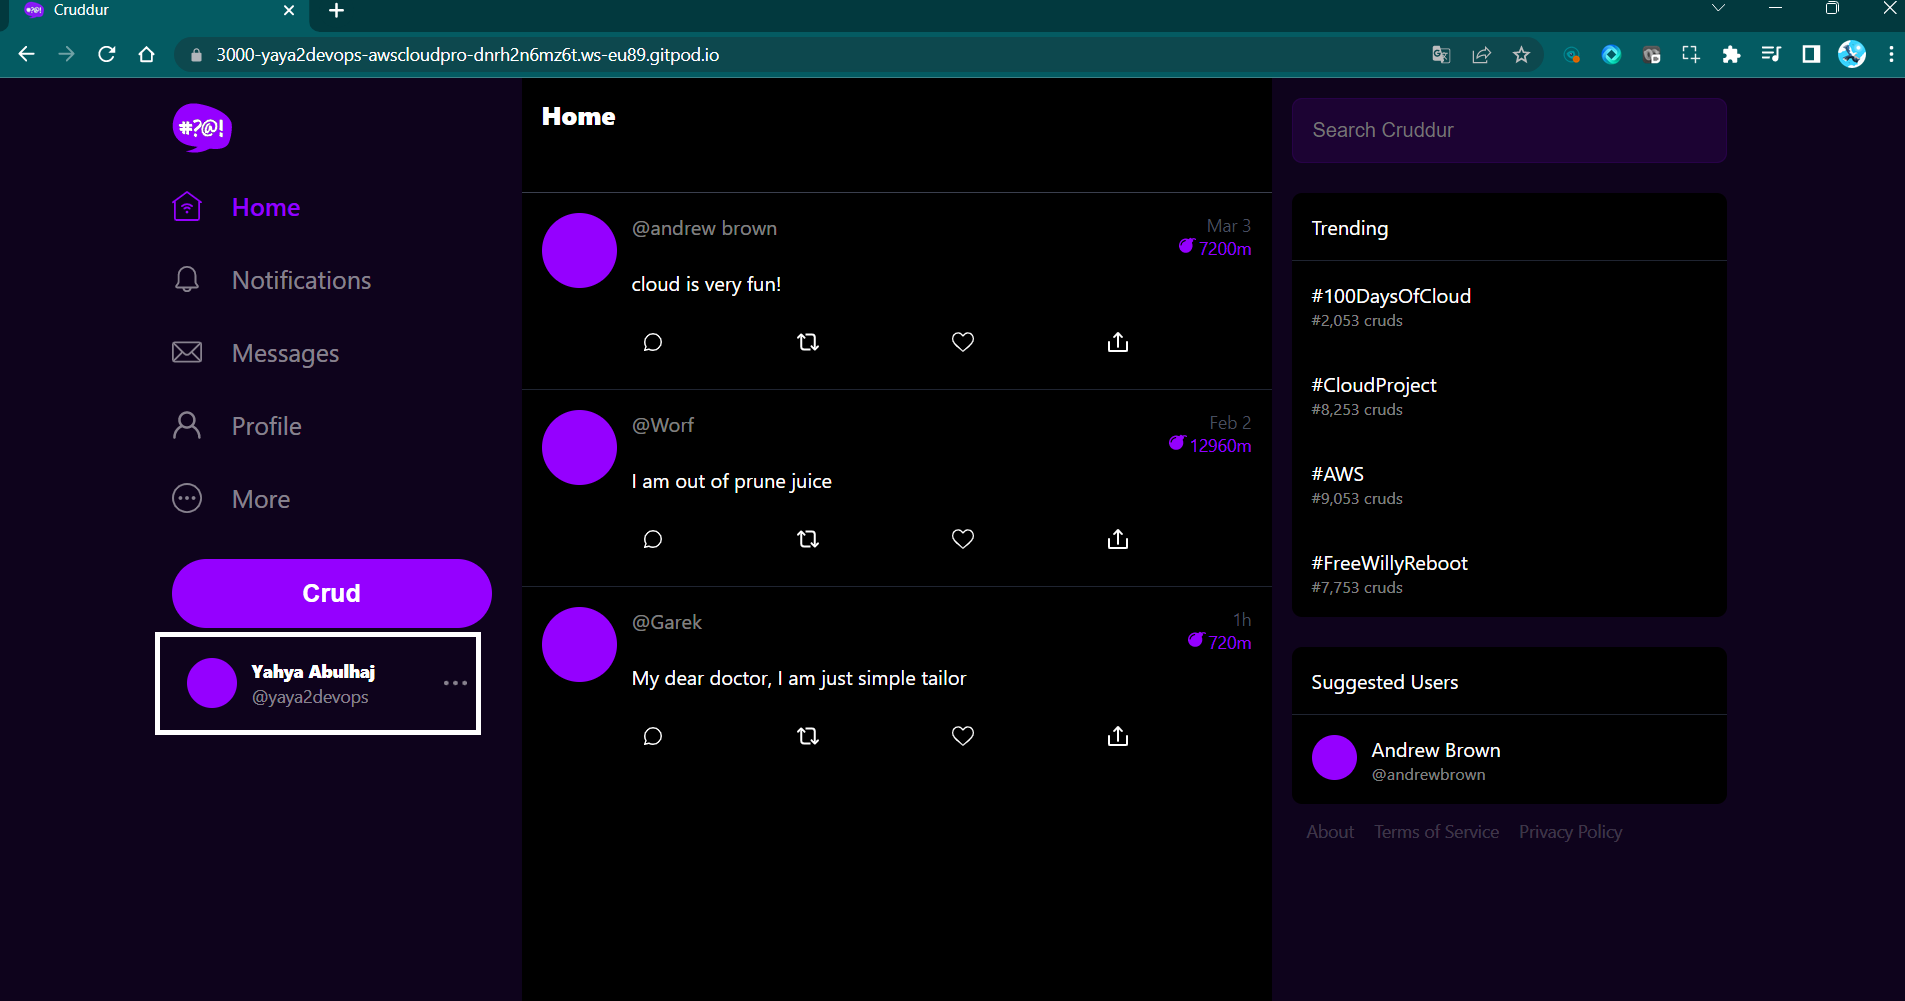
- Log back into the Cruddur application.
- You will now be able to view the updated name information, reflecting the changes made in the previous step.
- Re-operate and sign in the a real user.
Figure 2: Cruddur User Sign-In with Handle
Deleting User and Sign Out
- If needed, return to the AWS Cognito dashboard.
- Locate and delete the user.
- Sign out of the Cruddur application to ensure a clean session.
Step 5: Creating Sign-Up Page
- Open the
signupPage.jsfile. - Replace the
cookiesimport with the following:
import { Auth } from 'aws-amplify';- Replace the
onsubmitevent handler with the following code:
const onsubmit = async (event) => {
  event.preventDefault();
  setErrors('');
  try {
    const { user } = await Auth.signUp({
      username: email,
      password: password,
     // To Be Continued
    });
    console.log(user);
    window.location.href = `/confirm?email=${email}`;
  } catch (error) {
    console.log(error);
    setErrors(error.message);
  }
  return false;
};- The first line,
event.preventDefault(), prevents the default behavior of the submit button, which would be to reload the page. - The next line,
setErrors(''), clears theerrorsstate variable.
The goal is to keep your users signed in and engaged on the platform once they've logged in.
- Then the
autoSignInObject comes in
      autoSignIn: {
        // optional - enables auto sign in after user is confirmed
        enabled: true,
}autoSignIn: An object that specifies whether the user should be automatically signed in after they are created.
- Add Cruddur User Attributes using the following code.
  try {
    const { user } = await Auth.signUp({
      attributes: {
        name: name,
        email: email,
        preferred_username: username,
},attributes: An object that contains additional attributes about the user, such as their name and email address.
- The code should look like this.
const onsubmit = async (event) => {
  event.preventDefault();
  setErrors('');
  try {
    const { user } = await Auth.signUp({
      username: email,
      password: password,
      attributes: {
        name: name,
        email: email,
        preferred_username: username,
      },
      autoSignIn: {
        // optional - enables auto sign in after user is confirmed
        enabled: true,
      }
    });
    console.log(user);
    window.location.href = `/confirm?email=${email}`;
  } catch (error) {
    console.log(error);
    setErrors(error.message);
  }
  return false;
};- If the sign up is successful, the
tryblock will log the user object and redirect the user to the confirmation page. Theconsole.log()function prints the user object to the console. Thewindow.location.hreffunction sets the URL of the current window to the confirmation page. - If the sign up fails, the
catchblock will log the error and set theerrorsstate variable to the error message. Theconsole.log()function - prints the error to the console. ThesetErrors()function sets theerrorsstate variable to the error message.
- Save the Sign-Up page and verify it.
Figure 3: Cruddur Sign Up Page
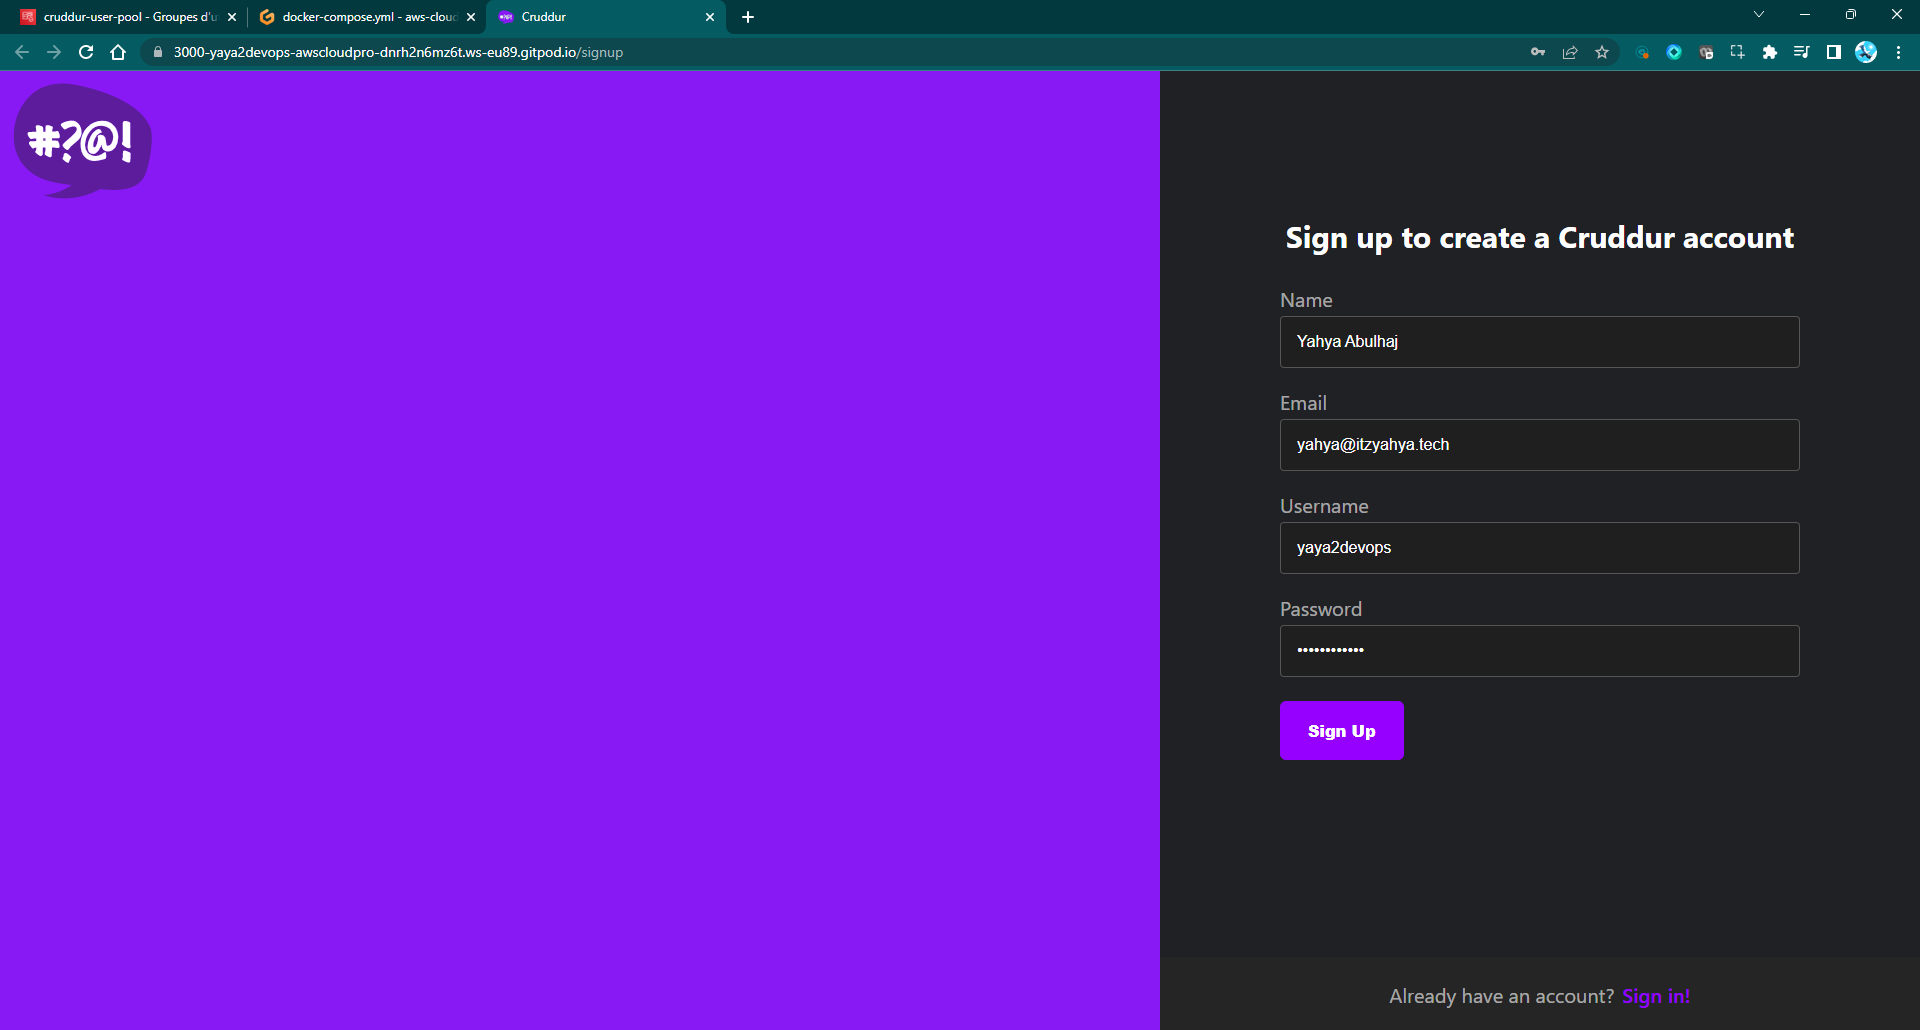
Once you have created the page it will now use the AWS Amplify library to sign up users.
Step 6: Creating Confirmation Page
- In the
ConfirmationPage.jsfile, ensure you have the necessary import statement at the beginning of your code:
import { Auth } from 'aws-amplify';- Locate the
resend_codefunction and add the new code to handle Confirmation.
const resend_code = async (event) => {
  setErrors('');
  try {
     # To Be Continued.
  } catch (err) {
    # To Be Continued
  }
};- Inside the try block, you will add the code to resend the activation code using AWS Amplify Auth. This code ensures that the activation code is resent to the user's email for confirmation.
  try {
    // Resend the activation code using AWS Amplify Auth
    await Auth.resendSignUp(email);
    console.log('Activation code resent successfully');
    setCodeSent(true);
Now, let's handle the specific error cases that might occur during the resend process.
- In the catch block, you can add conditional statements to provide meaningful error messages based on the type of error. This helps guide the user and provide relevant feedback.
    catch (err) {
    // Handle errors during resend process
    console.log(err);
    if (err.message === 'Username cannot be empty') {
      setErrors("Please provide an email to resend the Activation Code.");
    } else if (err.message === "Username/client id combination not found.") {
      setErrors("The provided email is either invalid or cannot be found.");
    }
You can leave the rest of the catch block as it is for now, and we will proceed to completing the error handling in the next step.
- Locate the existing
onsubmitfunction in your code.
This function is responsible for confirming the sign-up process and handling any errors that might occur.
- Replace the existing onsubmit function with the new code provided below.
const onsubmit = async (event) => {
    event.preventDefault();
    setErrors('');
    try {
      // Confirm the sign-up using AWS Amplify Auth
      await Auth.confirmSignUp(email, code);
      // Redirect the user to the homepage upon successful confirmation
      window.location.href = "/";
    } catch (error) {
      // Handle errors during confirmation
      setErrors(error.message);
    }
    return false;
}
This updated code ensures smooth handling of confirmation and error feedback.
Step 7: Testing the Confirmation Page
After incorporating these modifications, proceed through the following steps to ensure the Confirmation Page operates as intended:
- Refresh the Cruddur webpage to activate the recent changes and updates.
- Click on the "Join Now" button to initiate the sign-up process. Supply a valid email address as instructed.
- Upon successful completion of the sign-up process, you will be automatically redirected to the confirmation page.
- On the confirmation page, input the received code from your email client into the designated field.
.jpg)
If necessary, you have the option to utilize the "Resend code" feature on the confirmation page, which allows you to obtain a fresh activation code via email.
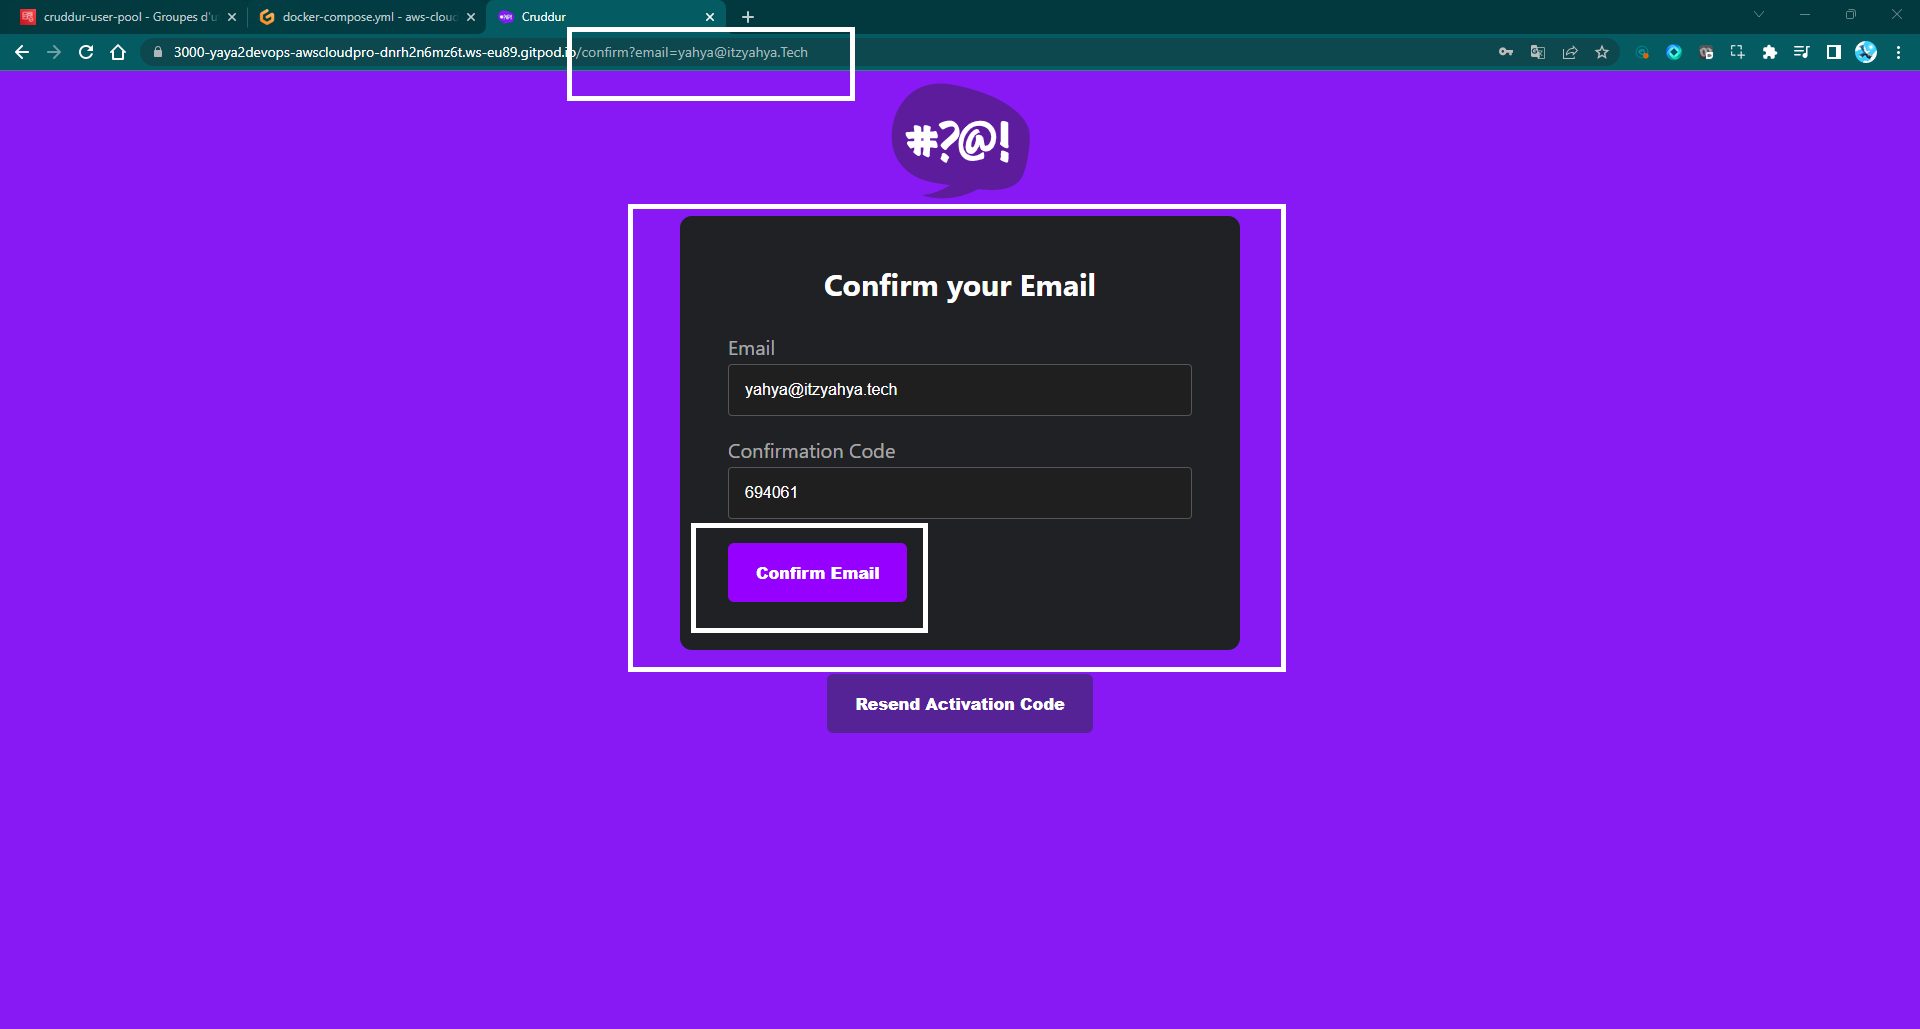
Figure 4: Cruddur Confirmation Page POC
Post-Verification Steps
Once the confirmation process has been verified, proceed with the following steps:
- Upon successful verification of the activation code, navigate to the application's sign-in page.
- Using your password after confirmation, sign in.
Step 8: Creating Recovery Page
- Add the auth import to your recovery page.
- Create two functions:
onsubmit_send_codeand constonsubmit_confirm_code.
const onsubmit_send_code = async (event) => {
  event.preventDefault();
  setErrors(''); // Clear any previous error messages.
   # To Be Continued
  return false; // Prevent the default form submission behavior.
}
const onsubmit_confirm_code = async (event) => {
  event.preventDefault();
  setErrors(''); // Clear any previous error messages.
  if (password == passwordAgain) {
   # To Be Continued
  } else {
  }
  return false;
}- Define
onsubmit_send_codeto handle submitting the form to send a password reset code.
const onsubmit_send_code = async (event) => {
  event.preventDefault();
  setErrors(''); // Clear any previous error messages.

  // Call the `forgotPassword` method from the `Auth` module to send a password reset code.
  Auth.forgotPassword(username)
    .then((data) => setFormState('confirm_code')) // Move to the next form state after successful request.
    .catch((err) => setErrors(err.message)); // Handle any errors by displaying an error message.
  return false; // Prevent the default form submission behavior.
}- Define
onsubmit_confirm_codeto handle submitting the confirmation code and new password.
const onsubmit_confirm_code = async (event) => {
  event.preventDefault();
  setErrors('');

  // Check if the entered passwords match.
  if (password == passwordAgain) {
    // Call the `forgotPasswordSubmit` method to confirm the password reset using the code and new password.
    Auth.forgotPasswordSubmit(username, code, password)
       // Move to the success state after successful password reset.
      .then((data) => setFormState('success'))
      // Handle any errors by displaying an error message.
      .catch((err) => setErrors(err.message));
  } else {
    // Display an error message if passwords do not match.
    setErrors('Passwords do not match');
  }
  return false; // Prevent the default form submission behavior.
}- Combine the code to reach this level of dev in your
RecoverPage.js.
import { Auth } from 'aws-amplify';

const onsubmit_send_code = async (event) => {
  event.preventDefault();
  setErrors('');
  Auth.forgotPassword(username)
    .then((data) => setFormState('confirm_code'))
    .catch((err) => setErrors(err.message));
  return false;
}

const onsubmit_confirm_code = async (event) => {
  event.preventDefault();
  setErrors('');
  if (password == passwordAgain) {
    Auth.forgotPasswordSubmit(username, code, password)
      .then((data) => setFormState('success'))
      .catch((err) => setErrors(err.message));
  } else {
    setErrors('Passwords do not match');
  }
  return false;
}
Step 9: Testing Recovery Page
- Save the changes to the file and refresh the webpage in your browser.
- Locate and click on the
Forgot Passwordlink. - Input your email address, then click the
Send Recovery Codebutton. - Check your email inbox for a message containing a recovery code.
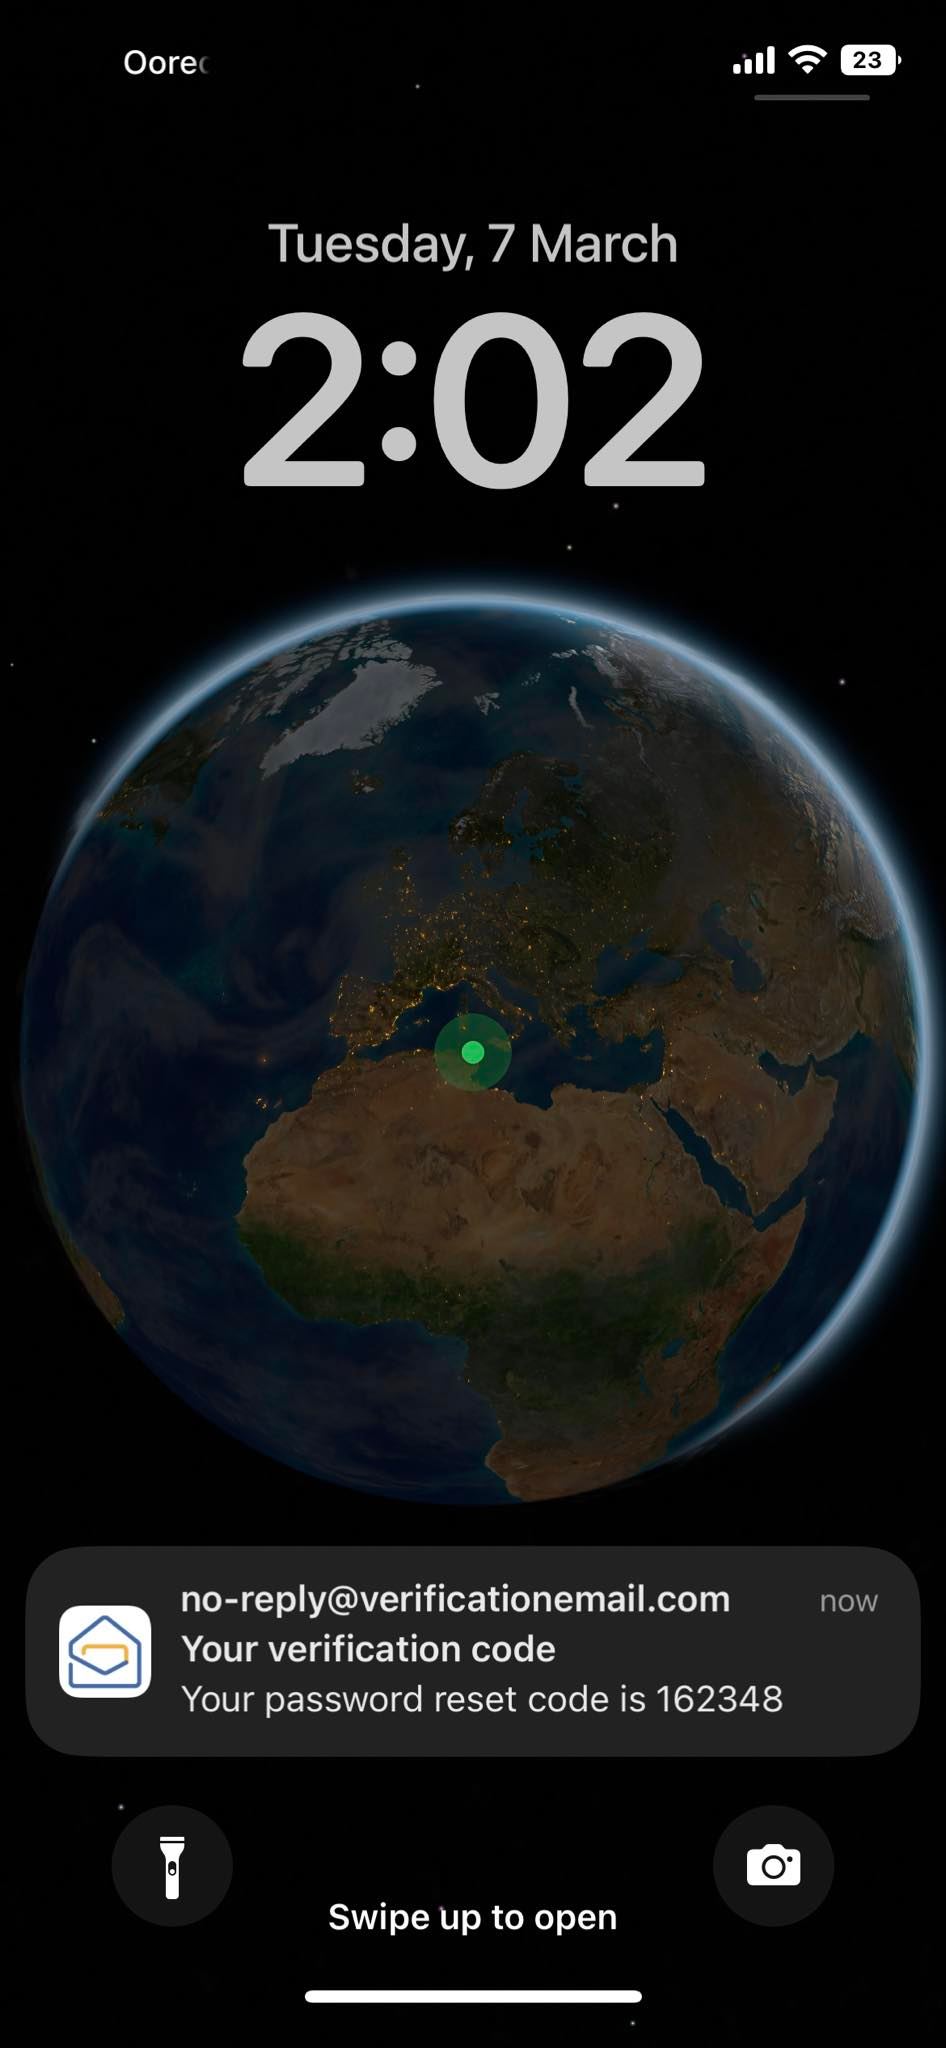
- On the webpage, enter the recovery code along with your new password.
Figure 4: Cruddur Recover Page - Forgot URL
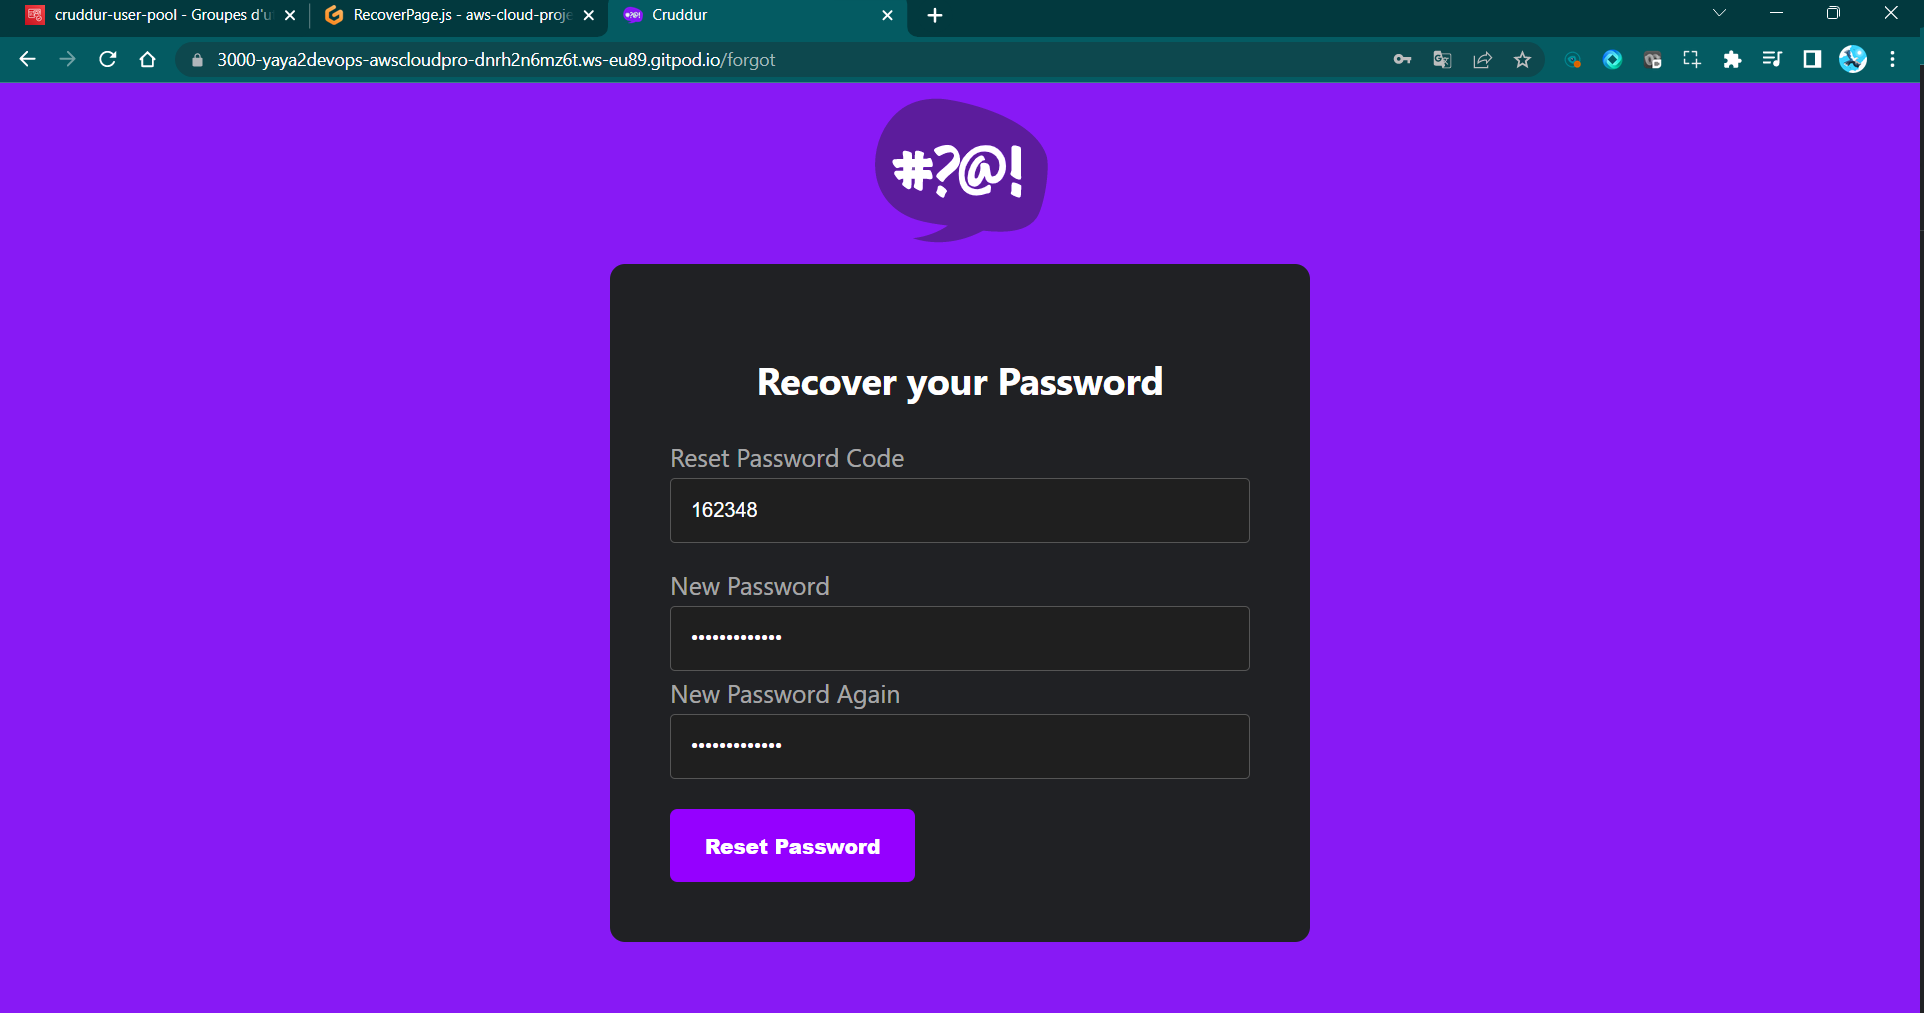
- Click the
Resetbutton to finalize the password recovery process. - Sign In again using the recovered password.
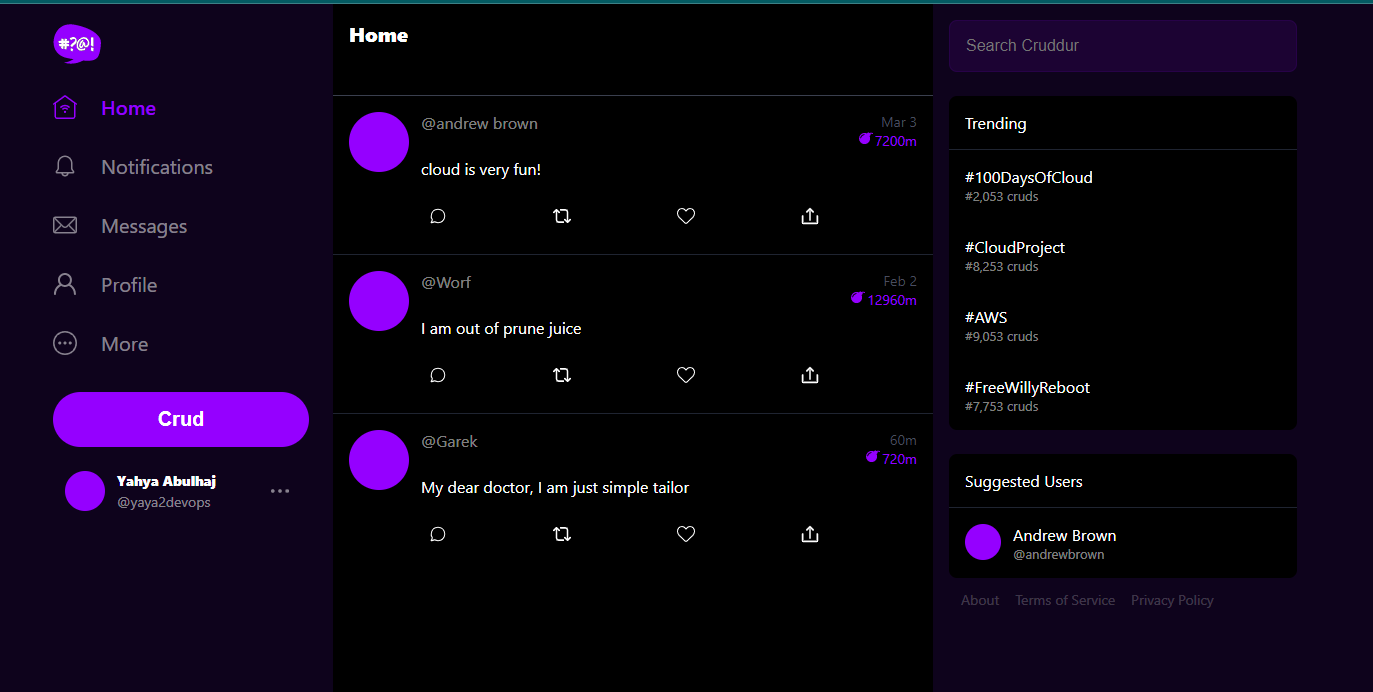
Figure 5: Cruddur SignIn After Recovery
The Future of Cryptographic Passports
Tokens have been used for authentication purposes in computing for quite some time. In a broader sense, a token is a piece of data that represents a user's identity, authentication session, or some other form of authorization.

Tokens are often used as an alternative to transmitting sensitive information like passwords over the network and come in various forms, such as,
- session cookies; User session management via browser cookies.
- bearer tokens; Access tokens for API authorization.
- JWTs; Compact, self-contained data for secure information exchange.
The idea is to provide a secure and efficient way to authenticate users and authorize their access to protected resources.
Create a JSON Web Token
JWTs tend to be more complex and involve encoding claims, specifying algorithms, and managing signatures for secure information exchange. Let me uncover it for you.
JWT was first proposed in 2011 by Auth0 and IANA. It is based on the JSON Web Signature (JWS) and JSON Web Encryption (JWE) standards.
JSON Web Tokens is a compact, URL-safe means of representing claims to be transferred between two parties. These claims can be used for authentication and authorization purposes.
JWTs consist of three parts,
- Header: The header typically consists of two parts: the type of token and the signing algorithm being used, such as
HMACSHA256orRSA. - Payload: The second part of the token is the payload, which contains the claims. Claims are statements about an
entity(typically, the user) and additionaldata. There are three types of claims itself:registered,public, andprivateclaims.
+--------------------------------------------------------------------+
|                              JWT                                   |
|--------------------------------------------------------------------|
|                        Header (Base64)                             |
|--------------------------------------------------------------------|
|                        Payload (Base64)                            |
|--------------------------------------------------------------------|
|                       Signature (Base64)                           |
+--------------------------------------------------------------------+- Signature: To create the signature part, you take the
encoded header,encoded payload, asecret, thealgorithmspecified in the header, andsignthat.
Why Base64?
Base64 is a binary-to-text encoding scheme that is commonly used to represent binary data in a printable ASCII string format. This allows to safely transmit and store our token.
JWTs need to be compact and easily transmissible. To achieve this, the JSON header is first converted into a string and then encoded in Base64Url format.
Base64Url encoding is a variation of Base64 that is URL-safe and does not include characters that might cause issues in URLs or filenames.
- Header (Base64Url encoded JSON):
{
  "alg": "HS256",
  "typ": "JWT"
}alg(Algorithm): Specifies the algorithm used to sign the token, such as HMAC SHA-256 (HS256) or RSA (RS256).typ(Type): Describes the type of token, which is JWT in this case.- For instance, if the above JSON header is Base64Url encoded:
eyJhbGciOiAiSFMyNTYiLCAidHlwIjogIkpXVCJ9
- Payload (Base64Url encoded JSON):
{
  "sub": "1234567890",
  "name": "Yahya Abulhaj",
  "iat": 1516239022
}- The payload contains claims, which are statements about an entity (typically the user) and additional metadata.
- These claims can include user information, expiration time
exp, issueriss, and more.
- Payload might as well look like:
eyJzdWIiOiIxMjM0NTY3ODkwIiwibmFtZSI6IkpvaG4gRG9lIiwiaWF0IjoxNTE2MjM5MDIyfQ
- Signature: The signature is created by combining the encoded header, encoded payload, and a secret key using the specified algorithm. It ensures the integrity of the JWT and verifies that it hasn't been tampered with. The signature is then Base64Url encoded.
- Signature:
SflKxwRJSMeKKF2QT4fwpMeJf36POk6yJV_adQssw5c
- The complete JWT is a concatenation of the Base64Url-encoded header, payload, and signature, separated by periods.
eyJhbGciOiJIUzI1NiIsInR5cCI6IkpXVCJ9.
eyJzdWIiOiIxMjM0NTY3ODkwIiwibmFtZSI6IkpvaG4gRG9lIiwiaWF0IjoxNTE2MjM5MDIyfQ.
SflKxwRJSMeKKF2QT4fwpMeJf36POk6yJV_adQssw5c
Again, the signature is generated using the header and payload along with a secret key and a chosen algorithm.
The recipient can use the same secret key to validate the signature and ensure the JWT's integrity.
From Here to Infinity: The Path Ahead
What is required further is to establish libraries and frameworks that handle JWT creation and verification which is what we will be working.
The design comes in two ways and the choice between symmetric and asymmetric JWTs lies in the way they are signed or verified.
- Symmetric JWTs use a single secret key for both signing and verification. They are simpler and faster but require careful management of the secret key to prevent unauthorized access.
- Asymmetric JWTs use a private key for signing and a corresponding public key for verification. They provide higher security and are suitable for scenarios where multiple parties need to verify tokens or where token verification is distributed.
Other factors when architecting Include security requirements, infrastructure, and performance considerations. We will leverage a custom verify JWT for Cruddur Application on Python Flask using the asymmetric cryptography to verify the signature.
Extending User Sessions
In a typical authentication flow with JWTs, a user logs in using their credentials (username and password), and if the credentials are valid, the server issues both an access token and a refresh token to the client.
Login:   --------------------------------------+
                  | User Enters |    Server    |
                  | Credentials |    Validates |
                  -----------------------------+
                                   |           +
                                   v           +
Access Token:  --------------------------------+
                  | Server Generates |         +
                  | Access Token     |         +
                  -----------------------------+
                                   |
                                   v
Refresh Token: ---------------------------------+
                  | Server Generates |          +
                  | Refresh Token    |          +
                  ------------------------------+
                                   |
                                   v
Access Token:  ---------------------------------+
                  | Client Sends    |           +
                  | Access Token    |           +
                  | in Requests     |           +
                  ------------------------------+
                                   |
                                   v
           -------------------------------------+
          | Access Token Expires,               |
          | Client Uses Refresh Token to Request|
          | a New Access Token                  +
           -------------------------------------+
                                   |
                                   v
Access Token:     -------------------------------+
                  | Server Validates|            +
                  | Refresh Token   |            +
                  | and Generates   |            +
                  | New Access Token|            +
                  -------------------------------+
                                   |
                                   v
          +--------------------------------------+
          | Client Sends New Access Token in     |
          |  Next Requests                       +
+--------------------------------------+- The user logs in with
credentials. - The server generates an
access token(short-lived) and arefresh token(long-lived). - The client uses the
access tokento make requests to protected resources. - When the access token expires, the client uses the
refresh tokento request a new access token without the need for the user to log in again. - The server validates the
refresh tokenand generates a `new access token. - The client uses the
new access tokento continue accessing protected resources.
This is an approach worth informing that enhances security by reducing the exposure of user credentials and provides a smoother user experience.
Considerations
JWTs can be vulnerable to man-in-the-middle attacks if they are not transmitted securely. Additionally, JWTs can only be used to transmit a limited amount of data.
Beyond Basics — Design Personalized JWT
Without a robust verification system, the validity of these tokens cannot be guaranteed, exposing applications to potential vulnerabilities. The process of verifying JWT tokens involves a series of crucial steps aimed at confirming the authenticity and trustworthiness of incoming tokens.
This verification system acts as a safeguard, mitigating the risks associated with unauthorized access, token tampering, and expired sessions.
Please envision the following as a mental visualization of the verification process;
   ┌──────────────────┐              ┌────────────────┐
   │   Receive JWT    │              │ Parse Token    │
   │     Token        ◄────────────▶    (Header,
   └──────────────────┘              │   Payload,     │
                                     │   Signature)   │
                                     └────────────────┘
                                                 │
                                                 ▼
                               ┌───────────────────────┐
                               │   Validate Header     │
                               │  (Algorithm Check)    │
                               └───────────────────────┘
                                                 │
                                                 ▼
                     ┌─────────────────────────────────────┐
                     │    Validate Issuer and Audience     │
                     └─────────────────────────────────────┘
                                                 │
                                                 ▼
              ┌─────────────────────────────────────────────────┐
              │ Check Expiration Time (exp) and Not Before (nbf)│
              └─────────────────────────────────────────────────┘
                                                 │
                                                 ▼
                 ┌────────────────────────────────────────┐
                 │    Check Issued At (iat) if Necessary  │
                 └────────────────────────────────────────┘
                                                 │
                                                 ▼
    ┌───────────────────────────────────────────────────────────┐
    │     Verify Signature (Using Secret Key or Public Key)     │
    └───────────────────────────────────────────────────────────┘
                                                 │
                                                 ▼
                         ┌─────────────────────────────────┐
                         │   Make Token Validity Decision  │
                         └─────────────────────────────────┘
                                                 │
                                                 ▼
                       ┌──────────────────────────────────┐
                       │ Perform Additional Custom Checks │
                       └──────────────────────────────────┘
                                                 │
                                                 ▼
                           ┌────────────────────────┐
                           │     Process Request    │
                           └────────────────────────┘
                            │  │  │
                            ▼  ▼  ▼
     ┌──────────────────────────────────────────────┐
     │    Resource Access, Response Generation      │
     └──────────────────────────────────────────────┘
We aim to accomplish the aboves by crafting our unique JWT verification mechanism using Python. If ready, let's do it.
- Create a file
cognito_jwt_token.pyin the lib directory. This file will contain the code for verifying JWT tokens. - Import the from following modules;
time,requests,jose,jose.exceptions,jose.utils:
import time
import requests
from jose import jwk, jwt
from jose.exceptions import JOSEError
from jose.utils import base64url_decode- Create the following classes
FlaskAWSCognitoErrorandTokenVerifyErrorexceptions to raise errors.
class FlaskAWSCognitoError(Exception):
  pass

class TokenVerifyError(Exception):
  pass
The FlaskAWSCognitoError exception is raised for errors that are not related to the JWT token, such as errors that occur when loading the JWK keys.
- Create extract_access_token function to extract the access token that takes the request headers as input and returns the access token if it is found.
def extract_access_token(request_headers):
    access_token = None
    auth_header = request_headers.get("Authorization")
    if auth_header and " " in auth_header:
        _, access_token = auth_header.split()
    return access_token
This function is a good example of how to use regular expressions to extract data from strings. The regular expression " " in auth_header checks if the Authorization header contains a space character. The regular expression _, access_token = auth_header.split() splits the Authorization header on the space character and returns the second part of the header as the access token.
- Start creating the
CognitoJwtTokenClass with the following methods and decoders.
class CognitoJwtToken:
    def __init__(self, user_pool_id, user_pool_client_id, region, request_client=None):
    # To be Continued

    def _load_jwk_keys(self):
    # To be Continued

    @staticmethod
    def _extract_headers(token):
    # To be Continued

    def _find_pkey(self, headers):
    # To be Continued

    @staticmethod
    def _verify_signature(token, pkey_data):
    # To be Continued

    @staticmethod
    def _extract_claims(token):
    # To be Continued

    @staticmethod
    def _check_expiration(claims, current_time):
    # To be Continued

    def _check_audience(self, claims):
    # To be Continued

    def verify(self, token, current_time=None):
# To be Continued- Create
__init__method to initializes the class with the AWS region, user pool ID, user pool client ID, and a request client.
    def __init__(self, user_pool_id, user_pool_client_id, region, request_client=None):
        self.region = region
        if not self.region:
            raise FlaskAWSCognitoError("No AWS region provided")
        self.user_pool_id = user_pool_id
        self.user_pool_client_id = user_pool_client_id
        self.claims = None
        if not request_client:
            self.request_client = requests.get
        else:
            self.request_client = request_client
self._load_jwk_keys()- Add
_load_jwk_keysto loads the JSON Web Key keys from the Cognito user pool.
    def _load_jwk_keys(self):
        keys_url = f"https://cognito-idp.{self.region}.amazonaws.com/{self.user_pool_id}/.well-known/jwks.json"
        try:
            response = self.request_client(keys_url)
            self.jwk_keys = response.json()["keys"]
        except requests.exceptions.RequestException as e:
raise FlaskAWSCognitoError(str(e)) from e_extract_headerswhich Extracts the headers from the JWT token.
    @staticmethod
    def _extract_headers(token):
        try:
            headers = jwt.get_unverified_headers(token)
            return headers
        except JOSEError as e:
raise TokenVerifyError(str(e)) from e- Finds the public key for the JWT token in the JWK keys using
_find_pkey.
    def _find_pkey(self, headers):
        kid = headers["kid"]
        key_index = -1
        for i in range(len(self.jwk_keys)):
            if kid == self.jwk_keys[i]["kid"]:
                key_index = i
                break
        if key_index == -1:
            raise TokenVerifyError("Public key not found in jwks.json")
return self.jwk_keys[key_index]_verify_signature- Verifies the signature of the JWT token.
    @staticmethod
    def _verify_signature(token, pkey_data):
        try:
            public_key = jwk.construct(pkey_data)
        except JOSEError as e:
            raise TokenVerifyError(str(e)) from e
        message, encoded_signature = str(token).rsplit(".", 1)
        decoded_signature = base64url_decode(encoded_signature.encode("utf-8"))
        if not public_key.verify(message.encode("utf8"), decoded_signature):
            raise TokenVerifyError("Signature verification failed")
The @staticmethod decorator is used to create a static method that can be called without needing to instantiate an object of the class.
_extract_claims- Extracts the claims from the JWT token.
    @staticmethod
    def _extract_claims(token):
        try:
            claims = jwt.get_unverified_claims(token)
            return claims
        except JOSEError as e:
raise TokenVerifyError(str(e)) from e- Create
_check_expirationto check if the JWT token has expired.
    @staticmethod
    def _check_expiration(claims, current_time):
        if not current_time:
            current_time = time.time()
        if current_time > claims["exp"]:
raise TokenVerifyError("Token is expired") _check_audience- Checks if the JWT token is intended for the specified audience.
    def _check_audience(self, claims):
        audience = claims["aud"] if "aud" in claims else claims["client_id"]
        if audience != self.user_pool_client_id:
raise TokenVerifyError("Token was not issued for this audience")- Verify the JWT token and returns the claims using
verify.
    def verify(self, token, current_time=None):
        """ https://github.com/awslabs/aws-support-tools/blob/master/Cognito/decode-verify-jwt/decode-verify-jwt.py """
        if not token:
            raise TokenVerifyError("No token provided")

        headers = self._extract_headers(token)
        pkey_data = self._find_pkey(headers)
        self._verify_signature(token, pkey_data)

        claims = self._extract_claims(token)
        self._check_expiration(claims, current_time)
        self._check_audience(claims)

        self.claims = claims
        return claims
The verify method is the most important method in the class. It takes a JWT token as input and returns the claims if the token is valid. The method first extracts the headers from the token and then finds the public key for the token in the JWK keys.
The method then verifies the signature of the token and extracts the claims. Finally, the method checks if the token has expired and if it is intended for the specified audience. If all of the checks pass, the method returns the claims. Otherwise, the method raises an exception.
Here we are, having completed the design of our JWT token. Please verify It looks like this.
import time
import requests
from jose import jwk, jwt
from jose.exceptions import JOSEError
from jose.utils import base64url_decode

class FlaskAWSCognitoError(Exception):
  pass

class TokenVerifyError(Exception):
  pass

def extract_access_token(request_headers):
    access_token = None
    auth_header = request_headers.get("Authorization")
    if auth_header and " " in auth_header:
        _, access_token = auth_header.split()
    return access_token

class CognitoJwtToken:
    def __init__(self, user_pool_id, user_pool_client_id, region, request_client=None):
        self.region = region
        if not self.region:
            raise FlaskAWSCognitoError("No AWS region provided")
        self.user_pool_id = user_pool_id
        self.user_pool_client_id = user_pool_client_id
        self.claims = None
        if not request_client:
            self.request_client = requests.get
        else:
            self.request_client = request_client
        self._load_jwk_keys()

    def _load_jwk_keys(self):
        keys_url = f"https://cognito-idp.{self.region}.amazonaws.com/{self.user_pool_id}/.well-known/jwks.json"
        try:
            response = self.request_client(keys_url)
            self.jwk_keys = response.json()["keys"]
        except requests.exceptions.RequestException as e:
            raise FlaskAWSCognitoError(str(e)) from e

    @staticmethod
    def _extract_headers(token):
        try:
            headers = jwt.get_unverified_headers(token)
            return headers
        except JOSEError as e:
            raise TokenVerifyError(str(e)) from e

    def _find_pkey(self, headers):
        kid = headers["kid"]
        key_index = -1
        for i in range(len(self.jwk_keys)):
            if kid == self.jwk_keys[i]["kid"]:
                key_index = i
                break
        if key_index == -1:
            raise TokenVerifyError("Public key not found in jwks.json")
        return self.jwk_keys[key_index]

    @staticmethod
    def _verify_signature(token, pkey_data):
        try:
            public_key = jwk.construct(pkey_data)
        except JOSEError as e:
            raise TokenVerifyError(str(e)) from e
        message, encoded_signature = str(token).rsplit(".", 1)
        decoded_signature = base64url_decode(encoded_signature.encode("utf-8"))
        if not public_key.verify(message.encode("utf8"), decoded_signature):
            raise TokenVerifyError("Signature verification failed")

    @staticmethod
    def _extract_claims(token):
        try:
            claims = jwt.get_unverified_claims(token)
            return claims
        except JOSEError as e:
            raise TokenVerifyError(str(e)) from e

    @staticmethod
    def _check_expiration(claims, current_time):
        if not current_time:
            current_time = time.time()
        if current_time > claims["exp"]:
            raise TokenVerifyError("Token is expired")

    def _check_audience(self, claims):
        audience = claims["aud"] if "aud" in claims else claims["client_id"]
        if audience != self.user_pool_client_id:
            raise TokenVerifyError("Token was not issued for this audience")

    def verify(self, token, current_time=None):
        """ https://github.com/awslabs/aws-support-tools/blob/master/Cognito/decode-verify-jwt/decode-verify-jwt.py """
        if not token:
            raise TokenVerifyError("No token provided")

        headers = self._extract_headers(token)
        pkey_data = self._find_pkey(headers)
        self._verify_signature(token, pkey_data)

        claims = self._extract_claims(token)
        self._check_expiration(claims, current_time)
        self._check_audience(claims)

        self.claims = claims
        return claims
Now, it's time to move forward with its implementation.
Serve Authenticated API Endpoints
- In
HomeFeedPage.js, under theloadDatafunction, add the following code to theconstdeclaration to include the required authorization headers when making a GET request:
        headers: {
          Authorization: `Bearer ${localStorage.getItem("access_token")}`,
        },
This code will add an Authorization header to the request, with the value of the access token stored in localStorage. This will tell the backend that the request is authenticated.
- In
components/ProfileInfo.js, modify the code in thesignOut()function to remove the access token from localStorage:
const signOut = async () => {
    try {
        await Auth.signOut({ global: true });
        window.location.href = "/"
        localStorage.removeItem("access_token")
    } catch (error) {
        console.log('error signing out: ', error);
    }
  }
The addition will remove the access token from localStorage, so that the user will be logged out when they sign out.
- In the backend, update the CORS configuration in
app.pyto allow theAuthorizationheader to be passed in requests to the backend API.
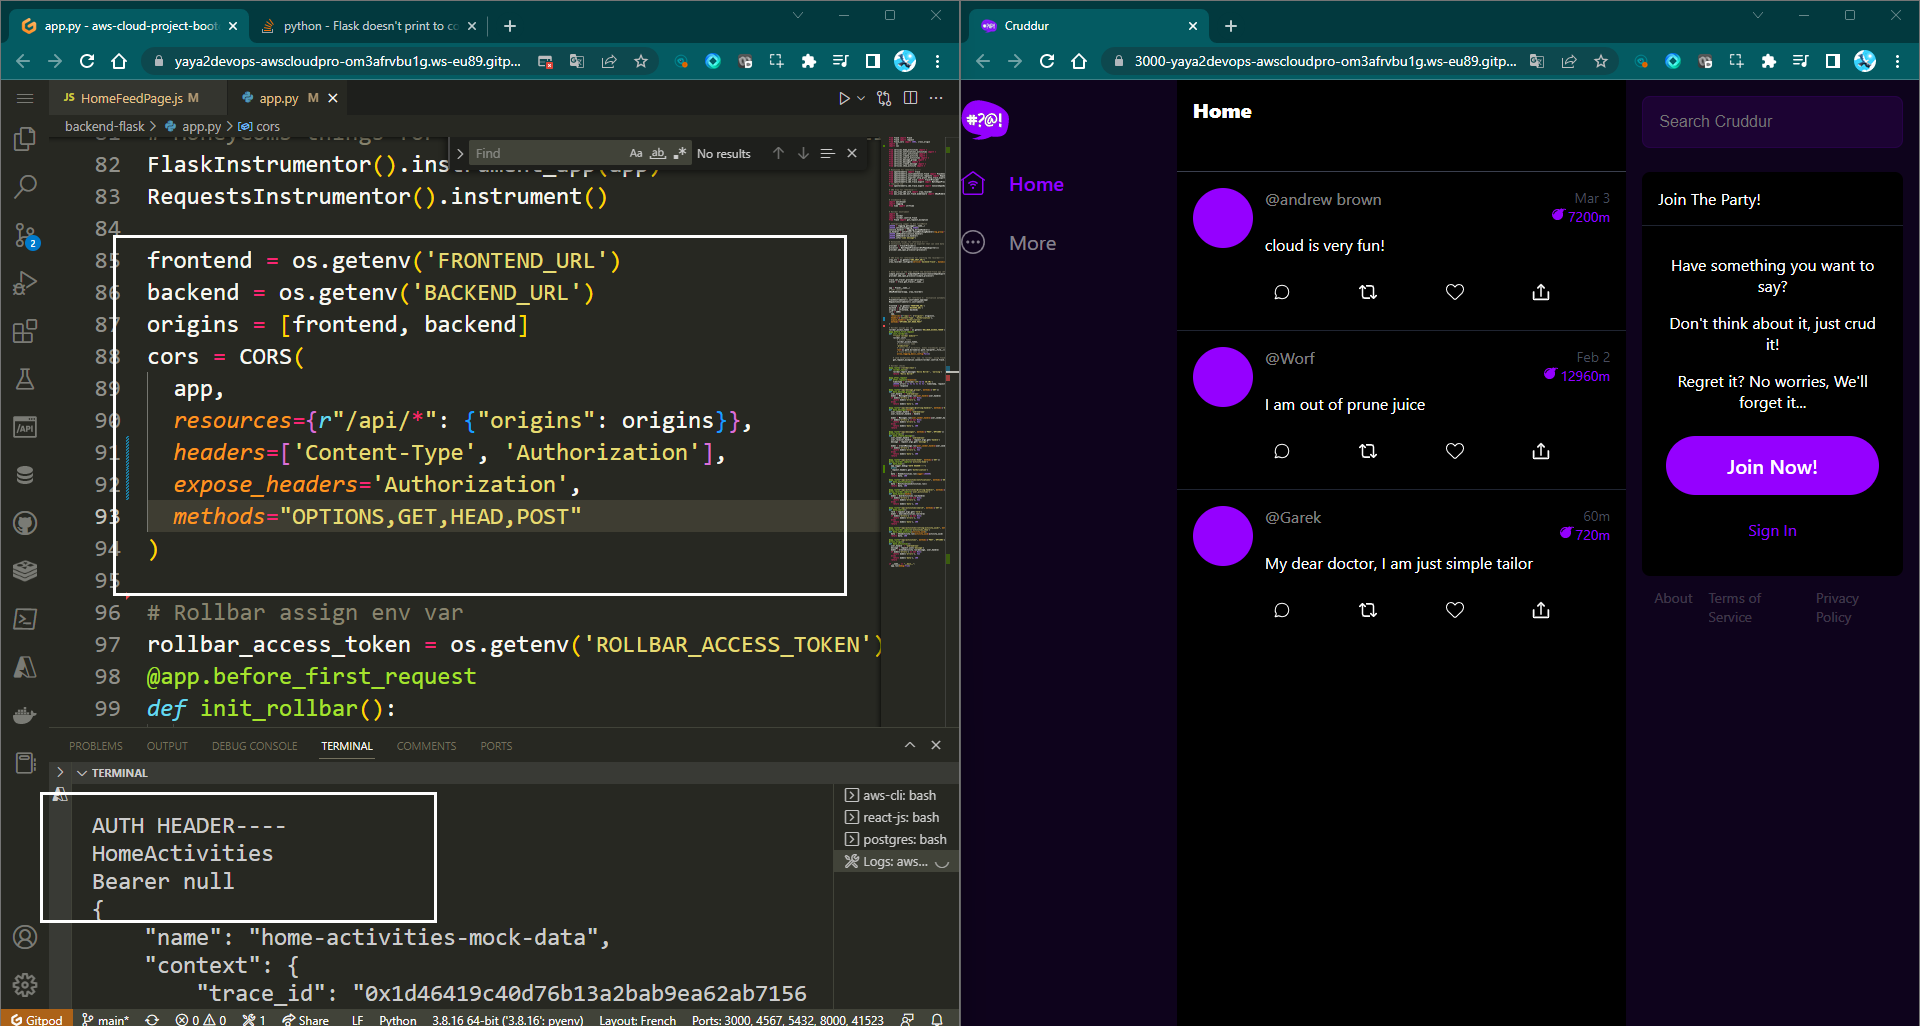
cors = CORS(
    app,
    resources={r"/api/*": {"origins": origins}},
    headers=["Content-Type", "Authorization", "traceparent"],
    expose_headers="Authorization",
    methods="OPTIONS,GET,HEAD,POST",
)- In the
app.py, add a logger statement to thedata_home()route to print the Authorization header so that you can verify that it is being passed in correctly.
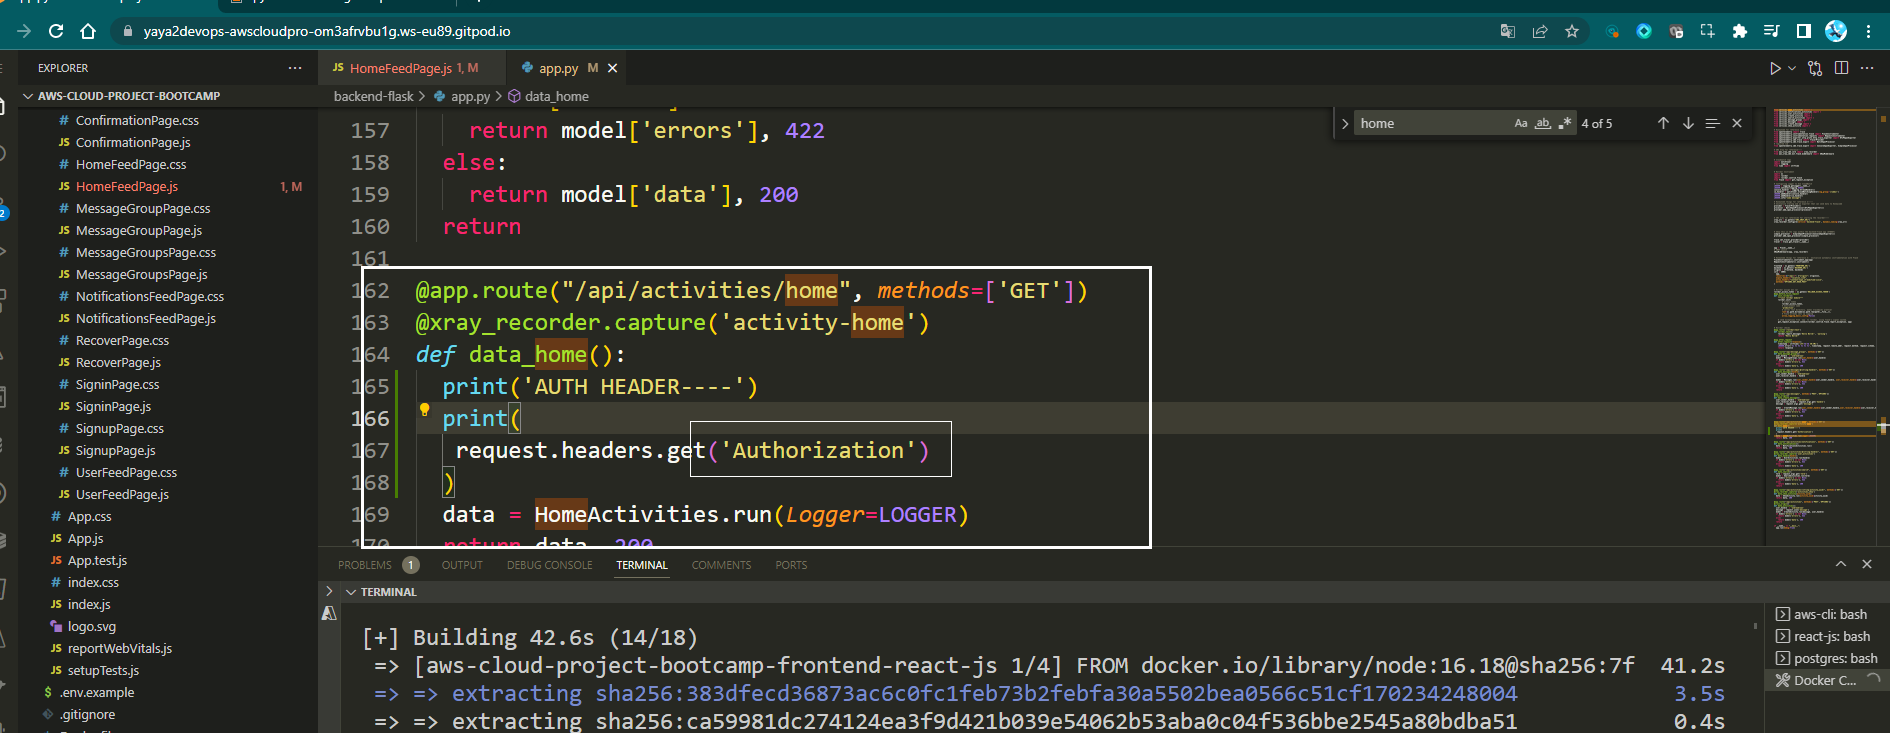
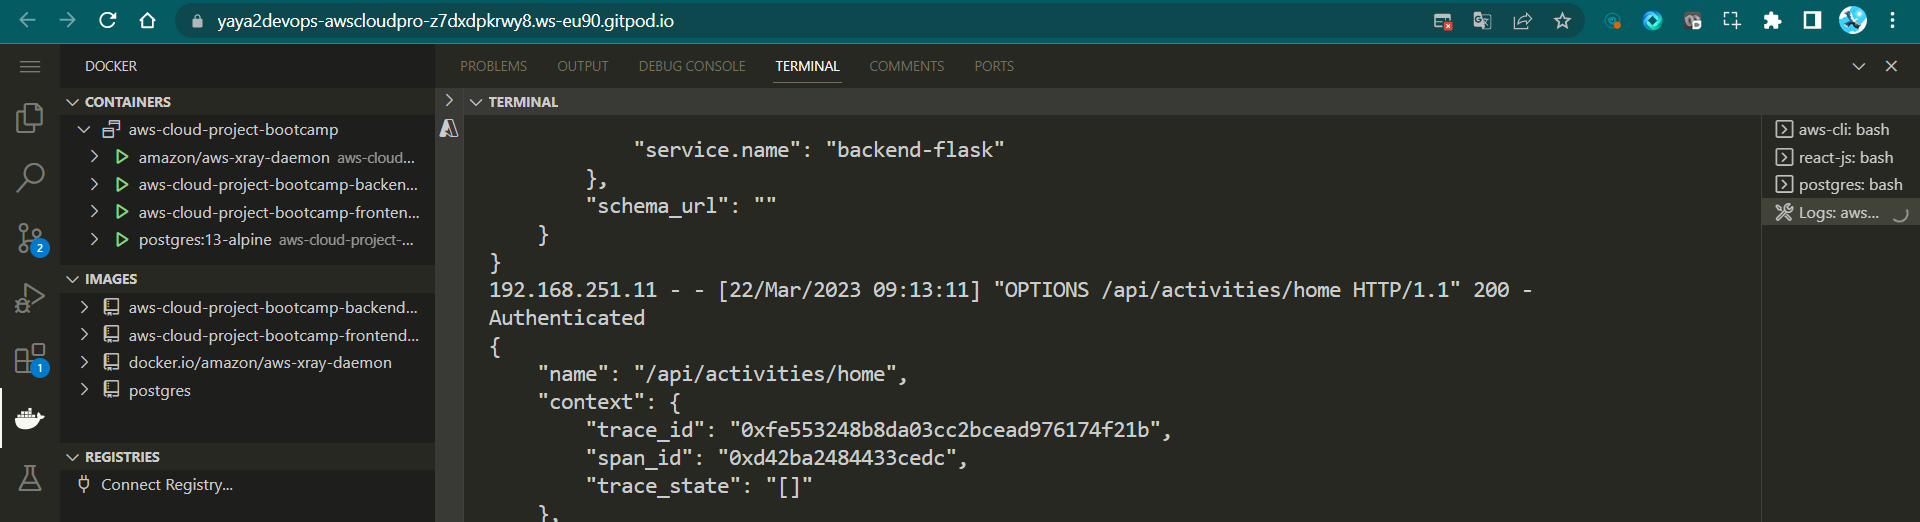
app.logger.debug("AUTH HEADER", request.headers.get("Authorization"))- Open the backend logs and verify that the
Authorizationheader is being printed.
Once you have verified that it is working correctly, you can delete the logger statement or leave it.
- In the
app.py, import thecognito_jwt_tokenmodule.
from lib.cognito_jwt_token import CognitoJwtToken, extract_access_token, TokenVerifyError- Initialize a
CognitoJwtTokenobject in the app object below main.
cognito_jwt_token = CognitoJwtToken(
    region=os.getenv("AWS_DEFAULT_REGION"),
    user_pool_client_id=os.getenv("AWS_COGNITO_USER_POOL_CLIENT_ID"),
    user_pool_id=os.getenv("AWS_COGNITO_USER_POOL_ID"),
)- Update the
data_homeroute to verify the JWT token before returning the data.
@app.route("/api/activities/home", methods=["GET"])
def data_home():
    access_token = extract_access_token(request.headers)
    try:
        claims = cognito_jwt_token.verify(access_token)
        # authenticated request
        app.logger.debug("authenticated")
        app.logger.debug(claims)
        app.logger.debug(claims["username"])
        data = HomeActivities.run(cognito_user_id=claims["username"])
    except TokenVerifyError as e:
        # unauthenticated request
        app.logger.debug(e)
        app.logger.debug("unauthenticated")
        data = HomeActivities.run()
return data, 200- Update the
home_activities.pyfile to add a newcognito_user_idargument to the run function.
if cognito_user_id != None:
    extra_crud = {
      'uuid': '248959df-3079-4947-b847-9e0892d1baz4',
      'handle':  'Lore',
      'message': 'My dear brother, it the humans that are the problem',
      'created_at': (now - timedelta(hours=1)).isoformat(),
      'expires_at': (now + timedelta(hours=12)).isoformat(),
      'likes': 1042,
      'replies': []
    }
results.insert(0,extra_crud)- Add a new if statement to the run function to check if the
cognito_user_idis not None. If it is not None, then add a new crud object to the results list. - Add
python-josepackages to the requirements.txt file.
requests
python-jose-
Install the packages using
pip install -rrequirements.txt. -
Update the
signOutfunction in thecomponents/ProfileInfo.jsfile to clear theaccess_tokenfrom local storage.
const signOut = async () => {
    try {
        await Auth.signOut({ global: true });
        window.location.href = "/"
        localStorage.removeItem("access_token")
    } catch (error) {
        console.log('error signing out: ', error);
    }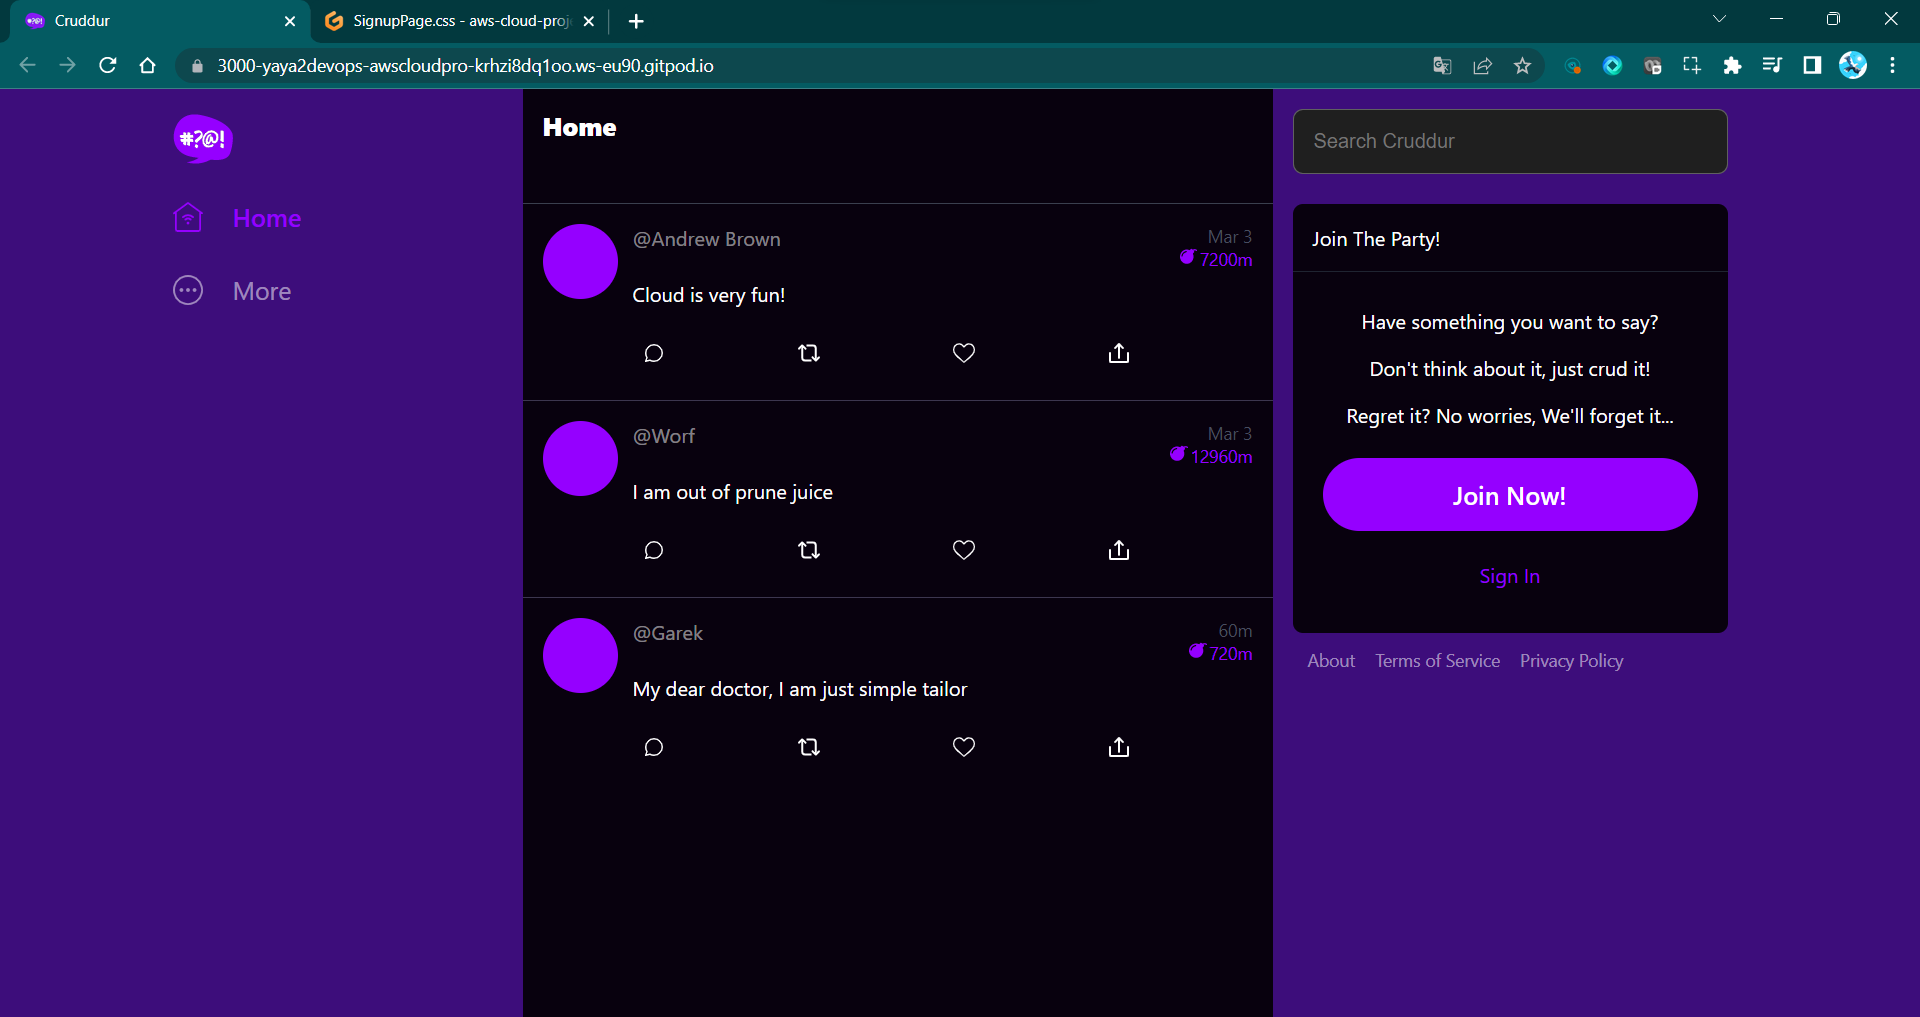
}- When you log in to the app, the
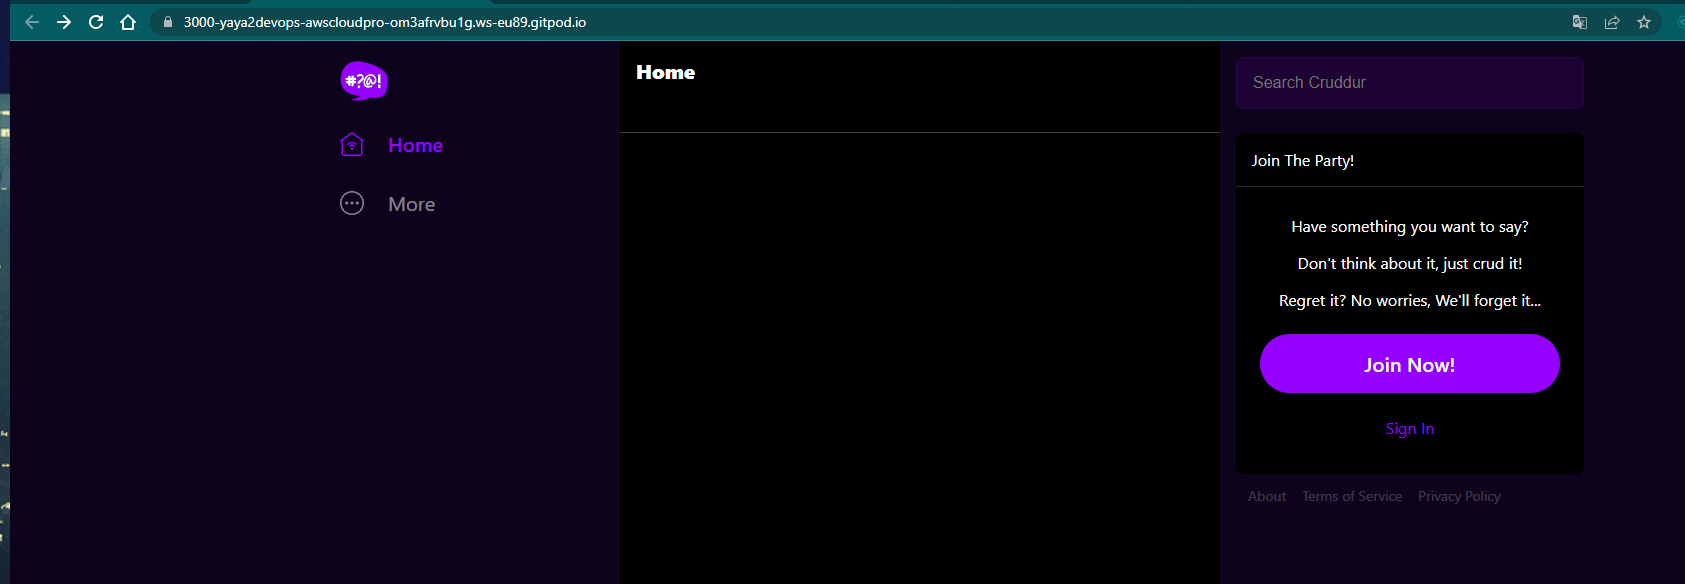
data_homeroute will verify the JWT token and return the data. - If you are logged out, the
data_homeroute will not verify the JWT token and will return an error.
Now try logging in and out and consult application logs.
Pixel CSS Perfect Pro Max
In the following segment, we'll elevate the website's visual allure through meticulous CSS refinement and precision tuning of the user interface.
Figure 6: Cruddur Stale User Interface
- Define the color palette in the
index.cssfile to create an appealing design variables.
:root {
  --bg: rgb(61,13,123);
  --fg: rgb(8,1,14);

  --field-border: rgb(255,255,255,0.29);
  --field-border-focus: rgb(149,0,255,1);
  --field-bg: rgb(31,31,31);
}- In the same
index.cssfile, set thebackground-colorproperty inhtml,bodyelement.
* { box-sizing: border-box; }
html,body {
  height: 100%;
  width: 100%;
/* background: rgb(14,3,28); */
  background: var(--bg);
}- Within the
src/app.cssfile, update the background color of the.contentelement to match the--fgcolor variable.
.content {
  width: 600px;
  height: 100%;
  /* background: #000;*/
  background: var(--fg);
}- Navigate to
components/ActivityItem.cssand enhance the appearance by modifying theborder-bottomstyle within the.activity_itemclass.
.activity_item {
  display: flex;
  flex-direction: column;
  /*border-bottom: solid 1px rgb(31,36,49);*/
  border-bottom: solid 1px rgb(60,54,79);
  overflow: hidden;
  padding: 16px;
}- Make the UI more vibrant by changing the color of
section footer alinks in thecomponents/DesktopSidebar.cssfile.
section footer a {
  text-decoration: none;
  /*color: rgba(255,255,255,0.2);*/
  color: rgba(255,255,255,0.5);
  font-size: 14px;
}- Inside
/components/JoinSection.css, apply the defined color scheme by setting thebackground-colorandborderproperties for.search_field input[type='text'].
.join {
  display: flex;
  flex-direction: column;
  /*background: #000;*/
  background: var(--fg);
  border-radius: 8px;
  margin-top: 24px;
}- Continue in the same file and improve the focus style of the
.search_field input[type='text']element by adjusting its border.
.search_field input[type='text'] {
  /*border: solid 1px rgba(149,0,255,0.1);*/
  /*background: rgba(149,0,255,0.1);*/
  border: solid 1px var(--field-border);
  background: var(--field-bg);
  padding: 16px;
  font-size: 16px;
  border-radius: 8px;
  width: 100%;
  outline: none;
  color: #fff;
}

.search_field input[type='text']:focus {
  /*border: solid 1px rgb(149,0,255,1);*/
  border: solid 1px var(--field-border-focus)
}- Open
signinpage.cssand update the border and background ofinput[type='text']andinput[type='password']within thearticle.signin-articleclass.
article.signin-article input[type='text'],
article.signin-article input[type='password'] {
  font-family: Arial, Helvetica, sans-serif;
  font-size: 16px;
  border-radius: 4px;
  border: none;
  outline: none;
  display: block;
  outline: none;
  resize: none;
  width: 100%;
  padding: 16px;
  /*border: solid 1px #555555;*/
  /*background: #1f1f1f;*/
  border: solid 1px var(--field-border);
  background: var(--field-bg);
  color: #fff;
}- In the same file, enhance the focus style of
input[type='text']andinput[type='password']within thearticle.signin-articleclass.
article.signin-article input[type='text']:focus ,
article.signin-article input[type='password']:focus {
  /*border: solid 1px rgb(149,0,255,1);*/
  border: solid 1px var(--field-border-focus);
}- For the signup page, provide a consistent look by adding the border color to
input[type='text']andinput[type='password']elements withinarticle.signup-article.
article.signup-article input[type='text'],
article.signup-article input[type='password'] {
  font-family: Arial, Helvetica, sans-serif;
  font-size: 16px;
  border-radius: 4px;
  border: none;
  outline: none;
  display: block;
  outline: none;
  resize: none;
  width: 100%;
  padding: 16px;
  /*border: solid 1px #555555;*/
  border: solid 1px var(--field-border);
  background: #1f1f1f;
  color: #fff;
}- Complete the signup page by enhancing the focus style of
input[type='text']andinput[type='password']elements within thearticle.signup-articleclass.
article.signup-article input[type='text']:focus ,
article.signup-article input[type='password']:focus {
/*border: solid 1px rgb(149,0,255,1);*/
border: solid 1px var(--field-border-focus);
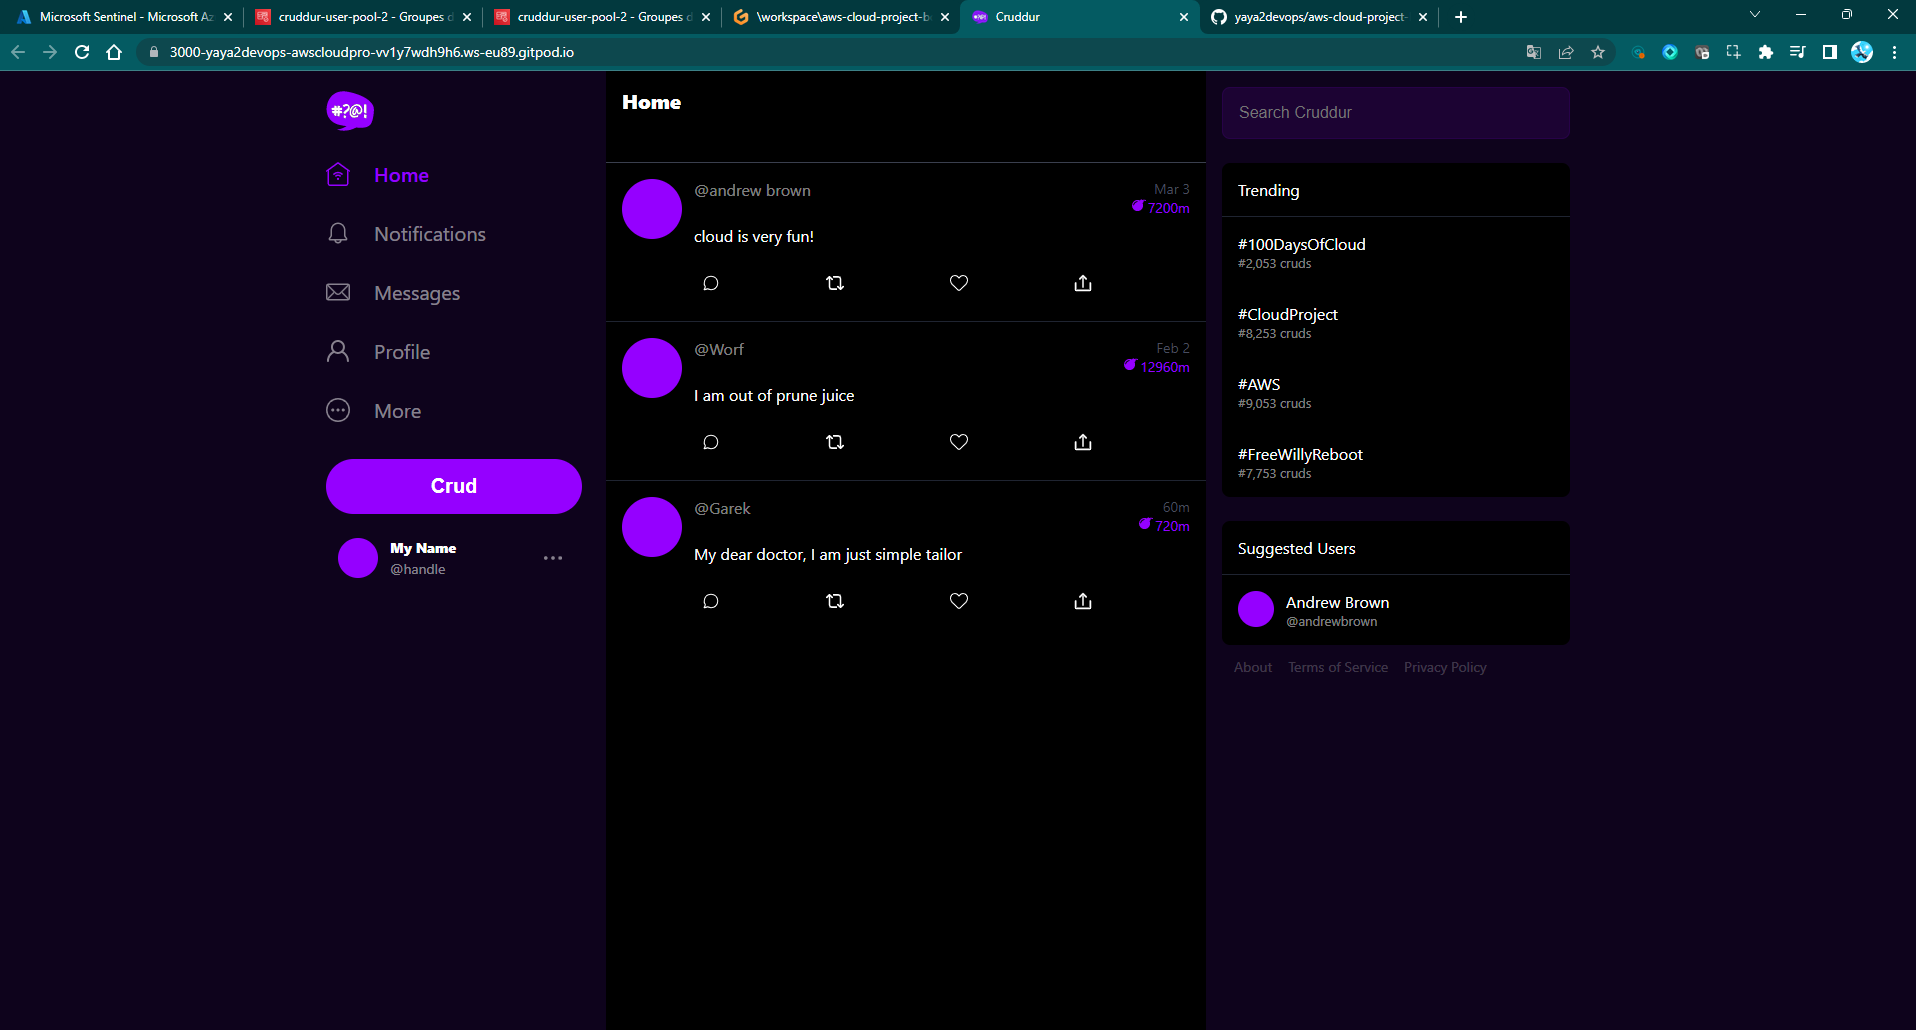
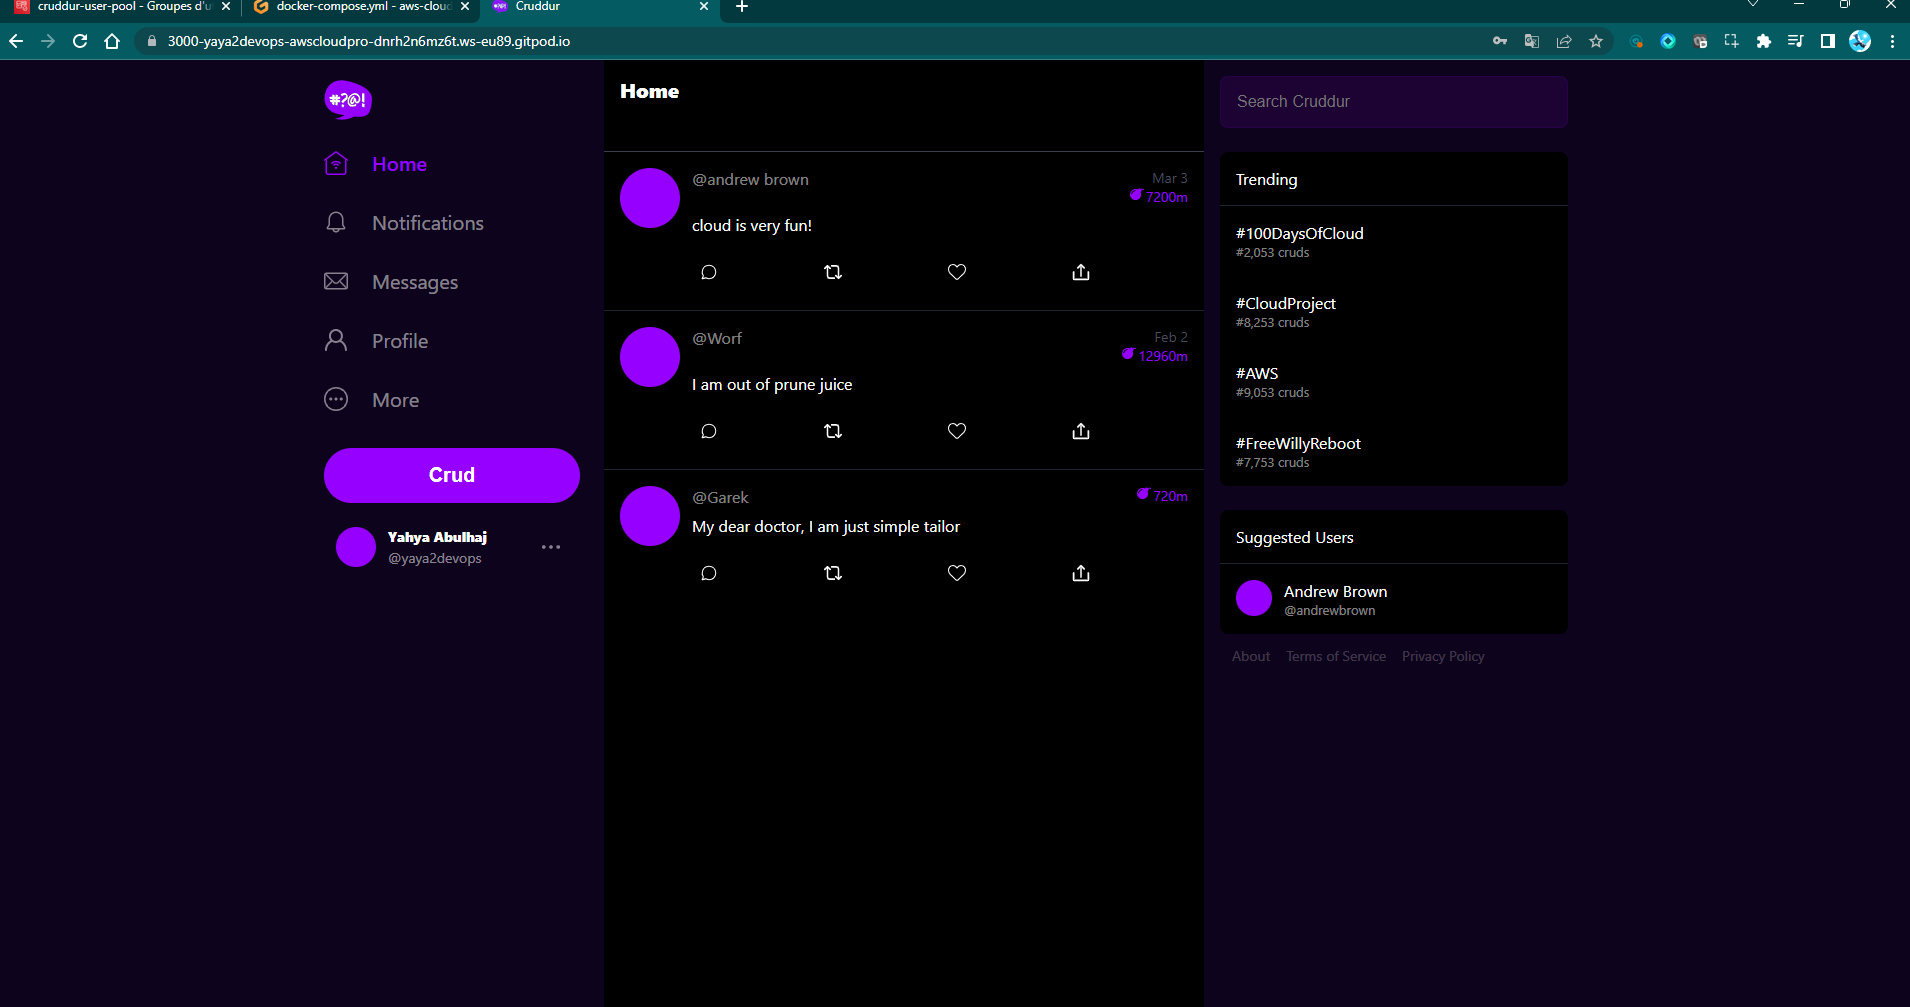
}- Make your way to the frontend to experience firsthand the brilliance of the applied design.
Figure 7: Cruddur CSS Visual Contrast
| 💻 Code Commit (opens in a new tab) |
|---|
Reference
- JWTs - Internet Engineering Task Force (opens in a new tab)
- Amazon Cognito OpenID Connect (opens in a new tab)
- OpenID Connect website (opens in a new tab)
- OAuth 2.0 website (opens in a new tab)
| :information_source: | Crafting CSS in just 3 minutes! Click (opens in a new tab) to redirect. |
|---|