NoSQL with Amazon DynamoDB
This week (opens in a new tab), we're diving headfirst into the exciting world of NoSQL, harnessing the power of AWS DynamoDB to revolutionize the messaging functionality within our application.
My data journey began with my Microsoft Azure Fundamentals (opens in a new tab) experience.
You can find my notes on the subject here (opens in a new tab), which might be useful to you.
I passed that with a 900 points plus score, Its open sourced too (opens in a new tab).
- Personalizing Your NoSQL Experience
- A Masterclass On NoSQL Schema
- The DynamoDB Encyclopedia
- Scripted Solutions for Access Patterns and Beyond
DdbClass for Conversational Feature- Cruddur Messanging Pre-Access Patterns
- Primer on Premier DynamoDB: A 101 Explainer
Our choice of NoSQL over SQL is a testament to the sheer complexity of the messaging process, which defies conventional schema-based structuring. Messages are inherently unpredictable; you never know who will engage in a conversation with whom.
Some may even create group chats that defy the boundaries of conventional data modeling in SQL. Welcome to the core of our bootcamp, where transformation begins.
Personalizing Your NoSQL Experience
The term NoSQL was first coined in 1998 by Carlo Strozzi, who used it to describe his lightweight, open-source relational database that did not expose the standard Structured Query Language (SQL) interface.
The concept of NoSQL databases has its roots in the early days of the internet—early 2000s, when developers began to realize that traditional relational databases were not well-suited for storing and querying large amounts of unstructured data.
Different types of NoSQL databases;
There are many different types of NoSQL databases, each with its own strengths and weaknesses.
graph TB
    subgraph Application
        A((User Interface))
        B((Application Server))
    end

    subgraph NoSQL Database
        C((Document Store))
        D((Key-Value Store))
        E((Column-Family Store))
        F((Graph Database))
    end

    A --> B
    B --> C
    B --> D
    B --> E
B --> F- Key-value stores(Our DynamoDB): Key-value stores store data in the form of key-value pairs. The key is used to uniquely identify the data, and the value is the data itself.
- Document stores: Document stores store data in the form of documents. Documents are like JSON objects, and they can contain a variety of data types.
- Columnar stores: Columnar stores store data in columns. This can be useful for applications that need to scan large amounts of data for specific values.
- Graph databases: Graph databases store data in the form of graphs. Graphs are made up of nodes and edges, and they can be used to represent relationships between data.
A number of NoSQL databases were developed, including Bigtable, Cassandra, and MongoDB and were designed to be more scalable, flexible, and fault-tolerant. Later in 2012, Amazon Web Services introduced DynamoDB in response to the growing demand and to make it easier for you to develop on the NoSQL model.
The Data Manager Battle
NoSQL databases are designed for unstructured data like images and videos, while SQL databases are designed for querying and reporting.
In SQL databases, the schema is fixed and must be desined first.
NoSQL databases do not have a fixed schema.
Observe the self-generated insights to empower you on this topic;
classDiagram
    class NoSQL {
        - Schema: Not required
        - Flexibility: More flexible
        - Scalability: More scalable
        - Throughput: Higher throughput for writes
        - Latency: Higher latency for reads
        - Cost: Lower cost for large volumes of data
        - Use cases: Big data, real-time applications, applications with changing data models
    }

    class SQL {
        - Schema: Required
        - Flexibility: Less flexible
        - Scalability: Less scalable
        - Throughput: Higher throughput for reads
        - Latency: Lower latency for reads
        - Cost: Higher cost for small volumes of data
        - Use cases: OLTP applications, applications with complex queries
    }

NoSQL --|> SQL- NoSQL databases are often used for big data applications. The data model must be able to handle large volumes of data.
- NoSQL databases are often used for real-time applications.The data model must be able to keep the data consistent in real time.
NoSQL databases offer a dynamic approach to data modeling but it is a complex task. This flexibility can be advantageous in scenarios where the data's structure is not well-known in advance or where rapid development and scalability are essential.
Nonetheless, achieving data integrity and efficient querying demands thoughtful planning and design. Let's go over the process of architecting the data model for our application.
A Masterclass On NoSQL Schema
Data modeling in DynamoDB differs from traditional relational databases due to its schema-less nature, which allows for flexibility but requires careful planning to achieve optimal performance.
graph LR
    subgraph DynamoDB
        A(Schema-less)
        B(Flexibility)
        C(Optimal Performance)
    end

    subgraph Traditional DB
        D(Structured Schema)
        E(Less Flexibility)
        F(Performance Tuning)
    end

    A --> B
    A --> C
    D --> E
    E --> F
It's quite remarkable that you can integrate Amazon DynamoDB, a NoSQL database service, into a SQL-based environment (opens in a new tab).
Pre-Data Model
The following steps serve as acknowledged guidelines that will steer you towards establishing a solid foundation for designing your NoSQL data modeling that will be showcased through our Cruddur app development.
- Understand Your Data Access Patterns
- Understand the primary access patterns of your application.
- Identify the common queries that your application will perform.
- Apply frequently used patterns in your app before optimization.
- Denormalization is Key
- DynamoDB doesn't support complex JOIN operations like relational databases.
- Design for flat tables instead.
- Using one table instead of linked tables boosts scalability.
- Duplicate some information across multiple tables (opens in a new tab) to optimize read operations.
- Choose the Right Partition Key
- The hash key determines how data is distributed (opens in a new tab) across DynamoDB partitions.
- Common choices for partition keys include user IDs, timestamps, or unique identifiers.
- Key condition expressions for query only for RANGE, HASH is only equality
- Generate a UUID for an entity only when needed for a specific access pattern (opens in a new tab).
- Each query requires a partition key (pk) and, if available in the table, a sort key (sk).
- Design Secondary Indexes
- Design these indexes based on your access patterns.
- Store data as a JSON document in a string field If you're not indexing
- Repeating data for better indexing is acceptable.
- Be aware that secondary indexes come with additional costs and write capacity requirements.
- Changing a key (simple.pk or composite.sk) requires creating a new item.
- Use Composite Primary Keys Sparingly
- Composite primary keys consist of both a partition key and a sort key (range key) e.g. pk = 'yaya2devops'
- Data keys can serve as a third key or store JSON documents
- Useful for modeling hierarchical data (opens in a new tab) but should be used judiciously because they limit your query flexibility.
- Understand Provisioned Throughput vs. On-Demand Capacity
- DynamoDB offers both provisioned and on-demand capacity (opens in a new tab) modes.
- Provisioned capacity requires you to specify the read and write capacity units
- On-demand automatically scales capacity based on your actual usage.
- Choose the capacity mode that aligns with your workload and budget.
- Monitor and Optimize
- Regularly monitor your DynamoDB tables using CloudWatch metrics and AWS X-Ray for tracing.
- Adjust your table's provisioned capacity or indexes as needed based on real usage patterns.
- Use tools like the AWS DynamoDB Auto Scaling feature (opens in a new tab) to automate capacity adjustments.
- Use Conditional Writes
- Allow you to make changes to your data only if specific conditions are met (opens in a new tab).
- Help yourself with data consistency (opens in a new tab) and integrity (opens in a new tab).
- Understand the Consistency Models
- DynamoDB offers two consistency models (opens in a new tab): eventually consistent reads and strongly consistent reads.
- Choose the one that fits your application's requirements.
- Leverage DynamoDB Streams
- DynamoDB Streams can be used to capture changes to your data and trigger other AWS services, enabling real-time processing and event-driven architectures(Employed).
- Consider Data Size and Item Size Limits
- DynamoDB's maximum item size limit (400 KB) (opens in a new tab)
- Partition size limit (10 GB).
- Design your data model accordingly (opens in a new tab).
- Use the AWS SDK for DynamoDB
- Use the AWS SDKs, which provide convenient APIs for working with DynamoDB, making it easier to interact with your data.
Continuously reevaluate and retest your data model to verify its alignment with your performance and scalability prerequisites. Let me take you into our application's data modeling for further insight.
DynamoDB Data Modeling
This tabular data model represents our use case for retrieving messages. This table is used to store messages in a DynamoDB table and is available just for You in CSV (opens in a new tab) and PDF (opens in a new tab)!
| pk | sk | data | uuid | display_name | handle | message | user_uuid | message_group_uuid |
|---|---|---|---|---|---|---|---|---|
| MSG#[group_uuid] | MSG#[created_at] | 32423432-235325-3525-325235352-235235 | Yahya Abulhaj | yaya2devops | Hey Bayko | 232cfd0f-3841-47bc-ad8b-44d9d3b7264f | 23523532-6433634643-234234234-23423525 | |
| GRP#[user_uuid] | GRP#[last_reply_at] | Andrew Bayko | bayko | Hey - Yaya, The legend. | 2342342-52353252-23523523-23424 | 23523532-6433634643-234234234-23423525 | ||
| GRP#[user_uuid] | GRP#[last_reply_at] | Yahya Abulhaj | yaya2devops | Ty. Love the cloud! | 232cfd0f-3841-47bc-ad8b-44d9d3b7264f | 23523532-6433634643-234234234-23423525 |
The table can be queried by the message_group_uuid or the created_at field.
The data column can be used to retrieve the data for a specific message.
Refer to the following to get a clear overview of each attribute within our DynamoDB table:
- pk (Primary Key): A combination of the
message_group_uuidandcreated_atfields, ensuring unique message identification. - sk (Sort Key): Represents the
created_atfield, ensuring messages are sorted chronologically. - data: A JSON object containing message data, including message text, sender's username, and sender's UUID.
- uuid: Unique identifier for each message.
- display_name: The sender's display name used for identification.
- handle: The sender's username used for logging into the application.
- message: The actual text content of the message.
- user_uuid: Unique identifier for the sender.
- message_group_uuid: Unique identifier for the message group.
I made sure not to place similar formats in close proximity.
Cruddur Messaging Pre-Access Patterns
To enable messaging functionality, we employed five DynamoDB patterns for implementation. We will uncover each access pattern A through E and explain how to implement them effectively.
Before delving deeper, take a moment to examine the following comprehensive architecture that encapsulates the key aspects. The representation of patterns describe the different ways in which we will access and query data using the NoSQL approach.
Check Me In SVG (opens in a new tab)

Proceed to my complete guide about the access patterns prior to our implementation.
- A. Listing Messages in Message Group into Application
- B. Listing Messages Group into Application
- C. Creating a Message for an existing Message Group into Application
- D. Creating a Message for a new Message Group into Application
- E. Updating a Message Group using DynamoDB Streams
A. Listing Messages in Message Group into Application
This pattern is used to list all the messages in a message group. The following steps are involved in implementing this pattern:
- Create a DynamoDB table with the following schema:
MessageGroupID:The primary key of the table. This is a partition key.MessageID:The secondary index of the table. This is a sort key.Message:The message content.
B. Listing Messages Group into Application
This pattern is used to list all the message groups. The following steps are involved in implementing this pattern:
- Create a DynamoDB table with the following schema:
MessageGroupID:The primary key of the table. This is a partition key.Name:The name of the message group.
- In the application, query the DynamoDB table for all the message groups.
C. Creating a Message for an existing Message Group into Application
This pattern is used to create a new message for an existing message group. The following steps are involved in implementing this pattern:
- Create a DynamoDB table with the following schema:
MessageGroupID:The primary key of the table. This is a partition key.MessageID:The secondary index of the table. This is a sort key.Message:The message content.
- In the application, create a new message and add it to the DynamoDB table.
D. Creating a Message for a new Message Group into Application
This pattern is used to create a new message group and a new message in the message group. The following steps are involved in implementing this pattern:
- Create a DynamoDB table with the following schema:
MessageGroupID:The primary key of the table. This is a partition key.MessageID:The secondary index of the table. This is a sort key.Message:The message content.
- In the application, create a new message group and add a new message to the message group.
E. Updating a Message Group using DynamoDB Streams
This pattern is used to update a message group using DynamoDB Streams. DynamoDB Streams is a feature of DynamoDB that allows you to track changes to your data. The following steps are involved in implementing this pattern:
- Enable DynamoDB Streams on the table that contains the message group.
- Create a Lambda function that will be triggered when a change is made to the message group.
- In the Lambda function, update the message group accordingly.
- Create a Lambda function that will be triggered when a new message is added to the table. The Lambda function should list all the messages in the message group and return them to the application.
- Call the Lambda function to list all the messages in the message group.
The DynamoDB Encyclopedia
Let's embark on a journey to master the art of NoSQL database using DynamoDB.
We will craft all that to our great bin directory!
bin
├── 💾ddb/
│   ├── 📂patterns/
│   │   ├── 📄list-conversations
│   │   └── 📄get-conversations
│   ├── 📄list-tables
│   ├── 📄drop
│   ├── 📄seed
│   └── 📄scan
└── 🔐cognito/
    ├── 📄list-users
    └── 💾db/
        └── 📄update_cognito_user_ids
The following is a recap of what we'll be doing.
- Local DynamoDB Setup— We'll start by setting up DynamoDB locally, ensuring you have a working environment for development.
- Schema Design— Next, we'll delve into the schema design, carefully crafting the structure that suits your application's needs.
- Data Loading— We'll guide you through the process of loading data into DynamoDB, ensuring your database is populated with the necessary information.
- Basic Operations— We'll create scripts for fundamental operations like adding, updating, and deleting records in the database.
- Access Patterns— We'll take a deep dive into each access pattern presented earlier, developing scripts for tasks such as reading and listing conversations from the database.
- Cognito Integration— We'll also cover scripts for seamless integration with Amazon Cognito.
DynamoDB Local
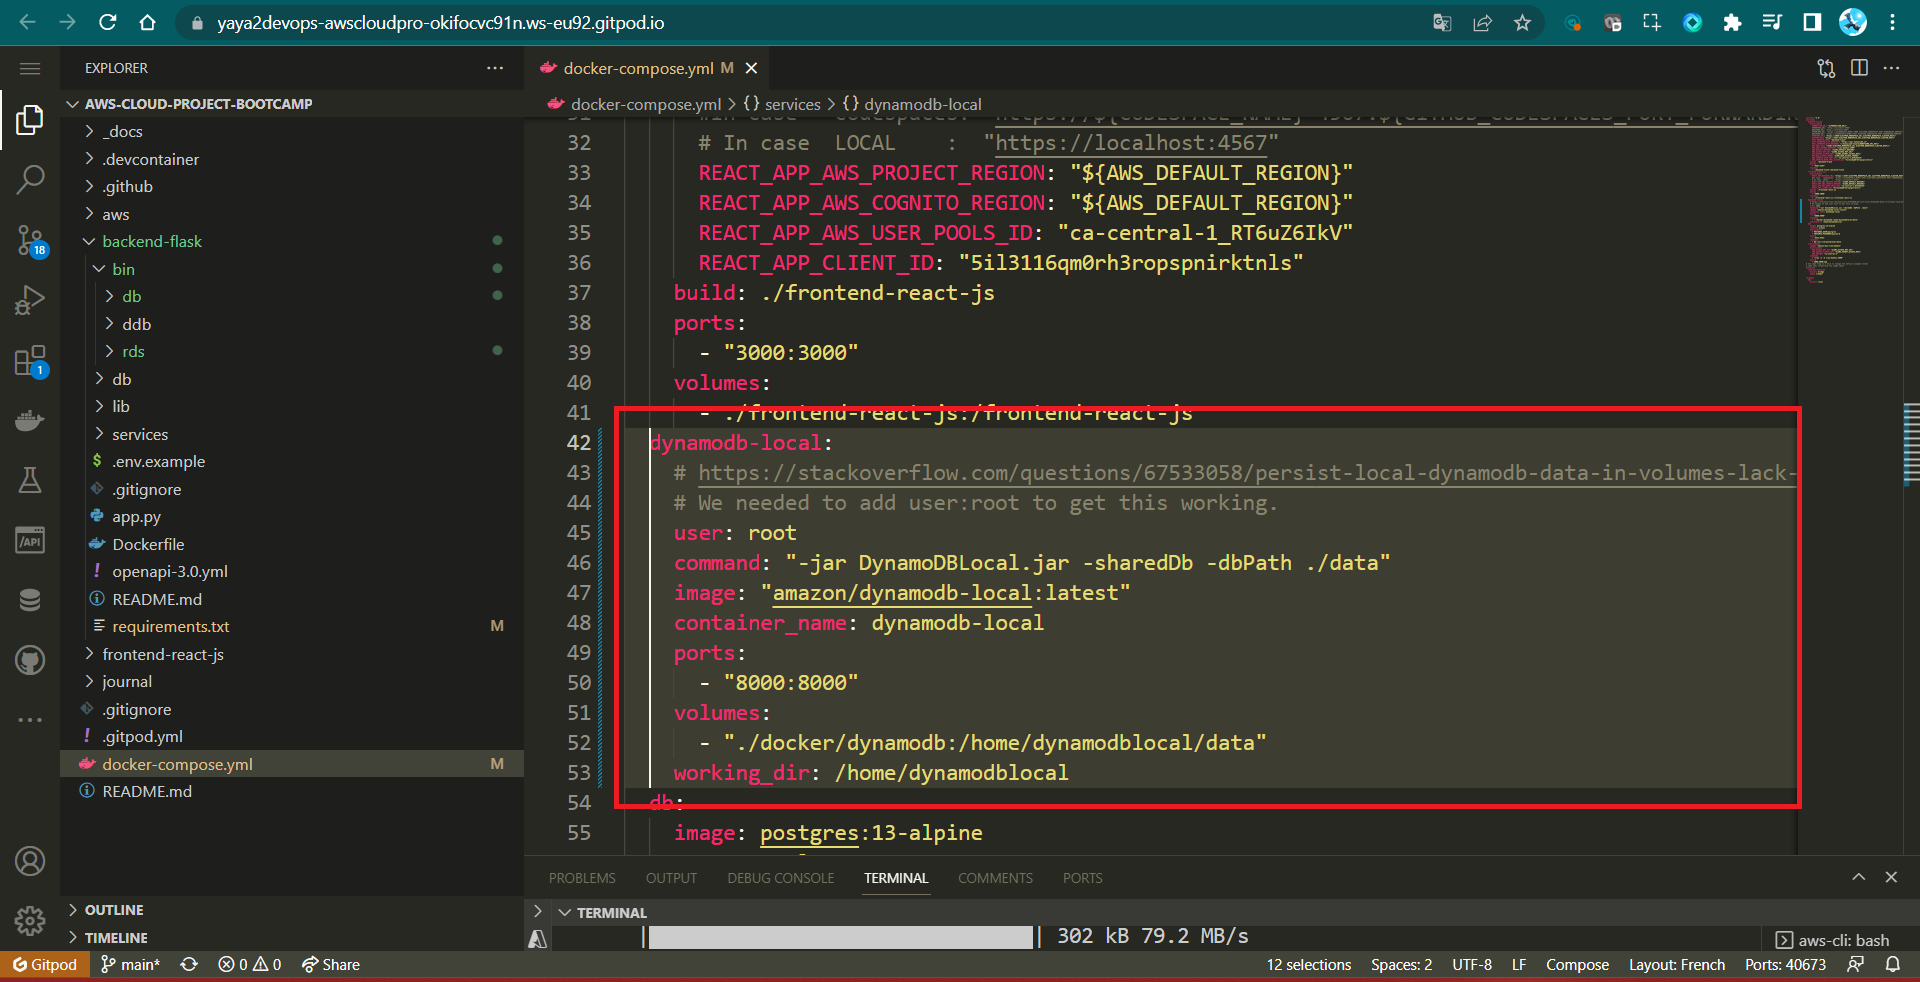
In our first week, we efficiently initiated the setup of Dynamo, and subsequently, we made a prudent decision to comment it out temporarily in order to conserve workspace credits.
Now, we are poised to re-enable it by simply uncommenting the relevant code in your docker-compose.yml
You can find guidance on configuring the DynamoDB setup locally in my previous technical writings.
Design Schema Load Script
We now have to set up the database structure and initialize it with the necessary configuration using a schema.
-
Requirements and Dependencies
-
Add
boto3to therequirements.txtfile:boto3==1.18.2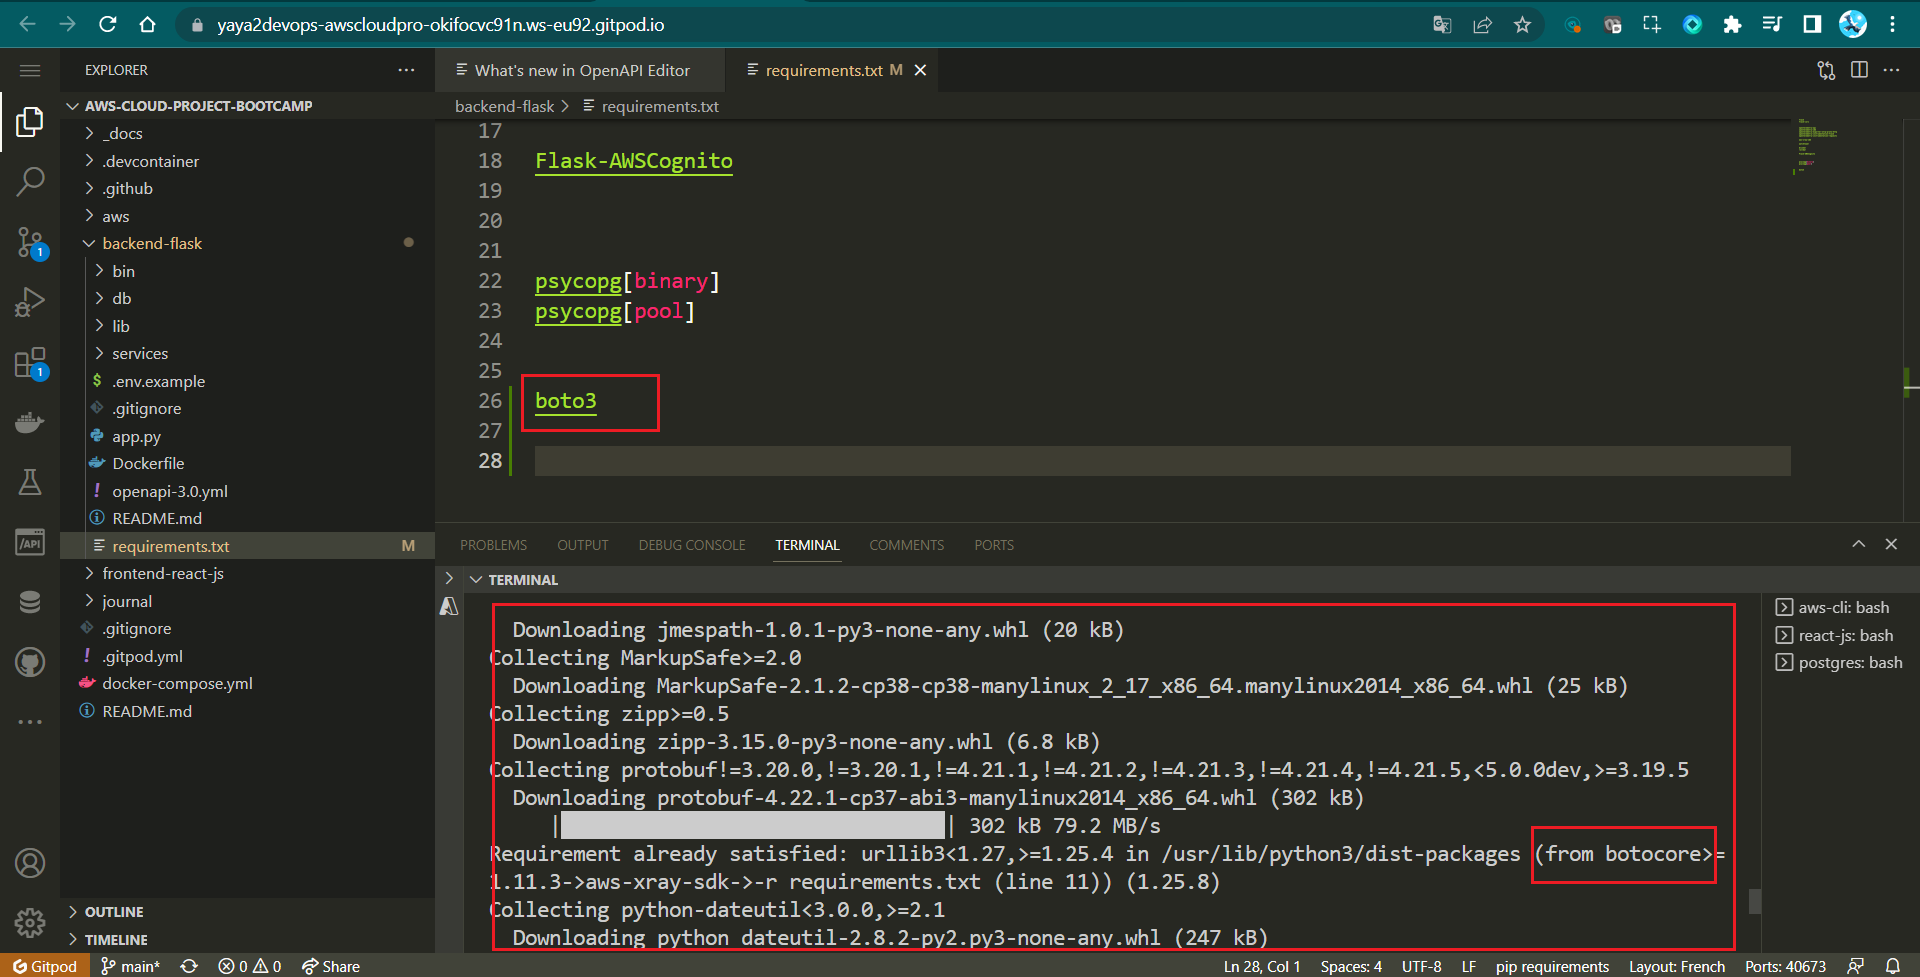
-
Install the dependencies:
pip install -r requirements.txt -
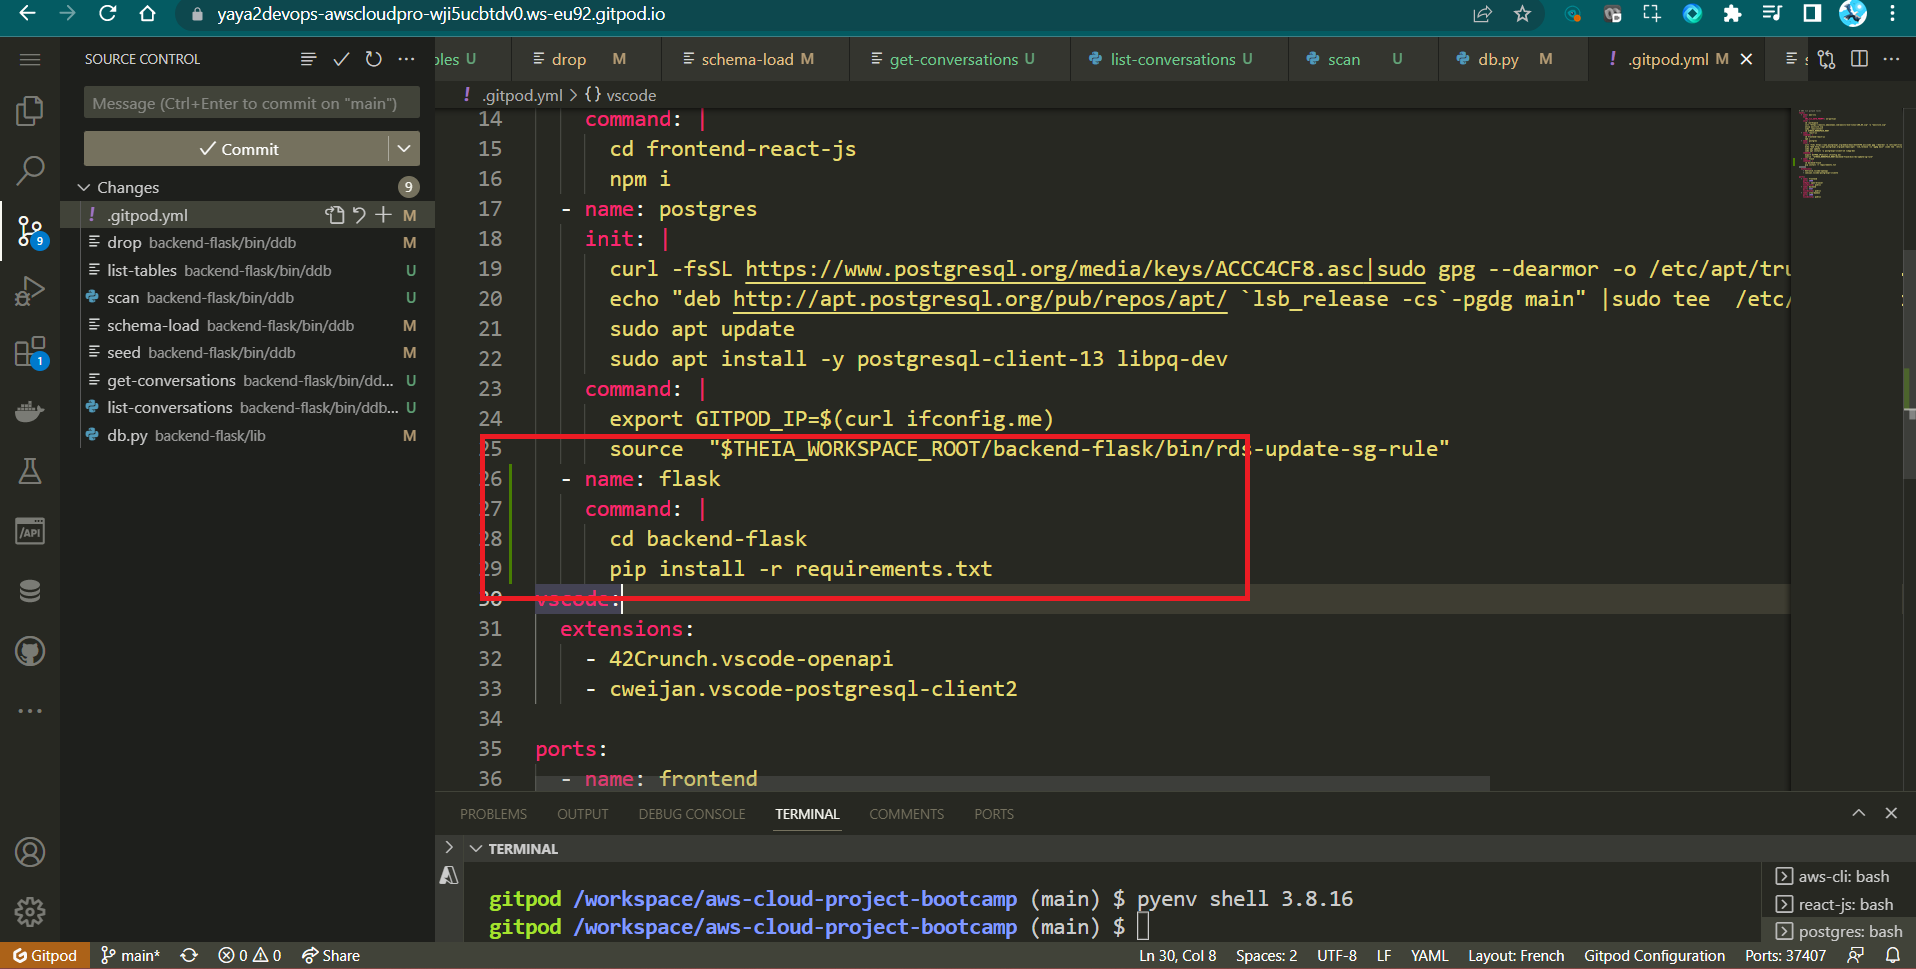
You can also automate the process in Gitpod
-
We import the boto3 library to interact with AWS services.
-
Folder Structure
- Create a new folder called
ddbinside thebackend-flask/bindirectory. This is where you will place theschema-loadscript.
- Create a new folder called
-
Execute
schema-loadScript-
Create a new file named
schema-loadinside theddbfolder. -
Make it executable:
chmod +x schema-load
-
-
Design the
schema-loadScript-
Set default attributes for DynamoDB client
attrs = {"endpoint_url": "http://localhost:8000"}We define default attributes for the DynamoDB client, including the local development endpoint URL.
-
Check if "prod" argument is provided to run in production mode
    if len(sys.argv) == 2:
        if "prod" in sys.argv[1]:
            attrs = {}
The script checks if an argument is provided when running the script. If the argument is "prod," it clears the attributes, which is used for production AWS environment settings.
-
Create a DynamoDB client
ddb = boto3.client("dynamodb", **attrs)We create a DynamoDB client using the provided or default attributes.
-
Define the table name
table_name = "cruddur-messages"The
table_namevariable holds the name of the table to be created. -
Create the DynamoDB table
   response = ddb.create_table(
   TableName=table_name,
   AttributeDefinitions=[
       {"AttributeName": "pk", "AttributeType": "S"},
       {"AttributeName": "sk", "AttributeType": "S"},
   ],
   KeySchema=[
       {"AttributeName": "pk", "KeyType": "HASH"},
       {"AttributeName": "sk", "KeyType": "RANGE"},
   ],
   BillingMode="PROVISIONED",
   ProvisionedThroughput={"ReadCapacityUnits": 5, "WriteCapacityUnits": 5},
)
We use the ddb.create_table() method to create the DynamoDB table with the specified schema and settings.
-
Print the response from table creation
print(response) -
Ace your script with The
#! /usr/bin/env python3shebang line at the start indicates that this is a py script.

-
After independently designing each component of the schema loading script, validate the script as follows.
#! /usr/bin/env python3

import boto3
import sys

attrs = {"endpoint_url": "http://localhost:8000"}

if len(sys.argv) == 2:
    if "prod" in sys.argv[1]:
        attrs = {}

ddb = boto3.client("dynamodb", **attrs)

table_name = "cruddur-messages"

response = ddb.create_table(
    TableName=table_name,
    AttributeDefinitions=[
        {"AttributeName": "pk", "AttributeType": "S"},
        {"AttributeName": "sk", "AttributeType": "S"},
    ],
    KeySchema=[
        {"AttributeName": "pk", "KeyType": "HASH"},
        {"AttributeName": "sk", "KeyType": "RANGE"},
    ],
    BillingMode="PROVISIONED",
    ProvisionedThroughput={"ReadCapacityUnits": 5, "WriteCapacityUnits": 5},
)

print(response)- Execute the script using
./schema-loadto create the specified DynamoDB table with the defined schema.

A Rapid NoSQL Operator
Hey Operator, I'll provide you with the necessary scripts to work with the NoSQL system. Once your schema is created, it will generate a single table in DynamoDB. With this table in place, you'll have the capability to perform actions such as listing the tables and dropping. Also, you can populate this table with data and subsequently scan its contents.
We welcome you to explore and engage in these operations as I guide you through each step.
- Create List Tables Script -
list-tables - Drop Table Script -
drop - Implement Seed Script -
seed - Implement Scan Script -
scan
Let's recap our directory structure. We've already created the load-schema script in the ddb directory. Now, we'll also add the following scripts that we discussed:
🌳bin
└── 💾ddb/
    ├── 📄schema-load (done King and Queen!)
    ├── 📄list-tables
    ├── 📄drop
    ├── 📄Seed
    └── 📄Scan
Create List Tables Script - list-tables
The purpose of this script is to list the tables in DynamoDB, and it allows you to specify whether you want to target the production environment or a local development environment.
#!/usr/bin/bash

set -e # Stop if it fails at any point

if [ "$1" = "prod" ]; then
    ENDPOINT_URL=""
else
    ENDPOINT_URL="--endpoint-url=http://localhost:8000"
fi

aws dynamodb list-tables $ENDPOINT_URL \
--query TableNames \
--output table
The set -e statement tells the script to exit immediately if any command fails. This is a good practice to follow in all shell scripts, as it helps to prevent errors from cascading.
The if statement checks to see if the prod argument was passed to the script. If it was, the ENDPOINT_URL variable is set to an empty string. This tells the AWS CLI to use the production DynamoDB endpoint. Otherwise, the ENDPOINT_URL variable is set to the default endpoint, which is http://localhost:8000.
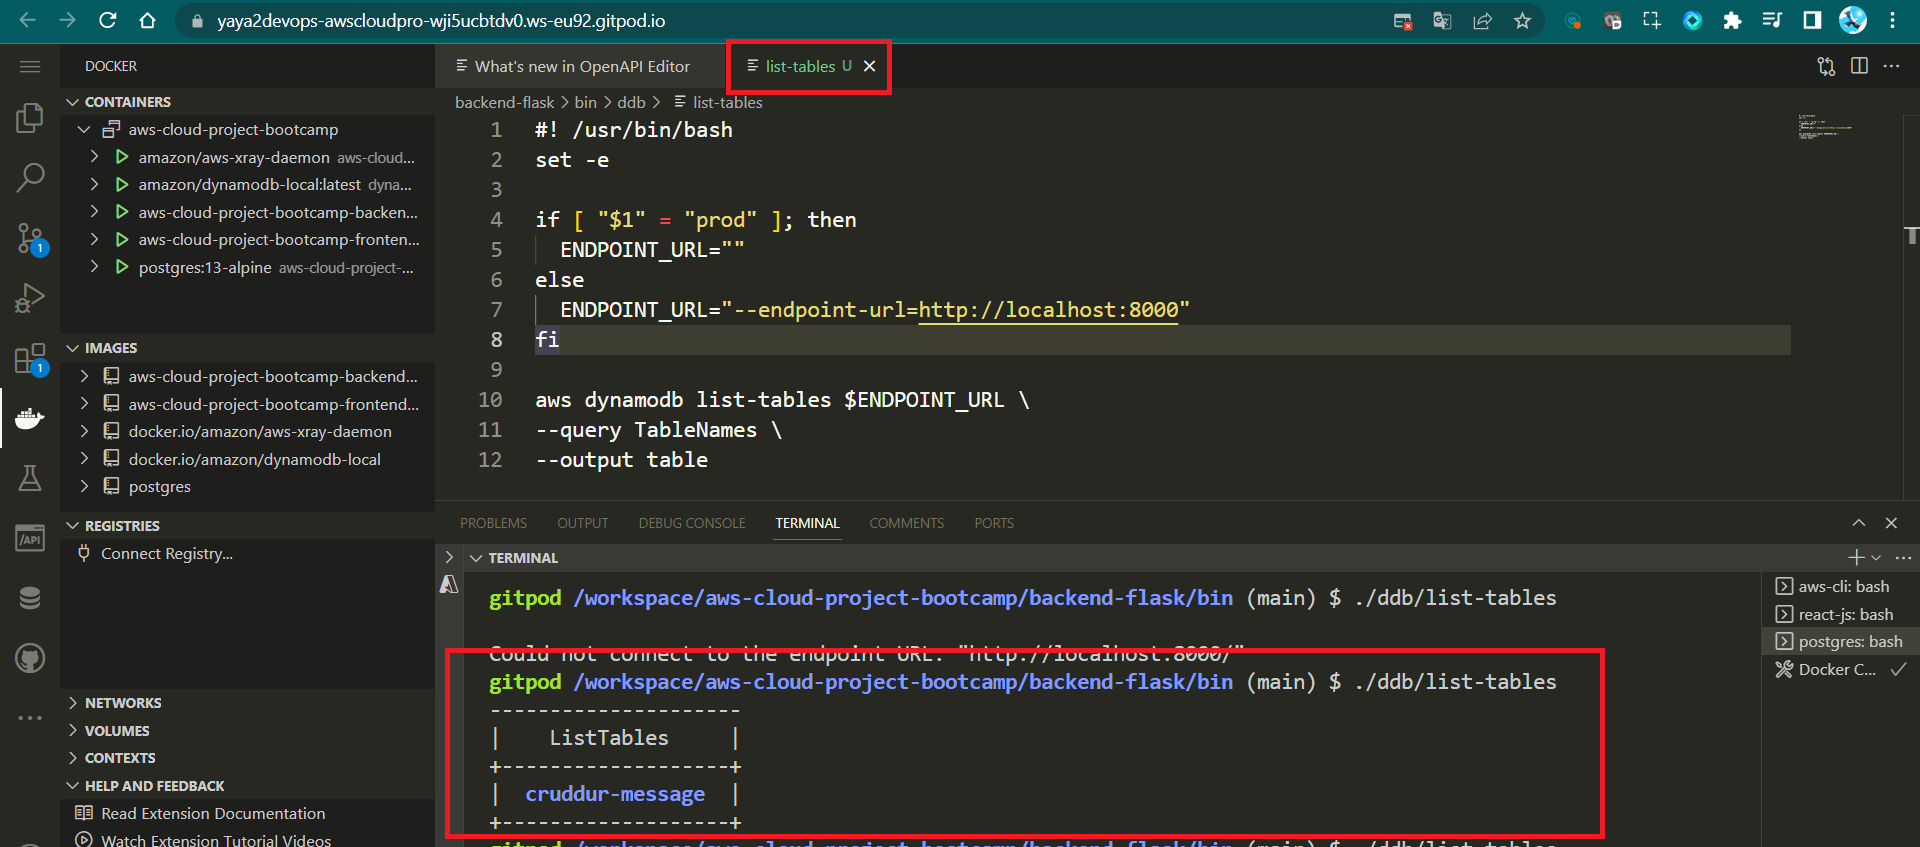
The aws dynamodb list-tables command lists all the tables in the current account. The --query TableNames option tells the command to only return the table names. The --output table option tells the command to format the output as a table.
Drop Table Script - drop
This script is used to delete a DynamoDB table. You need to provide the TABLE_NAME as an argument when running the script. It also supports specifying the environment (prod or local).
#! /usr/bin/bash

set -e # stop if it fails at any point

if [ -z "$1" ]; then
  echo "No TABLE_NAME argument supplied eg ./bin/ddb/drop cruddur-messages prod "
  exit 1
fi
TABLE_NAME=$1

if [ "$2" = "prod" ]; then
  ENDPOINT_URL=""
else
  ENDPOINT_URL="--endpoint-url=http://localhost:8000"
fi

echo "deleting table: $TABLE_NAME"

aws dynamodb delete-table $ENDPOINT_URL \
  --table-name $TABLE_NAME
The aws dynamodb delete-table command drops the specified table.
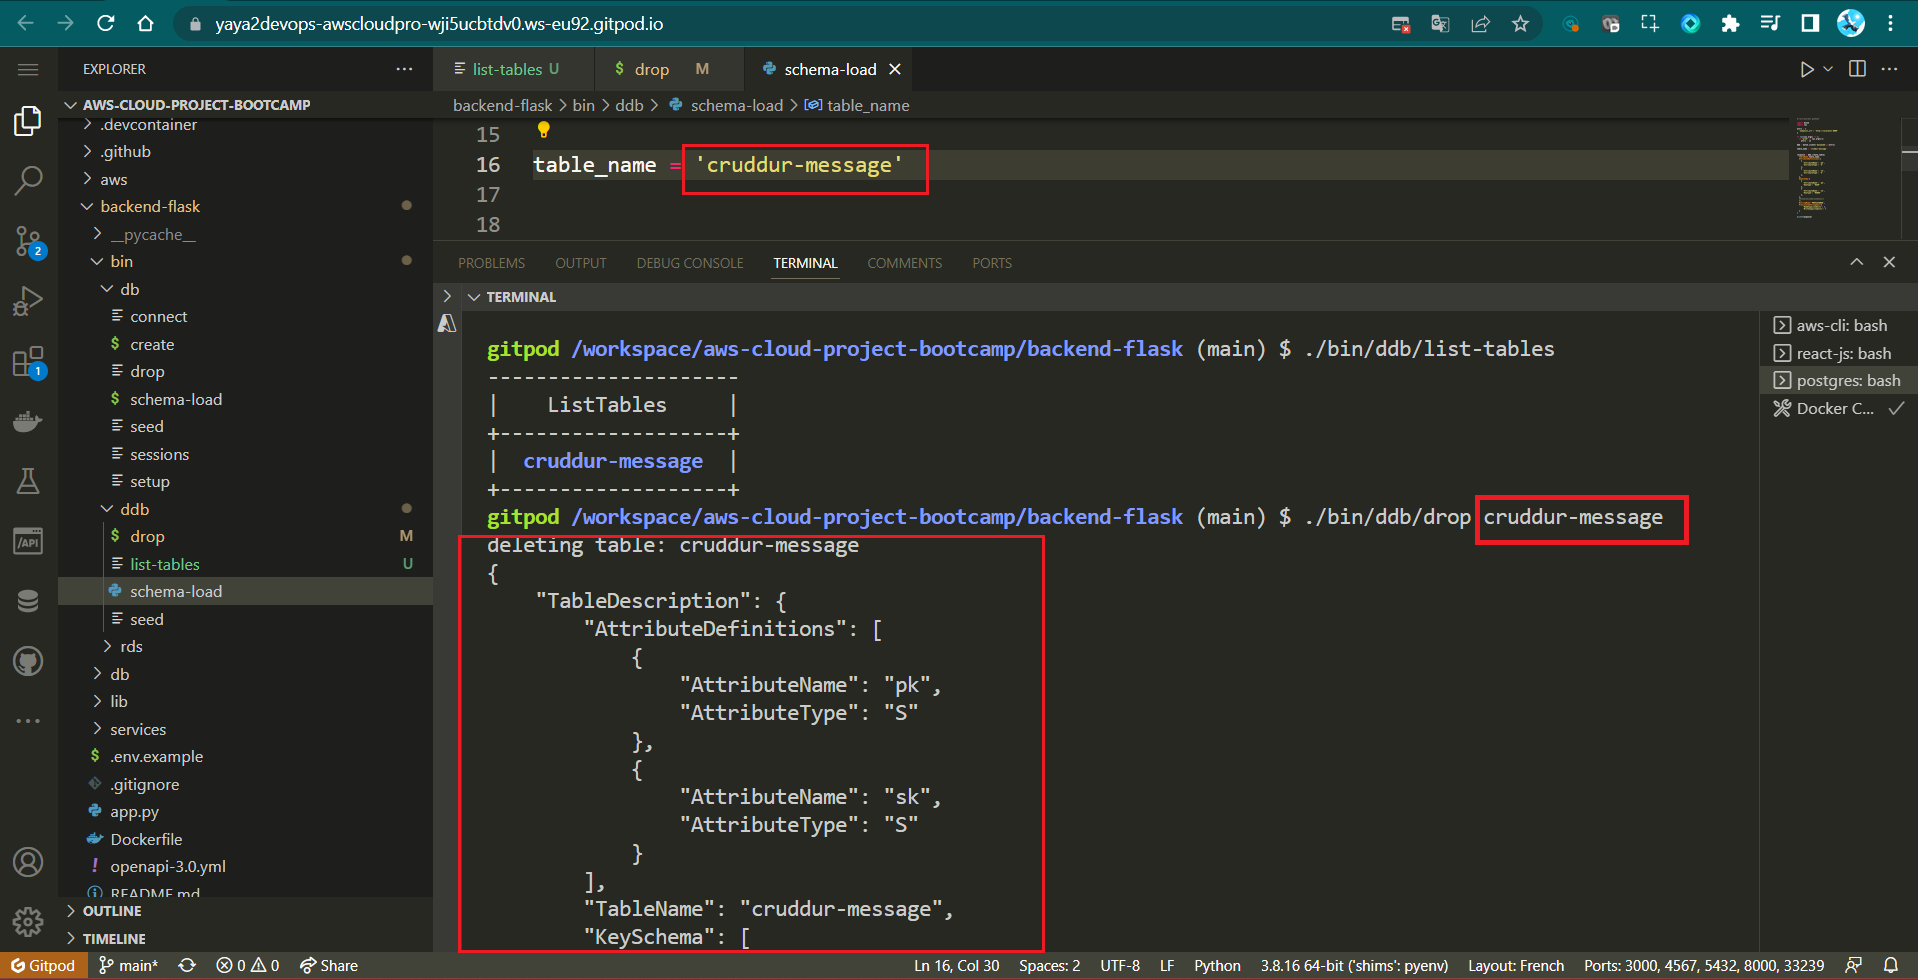
The --table-name option tells the command the name of the table to be dropped.
Implement Seed Script - seed
This script is responsible for updating the PostgreSQL database schema and seeding the data into DynamoDB.
- Import necessary modules:
- Start by importing the required modules, including
boto3,os,sys,datetime,timedelta, anduuid. These modules are used for various tasks such as interacting with DynamoDB, managing paths, and handling dates and times.
- Start by importing the required modules, including
#!/usr/bin/env python3

import boto3
import os
import sys
from datetime import datetime, timedelta, timezone
import uuid- Set up some initial variables:
- It defines
current_pathto store the absolute path of the current script file. - It calculates
parent_pathas the absolute path of the parent directory, which is three levels above the current script. - It appends the
parent_pathtosys.path, which allows importing modules from thelib.dbpackage located in that directory.
- It defines
current_path = os.path.dirname(os.path.abspath(__file__))
parent_path = os.path.abspath(os.path.join(current_path, '..', '..', 'backend-flask'))
sys.path.append(parent_path)
from lib.db import db- Configure DynamoDB client:
- It sets the
attrsdictionary with anendpoint_urlkey set to 'http://localhost:8000'. This is used for local development. If a command-line argument is provided with "prod" in it, theattrsdictionary is left empty to connect to a production database. - It creates a DynamoDB client (
ddb) using theboto3.clientmethod with the specified attributes.
- It sets the
attrs = {
  'endpoint_url': 'http://localhost:8000'
}
# unset endpoint url for use with production database
if len(sys.argv) == 2:
  if "prod" in sys.argv[1]:
    attrs = {}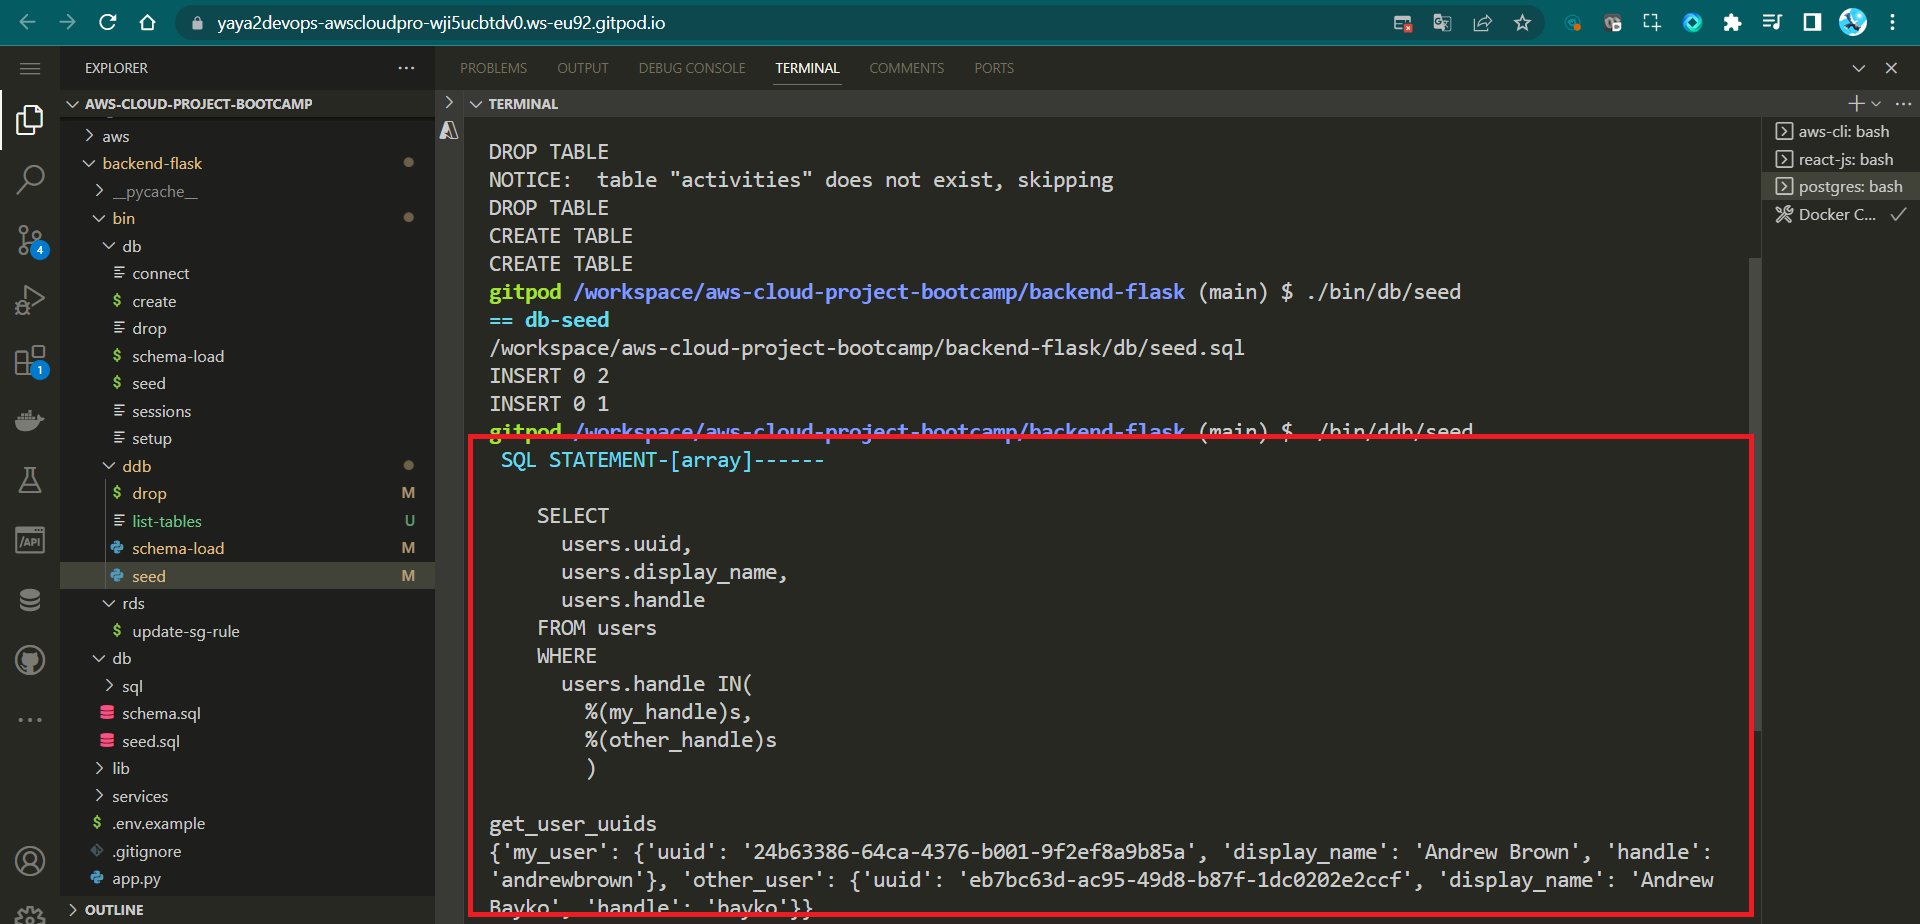
ddb = boto3.client('dynamodb',**attrs)- Define a function to get user UUIDs:
- This function executes an SQL query to retrieve user data from a database.
- It uses the
db.query_array_jsonmethod with a SQL query and parameters. - It extracts the user information for 'yaya2devops' and 'bayko' from the query results and stores them in a dictionary.
def get_user_uuids():
  sql = """
    SELECT
      users.uuid,
      users.display_name,
      users.handle
    FROM users
    WHERE
      users.handle IN(
        %(my_handle)s,
        %(other_handle)s
        )
  """
  users = db.query_array_json(sql,{
    'my_handle':  'yaya2devops',
    'other_handle': 'bayko'
  })
  my_user    = next((item for item in users if item["handle"] == 'yaya2devops'), None)
  other_user = next((item for item in users if item["handle"] == 'bayko'), None)
  results = {
    'my_user': my_user,
    'other_user': other_user
  }
  print('get_user_uuids')
  print(results)
return results- Define a function to create a message group:
- This function inserts a new record into a DynamoDB table named 'cruddur-messages' to represent a message group.
- It takes parameters such as the DynamoDB client (
client), message group UUID, user UUIDs, last message timestamp, and message content. - It constructs a dictionary called
recordcontaining the data for the record and uses theclient.put_itemmethod to insert it into the table.
def create_message_group(client,message_group_uuid, my_user_uuid, last_message_at=None, message=None, other_user_uuid=None, other_user_display_name=None, other_user_handle=None):
  table_name = 'cruddur-messages'
  record = {
    'pk':   {'S': f"GRP#{my_user_uuid}"},
    'sk':   {'S': last_message_at},
    'message_group_uuid': {'S': message_group_uuid},
    'message':  {'S': message},
    'user_uuid': {'S': other_user_uuid},
    'user_display_name': {'S': other_user_display_name},
    'user_handle': {'S': other_user_handle}  }

  response = client.put_item(
    TableName=table_name,
    Item=record
  )
print(response)- Define a function to create a message:
- This function inserts a new message record into the 'cruddur-messages' table in DynamoDB.
- It takes parameters including the message group UUID, message creation timestamp, message content, user UUID, user display name, and user handle.
- It constructs a dictionary called
recordcontaining the data for the message record and uses theclient.put_itemmethod to insert it into the table.
def create_message(client,message_group_uuid, created_at, message, my_user_uuid, my_user_display_name, my_user_handle):
  table_name = 'cruddur-messages'
  record = {
    'pk':   {'S': f"MSG#{message_group_uuid}"},
    'sk':   {'S': created_at },
    'message_uuid': { 'S': str(uuid.uuid4()) },
    'message': {'S': message},
    'user_uuid': {'S': my_user_uuid},
    'user_display_name': {'S': my_user_display_name},
    'user_handle': {'S': my_user_handle}
  }
  # insert the record into the table
  response = client.put_item(
    TableName=table_name,
    Item=record
  )
  # print the response
print(response)- Set
message_group_uuidand get user UUIDs:- It assigns a specific UUID to
message_group_uuid. - It calls the
get_user_uuidsfunction to retrieve user UUIDs for 'yaya2devops' and 'bayko' and stores the results in theusersdictionary.
- It assigns a specific UUID to
message_group_uuid = "5ae290ed-55d1-47a0-bc6d-fe2bc2700399"
now = datetime.now()
users = get_user_uuids()- Create message groups:
- Two message groups are created using the
create_message_groupfunction. One message group is created from 'yaya2devops' to 'Fan123', and the other from 'Fan123' to 'yaya2devops'. These message groups are placeholders with a filler message and a timestamp.
- Two message groups are created using the
create_message_group(
  client=ddb,
  message_group_uuid=message_group_uuid,
  my_user_uuid=users['my_user']['uuid'],
  other_user_uuid=users['other_user']['uuid'],
  other_user_handle=users['other_user']['handle'],
  other_user_display_name=users['other_user']['display_name'],
  last_message_at=now.isoformat(),
  message="this is a filler message"
)

create_message_group(
  client=ddb,
  message_group_uuid=message_group_uuid,
  my_user_uuid=users['other_user']['uuid'],
  other_user_uuid=users['my_user']['uuid'],
  other_user_handle=users['my_user']['handle'],
  other_user_display_name=users['my_user']['display_name'],
  last_message_at=now.isoformat(),
  message="this is a filler message"
)- Process a conversation:
- A conversation string is defined with alternating lines representing messages from "Person 1" and "Person 2".
- The conversation is split into individual lines.
- For each line in the conversation:
- If the line starts with 'Person 1:', it is considered a message from 'yaya2devops'.
- If the line starts with 'Person 2:', it is considered a message from 'Fan123'.
- The message content is extracted, and a timestamp is generated.
- The
create_messagefunction is called to insert each message into the 'cruddur-messages' table.
conversation = """
Yaya2DevOps: Hello You Gotta Understand Years Of Experience Have nothing To Do with Experience!
Fan123: Yes, truth ! I love it. You look very experienced in a young age!
Fan123: Hi again Yaya! I'm a huge fan of your work. Can we chat about your latest project?
Yaya2DevOps: Of course! I'd love to chat about my latest project. What would you like to know?
Fan123: I'm really interested in the technology stack you used for your project. Can you share some details?
Yaya2DevOps: Sure thing! For this project, I used Python for the backend, React for the frontend, and AWS DynamoDB as the database. It was a challenging but rewarding tech stack to work with.
Fan123: That sounds fascinating! Did you encounter any particularly interesting challenges while working with DynamoDB?
Yaya2DevOps: Oh, absolutely! DynamoDB's NoSQL nature was both a blessing and a challenge. The schema-less design gave us flexibility, but we had to carefully plan our data model to optimize queries and avoid bottlenecks.
Fan123: I can imagine that. How about scalability? Did you face any issues with scaling the system?
Yaya2DevOps: Scalability was a key concern. We had to design our tables and indexes with scalability in mind. DynamoDB's auto-scaling feature helped, but we still had to monitor and fine-tune our capacity settings.
Fan123: Thanks for sharing those insights, Yaya. It's really interesting to hear about your experiences. Can you tell me more about the project's architecture?
Yaya2DevOps: Certainly! We followed a microservices architecture, with various components communicating via RESTful APIs. We also used AWS Lambda for serverless functions to handle specific tasks.
Fan123: That sounds like a robust architecture. How about deployment and CI/CD? Did you have any automation in place?
Yaya2DevOps: Yes, we had a CI/CD pipeline set up using AWS CodePipeline and AWS CodeBuild. It allowed us to automate the deployment process, ensuring that updates were tested and deployed seamlessly.
Fan123: That's impressive! One last question: what advice do you have for aspiring developers looking to work on similar projects?
Yaya2DevOps: My advice would be to dive deep into your chosen technologies, stay updated with best practices, and never stop learning. Also, don't be afraid to seek help from the developer community—it's a valuable resource.
Fan123: Thank you for the advice, Yaya2DevOps! I'll definitely take that to heart. By the way, I've been following your work for a while now, and I'm really impressed with your projects. How do you manage to stay so productive and motivated?
Yaya2DevOps: I appreciate the kind words! Staying productive and motivated can be a challenge at times, but I find that setting clear goals and breaking them down into smaller, achievable tasks really helps. Plus, I'm passionate about what I do, and that enthusiasm drives me to keep going. And of course, having a supportive community like you all makes a big difference!
Fan123: That's great to hear! Speaking of communities, do you have any recommendations for online communities or forums where I can connect with other developers and learn from their experiences?
Yaya2DevOps: Absolutely! There are many fantastic online communities and forums where developers gather to share knowledge and experiences. Some popular ones include Stack Overflow, GitHub Discussions, Reddit's programming subreddits, and various tech-focused Discord servers. It's a good idea to explore these platforms, find the ones that align with your interests, and start engaging with fellow developers.
Fan123: Thanks for the suggestions, Yaya2DevOps! I'll definitely check those out. One last question: Do you have any favorite programming languages or tech stacks that you enjoy working with the most?
Yaya2DevOps: Ah, that's a tough one! I enjoy working with a variety of technologies, but if I had to pick, I'd say I have a soft spot for Python and the MERN (MongoDB, Express.js, React, Node.js) stack. Python's versatility is amazing, and MERN provides a great ecosystem for web development. But remember, the best tech stack often depends on the project's requirements.
Fan123: Thanks for sharing your favorites, Yaya2DevOps! Your insights are incredibly valuable. I'll keep that in mind as I continue my journey in the world of development. Keep up the fantastic work!
Yaya2DevOps: You're very welcome! I'm glad I could help. Feel free to reach out anytime if you have more questions or just want to chat about tech. Keep learning and coding, and best of luck with your development journey!
"""

lines = conversation.lstrip('\n').rstrip('\n').split('\n')
for i in range(len(lines)):
  if lines[i].startswith('Yaya2DevOps: '):
    key = 'my_user'
    message = lines[i].replace('Yaya2DevOps: ', '')
  elif lines[i].startswith('Fan123: '):
    key = 'other_user'
    message = lines[i].replace('Fan123: ', '')
  else:
    print(lines[i])
    raise 'invalid line'

  created_at = (now - timedelta(days=1)+ timedelta(minutes=i)).isoformat()
  create_message(
    client=ddb,
    message_group_uuid=message_group_uuid,
    created_at=created_at,
    message=message,
    my_user_uuid=users[key]['uuid'],
    my_user_display_name=users[key]['display_name'],
    my_user_handle=users[key]['handle']
  )
You can execute it using ./bin/ddb/seed.
The seed script would typically be run once, when you first deploy your application.
Implement Scan Script - scan
The scan script is used to list all data in DynamoDB.
#!/usr/bin/env python3

import boto3
import sys

attrs = {"endpoint_url": "http://localhost:8000"}

ddb = boto3.resource("dynamodb", **attrs)

table_name = "cruddur-messages"

table = ddb.Table(table_name)
response = table.scan()

print("RESPONSE >>>>>>>>", response)

items = response["Items"]

for item in items:
print(item)- import boto3 statement imports the Boto3 library, which is used to interact with AWS services.
- attrs dictionary defines the endpoint URL for the DynamoDB service.
- ddb variable is created and assigned to a Boto3 resource object for the DynamoDB service.
- table_name variable is assigned the name of the DynamoDB table to be scanned.
- table variable is created and assigned to a Boto3 table object for the specified table.
- scan() method is called on the table object to scan the table.
- print() statement prints the response from the scan() method to the console.
Execute the Python script to scan for data using the following command;
./bin/ddb/scan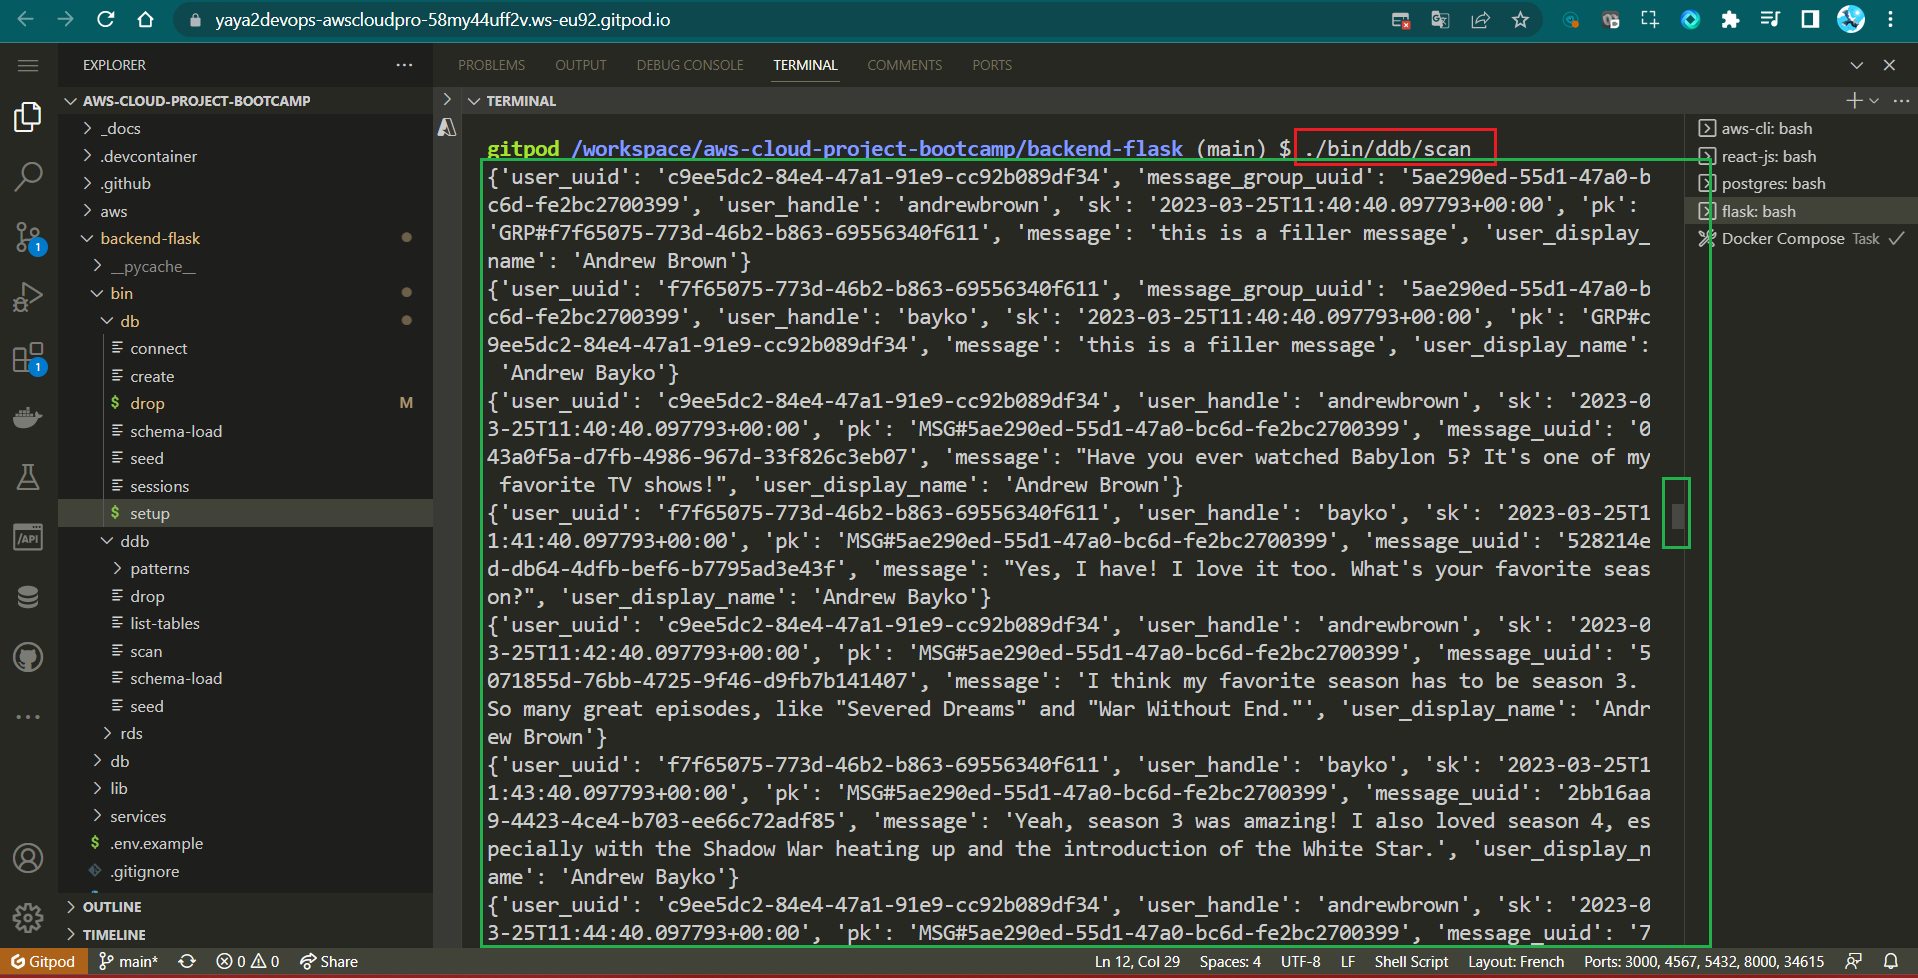
.............Scanning Return..............

{
  "user_uuid": "{{user_uuid_1}}",
  "user_handle": "{{user_handle_1}}",
  "sk": "{{sk_1}}",
  "pk": "{{pk_1}}",
  "message_uuid": "{{message_uuid_1}}",
  "message": "{{message_1}}",
  "user_display_name": "{{user_display_name_1}}"
}
{
  "user_uuid": "{{user_uuid_2}}",
  "user_handle": "{{user_handle_2}}",
  "sk": "{{sk_2}}",
  "pk": "{{pk_2}}",
  "message_uuid": "{{message_uuid_2}}",
  "message": "{{message_2}}",
  "user_display_name": "{{user_display_name_2}}"
}
{
  "user_uuid": "{{user_uuid_3}}",
  "user_handle": "{{user_handle_3}}",
  "sk": "{{sk_3}}",
  "pk": "{{pk_3}}",
  "message_uuid": "{{message_uuid_3}}",
  "message": "{{message_3}}",
  "user_display_name": "{{user_display_name_3}}"
}
............................................
Scripted Solutions for Access Patterns and Beyond
We will be incorporating the necessary design patterns into our app that plays a crucial role in facilitating interaction with Cruddur DynamoDB designed patterns later.
- Get conversations: Get conversations from various groups and years, with applied filters.
- List conversioanations: Display conversations specific to a user identified by their UUID.
- List Cognito Users: Display sign ups users from cognito to the CLI.
- Update Cognito ID: Update Cognito ID Script for PostgresSQL Database
☁️/
├── 📂bin/
│   ├── 🔐cognito/
│   │   └── 📄list-users  # psql+cognito
│   ├── 💾ddb/
│   │   └── 📂patterns/
│   │       ├── 📄get-conversation
│   │       └── 📄list-conversation
│   └── 💾db/
│       └── 📄update_cognito_user_ids # psql+cognito
└── 📂lib/
    └── 📄db.py
The first script will use composite keys (pk and sk) for querying, while the second script relies on a single partition key (pk) for user-specific queries. Later, you'll also have the opportunity to explore additional scripts that assist with PostgreSQL and Cognito.
Conversation Script Generator
The get script is designed to query our DynamoDB table for messages and get conversations. It filters messages from a specific year e.g. we tried (2023) and displays that.
Step 1 : Shebang and Imports
- Import the following library;
- AWS SDK library
- The sys module for command-line arguments
- JSON module for data serialization
- The datetime module for date and time manipulation.
#!/usr/bin/env python3

import boto3
import sys
import json
import datetime
Step 2: Configuration
- Set default local DynamoDB endpoint
attrs = {"endpoint_url": "http://localhost:8000"}- Check if there's one command-line argument and it contains "prod"
if len(sys.argv) == 2:
    if "prod" in sys.argv[1]:
        attrs = {}
If in production, use default AWS configuration.
Step 3: DynamoDB Client Setup
- Create a DynamoDB client
dynamodb = boto3.client("dynamodb", **attrs)- Define Table Name and Message Group UUID
table_name = "cruddur-messages"

message_group_uuid = "5ae290ed-55d1-47a0-bc6d-fe2bc2700399"- Define Query Parameters, Set the partition key and Filter for the year 2023.
query_params = {
    "TableName": table_name,
    "ScanIndexForward": False,
    "Limit": 20,
    "KeyConditionExpression": "pk = :pk AND begins_with(sk, :year)",
    "ExpressionAttributeValues": {
        ":pk": {"S": f"MSG#{message_group_uuid}"},
        ":year": {"S": "2023"},
    },
    "ReturnConsumedCapacity": "TOTAL",
}- Execute Query DynamoDB and Print Query Response, in JSON and Consumed Capacity;
response = dynamodb.query(**query_params)

print(json.dumps(response, sort_keys=True, indent=2))

print(json.dumps(response["ConsumedCapacity"], sort_keys=True, indent=2))- Process and Display Results
items = response["Items"]- Loop through the items in reverse order
for item in reversed(items):
    sender_handle = item["user_handle"]["S"]
    message = item["message"]["S"]
    timestamp = item["sk"]["S"]
    dt_object = datetime.datetime.strptime(timestamp, "%Y-%m-%dT%H:%M:%S.%f%z")
    formatted_datetime = dt_object.strftime("%Y-%m-%d %I:%M %p")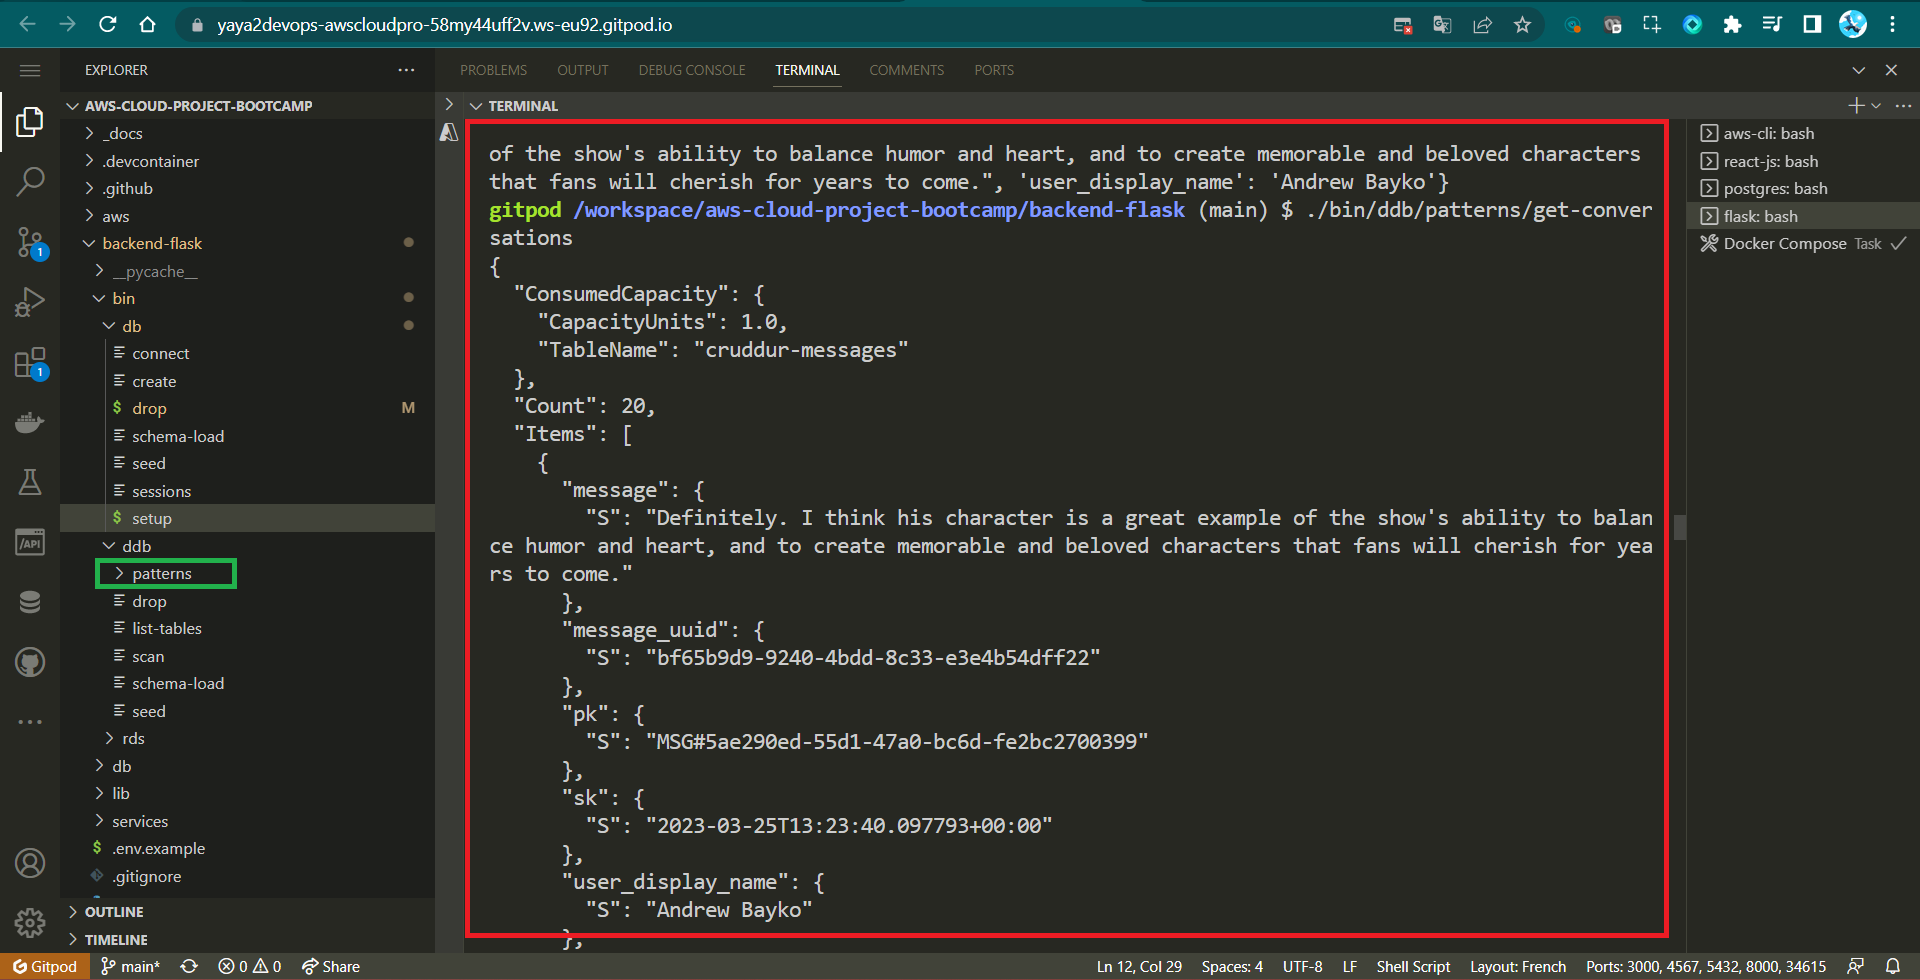
print(f"{sender_handle: <16}{formatted_datetime: <22}{message[:40]}...")- Make the file executable and run
./bin/ddb/patterns/get-conversations
{{response_date}}: This variable represents the date value in the "ResponseMetadata" section, which could be replaced with an actual date value (e.g., "Wed, 22 Mar 2023 08:35:09 GMT").{{server}}: Represents the server value in the "ResponseMetadata" section, which could be replaced with the server information (e.g., "Jetty(9.4.48.v20220622)").{{x_amz_crc32}}: Represents the x-amz-crc32 value in the "ResponseMetadata" section, which could be replaced with an actual CRC32 value.{{request_id}}: Represents both the "RequestId" in the "ResponseMetadata" section and the "x-amzn-requestid" in the "HTTPHeaders" section. This can be replaced with a unique request ID.{{http_status_code}}: Represents the HTTP status code in the "ResponseMetadata" section, which should be replaced with an actual HTTP status code (e.g., 200).{{retry_attempts}}: Represents the number of retry attempts in the "ResponseMetadata" section. You can replace it with the actual number of retry attempts.
"ResponseMetadata": {
    "HTTPHeaders": {
      "content-type": "application/x-amz-json-1.0",
      "date": "{{response_date}}",
      "server": "{{server}}",
      "transfer-encoding": "chunked",
      "x-amz-crc32": "{{x_amz_crc32}}",
      "x-amzn-requestid": "{{request_id}}"
    },
    "HTTPStatusCode": {{http_status_code}},
    "RequestId": "{{request_id}}",
    "RetryAttempts": {{retry_attempts}}
  },
"ScannedCount": {{scanned_count}}{{scanned_count}}: Represents the "ScannedCount" value, which can be replaced with the actual count of scanned items.{{capacity_units}}: Represents the "CapacityUnits" value, which can be replaced with an actual numerical value (e.g., 1.0).
{
  "CapacityUnits": {{capacity_units}},
  "TableName": "{{table_name}}"
}
{{user_handle_1}}           {{user_sk_1}}   Hi again Yaya! I'm a huge fan of your work. Can we...
{{user_handle_2}}     {{user_sk_2}}   Of course! I'd love to chat about my latest projec...
{{user_handle_1}}           {{user_sk_3}}   I'm really interested in the technology stack you used for...
{{user_handle_2}}     {{user_sk_4}}   Sure thing! For this project, I used Python for the backend, React for the frontend, and AWS DynamoDB as the database. It was a challenging but rewarding tech stack to work with.
{{user_handle_1}}           {{user_sk_5}}   That sounds fascinating! Did you encounter any particularly interesting challenges while working with DynamoDB?
{{user_handle_2}} {{user_sk_6}} Oh, absolutely! DynamoDB's NoSQL nature was both a blessing and a challenge. The schema-less design gave us flexibility, but we had to carefully plan our data model to optimize queries and avoid bottlenecks.{{table_name}}: Represents the "TableName" value, which should be replaced with the actual table name (e.g., "cruddur-messages").{{user_handle_X}}: These variables represent the user handles in the subsequent data entries. Replace them with the actual user handles.{{user_sk_X}}: These variables represent the "sk" values associated with each user in the subsequent data entries. Replace them with the actual values, which might represent timestamps or sorting keys.
Overall, the code sets up a script to query a DynamoDB table for messages, filter by a specific year, and print the results which is our get all convo.
Customer Focused Script
The script is tailored to listing conversations for a specific user.
- Step 0 : Custom Library Inspections
- Step 1: Set up paths and imports
- Step 2: Configure DynamoDB client
- Step 3: Define the DynamoDB table name
- Step 4: Define a function to get the user's UUID
- Step 5: Call the function to get the user's UUID
- Step 6: Define the query parameters for DynamoDB
- Step 7: Query and print the DynamoDB table and execute
We have to first start updading our libary before creating the script. It also includes a custom module (lib.db) for database operations.
Step 0 : Custom Library Inspections
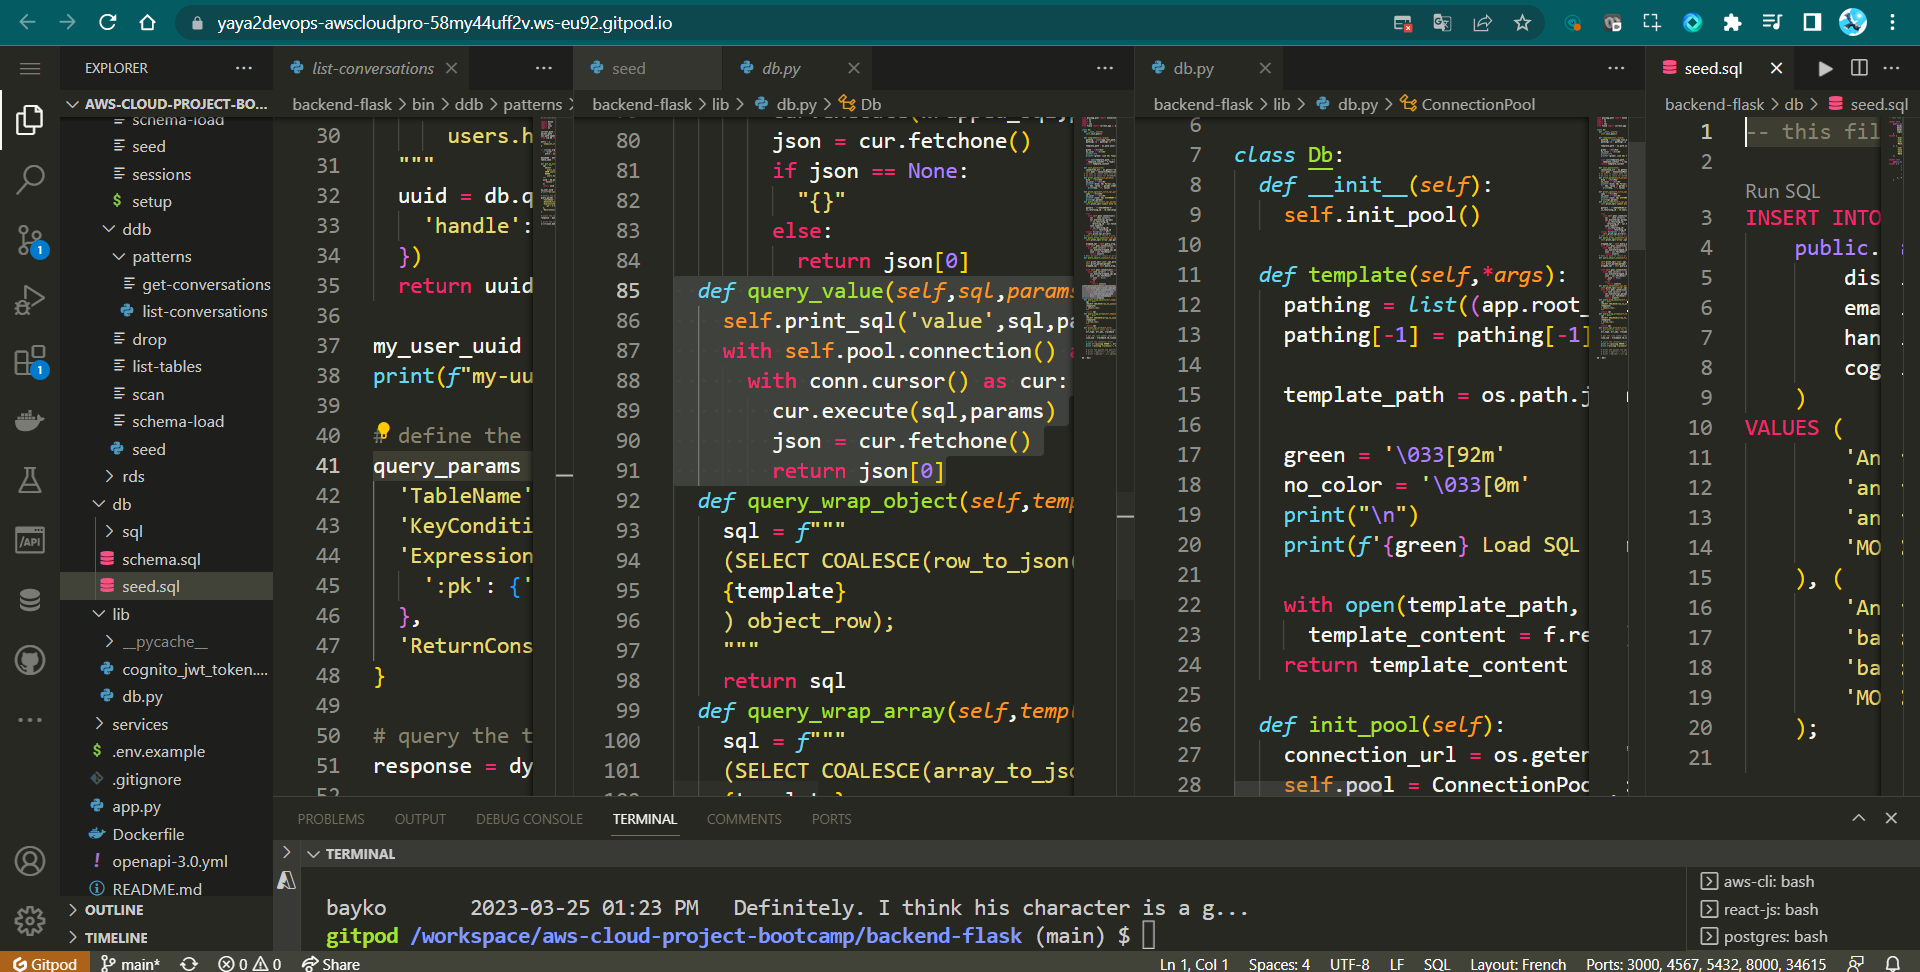
- Create
query_valuefunction in our custom-built librarydb.pyto simplify the retrieval of a single value from the database.
  def query_value(self, sql, params={}):
      self.print_sql("value", sql, params)

      with self.pool.connection() as conn:
          with conn.cursor() as cur:
              cur.execute(sql, params)
              json = cur.fetchone()
              return json[0]
The Function abstracts away the details of executing a query, fetching the value, and returning it. This simplifies code in other parts of your application where you need to retrieve single values from the database.
- Add The print_sql function in
db.pyto include a new parameter(params)and slightly modify its output format.
def print_sql(self,title,sql,params={}):
    print(sql,params)
This allows the print_sql function to display the query parameters alongside the SQL statement. This is helpful for debugging and understanding which values are being used in the query.
- Add some great color to the SQL statement, making it stand out for easier identification in the console output.
    cyan = '\033[96m'
    no_color = '\033[0m'
    print(f'{cyan} SQL STATEMENT-[{title}]------{no_color}')
What is that, show me. → Sure!
- Make sure the print_sql looks like this;
def print_sql(self,title,sql,params={}):
    cyan = '\033[96m'
    no_color = '\033[0m'
    print(f'{cyan} SQL STATEMENT-[{title}]------{no_color}')
    print(sql,params)
Step 1: Set up paths and imports
- Determine the script's parent directory and add it to the system path for imports
current_path = os.path.dirname(os.path.abspath(__file__))
parent_path = os.path.abspath(os.path.join(current_path, "..", "..", ".."))
sys.path.append(parent_path)- Import a custom module 'db' from 'lib.db'
from lib.db import dbStep 2: Configure DynamoDB client
- Set a default local DynamoDB endpoint for testing
attrs = {"endpoint_url": "http://localhost:8000"}- Check for command-line arguments to configure for production if needed
if len(sys.argv) == 2:
    if "prod" in sys.argv[1]:
        attrs = {}

dynamodb = boto3.client("dynamodb", **attrs)
Step 3: Define the DynamoDB table name
table_name = "cruddur-messages"Step 4: Define a function to get the user's UUID
- Start by creating the function
def get_my_user_uuids():
# lets do this!- Define an SQL query to select the user's UUID based on their handle
    sql = """
        SELECT
            users.uuid
        FROM users
        WHERE
            users.handle = %(handle)s
"""- Execute the SQL query using the 'db' module and return the UUID
    uuid = db.query_value(sql, {"handle": "yaya2devops"})

    return uuid
Step 5: Call the function to get the user's UUID
my_user_uuid = get_my_user_uuids()
print("my user uuid >>>>", my_user_uuid)
Step 6: Define the query parameters for DynamoDB
query_params = {
    "TableName": table_name,
    "KeyConditionExpression": "pk = :pk",  # Query based on the partition key
    "ExpressionAttributeValues": {":pk": {"S": f"GRP#{my_user_uuid}"}},  # Set the partition key value
    "ReturnConsumedCapacity": "TOTAL",
}
Step 7: Query and print the DynamoDB table and execute
- Add this line to query the table:
response = dynamodb.query(**query_params)- Print the items returned by the query
print(json.dumps(response, sort_keys=True, indent=2))- Make the file executable and run
./bin/ddb/patterns/list-coversations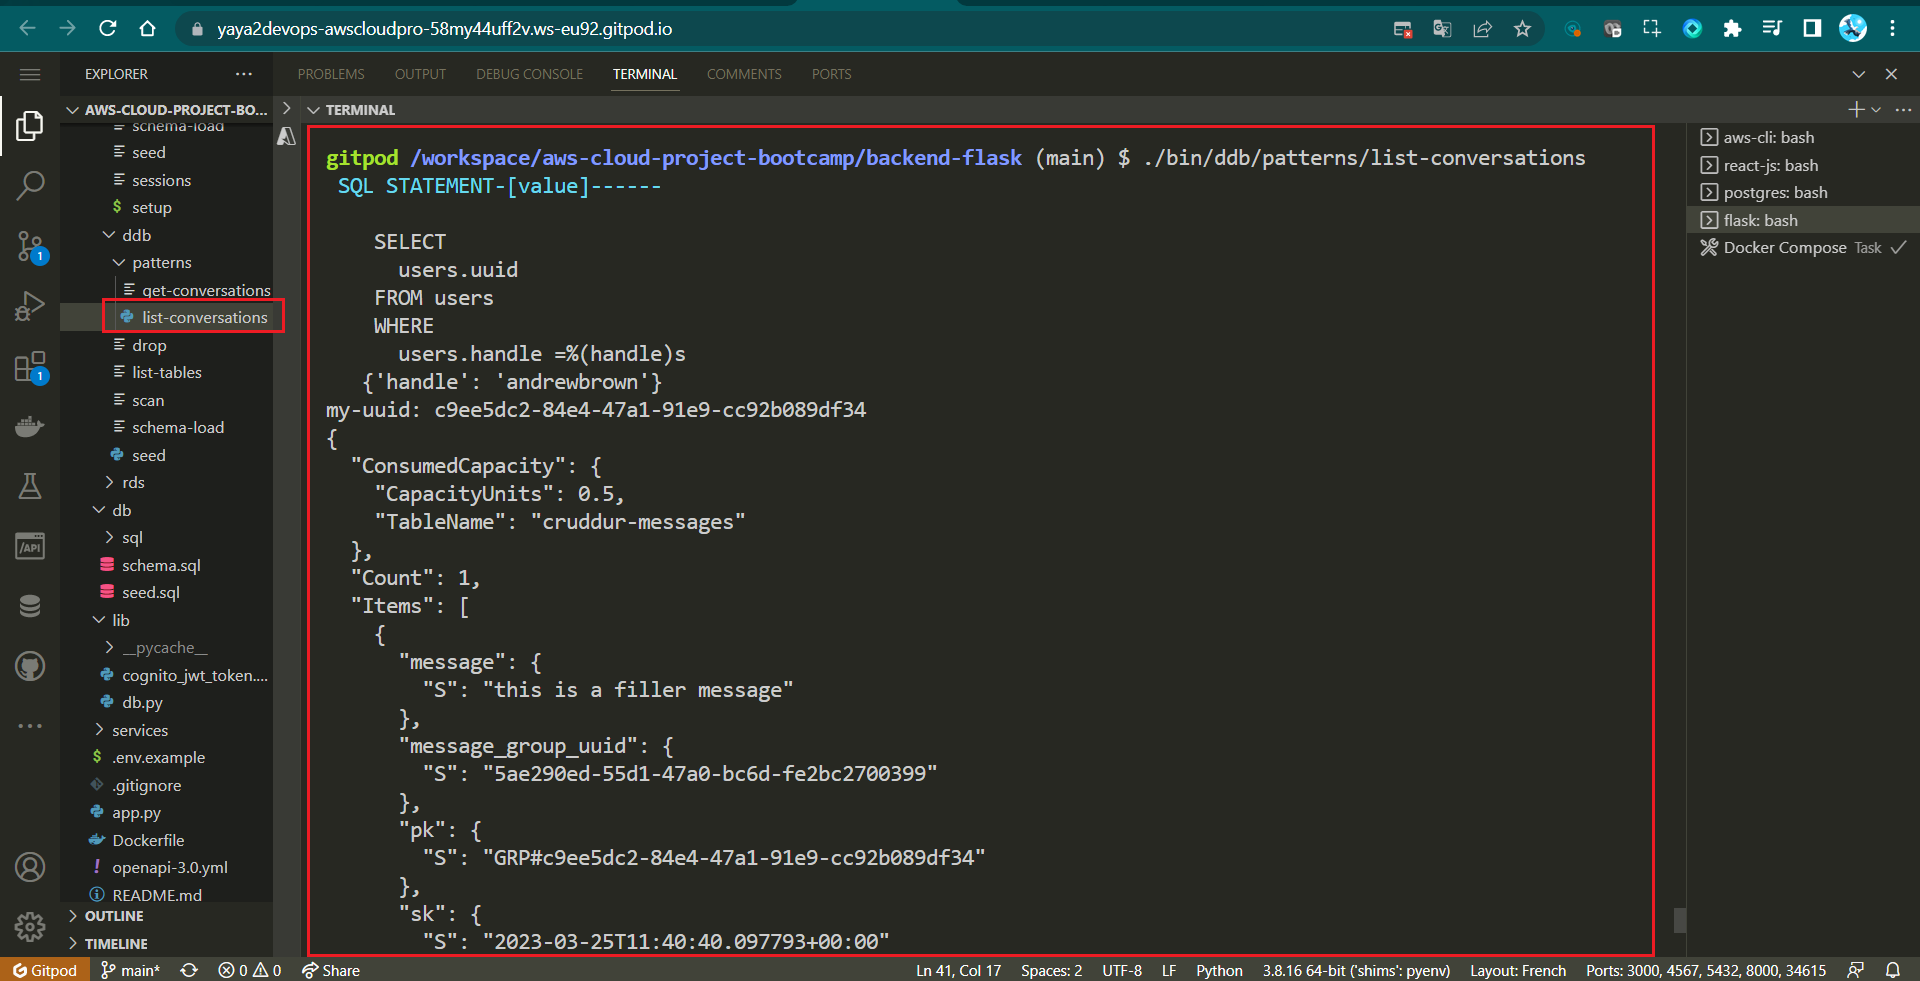
{
  "Items": [
    {
      "message": {
        "S": "this is a filler message"
      },
      "message_group_uuid": {
        "S": "{{message_group_uuid}}"
      },
      "pk": {
        "S": "{{pk}}"
      },
      "sk": {
        "S": "{{sk}}"
      },
      "user_display_name": {
        "S": "{{user_display_name}}"
      },
      "user_handle": {
        "S": "{{user_handle}}"
      },
      "user_uuid": {
        "S": "{{user_uuid}}"
      }
This script is more user-specific and lists conversations for a specific user based on their UUID, without filtering by year!
Amazon Cognito Meets PostgreSQL
We require a way to view the user details stored in your AWS Cognito user pool this the list-users script and then we will go to script the record update to psql using the update_cognito_user_ids.
☁️/
└── 📂bin/
    ├── 🔐cognito/
    │   └── 📄list-users
    └── 💾db/
        └── 📄update_cognito_user_ids
Script list-users
- Import the required lib json, boto3, and os.
#!/usr/bin/env python3

import boto3
import os
import json- Get the User Pool ID from environment variables
userpool_id = os.getenv("AWS_USER_POOLS_ID")It retrieves the User Pool ID from the environment variable AWS_USER_POOLS_ID using os.getenv.
- Create a Cognito client
client = boto3.client("cognito-idp")- Define parameters for listing users
params = {
    "UserPoolId": userpool_id,
    "AttributesToGet": ["preferred_username", "sub"],
}- List users in the Cognito user pool
response = client.list_users(**params)
users = response["Users"]- Create a dictionary to store user data
dict_users = {}- Iterate through the list of users
for user in users:
    attrs = user["Attributes"]
    sub = next((a for a in attrs if a["Name"] == "sub"), None)
    handle = next((a for a in attrs if a["Name"] == "preferred_username"), None)
dict_users[handle["Value"]] = sub["Value"]- Print the user details in a formatted JSON format. This allows you to see the list of users and their Cognito user IDs.
print(json.dumps(dict_users, sort_keys=True, indent=2, default=str))This script essentially fetches user data from your AWS Cognito user pool and presents it in a readable JSON format, which can be useful for debugging or monitoring purposes.
- Make sure the dev is well completed and your code is like this;
#!/usr/bin/env python3

import boto3
import os
import json

userpool_id = os.getenv("AWS_USER_POOLS_ID")
client = boto3.client("cognito-idp")
params = {"UserPoolId": userpool_id, "AttributesToGet": ["preferred_username", "sub"]}
response = client.list_users(**params)
users = response["Users"]

print(json.dumps(users, sort_keys=True, indent=2, default=str))

dict_users = {}
for user in users:
    attrs = user["Attributes"]
    sub = next((a for a in attrs if a["Name"] == "sub"), None)
    handle = next((a for a in attrs if a["Name"] == "preferred_username"), None)
    dict_users[handle["Value"]] = sub["Value"]

print(json.dumps(dict_users, sort_keys=True, indent=2, default=str))- Save it in
/bin/cognito/list-users, make it executable and run that.
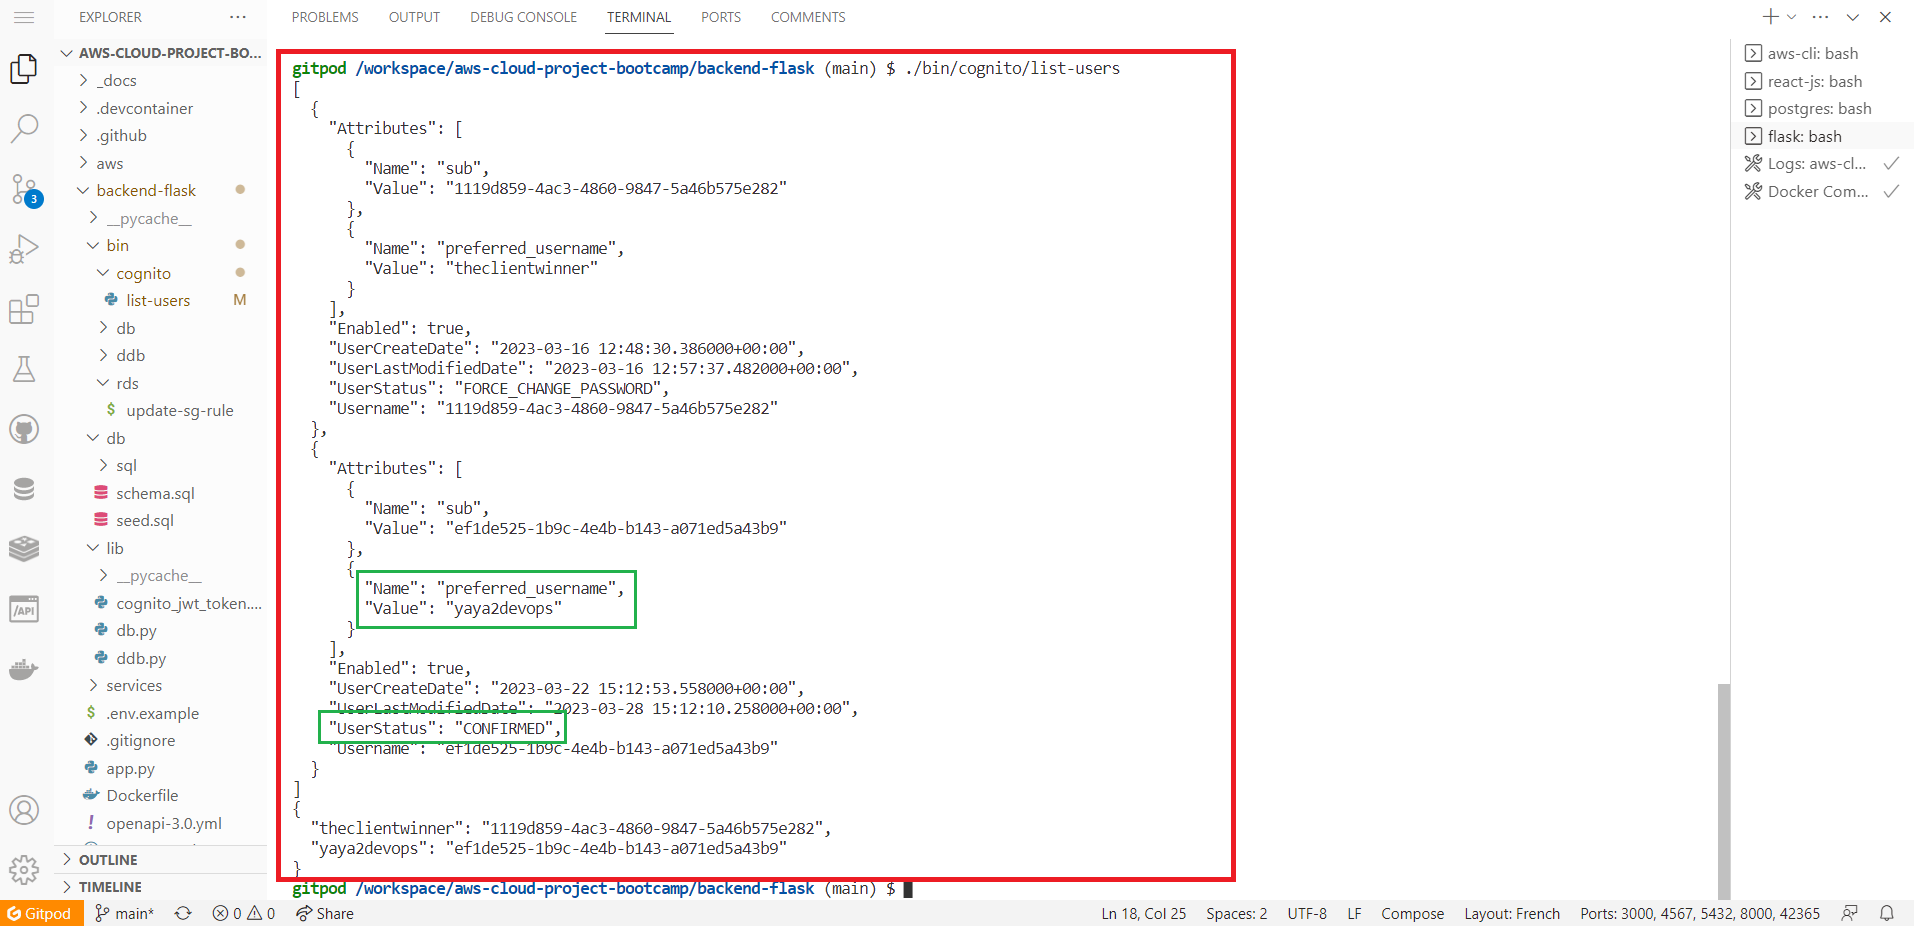
{
  "theclientwinner": "UUID-1",
  "yayaincloud": "UUID-2",
}
Script update_cognito_user_ids
We now have to update user records in a Postgres database based on information obtained from an AWS Cognito user pool. It takes a user's handle and their Cognito user ID as parameters and performs an SQL update operation.
If ready lets go design this as well.
- Your imports and python shebang;
#!/usr/bin/env python3

import boto3
import os
import sys- Set up the path to import custom modules
current_path = os.path.dirname(os.path.abspath(__file__))
parent_path = os.path.abspath(os.path.join(current_path, "..", ".."))
sys.path.append(parent_path)
from lib.db import db- Prepare your functions;
def update_users_with_cognito_user_id(handle, sub):
     # To be continued..
def get_cognito_user_ids():
# To be continued..- Start by creating your
update_users_with_cognito_user_idFunction:
def update_users_with_cognito_user_id(handle, sub):
    sql = """
    UPDATE public.users
    SET cognito_user_id = %(sub)s
    WHERE
      users.handle = %(handle)s;
  """
db.query_commit(sql, {"handle": handle, "sub": sub})- It takes two parameters:
handle(presumably a user's handle or username) andsub(Cognito user ID). - It defines an SQL query (
sql) to update thecognito_user_idfield in thepublic.userstable for a specific user (identified byhandle). - The
db.query_commitfunction is used to execute the SQL query with the provided parameters.
- Create
get_cognito_user_idsFunction:
def get_cognito_user_ids():
    userpool_id = os.getenv("AWS_USER_POOLS_ID")
    client = boto3.client("cognito-idp")
    params = {
        "UserPoolId": userpool_id,
        "AttributesToGet": ["preferred_username", "sub"],
    }
    response = client.list_users(**params)
    users = response["Users"]
    dict_users = {}
    for user in users:
        attrs = user["Attributes"]
        sub = next((a for a in attrs if a["Name"] == "sub"), None)
        handle = next((a for a in attrs if a["Name"] == "preferred_username"), None)
        dict_users[handle["Value"]] = sub["Value"]
    return dict_users
This function is responsible for retrieving user data from an AWS Cognito user pool.
- It first fetches the
AWS_USER_POOLS_IDenvironment variable, which presumably contains the User Pool ID for your Cognito pool. - It then creates a Cognito client using
boto3.client. - The
paramsdictionary specifies that you want to retrieve the "preferred_username" and "sub" (Cognito user ID) attributes for each user. - It calls
client.list_users(**params)to list the users in the Cognito user pool and stores the result in theusersvariable. - It iterates through the list of users, extracting their attributes, including "sub" (Cognito user ID) and "preferred_username," and adds this data to a dictionary named
dict_users. The keys are user handles, and the values are Cognito user IDs. - Finally, it returns this dictionary.
It will then provide this data for further processing, in updating user records in a database.
- Execute the script as code
users = get_cognito_user_ids()

for handle, sub in users.items():
    print("----", handle, sub)
update_users_with_cognito_user_id(handle=handle, sub=sub)- Overall, the following explains how the execution will work to achieve the goal.
| Step | Description |
|---|---|
| Retrieve Cognito User Data | Call the get_cognito_user_ids function to retrieve user data from an AWS Cognito user pool. Store resulting data in the users dictionary, with user handles (usernames) as keys and their corresponding Cognito user IDs as values. |
| Iterate Through User Data | Iterate through the users dictionary using a for loop. Extract the user's handle (username) and Cognito user ID for each user. |
| Print User Data | Inside the loop, print the user's handle and Cognito user ID in the format "----", handle, sub. Allows viewing of user data in the console or log. |
| Update Database Records | After printing user data, call the update_users_with_cognito_user_id function for each user. Function updates user records in a PostgreSQL database with the corresponding Cognito user ID. Ensures the database stays up-to-date with Cognito user IDs for each user. |
- Once done developing, please make sure It looks like this. Or close in logic;
#!/usr/bin/env python3

import boto3
import os
import sys

current_path = os.path.dirname(os.path.abspath(__file__))
parent_path = os.path.abspath(os.path.join(current_path, "..", ".."))
sys.path.append(parent_path)
from lib.db import db

def update_users_with_cognito_user_id(handle, sub):
    sql = """
    UPDATE public.users
    SET cognito_user_id = %(sub)s
    WHERE
      users.handle = %(handle)s;
  """
    db.query_commit(sql, {"handle": handle, "sub": sub})

def get_cognito_user_ids():
    userpool_id = os.getenv("AWS_USER_POOLS_ID")
    client = boto3.client("cognito-idp")
    params = {
        "UserPoolId": userpool_id,
        "AttributesToGet": ["preferred_username", "sub"],
    }
    response = client.list_users(**params)
    users = response["Users"]
    dict_users = {}
    for user in users:
        attrs = user["Attributes"]
        sub = next((a for a in attrs if a["Name"] == "sub"), None)
        handle = next((a for a in attrs if a["Name"] == "preferred_username"), None)
        dict_users[handle["Value"]] = sub["Value"]
    return dict_users

users = get_cognito_user_ids()

for handle, sub in users.items():
    print("----", handle, sub)
update_users_with_cognito_user_id(handle=handle, sub=sub)- Make sure It is automated along your other required setup scripts.
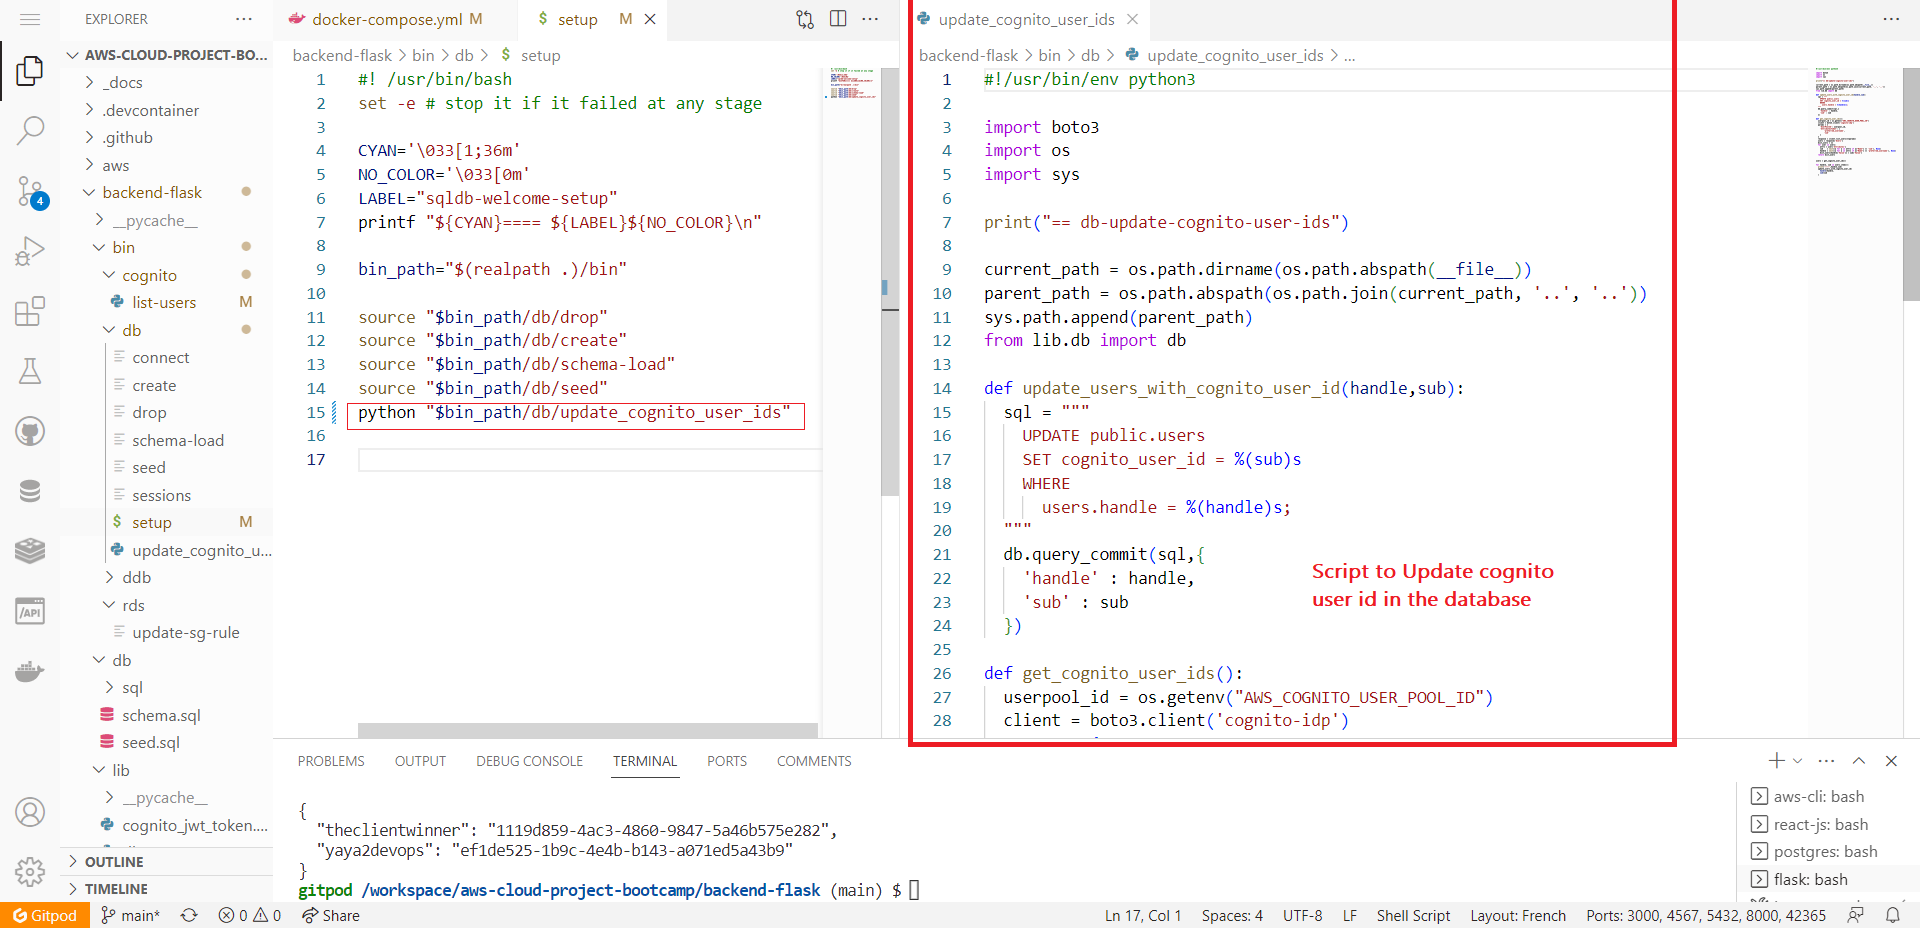
python3 "$bin_path/db/update_cognito_user_ids"- Re-run the setup script to see the updates in action.

Ddb Class for Conversational Feature
We will create an independent Class to interact with Amazon DynamoDB. The last will provide the required methods to implement the conversations feature in our app with the five patterns.
Allow me to assist you in getting your design off the ground by guiding you through a structured process.
We'll kick things off with the essential step of importing the necessary statements.
boto3; the official AWS SDK for Python.sys; provides access to various system-specific parameters and functions.- classes from
datetimemodule ; (datetime, timedelta, and timezone)datetimeis used to represent timestamps,timedeltais used to perform time-related calculationstimezoneis used to work with time zones.
import boto3
import sys
from datetime import datetime, timedelta, timezone
import uuid
import os
import botocore.exceptions

class Ddb:
  def client():
  # Your Code goes here

  def list_message_groups(client,my_user_uuid):
  # Your Code goes here

  def list_messages(client,message_group_uuid):
  # Your Code goes here

  def create_message():
  # Your Code goes here

  def create_message_group()
# Your Code goes here- Create
client()Method:- This method initializes and returns an AWS DynamoDB client.
- It checks if the
AWS_ENDPOINT_URLenvironment variable is set and uses it as the endpoint URL for the client. If not set, it uses the default endpoint.
  def client():
    endpoint_url = os.getenv("AWS_ENDPOINT_URL")
    if endpoint_url:
      attrs = { 'endpoint_url': endpoint_url }
    else:
      attrs = {}
    dynamodb = boto3.client('dynamodb',**attrs)
return dynamodb- Create
list_message_groups(args)Method:- This method retrieves a list of message groups associated with a specific user.
- It constructs a query to the DynamoDB table named 'cruddur-messages' to retrieve message groups for the given user UUID (
my_user_uuid).
  def list_message_groups(client,my_user_uuid):
    year = str(datetime.now().year)
    table_name = 'cruddur-messages'
    query_params = {
      'TableName': table_name,
      'KeyConditionExpression': 'pk = :pk AND begins_with(sk,:year)',
      'ScanIndexForward': False,
      'Limit': 20,
      'ExpressionAttributeValues': {
        ':year': {'S': year },
        ':pk': {'S': f"GRP#{my_user_uuid}"}
      }
    }
    print('query-params:',query_params)
    print(query_params)
    # query the table
    response = client.query(**query_params)
    items = response['Items']

    results = []
    for item in items:
      last_sent_at = item['sk']['S']
      results.append({
        'uuid': item['message_group_uuid']['S'],
        'display_name': item['user_display_name']['S'],
        'handle': item['user_handle']['S'],
        'message': item['message']['S'],
        'created_at': last_sent_at
      })
return results- The query filters for items where the partition key (
pk) equalsmy_user_uuidand the sort key (sk) begins with the current year. - It limits the result to 20 items and returns the results as a list of dictionaries.
- Create
list_messages(args)Method:- This method retrieves a list of messages within a specific message group.
- It constructs a query to the DynamoDB table named 'cruddur-messages' to retrieve messages for the given message group UUID (
message_group_uuid).
  def list_messages(client,message_group_uuid):
    year = str(datetime.now().year)
    table_name = 'cruddur-messages'
    query_params = {
      'TableName': table_name,
      'KeyConditionExpression': 'pk = :pk AND begins_with(sk,:year)',
      'ScanIndexForward': False,
      'Limit': 20,
      'ExpressionAttributeValues': {
        ':year': {'S': year },
        ':pk': {'S': f"MSG#{message_group_uuid}"}
      }
    }

    response = client.query(**query_params)
    items = response['Items']
    items.reverse()
    results = []
    for item in items:
      created_at = item['sk']['S']
      results.append({
        'uuid': item['message_uuid']['S'],
        'display_name': item['user_display_name']['S'],
        'handle': item['user_handle']['S'],
        'message': item['message']['S'],
        'created_at': created_at
      })
return results- The query filters for items where the partition key (
pk) equals 'message_group_uuid' and the sort key (sk) begins with the current year. - It limits the result to 20 items and returns the results as a list of dictionaries.
- Create
create_message(args)Method:- This method is used to create a new message within a message group.
  def create_message(client,message_group_uuid, message, my_user_uuid, my_user_display_name, my_user_handle):
    now = datetime.now(timezone.utc).astimezone()
    created_at = now.isoformat()
    message_uuid = str(uuid.uuid4())

    record = {
      'pk':   {'S': f"MSG#{message_group_uuid}"},
      'sk':   {'S': created_at },
      'message': {'S': message},
      'message_uuid': {'S': message_uuid},
      'user_uuid': {'S': my_user_uuid},
      'user_display_name': {'S': my_user_display_name},
      'user_handle': {'S': my_user_handle}
    }
    # insert the record into the table
    table_name = 'cruddur-messages'
    response = client.put_item(
      TableName=table_name,
      Item=record
    )
    # print the response
    print(response)
    return {
      'message_group_uuid': message_group_uuid,
      'uuid': my_user_uuid,
      'display_name': my_user_display_name,
      'handle':  my_user_handle,
      'message': message,
      'created_at': created_at
}- It generates a message UUID, constructs a DynamoDB item record with various attributes including the message content, user information, and timestamps.
- It then inserts this record into the 'cruddur-messages' table using the
put_itemoperation.
- Create
create_message_group(args)Method:- This method is used to create a new message group.
  def create_message_group(client, message,my_user_uuid, my_user_display_name, my_user_handle, other_user_uuid, other_user_display_name, other_user_handle):
    print('== create_message_group.1')
    table_name = 'cruddur-messages'

    message_group_uuid = str(uuid.uuid4())
    message_uuid = str(uuid.uuid4())
    now = datetime.now(timezone.utc).astimezone()
    last_message_at = now.isoformat()
    created_at = now.isoformat()
    print('== create_message_group.2')

    my_message_group = {
      'pk': {'S': f"GRP#{my_user_uuid}"},
      'sk': {'S': last_message_at},
      'message_group_uuid': {'S': message_group_uuid},
      'message': {'S': message},
      'user_uuid': {'S': other_user_uuid},
      'user_display_name': {'S': other_user_display_name},
      'user_handle':  {'S': other_user_handle}
    }

    print('== create_message_group.3')
    other_message_group = {
      'pk': {'S': f"GRP#{other_user_uuid}"},
      'sk': {'S': last_message_at},
      'message_group_uuid': {'S': message_group_uuid},
      'message': {'S': message},
      'user_uuid': {'S': my_user_uuid},
      'user_display_name': {'S': my_user_display_name},
      'user_handle':  {'S': my_user_handle}
    }

    print('== create_message_group.4')
    message = {
      'pk':   {'S': f"MSG#{message_group_uuid}"},
      'sk':   {'S': created_at },
      'message': {'S': message},
      'message_uuid': {'S': message_uuid},
      'user_uuid': {'S': my_user_uuid},
      'user_display_name': {'S': my_user_display_name},
      'user_handle': {'S': my_user_handle}
    }

    items = {
      table_name: [
        {'PutRequest': {'Item': my_message_group}},
        {'PutRequest': {'Item': other_message_group}},
        {'PutRequest': {'Item': message}}
      ]
    }

    try:
      print('== create_message_group.try')
      # Begin the transaction
      response = client.batch_write_item(RequestItems=items)
      return {
        'message_group_uuid': message_group_uuid
      }
    except botocore.exceptions.ClientError as e:
      print('== create_message_group.error')
print(e)- It generates UUIDs for the message group and message, constructs item records for both users' message groups, and the initial message within the group.
- It uses a batch write operation to insert these records into the 'cruddur-messages' table as a transaction.
- Include the print statements that can be used for debugging purposes. This also shows the 3 types of items of Cruddur DynamoDB table.
This code serves as the foundation for initiating our process of implementing the five patterns we've previously discussed. Our aim is to provide you with a solid starting point for your coding journey. So, without further ado, let's dive into the first pattern, Pattern A.
Implement Pattern A For Conversations
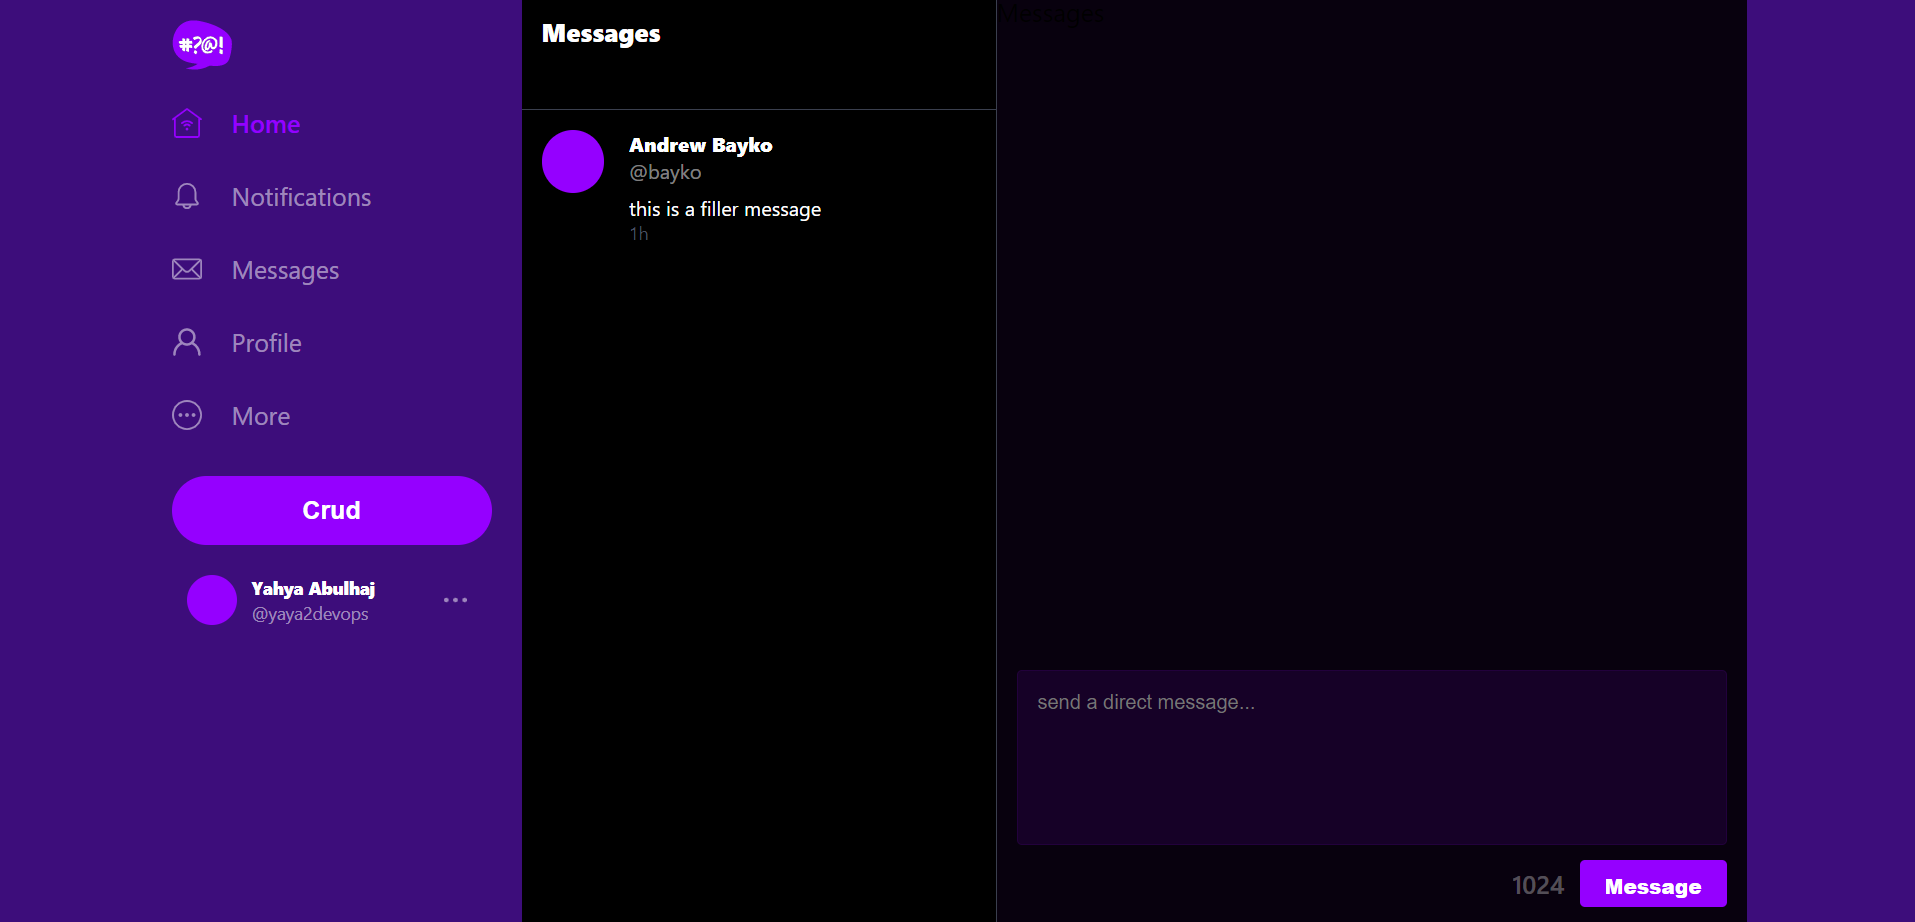
The initial pattern ensures that you encounter your first message group on the platform, featuring the bayko user.
📁backend-flask/
├── 📁lib/
│   └── 📄ddb.py
└── 📄app.py

🌳bin/
└── 💾ddb/
    └── 📁patterns/
        ├── 📄get-conversations
        └── 📄list-conversations
🌳bin/
└── 💾db/
    └── 📁setup/
        └── 📄setup

📁frontend-react-js/
└── 📁src/
    ├── 📁lib/
    │   └── 📄CheckAuth.js
    ├── 📁pages/
    │   ├── 📄HomeFeedPage.js
    │   ├── 📄MessageGroupPage.js
    │   └── 📄MessageGroupsPage.js
    └── 📁components/
        ├── 📄MessageForm.js
        └── 📄MessageGroupItem.js
A significant amount of work encompasses both frontend and backend development, as well as scripting. We hope you enjoy the journey.
Step 1 : Develop Get Conversations Script
- We will introduce the use of the
datetimemodule to obtain the current year (year) as a string.
# Updated code

# ...

year = str(datetime.datetime.now().year) - Code the
KeyConditionExpressionwithin thequery_paramsdictionary to include thebegins_with(sk, :year)condition, allowing the script to filter results based on the current year in the sorting key(sk).
query_params = {
    "TableName": table_name,
    "ScanIndexForward": False,
    "Limit": 20,
    "KeyConditionExpression": "pk = :pk AND begins_with(sk, :year)",  # Modified this line

    # ... (rest of the code remains unchanged)
}- Reverse the order of messages in the items list to ensure that the most recent messages appear first in the output.
items.reverse()  # Added this line
# ... (rest of the code remains unchanged)
Step 2 : Develop List Conversations Script
- Same as with previous script, employ the time.
# ...

my_user_uuid = get_my_user_uuids()

year = str(datetime.datetime.now().year) # Added this line- Modify the query parameters to include the 'begins_with' condition
query_params = {
    "TableName": table_name,
    "KeyConditionExpression": "pk = :pk AND begins_with(sk, :year)",  # Modified this line
    "ExpressionAttributeValues": {
        ":year": {"S": year},
        ":pk": {"S": f"GRP#{my_user_uuid}"},
    },
    "ReturnConsumedCapacity": "TOTAL",
}
This allows the code to filter results based on the current year in the sorting key (sk).
Step 3 : Handle Route for Message groups
- Update the
data_message_groupsFunction inapp.py:
- Modify the
data_message_groupsfunction in theapp.pyfile as follows:
@app.route("/api/message_groups", methods=["GET"])
def data_message_groups():
    claims = request.environ["claims"]
    cognito_user_id = claims["sub"]
    model = MessageGroups.run(cognito_user_id=cognito_user_id)

    if model["errors"] is not None:
        return model["errors"], 422
    else:
return model["data"], 200- Code the
services/message_groups.pyfile with the following code:
from datetime import datetime, timedelta, timezone

from lib.ddb import Ddb
from lib.db import db

class MessageGroups:
    def run(cognito_user_id):
        model = {"errors": None, "data": None}

        sql = db.template("users", "uuid_from_cognito_user_id")
        my_user_uuid = db.query_value(sql, {"cognito_user_id": cognito_user_id})

        print(f"UUID: {my_user_uuid}")

        ddb = Ddb.client()
        data = Ddb.list_message_groups(ddb, my_user_uuid)
        print("list_message_groups: ", data)

        model["data"] = data
return model- Remove the decoder Sign from that
data_messagesRoute inapp.pyaka @.
Step 4 : Reusable Authentication Class
We are taking a significant step to improve our authentication mechanism. We will create a dedicated and independent class that can be called whenever authentication is needed within our application.
This approach not only strengthens our authentication system but also enhances the overall workflow of our application.
Create Reusable Authentication Component
Create a reusable authentication component named CheckAuth.js in the frontend-react-js/src/lib/ directory. This component will be used for authentication across various parts of your application.
import { Auth } from "aws-amplify";

const checkAuth = async (setUser) => {
    Auth.currentAuthenticatedUser({
        bypassCache: false,
    })
        .then((user) => {
            console.log("user", user);
            return Auth.currentAuthenticatedUser();
        })
        .then((cognito_user) => {

            setUser({
                display_name: cognito_user.attributes.name,
                handle: cognito_user.attributes.preferred_username,
            });

        })
        .catch((err) => console.log(err));
};
Additionally, remove the import statement for cookies.
Implement Authentication in Source Code
For the following files, implement authentication using the CheckAuth component:
frontend-react-js/src/pages/HomeFeedPage.jsfrontend-react-js/src/pages/MessageGroupPage.jsfrontend-react-js/src/pages/MessageGroupsPage.jsfrontend-react-js/src/components/MessageForm.js
In each of these files, perform the following steps:
- Add the auth header to pass the bearer token:
headers: {
  'Authorization': `Bearer ${localStorage.getItem("access_token")}`,
},- Import the
checkAuthfunction:
import checkAuth from '../lib/CheckAuth'- Call the
checkAuthfunction:
checkAuth(setUser);- In
MessageGroupPage.jsfile, re define the asynchronous functionloadMessageGroupData
const loadMessageGroupData = async () => {
    try {
      const backend_url = `${process.env.REACT_APP_BACKEND_URL}/api/messages/${params.message_group_uuid}`
      const res = await fetch(backend_url, {
        method: "GET"
      });
      let resJson = await res.json();
      if (res.status === 200) {
        setMessages(resJson)
      } else {
        console.log(res)
      }
    } catch (err) {
      console.log(err);
    }
  };
The function first constructs the URL based on the REACT_APP_BACKEND_URL environment variable and params.message_group_uuid.
- Recode the class in
MessageGroupItem.jscomponent for improved UI interaction:
const classes = () => {
    let classes = ["message_group_item"];
    if (params.message_group_uuid == props.message_group.uuid) {
      classes.push("active");
    }
    return classes.join(" ");
  };

  return (
    <Link className={classes()} to={`/messages/` + props.message_group.uuid}>
      {/* Link To Content */}
    </Link>
  );
We used this code to style a link element conditionally. If the message_group_uuid matches the uuid from props.message_group, it applies the "active" CSS class to the link, allowing for custom styling when the link represents the active message group.
Step Take A Look At Pattern A
- After incorporating the necessary modifications mentioned earlier, launch the application and ensure that it is included in your Docker Compose configuration.
AWS_ENDPOINT_URL: "http://dynamodb-local:8000"
- Reload your schema, and dont seed it with your data.
- Now, navigate to your application and click on the "Message" tab and see!
- You should observe the placeholder message, which is "good and clean." without seed this time.
Great, let's proceed with additional patterns to ensure the system is in an optimal state.
Implement Conversation Pattern B
Pattern B involves targeting service endpoints for message groups and creating messages to ultimately display the message groups on the app.
📁backend-flask/
├── 📁services/
│   ├── 📄messages.py
│   ├── 📄create_message.py
└── 📄app.py

🌳bin/
└── 💾db/
    └── 📁setup/
        └── 📄setup
This will allow users to conveniently access and review their ongoing conversations with each other.
- Step 1: Develop MessagesDotPy
- Step 2: Develop CreateMessagePy
- Step 3: Instrument AppPy
- Step Take A Look Pattern B
Step 1: Develop Messages Dot Py
Start retrieve messages from a DynamoDB database based on a message group UUID and a user's Cognito user ID
- Import the Required Modules lib.ddb and lib.db we created and the Ddb and db classes.
from datetime import datetime, timedelta, timezone
from lib.ddb import Ddb
from lib.db import db- Modify the Class and Method Signature
class Messages:
    def run(message_group_uuid, cognito_user_id):
        # ...
Change the run method to accept message_group_uuid and cognito_user_id as parameters instead of user_sender_handle and user_receiver_handle.
- Replace the code responsible for generating mock message data in the first snippet with the appropriate database queries
sql = db.template("users", "uuid_from_cognito_user_id")
my_user_uuid = db.query_value(sql, {"cognito_user_id": cognito_user_id})
Queries a database to obtain a my_user_uuid based on the provided cognito_user_id.
- Initializes a DynamoDB client and retrieves a list of messages using the
Ddb.list_messagesmethod.
ddb = Ddb.client()
data = Ddb.list_messages(ddb, message_group_uuid)- Update the
model['errors']field in the model dictionary to handle erros
model = {"errors": None, "data": None} - Populate the
model['data']field in the model dictionary with the data retrieved from the database or DynamoDB.
model["data"] = data- Returns the
modeldictionary as the result.
return model- The run function went from this;
def run(user_sender_handle, user_receiver_handle):
  model = {
    'errors': None,
    'data': None
  }

  now = datetime.now(timezone.utc).astimezone()

  results = [
    {
      'uuid': '4e81c06a-db0f-4281-b4cc-98208537772a' ,
      'display_name': 'Yahya Abulhaj',
      'handle':  'yaya2devops',
      'message': 'Cloud is fun!',
      'created_at': now.isoformat()
    },
    {
      'uuid': '66e12864-8c26-4c3a-9658-95a10f8fea67',
      'display_name': 'Yahya Abulhaj',
      'handle':  'yaya2devops',
      'message': 'This platform is great!',
      'created_at': now.isoformat()
  }]
  model['data'] = results
To something like this, and thoroughly test your updated code to ensure that it correctly retrieves messages from the database and handles any potential errors. Make sure it works as expected in your application.
def run(message_group_uuid, cognito_user_id):
    model = {"errors": None, "data": None}

    sql = db.template("users", "uuid_from_cognito_user_id")
    my_user_uuid = db.query_value(sql, {"cognito_user_id": cognito_user_id})

    ddb = Ddb.client()
    data = Ddb.list_messages(ddb, message_group_uuid)
    print("list_messages")
    print(data)

    model["data"] = data
    return model
Transitioning from mock data generation to interacting with a real database involves more complexity and potential challenges. Please be careful when following these instructions. Lets go further and code the run method in message.py that will be later used in our app.py.
Step 2: Develop Create Message Py
Code a comprehensive implementation that can handle message creation and updates with database interactions, error checking, and user authentication.
- Update the run method's parameter list.
def run(
    mode,
    message,
    cognito_user_id,
    message_group_uuid=None,
    user_receiver_handle=None,
):
This accepts additional parameters, including mode, cognito_user_id, message_group_uuid, and user_receiver_handle. Remove the parameters that are not used above.
- Retain the error handling logic as it is in the main source.
- Implement database interactions using the db and Ddb classes for our group.
from lib.db import db
from lib.ddb import Ddb-
Implement the necessary database queries and operations within our
runCreateMessageis a Python class designed to handle message creation and updates.
class CreateMessage:
def run()- The
runmethod within this class accepts several parameters:mode: A string indicating the operation mode, either "create" or "update."message: The content of the message.cognito_user_id: The user's Cognito user ID for authentication.message_group_uuid: An optional identifier for the message group (required for updates).user_receiver_handle: An optional parameter representing the receiver's user handle (required for message creation).
def run(
    mode,
    message,
    cognito_user_id,
    message_group_uuid=None,
    user_receiver_handle=None,
):
model = {"errors": None, "data": None}- The
modeldictionary is initialized to store error information and resulting data. - Error checks are performed based on the operation mode:
- For "update" mode, it checks if
message_group_uuidis provided and not empty.
- For "update" mode, it checks if
if mode == "update":
    if message_group_uuid == None or len(message_group_uuid) < 1:
model["errors"] = ["message_group_uuid_blank"]- It also verifies the presence and length of
cognito_user_id.
if cognito_user_id == None or len(cognito_user_id) < 1:
    model["errors"] = ["cognito_user_id_blank"]
- For "create" mode, it checks if
user_receiver_handleis provided and not empty.
if mode == "create":
    if user_receiver_handle == None or len(user_receiver_handle) < 1:
model["errors"] = ["user_reciever_handle_blank"]- Message content is checked for presence and length. If the message is empty or exceeds 1024 characters, it sets error messages accordingly.
if message == None or len(message) < 1:
    model["errors"] = ["message_blank"]
elif len(message) > 1024:
    model["errors"] = ["message_exceed_max_chars"]
This code checks the message content. If the message is not provided or empty, it populates model["errors"] with the error message message_blank. If the message exceeds 1024 characters in length, it populates model["errors"] with the error message message_exceed_max_chars.
- If there are errors in the
model["errors"], it populatesmodel["data"]with default values, including "Yahya Abulhaj" as the display name, theuser_sender_handle, and the message content. This is done as a fallback response when there are errors.
if model["errors"]:
    model["data"] = {
        "display_name": "Yahya Abulhaj",
        "handle": user_sender_handle,
        "message": message,
    }
The remaining code below includes database interactions and additional logic based on the operation mode.
Depending on whether it's a "create" or "update" operation, it interacts with the database to create a message group or update a message.
else:
    sql = db.template("users", "create_message_users")

    if user_receiver_handle == None:
        rev_handle = ""
    else:
        rev_handle = user_receiver_handle
    users = db.query_array_json(
        sql,
        {
            "cognito_user_id": cognito_user_id,
            "user_receiver_handle": rev_handle,
        },
    )

    my_user = next((item for item in users if item["kind"] == "sender"), None)
    other_user = next((item for item in users if item["kind"] == "recv"), None)


    ddb = Ddb.client()

    if mode == "update":
        data = Ddb.create_message(
            client=ddb,
            message_group_uuid=message_group_uuid,
            message=message,
            my_user_uuid=my_user["uuid"],
            my_user_display_name=my_user["display_name"],
            my_user_handle=my_user["handle"],
        )
    elif mode == "create":
        data = Ddb.create_message_group(
            client=ddb,
            message=message,
            my_user_uuid=my_user["uuid"],
            my_user_display_name=my_user["display_name"],
            my_user_handle=my_user["handle"],
            other_user_uuid=other_user["uuid"],
            other_user_display_name=other_user["display_name"],
            other_user_handle=other_user["handle"],
)- Review the data assignment logic it stays the same.
            model["data"] = data
return model- Ensure that the transition to the second snippet is seamless and does not break any existing functionality.
You have successfully implemented create_message.py according to Pattern B requirements. This code snippet defines a class method (run) that handles message creation and updates based on various conditions and database interactions.
It also maintains error handling and returns data accordingly.
Step 3: Instrument AppPy
The main difference between the two route definitions is in the URL parameter and how it's used after coding the Messages.run method.
Instead of using the handle parameter from the URL to set user_receiver_handle, use message_group_uuid and retrieving cognito_user_id from the request headers.
- Update the Route Definition to use
message_group_uuidas the parameter
@app.route("/api/messages/<string:message_group_uuid>", methods=["GET"])- Update Variable Assignment
You don't need to assign user_sender_handle and user_receiver_handle values directly as you did in the first snippet. Instead, you can use the message_group_uuid and retrieve cognito_user_id from the request headers.
claims = request.environ["claims"]
cognito_user_id = claims["sub"]
model = Messages.run(
    cognito_user_id=cognito_user_id, message_group_uuid=message_group_uuid
)
Here, you're extracting the cognito_user_id from the claims in the request headers and passing it to Messages.run.
- Apply Error Handling and Response the same way
if model["errors"] is not None:
    return model["errors"], 422
else:
return model["data"], 200- Reflect on your code design; the updates went from this
@app.route("/api/messages/@<string:handle>", methods=['GET'])
def data_messages(handle):
  user_sender_handle = 'yaya2devops'
  user_receiver_handle = request.args.get('user_reciever_handle')

  model = Messages.run(user_sender_handle=user_sender_handle, user_receiver_handle=user_receiver_handle)
  if model['errors'] is not None:
    return model['errors'], 422
  else:
    return model['data'], 200
  return
After making these changes, thoroughly test your updated route to ensure that it correctly handles the message group UUID and user authentication (if applicable) and returns the expected responses.
@app.route("/api/messages/<string:message_group_uuid>", methods=["GET"])
def data_messages(message_group_uuid):
    claims = request.environ["claims"]
    cognito_user_id = claims["sub"]
    model = Messages.run(
        cognito_user_id=cognito_user_id, message_group_uuid=message_group_uuid
    )
    if model["errors"] is not None:
        return model["errors"], 422
    else:
        return model["data"], 200
    return
With these updates, you have transitioned from a route that used a user handle in the URL to one that uses a message group UUID and retrieves the user ID from the request headers, aligning it with the changes made in the Messages.run method. Let's embrace Pattern B!
Step Take A Look Pattern B
- Start your application by running the following command:
docker compose up- Load both your psql and NoSQL schemas using the following commands:
./bin/db/schema-load
./bin/ddb/schema-load- Alternatively, you can use the setup script including the seed:
./bin/db/setup- Access your application and perform the messaging check to validate the changes made.
Take me to this seed.

Implement Conversations Pattern C
We are going to implement the C functionality to display message groups in our application.
☁️aws-cloud-project-bootcamp
├── 🪶 app.py
├── 📁 backend-flask
│   ├── 📁 db
│   │   ├── 📁 sql
│   │   │   ├── 📁 users
│   │   │   │   └── 📄 create_message_users.sql
│   │   │   └── 📄 short.sql
│   │   ├── 📁 services
│   │   │   └── 📄 users_short.py
│   │   └── 📄 seed.sql
├── 📁 frontend-react-js
│   ├── 📁 src
│   │   ├── 📁 components
│   │   │   ├── 📄 MessageForm.js
│   │   │   └── 📄 MessageGroupNewItem.js
│   └── 📁 pages
│       └── 📄 MessageGroupNewPage.js
For our new message group, we will be using user names like "bayko."
- Develop
MessageFormPy - Develop
data_create_message()in AppPy - Code SQL Message Users
- Code
MessageGroupNewPage.js - ReactJS For
MessageGroupNewPage - Seed Record As Users
- Create
UsersShortPyand SQL Template - AppPy Required Changes
- Rendering All that To ReactJs
- Step Take A Look Pattern C
Develop MessageFormPy
- Go to MessageForm.js and Locate the onsubmit Function:
- In your original code, find the onsubmit function. It should look like this:
const onsubmit = async (event) => { // Existing code } - Set the
backend_url:- It constructs the URL to which the POST request will be sent. The URL is constructed using an environment variable
REACT_APP_BACKEND_URL(presumably defined elsewhere in your application) and appends "/api/messages" to it. This URL represents the endpoint on the backend server where the message will be sent.
- It constructs the URL to which the POST request will be sent. The URL is constructed using an environment variable
const backend_url = `${process.env.REACT_APP_BACKEND_URL}/api/messages`- Logging Payload:
- It logs the
messagevariable to the console, which can be helpful for debugging purposes.
- It logs the
console.log('onsubmit payload', message)- Construct JSON Object:
- It creates a JavaScript object
jsonthat contains the data to be sent in the POST request. In this case, it includes a"message"field with the value of themessagevariable.
- It creates a JavaScript object
let json = {
  "message": message
}- Conditional Field:
- It checks whether
params.handleexists. Ifparams.handleis defined, it adds a"handle"field to thejsonobject with the value ofparams.handle. Otherwise, ifparams.handleis not defined, it adds a"message_group_uuid"field with the value ofparams.message_group_uuid. This Markdown explanation summarizes what the code block does without including the JSX code snippet.
- It checks whether
if (params.handle) {
  json.handle = params.handle
} else {
  json.message_group_uuid = params.message_group_uuid
}- Create a POST request to the specified
backend_urlwith the provided JSON data and includes necessary headers
      const res = await fetch(backend_url, {
        method: "POST",
        headers: {
          'Accept': 'application/json',
          'Content-Type': 'application/json',
          'Authorization': `Bearer ${localStorage.getItem("access_token")}`,
        },
        body: JSON.stringify(
          json
),- This code initiates a POST request to a specified
backend_urlusing thefetchAPI. - It includes the following options in the request:
method: Specifies the HTTP method as "POST," indicating that it's a POST request.headers: Defines the request headers, including:'Accept': 'application/json': Specifies that the client expects a JSON response from the server.'Content-Type': 'application/json': Indicates that the request body contains JSON data.- Authorization Bearer thing is made: If an access token is stored in the browser's
localStorage, it includes it in the request headers as a bearer token for authentication.
body: Converts thejsonobject into a JSON string usingJSON.stringify(json)and sends it as the request body. This JSON data typically contains the message and, optionally, thehandleormessage_group_uuid.
Ensure that you have defined the params object appropriately within your component. Also, double-check that you have the necessary environment variables and localStorage setup for REACT_APP_BACKEND_URL and the bearer token.
This now include additional logic for handling params.handle and params.message_group_uuid, and it also includes an Authorizationheader with a bearer token from localStorage.
Develop data_create_message() in AppPy
- Update Function Parameters:
- Modify the function parameters to accept
message_group_uuidandhandlefrom the JSON request.
- Modify the function parameters to accept
def data_create_message():
    message_group_uuid = request.json.get("message_group_uuid", None)
    user_receiver_handle = request.json.get("handle", None)
message = request.json["message"]- Get Cognito User ID:
- Retrieve the Cognito User ID from the request environment claims.
claims = request.environ["claims"]
cognito_user_id = claims["sub"]- Conditional Logic:
- Implement conditional logic to determine whether a new message group should be created or a message should be added to an existing group. Use the
message_group_uuidparameter to make this decision.
- Implement conditional logic to determine whether a new message group should be created or a message should be added to an existing group. Use the
if message_group_uuid is None:
    # Create for the first time
    model = CreateMessage.run(
        mode="create",
        message=message,
        cognito_user_id=cognito_user_id,
        user_receiver_handle=user_receiver_handle,
    )
else:
    # Push onto an existing Message Group
    model = CreateMessage.run(
        mode="update",
        message=message,
        message_group_uuid=message_group_uuid,
        cognito_user_id=cognito_user_id,
)- Return Statements:
- Update the return statements to use
model["errors"]andmodel["data"].
- Update the return statements to use
if model["errors"] is not None:
    return model["errors"], 422
else:
return model["data"], 200-
Remove Unused Variables and Return Statement:
- Remove the unused variables
user_sender_handleanduser_receiver_handlefrom the code. - Remove the final
returnstatement since it's not necessary.
- Remove the unused variables
-
Indentation:
- Ensure that the code is properly indented based on the standard Python indentation rules.
The following showcase the complete function. Make sure Its the same in code or in logic.
@app.route("/api/messages", methods=["POST", "OPTIONS"])
@cross_origin()
def data_create_message():
    message_group_uuid = request.json.get("message_group_uuid", None)
    user_receiver_handle = request.json.get("handle", None)
    message = request.json["message"]

    claims = request.environ["claims"]
    cognito_user_id = claims["sub"]

    if message_group_uuid is None:
        # Create for the first time
        model = CreateMessage.run(
            mode="create",
            message=message,
            cognito_user_id=cognito_user_id,
            user_receiver_handle=user_receiver_handle,
        )
    else:
        # Push onto existing Message Group
        model = CreateMessage.run(
            mode="update",
            message=message,
            message_group_uuid=message_group_uuid,
            cognito_user_id=cognito_user_id,
        )

    if model["errors"] is not None:
        return model["errors"], 422
    else:
        return model["data"], 200
Code SQL Message Users
This SQL query will retrieve information from a database users table based on the following conditions.
-
Create an empty
create_message_users.sqlinbackend-flask/db/sql/users/ -
Create SELECT Clause:
- The query selects the following columns from the
userstable:uuid: Represents the universally unique identifier of a user.display_name: Denotes the display name of a user.handle: Represents the user's handle or username.kind: This column is created using a CASE statement and will be explained further below.
SELECT
  users.uuid,
  users.display_name,
  users.handle,
  CASE users.cognito_user_id = %(cognito_user_id)s
  WHEN TRUE THEN
    'sender'
  WHEN FALSE THEN
    'recv'
  ELSE
    'other'
END as kind- Create FROM Clause:
- The query specifies that it is retrieving data from the
public.userstable, which likely refers to theuserstable in thepublicschema of the database.
- The query specifies that it is retrieving data from the
FROM public.users- Create WHERE Clause:
- The query applies filtering conditions using the WHERE clause:
users.cognito_user_id = %(cognito_user_id)s: This condition checks if thecognito_user_idin theuserstable matches the value provided as%(cognito_user_id)s. It filters rows where the user'scognito_user_idmatches a specific value.users.handle = %(user_receiver_handle)s: This condition checks if thehandlein theuserstable matches the value provided as%(user_receiver_handle)s. It filters rows where the user's handle matches a specific value.
- The query applies filtering conditions using the WHERE clause:
WHERE
  users.cognito_user_id = %(cognito_user_id)s
  OR
users.handle = %(user_receiver_handle)s- About CASE Statement (kind):
- The
kindcolumn is generated using a CASE statement. - The CASE statement evaluates multiple conditions and returns a value based on the first condition that is true.
- In this case, it evaluates the condition
users.cognito_user_id = %(cognito_user_id)s. - If this condition is TRUE, it assigns the value 'sender' to the
kindcolumn. - If the condition is FALSE, it evaluates the condition
users.cognito_user_id = %(cognito_user_id)s. - If this second condition is TRUE, it assigns the value 'recv' to the
kindcolumn. - If neither condition is TRUE, it assigns the value 'other' to the
kindcolumn. - Essentially, this CASE statement categorizes users into three groups: 'sender,' 'recv' (receiver), or 'other,' based on whether their
cognito_user_idmatches the provided value or not.
- The
Code MessageGroupNewPage.js
- Lets start by Creating The File:
- A new file named
MessageGroupNewPage.jsis created in the/pagesdirectory.
- A new file named
- Imports:
- Import various dependencies and components required for the page.
import './MessageGroupPage.css';
import React from "react";
import { useParams } from 'react-router-dom';
import DesktopNavigation from '../components/DesktopNavigation';
import MessageGroupFeed from '../components/MessageGroupFeed';
import MessagesFeed from '../components/MessageFeed';
import MessagesForm from '../components/MessageForm';
import checkAuth from '../lib/CheckAuth';
- Function Component:
- Define a functional component named
MessageGroupPage.
- Define a functional component named
- State Variables:
- Declare several state variables using the
useStatehook to store component-related data.
- Declare several state variables using the
const [otherUser, setOtherUser] = React.useState([]);
const [messageGroups, setMessageGroups] = React.useState([]);
const [messages, setMessages] = React.useState([]);
const [popped, setPopped] = React.useState([]);
const [user, setUser] = React.useState(null);
const dataFetchedRef = React.useRef(false);
const params = useParams();- Data Loading Functions:
- Define two asynchronous functions,
loadUserShortDataandloadMessageGroupsData, to fetch data from the backend server using thefetchAPI.
- Define two asynchronous functions,
useEffectHook:- Utilize the
useEffecthook to load data when the component mounts. Prevent double data calls using thedataFetchedRefreference.
- Utilize the
React.useEffect(() => {
    // ... (data fetching logic)
}, []);- Component Rendering:
- Render the component's UI, including a desktop navigation component, a message group feed, a message feed, and a message form.
return (
    <article>
        <DesktopNavigation user={user} active={'home'} setPopped={setPopped} />
        <section className='message_groups'>
            <MessageGroupFeed otherUser={otherUser} message_groups={messageGroups} />
        </section>
        <div className='content messages'>
            <MessagesFeed messages={messages} />
            <MessagesForm setMessages={setMessages} />
        </div>
    </article>
);
This code defines a React component for a message group page. It fetches data from the backend server and renders a user interface that includes message groups, messages, and a message form.
ReactJS For MessageGroupNewPage
We have now to add the routing configuration to our React application to define our new route for MessageGroupNewPage.js.
- Import the MessageGroupNewPage component from the "./pages/MessageGroupNewPage" file at the top of
App.js.
import MessageGroupNewPage from "./pages/MessageGroupNewPage";- Define the new route in the application. This route is defined using an object with two properties:
{
  path: "/messages/new/:handle",
  element: <MessageGroupNewPage />,
},
Once you include this code in your App.js file, you'll be able to access the new route by simply visiting a URL that corresponds to the defined path.
For instance, if you have a link or navigation component that generates a URL like /messages/new/yaya2devops, clicking it will display the MessageGroupNewPage component and transmit yaya2devops as a parameter via the :handle route variable.
Seed Record As Users
We need to include the insertion of additional users in our seed data to test the messaging functionality.
- Add more user records are inserted into the
public.userstable. Lets adds these one additional users inseed.sql:
-- this file was manually created
INSERT INTO
    public.users (
        display_name,
        email,
        handle,
        cognito_user_id
    )
VALUES (
        'Yahya Abulhaj',
        'dev@yahya-abulhaj.dev',
        'yaya2devops',
        'MOCK'
)- To ensure that everything appears consistent, make sure it follows a uniform format like this:
-- this file was manually created

INSERT INTO
    public.users (
        display_name,
        email,
        handle,
        cognito_user_id
    )
VALUES (
        'Yahya Abulhaj',
        'dev@yahya-abulhaj.dev',
        'yaya2devops',
        'MOCK'
    ),
      (
        'Andrew Brown',
        'andrewb@exampro.co',
        'andrewbrown',
        'MOCK'
    ), (
        'Andrew Bayko',
        'bayko@exampro.co',
        'bayko',
        'MOCK'
    );

INSERT INTO
    public.activities (user_uuid, message, expires_at)
VALUES ( (
            SELECT uuid
            from public.users
            WHERE
                users.handle = 'yaya2devops'
            LIMIT
                1
        ), 'This was imported as seed data!', current_timestamp + interval '10 day'
    )
Create UsersShortPy and SQL Template
- Create an SQL Query Template:
- Create a SQL query file named
short.sqlin thebackend-flask/db/sql/usersdirectory.
- Create a SQL query file named
# File: backend-flask/db/sql/users/short.sql- SQL Query:
- Inside the
short.sqlfile, define an SQL query that selects specific user attributes (UUID, handle, display name) from thepublic.userstable based on the providedhandleparameter.
- Inside the
SELECT
    users.uuid,
    users.handle,
    users.display_name
FROM public.users
WHERE users.handle = %(handle)s- users_short Creation and
short.sqlcall:- Create a file named
users_short.pyin thebackend-flask/servicesdirectory.
- Create a file named
# File: backend-flask/services/users_short.py- Class Definition:
- Define a class named
UsersShortresponsible for retrieving short user information based on a provided handle.
- Define a class named
class UsersShort:
    def run(handle):
# ... (code for retrieving short user information)- Database Query:
- Inside the
UsersShortclass, construct and execute the SQL query we just created to retrieve user data from the database based on the provided handle.
- Inside the
        sql = db.template("users", "short")
results = db.query_object_json(sql, {"handle": handle})- Make sure
users_short.pyis as follows;
from lib.db import db

class UsersShort:
    def run(handle):
        sql = db.template("users", "short")
        results = db.query_object_json(sql, {"handle": handle})
        return results
AppPy Required Changes
- Import the
UsersShortclass inapp.py
from services.users_short import *- Define the route that allows you to access user data by handle in
app.py
@app.route("/api/users/@<string:handle>/short", methods=["GET"])
def data_users_short(handle):
    data = UsersShort.run(handle)
    return data, 200
I tell You How They Work Together;
- When a user makes a GET request to
"/api/users/@string:handle/short"in your application, Flask (or your web framework) routes the request to thedata_users_shortfunction. - The
data_users_shortfunction, in turn, uses the UsersShort class to query the database for user information using the handle provided in the URL. - The
UsersShortclass uses thelib.dbmodule to construct and execute SQL queries, and it returns the results as JSON data. - The JSON data is then sent as a response to the user's request, providing them with user information in a structured format.
Rendering All that To ReactJs
We now require to display user information such as their display name and handle and provide a link for users to start a new message conversation with that user that what's this for.
-
Create
frontend-react-js/src/components/MessageGroupNewItem.js -
Component Import:
- Import the necessary dependencies for the component.
-
Function Component:
- Define a functional component named
MessageGroupNewItem.
- Define a functional component named
-
Component Rendering:
- Render the component's UI, which includes a link (
<Link>) to a specific route. - The link is created using the
react-router-domlibrary (<Link>) and navigates to the/messages/new/{props.user.handle}route when clicked.
- Render the component's UI, which includes a link (
-
UI Elements:
- Inside the link, create a structured UI with the following elements:
<div className='message_group_avatar'>: Represents the message group's avatar.<div className='message_content'>: Contains message group information.<div className='message_group_identity'>: Displays the user's display name and handle.<div className='display_name'>: Displays the user's display name.<div className="handle">: Displays the user's handle (with the "@" symbol).
- Inside the link, create a structured UI with the following elements:
-
CSS Styling:
- The component applies CSS styles defined in an external CSS file (
MessageGroupItem.css).
- The component applies CSS styles defined in an external CSS file (
-
Component Export:
- Export the
MessageGroupNewItemcomponent as the default export for use in other parts of the application.
- Export the
-
Verify Your Frontend ReactJs Skills
- Re explore the file and consult your coding.
import './MessageGroupItem.css';
import { Link } from "react-router-dom";

export default function MessageGroupNewItem(props) {
  return (

    <Link className='message_group_item active' to={`/messages/new/`+props.user.handle}>
      <div className='message_group_avatar'></div>
      <div className='message_content'>
        <div classsName='message_group_meta'>
          <div className='message_group_identity'>
            <div className='display_name'>{props.user.display_name}</div>
            <div className="handle">@{props.user.handle}</div>
          </div>{/* activity_identity */}
        </div>{/* message_meta */}
      </div>{/* message_content */}
    </Link>
  );
}
To recap, the component includes a link to a specific route, displays user information, and applies CSS styles for styling.
Now this complete setup allows you to retrieve user data by handle through a specific API endpoint in your application.
Step Take A Look Pattern C
- Start by running your application using Docker Compose.
- Execute the setup script to configure your environment.
- Navigate to the "Messaging" tab in your application.
- Look for the seed user named "Bayko" within the messaging tab.
- Open the message group associated with Bayko.
- Compose and send a message to Bayko
Verify that the process completes successfully.

Congratulations! You have successfully implemented Pattern C.
Implement Conversations Pattern D
In this pattern, it's essential to ensure that we can create a new message group and write messages to.
- Creating and Locating the User Profile —
5 Steps - Crafting Messages to Londo —
5 Steps - Experiment with Londo —
5 Steps
Having completed the 'Bayko' implementation, it's now time to implement the necessary steps for a new user named 'Londo' thus the D pattern.
Creating and Locating the User Profile
- Add the following user to your database by including it in your
seed.sqlfile.
-- this file was manually created
INSERT INTO
    public.users (
        display_name,
        email,
        handle,
        cognito_user_id
    )
VALUES (
        'Londo Mollari',
        'lmollari@centari.com',
        'londo',
        'MOCK'
)- Develop
frontend-react-js/src/components/MessageGroupFeed.js
- Import a new component called
MessageGroupNewItemfrom the './MessageGroupNewItem' file.
import MessageGroupNewItem from './MessageGroupNewItem';- Declare a Variable
- Declare a variable named
message_group_new_item.
let message_group_new_item;This variable will be used to conditionally render the MessageGroupNewItem component based on the presence of props.otherUser.
- Do Conditional Rendering
- Check if the
props.otherUserexists. - If
props.otherUseris truthy, assign a JSX element with theMessageGroupNewItemcomponent to themessage_group_new_itemvariable, passingprops.otherUseras a prop.
- Check if the
if (props.otherUser) {
  message_group_new_item = <MessageGroupNewItem user={props.otherUser} />
}
A conditional check is performed. If props.otherUser exists (i.e., it's truthy), then the message_group_new_item variable is assigned a JSX element, specifically the MessageGroupNewItem component with the user prop set to props.otherUser. This means that if there's another user provided as a prop, the MessageGroupNewItem component will be rendered.
- Go Return JSX
- A container
divwith the class name 'message_group_feed.' - A heading
divwith the class name 'message_group_feed_heading,' containing the text 'Messages.'
- A container
return (
  <div className='message_group_feed'>
    <div className='message_group_feed_heading'>
      <div className='title'>Messages</div>
    </div>
    <div className='message_group_feed_collection'>
      {message_group_new_item}
      {props.message_groups.map(message_group => {
        return <MessageGroupItem key={message_group.uuid} message_group={message_group} />
      })}
    </div>
  </div>
);
The MessageGroupFeed also includes the following elements:
- A collection div with the class name
message_group_feed_collection,which contains:{message_group_new_item}: This is the conditional rendering ofMessageGroupNewItembased on the presence ofprops.otherUser.{props.message_groups.map(...)}: This maps over themessage_groupsprop and rendersMessageGroupItemcomponents for each item in the array, setting the key andmessage_groupprops accordingly.
Overall developers, the following code transformation added conditional rendering of the MessageGroupNewItem component based on the presence of props.otherUser, in addition to rendering the existing MessageGroupItem components for each item in the message_groups prop.
Now, let's put this into action.
https://port:dev-url/messages/new/londoYou can do so by simply navigating to our new user message group endpoint URL.
Crafting Messages to Londo
In your MessageForm.js, we will double code the following async function to have it accept messages. This will enable you to compose a message to your friend Londo.
  const onsubmit = async (event) => {
    event.preventDefault();
    try {
      const backend_url = `${process.env.REACT_APP_BACKEND_URL}/api/messages`
      console.log('onsubmit payload', message)
      const res = await fetch(backend_url, {
        method: "POST",
        headers: {
          'Accept': 'application/json',
          'Content-Type': 'application/json'
        },
        body: JSON.stringify({
          message: message
        }),
      });
      let message = await res.json();
      if (res.status === 200) {
        props.setMessages(current => [message,...current]);
      } else {
        console.log(res)
      }
    } catch (err) {
      console.log(err);
    }
}Subsequently, our attention will be directed towards the following precise block;
let message = await res.json();
if (res.status === 200) {
  props.setMessages(current => [message, ...current]);
} else {
  console.log(res);
}
Let's make the variable name more generic and doesn't imply that it always contains a single message.
- Change the variable
messagetodatawhen parsing the JSON response from the API usingawait res.json().
let data = await res.json();- Add a conditional check to see if data has a property called
message_group_uuid. If it does, it means the response contains information about a message group, so you log a message and redirect the user to the corresponding message group page usingwindow.location.href.
if (res.status === 200) {
  console.log('data:', data);
  if (data.message_group_uuid) {
    console.log('redirect to message group');
    window.location.href = `/messages/${data.message_group_uuid}`;
}- If
datadoes not have amessage_group_uuid, it means it's a regular message object, so you add it to theprops.setMessagesarray along with the current messages.
else {
    props.setMessages(current => [...current, data]);
  }
}- Finally, If the API request does not return a successful response (i.e., res.status is not 200), it logs the res object to the console.
else {
  console.log(res);
}- After meticulous design and coding, ensure that it resembles something along these lines:
let data = await res.json();
if (res.status === 200) {
  console.log('data:', data);
  if (data.message_group_uuid) {
    console.log('redirect to message group');
    window.location.href = `/messages/${data.message_group_uuid}`;
  } else {
    props.setMessages(current => [...current, data]);
  }
} else {
  console.log(res);
}
This code is ready to handle the response from our message group API request. It's also well designed to handle success, redirection, or error, and it provides appropriate logging and behavior for each case.
Let's put this into practice and see how it works in action.
Experiment with Londo
- Open the Cruddur app.
- Sign in using your credentials.
- Navigate to the messaging section in the left pane.
- Access Londo's message group within the messaging section.
- Write her out! Compose and send a message to Londo.

The 🌍 in Pattern E.
Your message should be successfully delivered, and you will see it displayed in the user interface. Our next objective is to ensure that these messages are stored in a production environment.
Implement Conversations Pattern E
This pattern offers the most enjoyable experience and delivers the highest value. We plan to redesign our schema to ensure it is production-ready.
- Schema Re-Design For Prod —
13 Steps - Setting Up a VPC Endpoint for DynamoDB —
5 Steps - Dynamo Streams Lambda Function —
3 Steps
Subsequently, we will leverage Dynamo streams to seamlessly transmit user-generated messages from our application directly to the production AWS DynamoDB. This orchestrated workflow will be initiated through a coded Lambda function.
Schema Re-Design For Prod
WHAT IS PK? SK? GSI? LSI? — I Got You
Our existing schema includes the following primary key (PK) and sort key (SK) attributes:
  AttributeDefinitions=[

    {
      'AttributeName': 'pk',
      'AttributeType': 'S'
    },
    {
      'AttributeName': 'sk',
      'AttributeType': 'S'
    },
],- Add the following attributes
    {
      'AttributeName': 'message_group_uuid',
      'AttributeType': 'S'
},- Create a list to hold the Global Secondary Index configuration
GlobalSecondaryIndexes= [{ }],- Inside GSI, Specify the name of the index
'IndexName': 'message-group-sk-index',- Define the key schema for the index
    'KeySchema': [{
        'AttributeName': 'message_group_uuid',
        'KeyType': 'HASH'  # This attribute is the partition key
    }, {
        'AttributeName': 'sk',
        'KeyType': 'RANGE'  # This attribute is the sort key
}],- Specify what attributes to project into the index
    'Projection': {
        'ProjectionType': 'ALL'
    },
This will project all attributes from the table
- Set the provisioned throughput for the index
'ProvisionedThroughput': {}- In
ProvisionedThroughput, Add Read capacity units for the index
'ReadCapacityUnits': 5- In
ProvisionedThroughput, Add Write capacity units for the index
'WriteCapacityUnits': 5So We just defined our Global Secondary Index named 'message-group-sk-index'.
Make sure its designed as required;
 GlobalSecondaryIndexes= [{
    'IndexName':'message-group-sk-index',
    'KeySchema':[{
      'AttributeName': 'message_group_uuid',
      'KeyType': 'HASH'
    },{
      'AttributeName': 'sk',
      'KeyType': 'RANGE'
    }],
    'Projection': {
      'ProjectionType': 'ALL'
    },
    'ProvisionedThroughput': {
      'ReadCapacityUnits': 5,
      'WriteCapacityUnits': 5
    },
  }],
This index has a key schema with a partition key (HASH) named message_group_uuid and a sort key (RANGE) named 'sk'.
Let's keep going with the schema design and actually go configure the DynamoDB table itself.
- Set the billing mode for the DynamoDB table to PROVISIONED
BillingMode='PROVISIONED',- Set the provisioned throughput for the DynamoDB table
ProvisionedThroughput={ }- In the
ProvisionedThroughput, Set read capacity units for the table
'ReadCapacityUnits': 5- In the
ProvisionedThroughput, Set Write capacity units for the table
'WriteCapacityUnits': 5Reflect and make sure your table design is as follows;
BillingMode = 'PROVISIONED'

ProvisionedThroughput = {
    'ReadCapacityUnits': 5,
    'WriteCapacityUnits': 5
}- Go load that in production and make sure the connection is configured.
./bin/ddb/schema-load prod
Setting Up a VPC Endpoint for DynamoDB
We need to establish a Virtual Private Cloud endpoint for our DynamoDB Streams.
1. Access the VPC Console
Begin by navigating to the AWS VPC console.
- Logging into your AWS account.
- From the AWS Management Console dashboard, locate and click on the Services dropdown menu at the top-left corner.
- In the Networking & Content Delivery section, select VPC.
2. Access the Endpoints Tab
Once you are in the VPC console:
- In the left-hand navigation pane, click on the Endpoints tab.
3. Create a New Endpoint
To create a new VPC endpoint for DynamoDB:
- Click the Create Endpoint button, usually found at the top of the main window.
4. Configure the Endpoint
Now, you need to configure your VPC endpoint.
4.1 Name the Endpoint
Provide a descriptive name for your VPC endpoint. This name should help you identify the endpoint's purpose or function, making it easier to manage multiple endpoints in the future.
4.2 Select DynamoDB as the Service
Under the Services section, select DynamoDB. This choice indicates that you are creating an endpoint specifically for accessing DynamoDB within your VPC.
4.3 Choose the VPC
Next, choose the appropriate VPC where you want to create this endpoint. This is the VPC where your DynamoDB data will be accessible. You can go for the default.
4.4 Select Available Route Tables
Specify the route tables that you want to associate with this endpoint. Route tables control the routing of traffic within your VPC, so selecting the appropriate ones ensures that your DynamoDB traffic is directed correctly.
4.5 Define Access Control
In the Policy or Access Control section, specify the level of access for this endpoint. In your case, you've chosen Full Access, which grants the highest level of access to DynamoDB.
5. Create the VPC Endpoint
- Click the Create button to initiate the creation of your VPC endpoint.

Dynamo Streams Lambda
Pre-Streams Process
- Create a New Lambda Function with the
Python 3.9 runtime. - Configure Execution Role basic Lambda permissions.
- Enable VPC and Select a VP You Created.
- In the "Advanced settings," enable Virtual Private Cloud (VPC) and choose a specific VPC.
- Choose
three subnetsfrom Your VPC. - Choose
Default Security Groups.
Concurrent Streams Function
Step 0 : Create a file and call it aws/lambdas/cruddur-messaging-stream.py
- Import necessary libraries:
- Import the JSON library for working with JSON data.
- Import the Boto3 library, the official AWS SDK for Python.
- Import specific classes (
KeyandAttr) from Boto3 for working with DynamoDB conditions.
import json
import boto3
from boto3.dynamodb.conditions import Key, Attr- Configure DynamoDB Resource:
- Create a DynamoDB resource object named
dynamodbwith a specific region and endpoint URL. Replace<region>with your actual AWS region and DynamoDB endpoint URL.
- Create a DynamoDB resource object named
dynamodb = boto3.resource(
   'dynamodb',
   region_name='<region>',
   endpoint_url="http://dynamodb.<region>.amazonaws.com"
)- Go Define the Lambda Handler Function:
- The
lambda_handlerfunction is the entry point for AWS Lambda. - It takes two parameters:
eventandcontext, representing the Lambda event trigger and runtime context.
- The
def lambda_handler(event, context):- Start Logging Event Data:
- Log the event data using
printto the Lambda execution logs for debugging and understanding the incoming event.
- Log the event data using
print("event-data", event)- Extract Event Information:
- Extract relevant information from the incoming event, focusing on DynamoDB events.
- Retrieve the
eventNamefrom the first record in the event to determine the type of DynamoDB event. - If it's a "REMOVE" event, log a message and return early, skipping further processing.
eventName = event["Records"][0]["eventName"]
if eventName == "REMOVE":
    print("skip REMOVE event")
    return
pk = event['Records'][0]['dynamodb']['Keys']['pk']['S']
sk = event['Records'][0]['dynamodb']['Keys']['sk']['S']
- Handle Other DynamoDB Events:
- If the event is not a "REMOVE" event, continue processing.
- Extract the
pk(partition key) andsk(sort key) from the DynamoDB record in the event. - Check if the
pkstarts with "MSG#"; if so, assume a specific kind of DynamoDB item and proceed to extract more data.
if pk.startswith('MSG#'):
    group_uuid = pk.replace("MSG#","")
    message = event['Records'][0]['dynamodb']['NewImage']['message']['S']
    print("GRUP ===>",group_uuid,message)
- Query a DynamoDB Table:
- Specify the table name and an index name to query, defined as
table_nameandindex_name. - Query the DynamoDB table using the
querymethod with aKeyConditionExpressionfiltering items based onmessage_group_uuidmatchinggroup_uuid. - Store the result in the
datavariable.
- Specify the table name and an index name to query, defined as
table_name = 'cruddur-messages'
index_name = 'message-group-sk-index'
table = dynamodb.Table(table_name)
data = table.query(
    IndexName=index_name,
    KeyConditionExpression=Key('message_group_uuid').eq(group_uuid)
)
print("RESP ===>",data['Items'])
- Modifying DynamoDB Data:
- Enter a loop to process each item retrieved from the query result (
data['Items']). - For each item, perform the following actions:
- Delete the item from the table using
table.delete_item. - Insert a new item into the table with a modified
skvalue, along with other attributes. - Log both the deletion and insertion actions using
print.
- Delete the item from the table using
- Enter a loop to process each item retrieved from the query result (
for i in data['Items']:
    delete_item = table.delete_item(Key={'pk': i['pk'], 'sk': i['sk']})
    print("DELETE ===>",delete_item)
    response = table.put_item(
        Item={
            'pk': i['pk'],
            'sk': sk,
            'message_group_uuid':i['message_group_uuid'],
            'message':message,
            'user_display_name': i['user_display_name'],
            'user_handle': i['user_handle'],
            'user_uuid': i['user_uuid']
        }
    )
    print("CREATE ===>",response)
This code function is designed to get triggered by DynamoDB events. It primarily deals with processing our Application conversations items in response to messaging process of our users.
- Return to the AWS Lambda console and deploy the code you've just created.
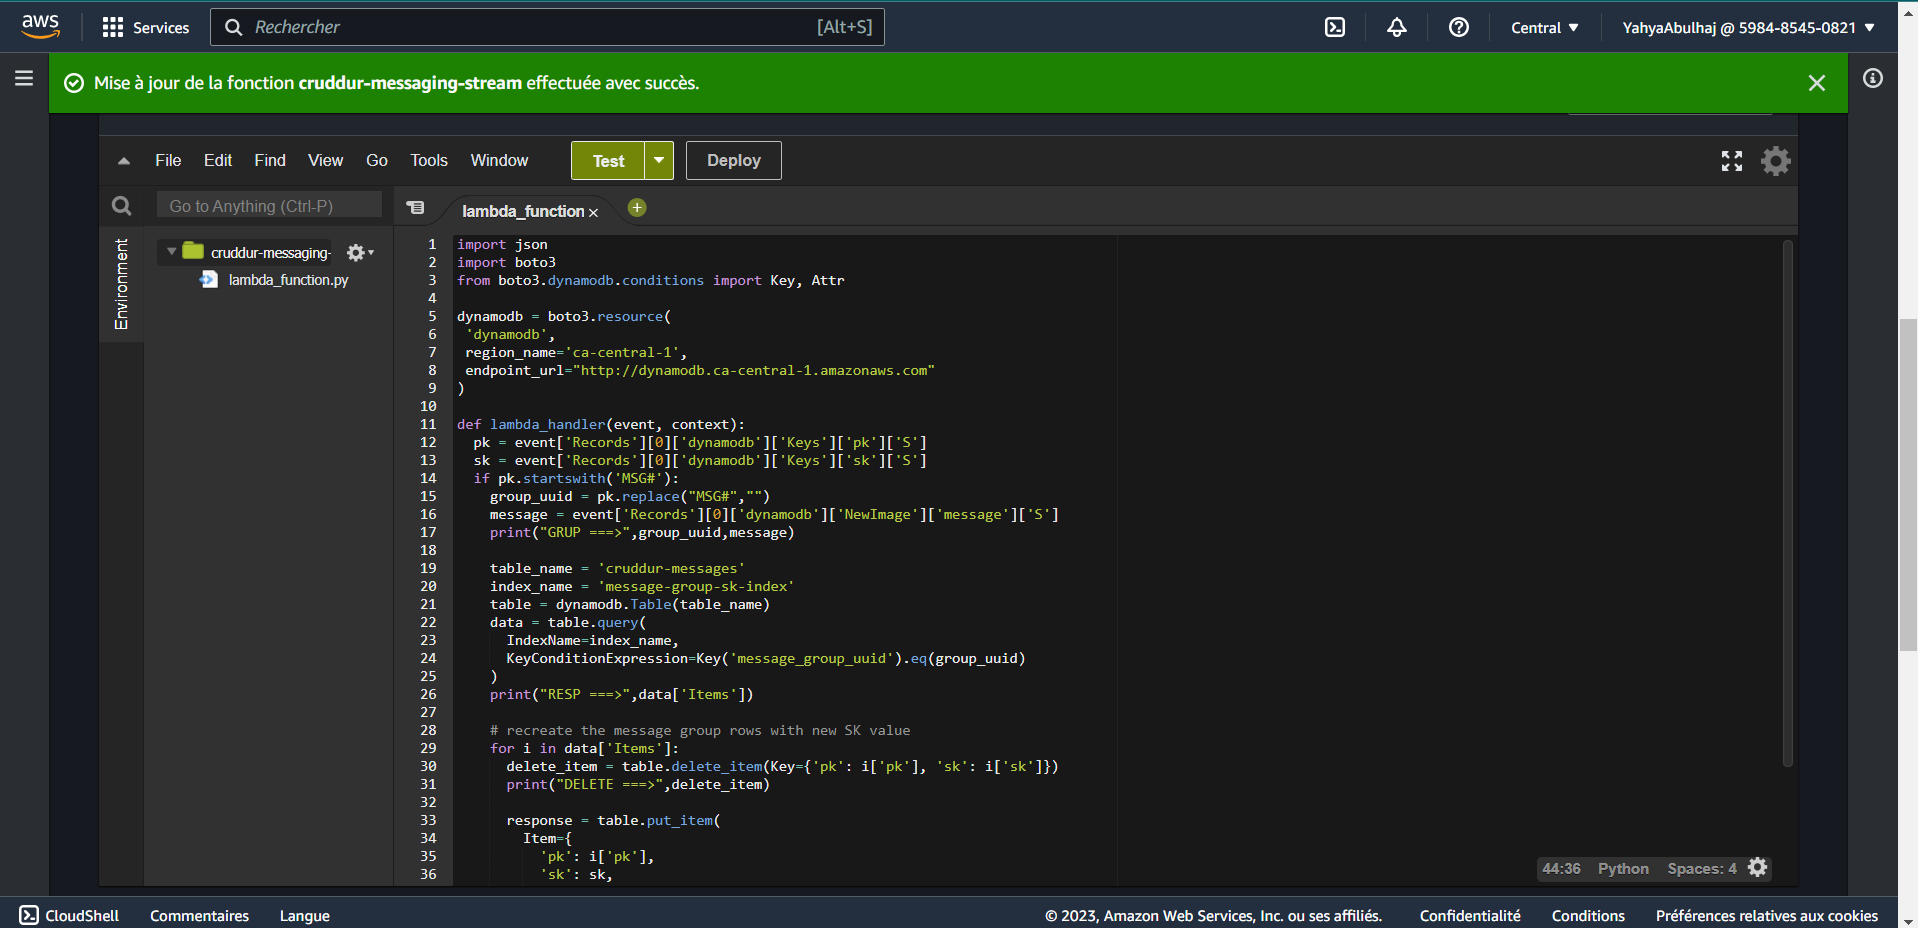
Post-Streams Process
This process will showcase what must be done after you successfully code your function and deployed to the console.
- Create Streams Inline Policy —
5 Steps - Turn Streams and Trigger —
4 Steps - Stream Prod Testing —
6 Steps
Create Streams Inline Policy
- Go to Configuration > Permissions > Execution role and click on the Role name.
- Under Permissions policies, click Add Permissions and then select Attach Policy.
- Choose the
AWSLambdaInvocation-DynamoDBpolicy and add it.
You can also configure it from the console.
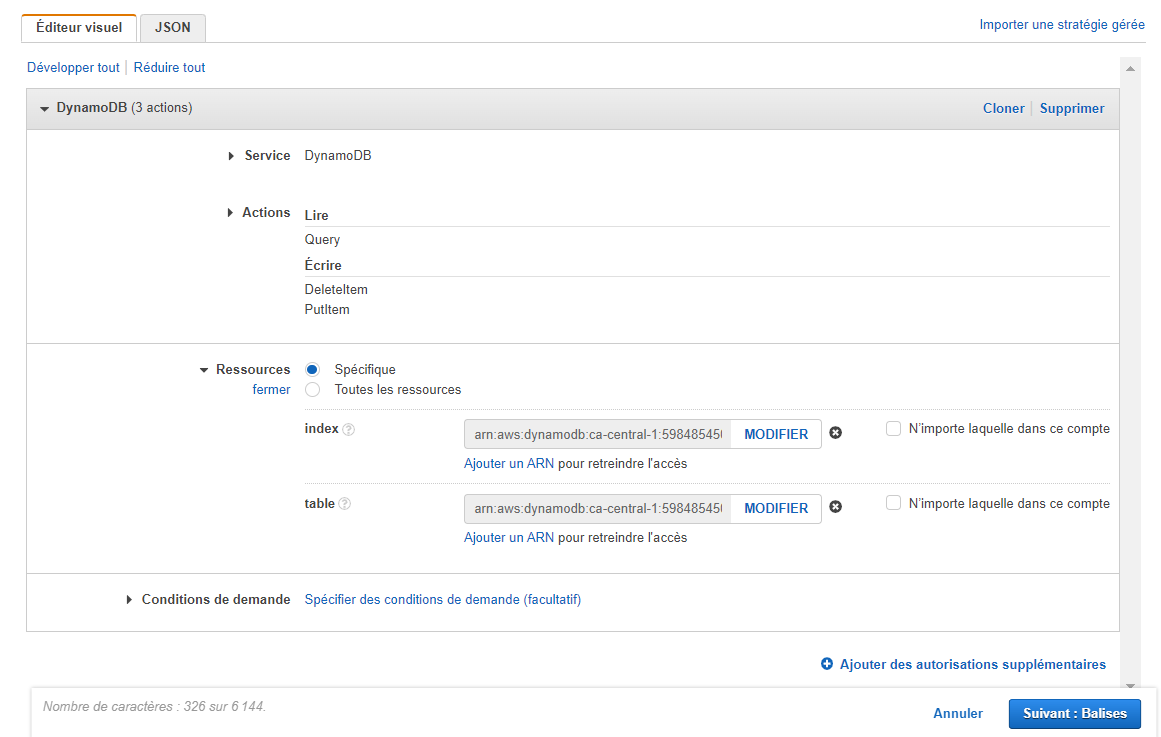
-
Or Click Add Permissions again and select Create Inline Policy to create a custom policy.
Add the following JSON code;
{ "Version": "2012-10-17", "Statement": [ { "Sid": "VisualEditor0", "Effect": "Allow", "Action": [ "dynamodb:PutItem", "dynamodb:DeleteItem", "dynamodb:Query" ], "Resource": [ "arn:aws:dynamodb:<region>:<account_id>:table/cruddur-messages/index/message-group-sk-index", "arn:aws:dynamodb:<region>:<account_id>:table/cruddur-messages" ] } ] } -
Click Save to save the changes.
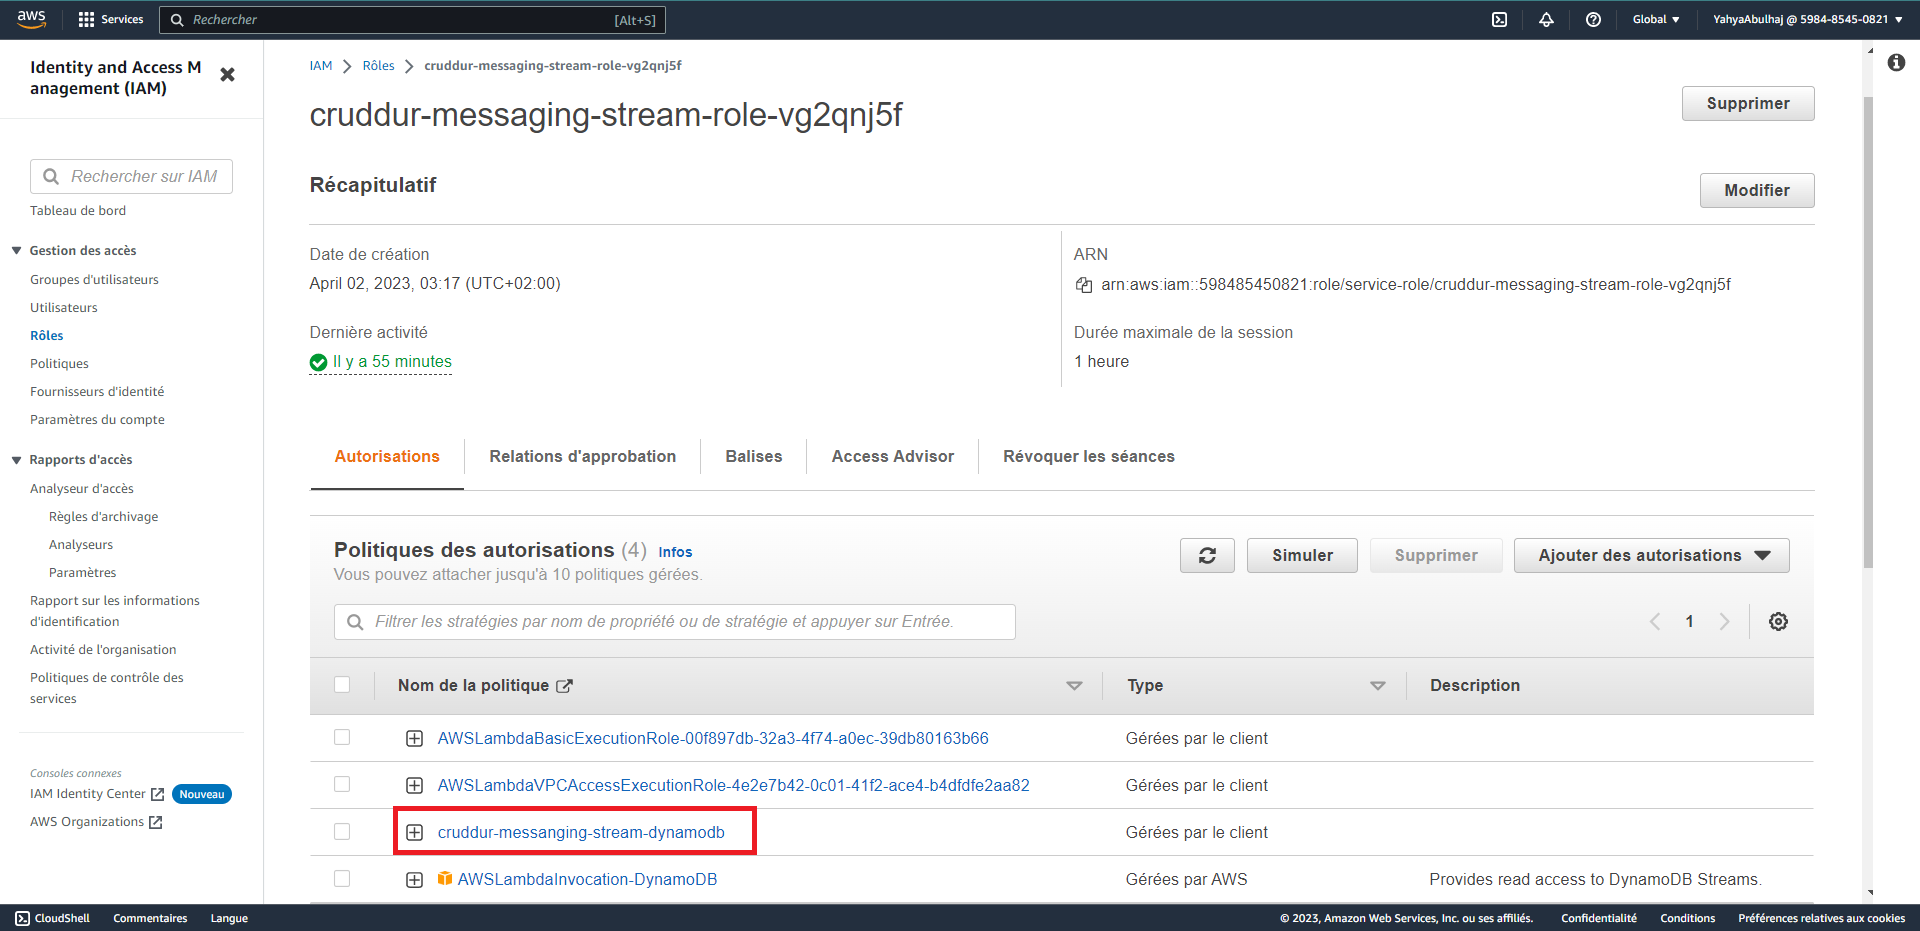
Turn Streams and Trigger
In here, we'll enable DynamoDB Streams and set it as a trigger for the Lambda function you've just created.
- Go to the Exports and Streams tab and activate DynamoDB Stream Details with the New Image attribute.
- Same tab, Click on the option to create a trigger.
- Select the Lambda function you've previously configured.
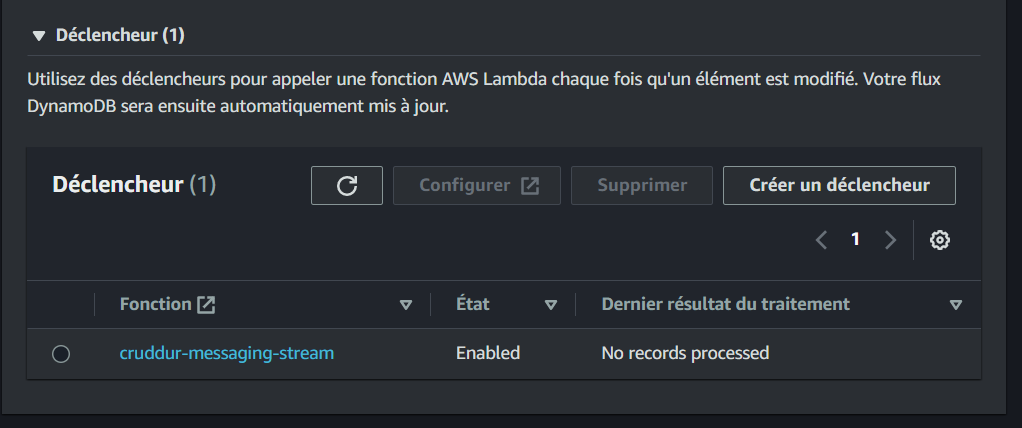
- Just proceed to create the trigger.
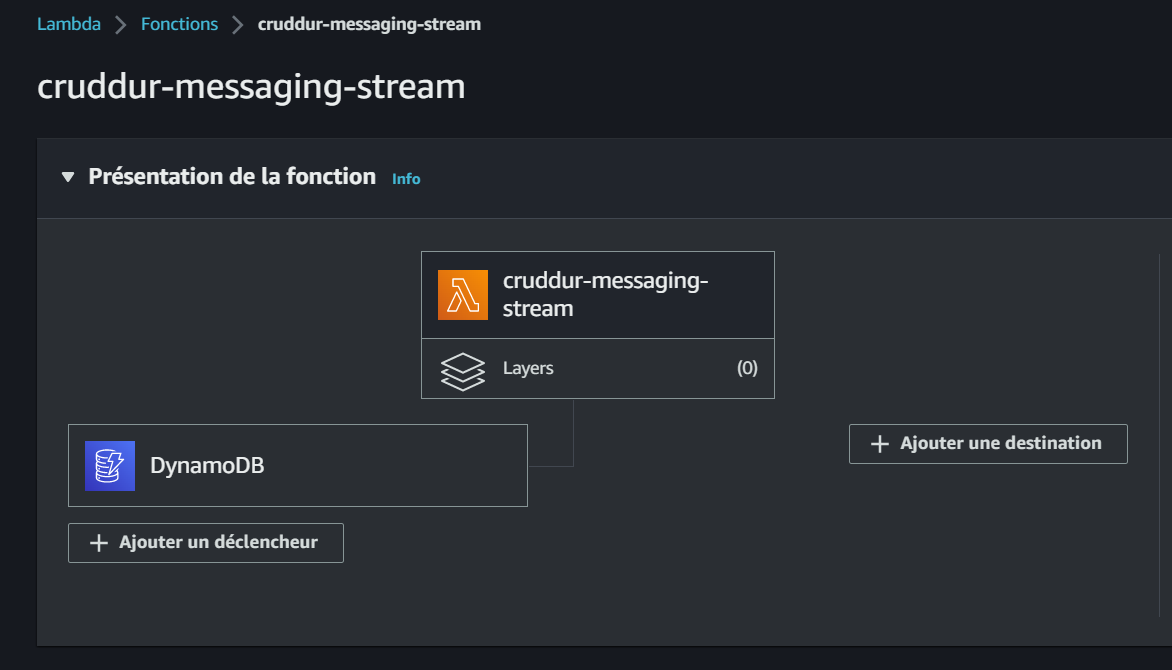
Stream Prod Testing
It's time to put this magic to the test.
- Ensure that you add a
#to your local connection settings in yourdocker-compose.yamlfile.
#AWS_ENDPOINT_URL: "http://dynamodb-local:8000" -
Launch your application using
docker compose up -
Execute your setup script.
./bin/db/setup- Access one of your message groups by navigating to the following URL in your web browser:
https://frontend-url/messages/new/bayko- Start a convo man!
The 🌍 for an Early Reason (opens in a new tab).

- Verify that conversations streamed to AWS DynamoDB Table.
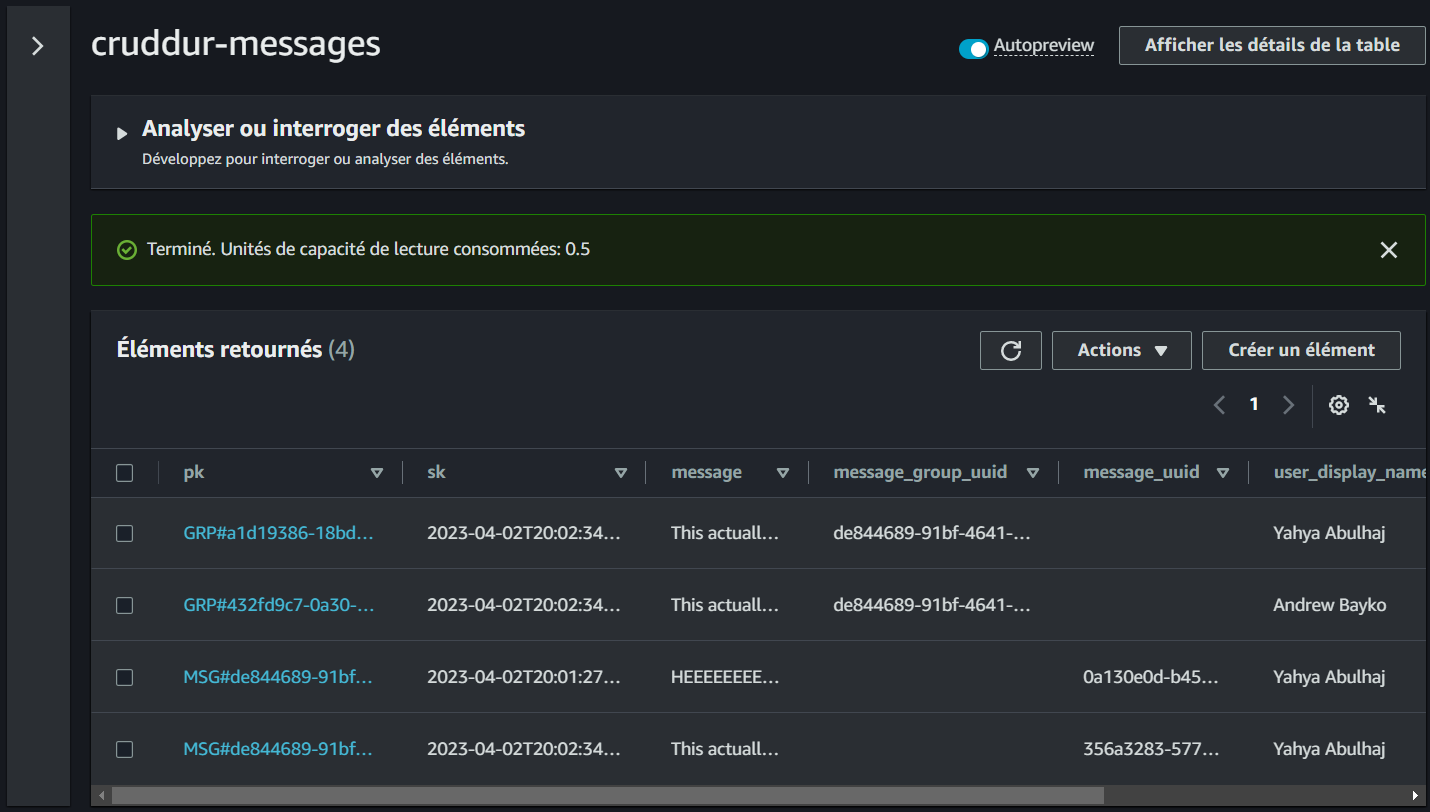
- Traceability of logs is available in CSV (opens in a new tab) and JSON (opens in a new tab).
- Access All Week Five Catalog from this location (opens in a new tab).
- Check this Cloudwatch Asset (opens in a new tab) for the streams.
Welcome to the future!
Primer on Premier DynamoDB: A 101 Explainer
There's no better way to conclude this than by providing you with the foundational starting point to rise from the bottom once more.
I made this table to explain to you the core concepts in DynamoDB.
This is a table, and it's quite straightforward. You're probably familiar with it, and it might have a different name elsewhere e.g. collection in MongoDB.
| Full Name | Nickname | Age | Date of Birth | Occupation | Mission |
|---|---|---|---|---|---|
| Yahya Abulhaj | Yaya | 22 | April 8, 2001 | DevOps Consultant | Value Provider |
| Yours | Yours | Yours | Yours | Yours | Yours |
An item refers to a single data record, which can also be referred to as a row or as "absolute explanation" a single line in the table.
Presenting my item;
| Yahya Abulhaj | Yaya | 22 | April 8, 2001 | DevOps Consultant | Value Provider |
|---|
You may also come across this concept when working with Comma-Separated Values (CSV).
Yahya Abulhaj, Yaya, 22, April 8, 2001, DevOps Consultant, Value ProviderNow, if I were to ask you, the database architect, for the 'Mission' attribute of that record,
how would you respond?
Exact. You would say the required attribute is "Value Provider".
Attributes are pieces of data attached to a single item, A Nickname of Yaya can be one of them.
Good stuff! You've solidified your understanding of three fundamental concepts in DynamoDB Tables, Items and Attributes that will serve as valuable guidance for any database system you attack.
Once your database is set up, the next step is query it. Querying a database table is mainly done using a primary key.
Simple Primary key
The primary key can be called "simple" if just made up by a partition key also called hash key.
pk, Partition key is the primary identifier for an item and is used to determine the physical partition where the item is stored.
Using a simple is like the standard key-value stores or even process of retrieving rows from a SQL table via a handle e.g. yaya2devops primary key.
Composite Primary key
On the other hand, there is Composite Primary Key which is a combination of two components: the partition key and the sort key sk also called range key.
sk, Sort key, is an optional attribute that, when used in conjunction with the partition key, allows you to create a compound primary key e.g. when you need to perform range queries or retrieve items based on their order within a partition
For example, in a table storing data about books, you might use;
- The International Standard Book Number (ISBN) as the partition key
- The publication date as the range key.
You have book titled "Zero To One" by Peter Thiel CEO Paypal with ISBN "1234567890," and it has multiple editions published on different dates. You can use this table to organize and query this data:
- Retrieve all editions of Zero To One (Simple)
| ISBN | Publication Date | Edition |
|---|---|---|
| 1234567890 | 2014-09-14 | Edition 1 |
| 2014-09-15 | Edition 2 | |
| 2014-09-16 | Edition 3 |
- Retrieve editions published within a specific date range (Composite)
Let's say you want to find all editions of "Zero To One" published between 14 septembre 2014, and 16 septembre 2014.
You can perform a query with;
- The ISBN partition key "1234567890"
- Range key condition that filters by the publication date within that date range
You can find the ISBN for this book here (opens in a new tab). I loved it! Or just google it (opens in a new tab)
Secondary Indexes
You may have additional access patterns that would be inefficient with your primary key.
That's where secondary indexes comes in for advanced pattern use cases.
1. Local Secondary Index
LSIs are indexes that allow you to query data within a single partition. You can create up to five LSIs per table for additional insights.
To better explain this, let me go back to Zero To One.
For this, I'll design my LSIs as GenreIndex.
So I make it as follows;
| Attribute | Description |
|---|---|
| Partition Key | ISBN (Same as the table's partition key) |
| Range Key | Genre (Genre of the book) |
If you want to find all books of a specific genre (e.g., "monopoly"), you can query the LSI with the ISBN (partition key) and Genre (range key).
| ISBN | Genre | Publication Date | Book Title |
|---|---|---|---|
| 1234567890 | Monopoly | 2014-09-16 | Zero To One |
| 2345678901 | Monopoly | 2013-05-15 | Monopoly Magic |
| 3456789012 | Monopoly | 2015-08-20 | Monopoly World |
!This allows you to efficiently retrieve all books of a particular genre, sorted by ISBN and genre, within a specific date range!
2. Global Secondary Indexes
GSIs are more versatile as they allow you to query data across partitions, You can create up to 20 GSIs per table. GSI is an additional data structure that allows you to query a database table using attributes other than the table's primary key.
- Adding secondary indexes can introduce complexity and potential performance overhead to your system.
- You should try to design your data model and queries in such a way that you can rely on the primary key
- Only use secondary indexes when you have no other good option to solve your problem.
Secondary indexes can significantly increase Storage, cost more, make the database schema more complex and harder to maintain.
However, They can greatly improve query performance for certain use cases where querying by attributes other than the primary key is essential.
Let's go back to our example and design gsi as AuthorIndex;
| Attribute | Description |
|---|---|
| Partition Key | Author (Name of the book's author) |
| Range Key | PublicationDate (Same as the table's range key) |
If you want to retrieve books written by a specific author (e.g., "Author Peter Thiel") across all genres, you can query the GSI with the Author (partition key). This allows you to efficiently get a list of books by that author, sorted by publication date, regardless of their ISBN or genre.
Maximized Data Unity
Let's combine all together to prove this powerful point.
We will query based on all our key designs —pk, lsi, gsi.
| Query | ISBN | Genre | Publication Date | Author |
|---|---|---|---|---|
| Example | 1234567890 | Monopoly | 2014-09-16 | Peter Thiel |
| 2014-09-16 | Peter Thiel | |||
| 2014-09-16 | Peter Thiel |
With these indexes, you can easily find all "monopoly" books within a specific date range (LSI) or all books by "Peter Thiel" across all genres (GSI).
Concluding your database One O One with the key difference between LSI and GSI;
- LSI (GenreIndex) is used for queries that involve filtering and sorting within the same partition (ISBN). It allows you to efficiently find books of a specific genre within a date range while staying within the same ISBN range.
- GSI (AuthorIndex) is used for queries that span multiple partitions. It enables you to efficiently find books by a specific author, regardless of their genre, across all ISBNs.
The key distinction lies in whether the query is limited to a single partition (LSI) or spans multiple partitions (GSI). In more complex scenarios or with larger datasets, this distinction becomes more significant.
I believe I've designed this section correctly, if you follow it closely, you'll establish a robust DB foundation. I have a strong affinity for databases, but my enthusiasm extends to all aspects of technology, The everything.
To elevate your database expertise, jump into this masterwork and revisit Week Four for SQL data using psql.
- Start again From here and Go and Do SQL as well.